
User Guide
Page 2
Motorola provides this guide without warranty of any derivative work (such as translation, transformation, or adaptation) without written permission from time to time without obligation on the part of Motorola to , the implied warranties of merchantability and fitness for product-related questions, please visit us online: www.motorola.com/cordless Or contact us at any time. All other product or service names are registered in...
Motorola provides this guide without warranty of any derivative work (such as translation, transformation, or adaptation) without written permission from time to time without obligation on the part of Motorola to , the implied warranties of merchantability and fitness for product-related questions, please visit us online: www.motorola.com/cordless Or contact us at any time. All other product or service names are registered in...
User Guide
Page 4
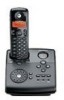
MD4260 User Guide Table of Contents Important Safety Instructions...viii Welcome...1 Handset Overview ...2 Base Unit Overview...3 MD4260 Display Overview ...4 Getting Started ...5 Battery Safety Instructions ...5 Installing the Battery...6 Installing the Base Unit ...7 Installing the Mounting Bracket (optional 8 Connecting the Base Unit ...9 Charging the Handset Battery...10 Basic Operations...11 Handset Indicators...11 Base Unit LEDs ...11 Making a Call ...12 Answering Calls...12 i i
MD4260 User Guide Table of Contents Important Safety Instructions...viii Welcome...1 Handset Overview ...2 Base Unit Overview...3 MD4260 Display Overview ...4 Getting Started ...5 Battery Safety Instructions ...5 Installing the Battery...6 Installing the Base Unit ...7 Installing the Mounting Bracket (optional 8 Connecting the Base Unit ...9 Charging the Handset Battery...10 Basic Operations...11 Handset Indicators...11 Base Unit LEDs ...11 Making a Call ...12 Answering Calls...12 i i
User Guide
Page 5
... User Guide Ending a Call ...12 Speakerphone Operation ...13 Adjusting the Volume from a Handset or the Base Unit 13 Redial Function ...13 Mute Function ...14 Locate a Misplaced Handset...14 Customizing Your Handset ...15 Naming Your Handset...15 Changing Your Language Setting ...15 Changing Your Ringer Tone ...16 Changing Your Ringer Volume ...16 Changing the Key Beep Setting ...17 Setting Your Local Area Code ...17 Changing the Dialing Method...18 Registering a New Handset ...18 Using the Phonebook ...19 Adding a Phonebook Entry...19 Deleting a Phonebook Entry...21 Caller ID/Call Waiting...
... User Guide Ending a Call ...12 Speakerphone Operation ...13 Adjusting the Volume from a Handset or the Base Unit 13 Redial Function ...13 Mute Function ...14 Locate a Misplaced Handset...14 Customizing Your Handset ...15 Naming Your Handset...15 Changing Your Language Setting ...15 Changing Your Ringer Tone ...16 Changing Your Ringer Volume ...16 Changing the Key Beep Setting ...17 Setting Your Local Area Code ...17 Changing the Dialing Method...18 Registering a New Handset ...18 Using the Phonebook ...19 Adding a Phonebook Entry...19 Deleting a Phonebook Entry...21 Caller ID/Call Waiting...
User Guide
Page 6
MD4260 User Guide Reviewing Caller ID Records ...22 Storing a Caller ID Entry in the Phonebook 22 Dialing from the Caller ID Log...23 Deleting a Caller ID Record...23 Deleting All Caller ID Records...23 Using the VIP Melody Feature ...24 Using the Answering Machine ...25 Setting Up Your Answering Machine 25 How to Change Your Answering Machine Language Prompts 25 Answering Machine Display Codes 26 Setting the Clock ...27 Listen to Messages ...28 Using the Room Monitor Feature...29 Enabling the Room Monitor Feature...
MD4260 User Guide Reviewing Caller ID Records ...22 Storing a Caller ID Entry in the Phonebook 22 Dialing from the Caller ID Log...23 Deleting a Caller ID Record...23 Deleting All Caller ID Records...23 Using the VIP Melody Feature ...24 Using the Answering Machine ...25 Setting Up Your Answering Machine 25 How to Change Your Answering Machine Language Prompts 25 Answering Machine Display Codes 26 Setting the Clock ...27 Listen to Messages ...28 Using the Room Monitor Feature...29 Enabling the Room Monitor Feature...

User Guide
Page 9
... the equipment. at 1-877-466-8646. Connection to Party Line Service is subject to a compatible modular jack that you to make changes in order for repair or warranty information, please contact Motorola, Inc. The telephone company may request that is solved. If the equipment is causing harm to the telephone network, the telephone company may make necessary modifications to file a complaint with...
... the equipment. at 1-877-466-8646. Connection to Party Line Service is subject to a compatible modular jack that you to make changes in order for repair or warranty information, please contact Motorola, Inc. The telephone company may request that is solved. If the equipment is causing harm to the telephone network, the telephone company may make necessary modifications to file a complaint with...
User Guide
Page 10
... PRODUCT TO RAIN OR MOISTURE. CAUTION: CHANGES AND MODIFICATIONS NOT EXPRESSLY APPROVED BY MOTOROLA FOR COMPLIANCE COULD VOID USER'S AUTHORITY TO OPERATE THE EQUIPMENT. This equipment is hearing aid compatible. If your home has specially wired alarm equipment connected to the telephone line, ensure the installation of the cordless phone does not disable your telephone company or qualified installer. If you have questions about what...
... PRODUCT TO RAIN OR MOISTURE. CAUTION: CHANGES AND MODIFICATIONS NOT EXPRESSLY APPROVED BY MOTOROLA FOR COMPLIANCE COULD VOID USER'S AUTHORITY TO OPERATE THE EQUIPMENT. This equipment is hearing aid compatible. If your home has specially wired alarm equipment connected to the telephone line, ensure the installation of the cordless phone does not disable your telephone company or qualified installer. If you have questions about what...
User Guide
Page 11
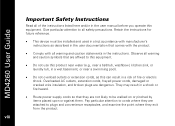
.... • Comply with all warning and caution statements in the instructions. Overloaded AC outlets, extension cords, frayed power cords, damaged or cracked wire insulation, and broken plugs are affixed to all safety precautions. MD4260 User Guide Important Safety Instructions Read all of the instructions listed here and/or in the user manual before you operate this can result in a risk of fire or...
.... • Comply with all warning and caution statements in the instructions. Overloaded AC outlets, extension cords, frayed power cords, damaged or cracked wire insulation, and broken plugs are affixed to all safety precautions. MD4260 User Guide Important Safety Instructions Read all of the instructions listed here and/or in the user manual before you operate this can result in a risk of fire or...
User Guide
Page 13
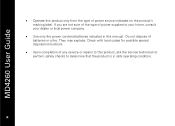
MD4260 User Guide • Operate this product, ask the service technician to perform safety checks to your home, consult your dealer or local power company. • Use only the power cord and batteries indicated in a fire. They may explode. Do not dispose of batteries in this manual. Check with local codes for possible special disposal instructions. • Upon completion of any service or repairs to this product only from the type...
MD4260 User Guide • Operate this product, ask the service technician to perform safety checks to your home, consult your dealer or local power company. • Use only the power cord and batteries indicated in a fire. They may explode. Do not dispose of batteries in this manual. Check with local codes for possible special disposal instructions. • Upon completion of any service or repairs to this product only from the type...
User Guide
Page 14
... update or other service. Registering helps facilitate warranty service and permits us to contact you will need to provide a copy of your dated sales receipt to ensure that your purchase includes each of a Motorola MD4260 cordless phone. Please retain your original dated sales receipt for warranty coverage. To register your product online, visit: http://broadbandregistration.motorola.com Product registration is not required for your new Motorola product. MD4260 User Guide...
... update or other service. Registering helps facilitate warranty service and permits us to contact you will need to provide a copy of your dated sales receipt to ensure that your purchase includes each of a Motorola MD4260 cordless phone. Please retain your original dated sales receipt for warranty coverage. To register your product online, visit: http://broadbandregistration.motorola.com Product registration is not required for your new Motorola product. MD4260 User Guide...
User Guide
Page 16
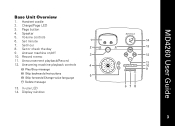
Speaker 5. Volume controls 6. Set hour 8. In use LED 14. Handset cradle 2. Announcement playback/Record 12. Set or check the day 2 9. Charge/Page LED 3. Page button 4. Display window 14 13 12 11 10 9 678 3 3 MD4260 User Guide Answer machine on/off 3 10. Record memo 11. Set minute 1 7. Base Unit Overview 1. Answering machine playback controls 4 5 13.
Speaker 5. Volume controls 6. Set hour 8. In use LED 14. Handset cradle 2. Announcement playback/Record 12. Set or check the day 2 9. Charge/Page LED 3. Page button 4. Display window 14 13 12 11 10 9 678 3 3 MD4260 User Guide Answer machine on/off 3 10. Record memo 11. Set minute 1 7. Base Unit Overview 1. Answering machine playback controls 4 5 13.
User Guide
Page 22
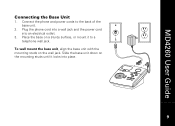
Plug the phone cord into a wall jack and the power cord into place. 9 9 To wall mount the base unit, align the base unit with the mounting studs on a sturdy surface, or mount it locks into an electrical outlet. 3. Connect the phone and power cords to a telephone wall jack. MD4260 User Guide Connecting the Base Unit 1. Slide the base unit down on the mounting studs until it to the back of the base unit. 2. Place the base on the wall jack.
Plug the phone cord into a wall jack and the power cord into place. 9 9 To wall mount the base unit, align the base unit with the mounting studs on a sturdy surface, or mount it locks into an electrical outlet. 3. Connect the phone and power cords to a telephone wall jack. MD4260 User Guide Connecting the Base Unit 1. Slide the base unit down on the mounting studs until it to the back of the base unit. 2. Place the base on the wall jack.

User Guide
Page 23
The initial battery charge time is blank and does not activate when you recharge the battery. 10 10 If your handset. NOTE: When in use to ensure maximum daily performance. Be sure to place the handset in its base when not in LOW BATTERY mode, the keypad sounds, backlighting, and speakerphone features will not work. MD4260 User Guide Charging the Handset Battery A rechargeable battery pack powers your handset displays a LOW BATTERY message, or the handset appears...
The initial battery charge time is blank and does not activate when you recharge the battery. 10 10 If your handset. NOTE: When in use to ensure maximum daily performance. Be sure to place the handset in its base when not in LOW BATTERY mode, the keypad sounds, backlighting, and speakerphone features will not work. MD4260 User Guide Charging the Handset Battery A rechargeable battery pack powers your handset displays a LOW BATTERY message, or the handset appears...

User Guide
Page 24
MD4260 User Guide Basic Operations Handset Indicators Indicator Description Mute ON Turns on when the microphone is muted NEW Turns on when a new call is received and added to the call log LOW BATTERY Handset battery is low and should be charged Turns on when the ringer is muted Base Unit LEDs LED in use charge/page Description The LED is on when the handset is off -hook or when an extension phone is charging in the base. The LED flashes when the base pages any registered handsets. 1111 The LED is on when the phone is off -hook.
MD4260 User Guide Basic Operations Handset Indicators Indicator Description Mute ON Turns on when the microphone is muted NEW Turns on when a new call is received and added to the call log LOW BATTERY Handset battery is low and should be charged Turns on when the ringer is muted Base Unit LEDs LED in use charge/page Description The LED is on when the handset is off -hook or when an extension phone is charging in the base. The LED flashes when the base pages any registered handsets. 1111 The LED is on when the phone is off -hook.
User Guide
Page 25
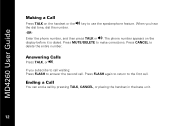
... to call waiting: Press FLASH to answer the second call by pressing TALK, CANCEL, or placing the handset in the base unit. 12 12 Answering Calls Press TALK, or v. The phone number appears on the handset or the v key to make corrections. Press FLASH again to return to delete the entire number. If you hear the dial tone, dial the number. -OREnter the phone number, and then press TALK or v. Press MUTE/DELETE to use the speakerphone feature. MD4260 User Guide Making a Call...
... to call waiting: Press FLASH to answer the second call by pressing TALK, CANCEL, or placing the handset in the base unit. 12 12 Answering Calls Press TALK, or v. The phone number appears on the handset or the v key to make corrections. Press FLASH again to return to delete the entire number. If you hear the dial tone, dial the number. -OREnter the phone number, and then press TALK or v. Press MUTE/DELETE to use the speakerphone feature. MD4260 User Guide Making a Call...
User Guide
Page 26
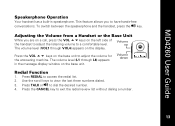
MD4260 User Guide Speakerphone Operation Your handset has a built-in the message display window on the base unit. Adjusting the Volume from a Handset or the Base Unit While you to have hands-free conversations. Volume down AM NEW CALL # PM REPT MEM # Redial Function 1. Press the CANCEL key to adjust the volume for the answering machine. up The volume level (VOL1 through L8) appears in speakerphone. This feature allows you are on a call, press the VOL...
MD4260 User Guide Speakerphone Operation Your handset has a built-in the message display window on the base unit. Adjusting the Volume from a Handset or the Base Unit While you to have hands-free conversations. Volume down AM NEW CALL # PM REPT MEM # Redial Function 1. Press the CANCEL key to adjust the volume for the answering machine. up The volume level (VOL1 through L8) appears in speakerphone. This feature allows you are on a call, press the VOL...

User Guide
Page 30
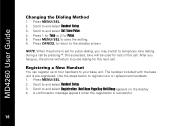
... select Handset Setup. 3. MD4260 User Guide Changing the Key Beep Setting 1. Press 1 for On or 2 for Off. 5. If you only need seven digits where you live, you can enter your three-digit local area code. 5. Scroll to and select Area Code. 4. Setting Your Local Area Code Most caller ID information lists the 10-digit calling number. Press the MENU/SEL key to and select Set Key Beeps. 4. Enter your local area code and the phone...
... select Handset Setup. 3. MD4260 User Guide Changing the Key Beep Setting 1. Press 1 for On or 2 for Off. 5. If you only need seven digits where you live, you can enter your three-digit local area code. 5. Scroll to and select Area Code. 4. Setting Your Local Area Code Most caller ID information lists the 10-digit calling number. Press the MENU/SEL key to and select Set Key Beeps. 4. Enter your local area code and the phone...
User Guide
Page 31
... to register new or replacement handsets. 1. Once pressed, tone will return to your base unit. The handset included with the base unit is successful. 18 18 After you may switch to and select Handset Setup. 3. Registering a New Handset You can register up , the phone will be used for Pulse. 5. Use the steps below to save the setting. 6. A confirmation message appears when the registration is pre-registered. Scroll to temporary tone dialing during a call . Press MENU/SEL. 2. MD4260 User Guide Changing the Dialing...
... to register new or replacement handsets. 1. Once pressed, tone will return to your base unit. The handset included with the base unit is successful. 18 18 After you may switch to and select Handset Setup. 3. Registering a New Handset You can register up , the phone will be used for Pulse. 5. Use the steps below to save the setting. 6. A confirmation message appears when the registration is pre-registered. Scroll to temporary tone dialing during a call . Press MENU/SEL. 2. MD4260 User Guide Changing the Dialing...

User Guide
Page 38
... check day and time. Press day time key to stop recording. English/French prompts): Press and hold day time key to set up prompt in the selected language. 2255 During the initial power up instructions." Press and hold the fast forward ( ) button. The display reads En for English, SP for Spanish, or FR for your answering machine, the system announces, "Press review to receive set time. English/Spanish prompts, Canada models - Setting...
... check day and time. Press day time key to stop recording. English/French prompts): Press and hold day time key to set up prompt in the selected language. 2255 During the initial power up instructions." Press and hold the fast forward ( ) button. The display reads En for English, SP for Spanish, or FR for your answering machine, the system announces, "Press review to receive set time. English/Spanish prompts, Canada models - Setting...
User Guide
Page 39
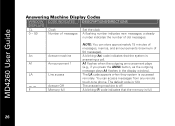
... access Answer Off Memory full NOTE: You can access messages from any remote touch-tone phone. a steady number indicates the number of 59 messages). An A1 LA - - A blinking (An) code indicates that the memory is accessed remotely. You can store approximately 15 minutes of messages, memos, and announcements (maximum of old messages. The LA code appears when they system is full. 26 26 MD4260 User Guide Answering Machine Display Codes WINDOW CODE INDICATES DESCRIPTIONS/DIRECTIONS DISPLAYS CL Clock Set the clock 0 ~ 59 Number of messages A flashing number indicates new...
... access Answer Off Memory full NOTE: You can access messages from any remote touch-tone phone. a steady number indicates the number of 59 messages). An A1 LA - - A blinking (An) code indicates that the memory is accessed remotely. You can store approximately 15 minutes of messages, memos, and announcements (maximum of old messages. The LA code appears when they system is full. 26 26 MD4260 User Guide Answering Machine Display Codes WINDOW CODE INDICATES DESCRIPTIONS/DIRECTIONS DISPLAYS CL Clock Set the clock 0 ~ 59 Number of messages A flashing number indicates new...
User Guide
Page 40
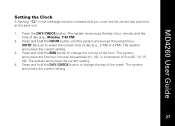
... setting. 3. MD4260 User Guide Setting the Clock A flashing "CL" in increments of day (e.g., 3 AM or 3 PM). The system announces the current setting. 4. Press and hold the MIN button to change the minute of day (e.g., Monday, 7:42 PM). 2. The system announces the first two minutes sequentially (01, 02), in the message window indicates that you must set the correct day and time at the base unit...
... setting. 3. MD4260 User Guide Setting the Clock A flashing "CL" in increments of day (e.g., 3 AM or 3 PM). The system announces the current setting. 4. Press and hold the MIN button to change the minute of day (e.g., Monday, 7:42 PM). 2. The system announces the first two minutes sequentially (01, 02), in the message window indicates that you must set the correct day and time at the base unit...


