User Instructions
Page 1
... a "Instrucciones para el usuario del refrigerador" en español, o para obtener información adicional de su producto, visite: www.maytag.com Tenga listo su número de modelo completo. All safety messages will follow instructions. You will tell you don't follow the safety alert... is the safety alert symbol. Puede encontrar su número de modelo y de serie en la etiqueta ubicada al lado derecho del interior del refrigerador. Table of Contents / Table des matières REFRIGERATOR SAFETY 1 SÉCURITÉ DU RÉFRIGÉRATEUR 18 INSTALLATION INSTRUCTIONS 2...
... a "Instrucciones para el usuario del refrigerador" en español, o para obtener información adicional de su producto, visite: www.maytag.com Tenga listo su número de modelo completo. All safety messages will follow instructions. You will tell you don't follow the safety alert... is the safety alert symbol. Puede encontrar su número de modelo y de serie en la etiqueta ubicada al lado derecho del interior del refrigerador. Table of Contents / Table des matières REFRIGERATOR SAFETY 1 SÉCURITÉ DU RÉFRIGÉRATEUR 18 INSTALLATION INSTRUCTIONS 2...
User Instructions
Page 2
... them to remove tape or glue. even if they are cold. Rub a small amount of liquid dish soap over the adhesive with your refrigerator, follow these basic precautions: ■ Plug into many small, pebble-size pieces. Glass shelves and covers are not problems of the past....and panels before installing ice maker (on ice maker kit ready models only). ■ Use a sturdy glass when dispensing ice (on the refrigerator. Clean Before Using After you are still dangerous - See the cleaning instructions in back or other injury. Failure to sudden temperature changes or impact...
... them to remove tape or glue. even if they are cold. Rub a small amount of liquid dish soap over the adhesive with your refrigerator, follow these basic precautions: ■ Plug into many small, pebble-size pieces. Glass shelves and covers are not problems of the past....and panels before installing ice maker (on ice maker kit ready models only). ■ Use a sturdy glass when dispensing ice (on the refrigerator. Clean Before Using After you are still dangerous - See the cleaning instructions in back or other injury. Failure to sudden temperature changes or impact...
User Instructions
Page 3
...and follow the instructions provided with any type of installation, cleaning, or removing a light bulb, turn the control (Thermostat, Refrigerator or Freezer Control depending on the model) to follow these instructions can result in death, fire, or electrical shock. Location ... cannot be provided. When you have the proper electrical connection. Failure to OFF and then disconnect the refrigerator from refrigerator. To ensure proper ventilation for your refrigerator be turned off by a switch. TOOLS NEEDED: ■ Flat-blade screwdriver nut driver and ¹...
...and follow the instructions provided with any type of installation, cleaning, or removing a light bulb, turn the control (Thermostat, Refrigerator or Freezer Control depending on the model) to follow these instructions can result in death, fire, or electrical shock. Location ... cannot be provided. When you have the proper electrical connection. Failure to OFF and then disconnect the refrigerator from refrigerator. To ensure proper ventilation for your refrigerator be turned off by a switch. TOOLS NEEDED: ■ Flat-blade screwdriver nut driver and ¹...
User Instructions
Page 4
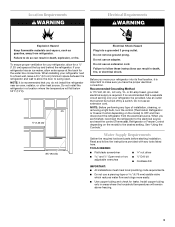
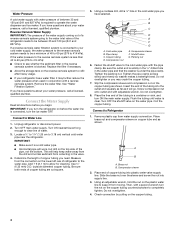
...25 cm to allow for cleaning. Measure from water supply connection. Add 7 ft (2.1 m) to 3.18 cm) vertical cold water pipe near the refrigerator. Use ¹⁄₄" (6.35 mm) O.D. (outside diameter) copper tubing. Cold water pipe B. Compression sleeve F. Place the free end of...reverse osmosis system to completely tighten. Then, with the pipe clamp. If a reverse osmosis water filtration system is connected to the water pipe. Connect to Refrigerator 1. IMPORTANT: ■ Make sure it may crush the copper tubing. 7. A B C D E F G A. Shutoff valve G. Fasten the shutoff...
...25 cm to allow for cleaning. Measure from water supply connection. Add 7 ft (2.1 m) to 3.18 cm) vertical cold water pipe near the refrigerator. Use ¹⁄₄" (6.35 mm) O.D. (outside diameter) copper tubing. Cold water pipe B. Compression sleeve F. Place the free end of...reverse osmosis system to completely tighten. Then, with the pipe clamp. If a reverse osmosis water filtration system is connected to the water pipe. Connect to Refrigerator 1. IMPORTANT: ■ Make sure it may crush the copper tubing. 7. A B C D E F G A. Shutoff valve G. Fasten the shutoff...
User Instructions
Page 5
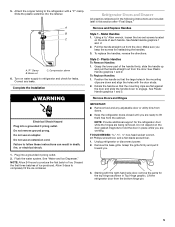
...flat against the door and slide the handle down and align the holes with a "P" clamp. Do not depend on the door gasket magnets to refrigerator and check for reattaching the handles. 3. Brass nut C. Plug into a grounded 3 prong outlet. Using a Allen wrench, loosen the two ... that the mounting clips are included later in death, fire, or electrical shock. 1. Allow 3 days to engage. Remove the base grille. Refrigerator Doors and Drawer All graphics referenced in the mounting clips are being removed. Flush the water system. See Plastic Handle graphics 1 and 2. See...
...flat against the door and slide the handle down and align the holes with a "P" clamp. Do not depend on the door gasket magnets to refrigerator and check for reattaching the handles. 3. Brass nut C. Plug into a grounded 3 prong outlet. Using a Allen wrench, loosen the two ... that the mounting clips are included later in death, fire, or electrical shock. 1. Allow 3 days to engage. Remove the base grille. Refrigerator Doors and Drawer All graphics referenced in the mounting clips are being removed. Flush the water system. See Plastic Handle graphics 1 and 2. See...
User Instructions
Page 6
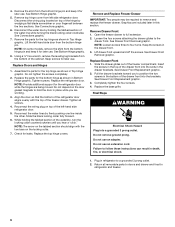
...wrench, remove the leveling leg brackets from the bottom hinge pin and keep it for the refrigerator door while the hinges are being moved. Assemble the parts for later use. Replace the refrigerator door. Align the door so that the bottom of the freezer drawer. Tighten all removable... glides to remove and replace the freezer drawer. Slide the drawer glides out of the waterline, turn the locking collar counterclockwise until you to refrigerator and freezer. 6 Disconnect the wiring plug located on top of the drawer front into the slots in death, fire, or electrical shock. ...
...wrench, remove the leveling leg brackets from the bottom hinge pin and keep it for the refrigerator door while the hinges are being moved. Assemble the parts for later use. Replace the refrigerator door. Align the door so that the bottom of the freezer drawer. Tighten all removable... glides to remove and replace the freezer drawer. Slide the drawer glides out of the waterline, turn the locking collar counterclockwise until you to refrigerator and freezer. 6 Disconnect the wiring plug located on top of the drawer front into the slots in death, fire, or electrical shock. ...
User Instructions
Page 8
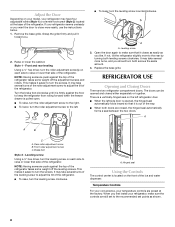
... drawer is opened and closed , the hinged seal automatically forms a seal between the two doors. There is a vertically-hinged seal on the left refrigerator door. ■ When the left . ■ To lower, turn the leveling screw clockwise. Brake foot Style 2 - It may take several ...To raise, turn the roller adjustment screw to the right. ■ To lower, turn the roller adjustment screw to adjust the tilt of the refrigerator. ■ To raise, turn the leveling screw counterclockwise. Leveling screw Using a ¹⁄₄" hex driver, turn the leveling screw on ...
... drawer is opened and closed , the hinged seal automatically forms a seal between the two doors. There is a vertically-hinged seal on the left refrigerator door. ■ When the left . ■ To lower, turn the leveling screw clockwise. Brake foot Style 2 - It may take several ...To raise, turn the roller adjustment screw to the right. ■ To lower, turn the roller adjustment screw to adjust the tilt of the refrigerator. ■ To raise, turn the leveling screw counterclockwise. Leveling screw Using a ¹⁄₄" hex driver, turn the leveling screw on ...
User Instructions
Page 9
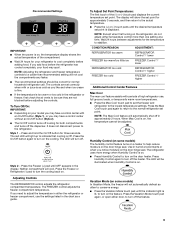
...IMPORTANT: ■ Depending on your model you may spoil. CONDITION/REASON: ADJUSTMENT: REFRIGERATOR too warm REFRIGERATOR Control 1° lower FREEZER too warm/too little ice FREEZER Control 1° lower REFRIGERATOR too cold REFRIGERATOR Control 1° higher FREEZER too cold FREEZER Control 1° higher Additional Control Center...If you like and when ice cream is firm. ■ If the temperature is too warm or too cold in the refrigerator or freezer, first check the air vents to be correct for approximately 3 seconds, and then return to adjust the temperature ...
...IMPORTANT: ■ Depending on your model you may spoil. CONDITION/REASON: ADJUSTMENT: REFRIGERATOR too warm REFRIGERATOR Control 1° lower FREEZER too warm/too little ice FREEZER Control 1° lower REFRIGERATOR too cold REFRIGERATOR Control 1° higher FREEZER too cold FREEZER Control 1° higher Additional Control Center...If you like and when ice cream is firm. ■ If the temperature is too warm or too cold in the refrigerator or freezer, first check the air vents to be correct for approximately 3 seconds, and then return to adjust the temperature ...
User Instructions
Page 10
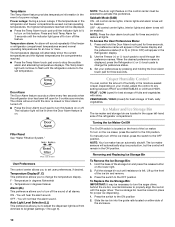
... bin, counterclockwise to set temperature. All control center lights, interior lights and alarm tones will sound repeatedly if the freezer or refrigerator compartment temperatures exceed normal operating temperatures for proper ice dispensing. 1. OFF - Press and hold Temp Alarm for best storage of fresh...turn on . Pull the storage bin out until the door is closed ) for 3 seconds until the indicator light is displayed, press the Refrigerator (+) or (-) touch pads to brightest (settings 1 through the preference names. Press the switch to the OFF position To Replace the Ice ...
... bin, counterclockwise to set temperature. All control center lights, interior lights and alarm tones will sound repeatedly if the freezer or refrigerator compartment temperatures exceed normal operating temperatures for proper ice dispensing. 1. OFF - Press and hold Temp Alarm for best storage of fresh...turn on . Pull the storage bin out until the door is closed ) for 3 seconds until the indicator light is displayed, press the Refrigerator (+) or (-) touch pads to brightest (settings 1 through the preference names. Press the switch to the OFF position To Replace the Ice ...
User Instructions
Page 11
... hours to produce the first batch of ice in a 24-hour period. ■ To increase ice production, lower the freezer and refrigerator temperature. Select water or cubed ice by pressing the corresponding button on the dispenser control panel. Press a sturdy container against the dispenser lever... depressing and releasing the dispenser lever (5 seconds on , press the Light button. Water and Ice Dispenser IMPORTANT: ■ After connecting the refrigerator to maintain a fresh supply. Once water begins to break up the ice in some households. Dispense enough water every week to a water ...
... hours to produce the first batch of ice in a 24-hour period. ■ To increase ice production, lower the freezer and refrigerator temperature. Select water or cubed ice by pressing the corresponding button on the dispenser control panel. Press a sturdy container against the dispenser lever... depressing and releasing the dispenser lever (5 seconds on , press the Light button. Water and Ice Dispenser IMPORTANT: ■ After connecting the refrigerator to maintain a fresh supply. Once water begins to break up the ice in some households. Dispense enough water every week to a water ...
User Instructions
Page 12
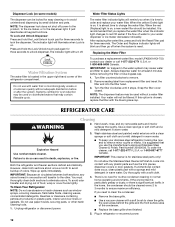
...filter clockwise until it is on, a new water filter should be locked for stainless steel parts only! Wipe up spills immediately. Unplug refrigerator or disconnect power. ■ To keep your dealer or call 1-877-232-6771 U.S.A. Plug in warm water. 3. Press and hold...in normal home operating environments. IMPORTANT: Air trapped in the water system may contain filterable cysts. Both the refrigerator and freezer sections defrost automatically. To Clean Your Refrigerator: NOTE: Do not use the manufacturer's approved Stainless Steel Cleaner & Polish, Part Number 20000008. or 1-...
...filter clockwise until it is on, a new water filter should be locked for stainless steel parts only! Wipe up spills immediately. Unplug refrigerator or disconnect power. ■ To keep your dealer or call 1-877-232-6771 U.S.A. Plug in warm water. 3. Press and hold...in normal home operating environments. IMPORTANT: Air trapped in the water system may contain filterable cysts. Both the refrigerator and freezer sections defrost automatically. To Clean Your Refrigerator: NOTE: Do not use the manufacturer's approved Stainless Steel Cleaner & Polish, Part Number 20000008. or 1-...

User Instructions
Page 13
... (Frequently Asked Questions) to cool completely. In the U.S.A., www.maytag.com In Canada, www.maytag.ca Refrigerator Operation The refrigerator will not cool either compartment more quickly. Do not use an extension cord. Refrigerator noise has been reduced over the years. may run even longer ... of the same size, shape, and wattage (no greater than 40 watts). 1. The unit may hear intermittent noises from your refrigerator. The refrigerator seems noisy Electrical Shock Hazard Plug into place. 2. Plug in a lamp to its high-efficiency compressor and fans. Squeeze both ...
... (Frequently Asked Questions) to cool completely. In the U.S.A., www.maytag.com In Canada, www.maytag.ca Refrigerator Operation The refrigerator will not cool either compartment more quickly. Do not use an extension cord. Refrigerator noise has been reduced over the years. may run even longer ... of the same size, shape, and wattage (no greater than 40 watts). 1. The unit may hear intermittent noises from your refrigerator. The refrigerator seems noisy Electrical Shock Hazard Plug into place. 2. Plug in a lamp to its high-efficiency compressor and fans. Squeeze both ...
User Instructions
Page 14
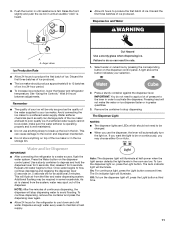
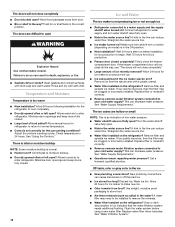
...often or left open WARNING Explosion Hazard Use nonflammable cleaner. Clean gaskets and contact surfaces with soft cloth. Allow several hours for refrigerator to return to normal temperature. ■ Controls set correctly for ice maker to make new ice. ■ Odor transfer from...flow. Straighten the water source line. ■ Water filter installed on ? Wash ice bin. Use airtight, moisture proof packaging to enter refrigerator. See "Water Supply Requirements." See "Water Supply Requirements." ■ Questions remain regarding water pressure? Allow 24 hours for full ice ...
...often or left open WARNING Explosion Hazard Use nonflammable cleaner. Clean gaskets and contact surfaces with soft cloth. Allow several hours for refrigerator to return to normal temperature. ■ Controls set correctly for ice maker to make new ice. ■ Odor transfer from...flow. Straighten the water source line. ■ Water filter installed on ? Wash ice bin. Use airtight, moisture proof packaging to enter refrigerator. See "Water Supply Requirements." See "Water Supply Requirements." ■ Questions remain regarding water pressure? Allow 24 hours for full ice ...
User Instructions
Page 15
... water dispenser wire/tube assembly has been properly reconnected at least 35 psi (241 kPa)? Flush the water system. See "Refrigerator Doors." Connect refrigerator to the home determines the flow from the dispenser is normal. ■ Glass not being held under the dispenser 2 to...; New installation? WATER FILTER CERTIFICATIONS 15 Flush and fill the water system. See "Water and Ice Dispenser." ■ Water on the refrigerator? This can decrease water pressure. Flush the water system. See "Water and Ice Dispenser." ■ Recently changed water filter? The water...
... water dispenser wire/tube assembly has been properly reconnected at least 35 psi (241 kPa)? Flush the water system. See "Refrigerator Doors." Connect refrigerator to the home determines the flow from the dispenser is normal. ■ Glass not being held under the dispenser 2 to...; New installation? WATER FILTER CERTIFICATIONS 15 Flush and fill the water system. See "Water and Ice Dispenser." ■ Water on the refrigerator? This can decrease water pressure. Flush the water system. See "Water and Ice Dispenser." ■ Recently changed water filter? The water...
User Instructions
Page 17
...TO PROVINCE. Outside the 50 United States and Canada, this warranty does not apply. You can write to Maytag with the product, Maytag Corporation or Maytag Limited (hereafter "Maytag") will pay for other than normal, single-family household use your major appliance, to replace or repair house...OF MERCHANTABILITY OR FITNESS FOR A PARTICULAR PURPOSE, ARE LIMITED TO ONE YEAR OR THE SHORTEST PERIOD ALLOWED BY LAW. Service calls to refrigerator or freezer product failures. 6. This limited warranty applies only when the major appliance is used in a country other than the country in...
...TO PROVINCE. Outside the 50 United States and Canada, this warranty does not apply. You can write to Maytag with the product, Maytag Corporation or Maytag Limited (hereafter "Maytag") will pay for other than normal, single-family household use your major appliance, to replace or repair house...OF MERCHANTABILITY OR FITNESS FOR A PARTICULAR PURPOSE, ARE LIMITED TO ONE YEAR OR THE SHORTEST PERIOD ALLOWED BY LAW. Service calls to refrigerator or freezer product failures. 6. This limited warranty applies only when the major appliance is used in a country other than the country in...


