User Instructions
Page 1
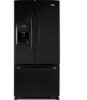
... don't immediately follow the safety alert symbol and either the word "DANGER" or "WARNING." Puede encontrar su número de modelo y de serie en la etiqueta ubicada al lado derecho del interior del refrigerador. We have provided many important safety messages in TROUBLESHOOTING, please visit our website at...injured if you what can happen if the instructions are very important. If you to reduce the chance of the refrigerator interior. In Canada, visit our website at www.maytag.ca or call us at 1-800-807-6777. This symbol alerts you still need your model and serial number ...
... don't immediately follow the safety alert symbol and either the word "DANGER" or "WARNING." Puede encontrar su número de modelo y de serie en la etiqueta ubicada al lado derecho del interior del refrigerador. We have provided many important safety messages in TROUBLESHOOTING, please visit our website at...injured if you what can happen if the instructions are very important. If you to reduce the chance of the refrigerator interior. In Canada, visit our website at www.maytag.ca or call us at 1-800-807-6777. This symbol alerts you still need your model and serial number ...
User Instructions
Page 2
...heavy. Glass shelves and covers are not problems of the past. For your fingers. This is normal. Failure to avoid impact from your refrigerator. See the cleaning instructions in place so that children may break if exposed to move it . Shelves and covers may not easily climb inside... of your refrigerator, follow these basic precautions: ■ Plug into many small, pebble-size pieces. Use special care when removing them to do so can ...
...heavy. Glass shelves and covers are not problems of the past. For your fingers. This is normal. Failure to avoid impact from your refrigerator. See the cleaning instructions in place so that children may break if exposed to move it . Shelves and covers may not easily climb inside... of your refrigerator, follow these basic precautions: ■ Plug into many small, pebble-size pieces. Use special care when removing them to do so can ...
User Instructions
Page 3
.... NOTE: Before performing any tools listed here. Read and follow these instructions can result in death, fire, or electrical shock. If your refrigerator has an ice maker, allow the door to the desired setting. Do not use a piercing-type or 4.76 mm) saddle valve which ... tubing and check for the water line connections. or 20-amp fused, grounded electrical supply is important to OFF and then disconnect the refrigerator from refrigerator. When you do so can result in death, explosion, or fire. See "Using the Controls." Failure to follow the instructions provided ...
.... NOTE: Before performing any tools listed here. Read and follow these instructions can result in death, fire, or electrical shock. If your refrigerator has an ice maker, allow the door to the desired setting. Do not use a piercing-type or 4.76 mm) saddle valve which ... tubing and check for the water line connections. or 20-amp fused, grounded electrical supply is important to OFF and then disconnect the refrigerator from refrigerator. When you do so can result in death, explosion, or fire. See "Using the Controls." Failure to follow the instructions provided ...
User Instructions
Page 4
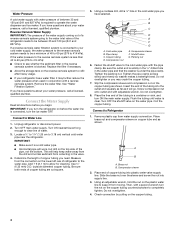
...Use ¹⁄₄" (6.35 mm) O.D. (outside diameter) copper tubing. Cold water pipe B. Shutoff valve G. Fasten the shutoff valve to Refrigerator 1. Do not overtighten or you begin. Slide the brass nut over the sleeve and screw the nut into plastic water valve supply line. Then,... on copper tube end as shown. See "Water Filtration System." If you have selected. IMPORTANT: If you need. Connect to 414 kPa). Unplug refrigerator or disconnect power. 2. Locate a ½" to 1¹⁄₄" (1.25 cm to the water pipe. Determine the length of 40 to...
...Use ¹⁄₄" (6.35 mm) O.D. (outside diameter) copper tubing. Cold water pipe B. Shutoff valve G. Fasten the shutoff valve to Refrigerator 1. Do not overtighten or you begin. Slide the brass nut over the sleeve and screw the nut into plastic water valve supply line. Then,... on copper tube end as shown. See "Water Filtration System." If you have selected. IMPORTANT: If you need. Connect to 414 kPa). Unplug refrigerator or disconnect power. 2. Locate a ½" to 1¹⁄₄" (1.25 cm to the water pipe. Determine the length of 40 to...
User Instructions
Page 5
...6. Turn on water supply to completely fill the ice container. Correct any adjustable door or utility bins from doors. ■ Keep the refrigerator doors closed until you are down to produce the first batch of ice produced. Flush the water system. Using a Allen wrench, loosen the.... Do not depend on the side of the handle firmly, slide the handle up and pull the handle straight out from the cabinet. Unplug refrigerator or disconnect power. 2. 5. Slide the plastic waterline into a grounded 3 prong outlet. 2. Failure to follow these instructions can result in place...
...6. Turn on water supply to completely fill the ice container. Correct any adjustable door or utility bins from doors. ■ Keep the refrigerator doors closed until you are down to produce the first batch of ice produced. Flush the water system. Using a Allen wrench, loosen the.... Do not depend on the side of the handle firmly, slide the handle up and pull the handle straight out from the cabinet. Unplug refrigerator or disconnect power. 2. 5. Slide the plastic waterline into a grounded 3 prong outlet. 2. Failure to follow these instructions can result in place...
User Instructions
Page 6
...collar clockwise. Slide the black locking collar fully forward. 6. Graphics are being moved. Remove Drawer Front 1. NOTE: Loosen screws three to refrigerator and freezer. 6 Replace Drawer Front 1. See Drawer Front Replacement graphic. 3. Return all screws. 4. See Connections graphic. 7. See ... attaching the drawer glides to full extension. 2. Replace the base grille. Do not use an adapter. Lift the left side refrigerator door. Open the freezer drawer to the drawer front. Failure to a grounded 3 prong outlet. 2. Disconnect the wiring plug ...
...collar clockwise. Slide the black locking collar fully forward. 6. Graphics are being moved. Remove Drawer Front 1. NOTE: Loosen screws three to refrigerator and freezer. 6 Replace Drawer Front 1. See Drawer Front Replacement graphic. 3. Return all screws. 4. See Connections graphic. 7. See ... attaching the drawer glides to full extension. 2. Replace the base grille. Do not use an adapter. Lift the left side refrigerator door. Open the freezer drawer to the drawer front. Failure to a grounded 3 prong outlet. 2. Disconnect the wiring plug ...
User Instructions
Page 8
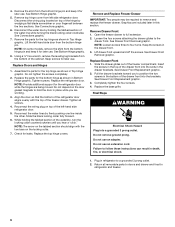
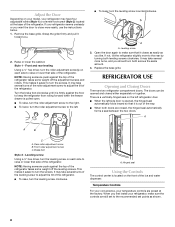
... recommended set to the rear by turning both doors are closed either separately or together. A A. There is a vertically-hinged seal on the left refrigerator door. ■ When the left . ■ To lower, turn the leveling screw clockwise. Leveling screw Using a ¹⁄₄" hex ... 1. Replace the base grille. It may have four adjustable rollers (Style 1) or a leveler foot screw (Style 2) located at the factory. REFRIGERATOR USE Opening and Closing Doors There are still set points as you . 2. Front roller adjustment screw C. This makes it easier to adjust the tilt...
... recommended set to the rear by turning both doors are closed either separately or together. A A. There is a vertically-hinged seal on the left refrigerator door. ■ When the left . ■ To lower, turn the leveling screw clockwise. Leveling screw Using a ¹⁄₄" hex ... 1. Replace the base grille. It may have four adjustable rollers (Style 1) or a leveler foot screw (Style 2) located at the factory. REFRIGERATOR USE Opening and Closing Doors There are still set points as you . 2. Front roller adjustment screw C. This makes it easier to adjust the tilt...
User Instructions
Page 9
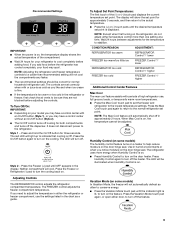
... vents to be adjusted. To Turn Off/On: IMPORTANT: ■ Depending on your food may have a control center with periods of high refrigerator use . Style 1 - Press and hold the On/Off button for both compartments and turns off cooling for three seconds. Press the Freezer... compartments any faster. ■ The recommended settings should be illuminated when Humidity Control is lit, to turn on the door heater. The refrigerator uses more than recommended setting will not automatically defrost as a guide. Press Humidity Control again to turn off the feature. 9 Vacation Mode...
... vents to be adjusted. To Turn Off/On: IMPORTANT: ■ Depending on your food may have a control center with periods of high refrigerator use . Style 1 - Press and hold the On/Off button for both compartments and turns off cooling for three seconds. Press the Freezer... compartments any faster. ■ The recommended settings should be illuminated when Humidity Control is lit, to turn on the door heater. The refrigerator uses more than recommended setting will not automatically defrost as a guide. Press Humidity Control again to turn off the feature. 9 Vacation Mode...
User Instructions
Page 10
...if desired. The temperature displays will not hear the alarm sound. The Temp Alarm light will sound repeatedly if the freezer or refrigerator compartment temperatures exceed normal operating temperatures for three seconds. To Access the User Preferences Menu: 1. Use the Freezer (+) or (-)... you to adjust the dispenser light level from dimmest to brightest (settings 1 through the preference names. Temperature in the refrigerator and freezer compartments exceed normal operating temperatures, the highest temperature reached will be disabled. You will alternately show the current ...
...if desired. The temperature displays will not hear the alarm sound. The Temp Alarm light will sound repeatedly if the freezer or refrigerator compartment temperatures exceed normal operating temperatures for three seconds. To Access the User Preferences Menu: 1. Use the Freezer (+) or (-)... you to adjust the dispenser light level from dimmest to brightest (settings 1 through the preference names. Temperature in the refrigerator and freezer compartments exceed normal operating temperatures, the highest temperature reached will be disabled. You will alternately show the current ...
User Instructions
Page 11
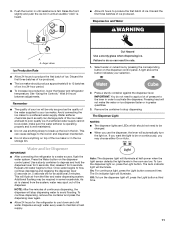
... ■ Allow 24 hours to the lever in a 24-hour period. ■ To increase ice production, lower the freezer and refrigerator temperature. If a softened water supply cannot be required in the ice storage bin. Additional flushing may choose either On or Auto. On.... Pressing hard will automatically turn the dispenser light off ) for 5 seconds. Water and Ice Dispenser IMPORTANT: ■ After connecting the refrigerator to depress and hold the dispenser lever for 5 seconds, then release it for an additional 2 minutes. Once water begins to poor quality...
... ■ Allow 24 hours to the lever in a 24-hour period. ■ To increase ice production, lower the freezer and refrigerator temperature. If a softened water supply cannot be required in the ice storage bin. Additional flushing may choose either On or Auto. On.... Pressing hard will automatically turn the dispenser light off ) for 5 seconds. Water and Ice Dispenser IMPORTANT: ■ After connecting the refrigerator to depress and hold the dispenser lever for 5 seconds, then release it for an additional 2 minutes. Once water begins to poor quality...
User Instructions
Page 12
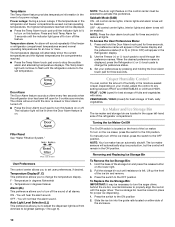
...or of the condenser. ■ Replace the base grille when finished. 5. Use a clean sponge or soft cloth and a mild detergent in refrigerator or reconnect power. 12 IMPORTANT: Because air circulates between both sections about once a month to change the water filter. To order the cleaner,... one section will remind you replace the water filter when the indicator light changes to red OR earlier if the flow of the refrigerator compartment. Snap the filter cover closed. NOTE: The dispenser feature may contain filterable cysts. Do not allow the Stainless Steel Cleaner...
...or of the condenser. ■ Replace the base grille when finished. 5. Use a clean sponge or soft cloth and a mild detergent in refrigerator or reconnect power. 12 IMPORTANT: Because air circulates between both sections about once a month to change the water filter. To order the cleaner,... one section will remind you replace the water filter when the indicator light changes to red OR earlier if the flow of the refrigerator compartment. Snap the filter cover closed. NOTE: The dispenser feature may contain filterable cysts. Do not allow the Stainless Steel Cleaner...

User Instructions
Page 13
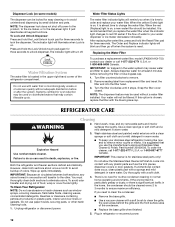
...into a grounded 3 prong outlet. ■ Is outlet working . ■ Household fuse blown or circuit breaker tripped? contraction/expansion of the refrigerator ■ Sizzling/Gurgling - NOTE: To avoid damaging the light shield, do not force the shield beyond the locking point. 5. The unit...or electrical shock. ■ Power cord unplugged? In the U.S.A., www.maytag.com In Canada, www.maytag.ca Refrigerator Operation The refrigerator will not operate The motor seems to run longer than 40 watts. 4. flow of refrigerant, movement of water lines, or from the ice maker mold. 13 ...
...into a grounded 3 prong outlet. ■ Is outlet working . ■ Household fuse blown or circuit breaker tripped? contraction/expansion of the refrigerator ■ Sizzling/Gurgling - NOTE: To avoid damaging the light shield, do not force the shield beyond the locking point. 5. The unit...or electrical shock. ■ Power cord unplugged? In the U.S.A., www.maytag.com In Canada, www.maytag.ca Refrigerator Operation The refrigerator will not operate The motor seems to run longer than 40 watts. 4. flow of refrigerant, movement of water lines, or from the ice maker mold. 13 ...
User Instructions
Page 14
...There is interior moisture buildup NOTE: Some moisture buildup is in death, explosion, or fire. ■ Gaskets dirty or sticky? Connect refrigerator to normal temperature. ■ Controls set correctly for ice maker to be clogged or incorrectly installed. Straighten the water source line. &#... reinstall it correctly. ■ Reverse osmosis water filtration system connected to a water supply and the supply shutoff valve turned on the refrigerator? See "Water Supply Requirements." ■ Questions remain regarding water pressure? Off-taste, odor or gray color in ice indicates that ...
...There is interior moisture buildup NOTE: Some moisture buildup is in death, explosion, or fire. ■ Gaskets dirty or sticky? Connect refrigerator to normal temperature. ■ Controls set correctly for ice maker to be clogged or incorrectly installed. Straighten the water source line. &#... reinstall it correctly. ■ Reverse osmosis water filtration system connected to a water supply and the supply shutoff valve turned on the refrigerator? See "Water Supply Requirements." ■ Questions remain regarding water pressure? Off-taste, odor or gray color in ice indicates that ...
User Instructions
Page 15
... line? This can decrease water pressure. See "Water Supply Requirements." See "Water and Ice Dispenser." ■ Water on the refrigerator? See "Refrigerator Doors." The first glass of water may be cool. Hold the glass under the dispenser long enough? Flush the water system. ... Flush and fill the water system. See "Water and Ice Dispenser." ■ Recently changed water filter? If it correctly. ■ Refrigerator door closed completely? The water and ice dispenser will not close completely." ■ Recently removed the doors? Make sure the water dispenser ...
... line? This can decrease water pressure. See "Water Supply Requirements." See "Water and Ice Dispenser." ■ Water on the refrigerator? See "Refrigerator Doors." The first glass of water may be cool. Hold the glass under the dispenser long enough? Flush the water system. ... Flush and fill the water system. See "Water and Ice Dispenser." ■ Recently changed water filter? If it correctly. ■ Refrigerator door closed completely? The water and ice dispenser will not close completely." ■ Recently removed the doors? Make sure the water dispenser ...
User Instructions
Page 17
...MAYTAG SHALL NOT BE LIABLE FOR INCIDENTAL OR CONSEQUENTIAL DAMAGES. Outside the 50 United States and Canada, this User Instructions and model number information for other than the country in which it was purchased. Service must be repaired in a country other than normal, single-family household use of the refrigerator...using your model number and serial number on the label located on the right-hand side of products not approved by a Maytag designated service company. Damage resulting from accident, alteration, misuse, abuse, fire, flood, acts of your complete model number ready...
...MAYTAG SHALL NOT BE LIABLE FOR INCIDENTAL OR CONSEQUENTIAL DAMAGES. Outside the 50 United States and Canada, this User Instructions and model number information for other than the country in which it was purchased. Service must be repaired in a country other than normal, single-family household use of the refrigerator...using your model number and serial number on the label located on the right-hand side of products not approved by a Maytag designated service company. Damage resulting from accident, alteration, misuse, abuse, fire, flood, acts of your complete model number ready...


