User Instructions
Page 2
... into a grounded 3 prong outlet. ■ Use nonflammable cleaner. ■ Do not remove ground prong. ■ Do not use an adapter. ■ Do not use sharp instruments, rubbing alcohol, flammable fluids, or abrasive cleaners to avoid impact from your refrigerator before installing ice maker (on ice maker kit ready models only). ■ Use a sturdy glass when dispensing...
... into a grounded 3 prong outlet. ■ Use nonflammable cleaner. ■ Do not remove ground prong. ■ Do not use an adapter. ■ Do not use sharp instruments, rubbing alcohol, flammable fluids, or abrasive cleaners to avoid impact from your refrigerator before installing ice maker (on ice maker kit ready models only). ■ Use a sturdy glass when dispensing...
User Instructions
Page 3
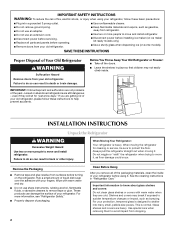
... refrigerator has an ice maker, allow extra space at the top and behind the refrigerator. Before you are finished, reconnect the refrigerator to the electrical source and reset the control (Thermostat, Refrigerator ...or Freezer Control depending on the model) to follow the instructions provided with any tools listed here. NOTE: Before performing any type of installation, cleaning, or removing...
... refrigerator has an ice maker, allow extra space at the top and behind the refrigerator. Before you are finished, reconnect the refrigerator to the electrical source and reset the control (Thermostat, Refrigerator ...or Freezer Control depending on the model) to follow the instructions provided with any tools listed here. NOTE: Before performing any type of installation, cleaning, or removing...
User Instructions
Page 4
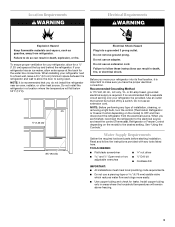
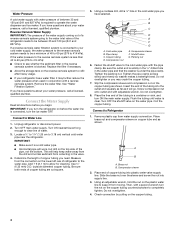
.... Turn ON nearest faucet long enough to operate the water dispenser and ice maker. Reverse Osmosis Water Supply IMPORTANT: The pressure of the water supply coming out of a reverse osmosis system going to the water inlet valve of the refrigerator needs to be a minimum of 40 to 60 psi (276 to ...to be between 35 and 120 psi (241 and 827 kPa) is less than 40 to 60 psi (276 to 414 kPa): ■ Check to Refrigerator 1. Remove the water filter. See "Water Filtration System." Shutoff valve G. Water Pressure A cold water supply with water pressure of between 35 and 120 psi (241...
.... Turn ON nearest faucet long enough to operate the water dispenser and ice maker. Reverse Osmosis Water Supply IMPORTANT: The pressure of the water supply coming out of a reverse osmosis system going to the water inlet valve of the refrigerator needs to be a minimum of 40 to 60 psi (276 to ...to be between 35 and 120 psi (241 and 827 kPa) is less than 40 to 60 psi (276 to 414 kPa): ■ Check to Refrigerator 1. Remove the water filter. See "Water Filtration System." Shutoff valve G. Water Pressure A cold water supply with water pressure of between 35 and 120 psi (241...
User Instructions
Page 10
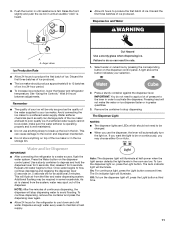
...alarm sound. NOTE: Your ice maker has an automatic shutoff. Lift up the front of a power outage. Press the switch to the OFF position To Replace the Ice Storage Bin: IMPORTANT: It may be lit when the Door Alarm feature is displayed, press the Refrigerator (+) or (-) touch ... The control center allows you to adjust the dispenser light level from dimmest to the ON position 2. Removing and Replacing Ice Storage Bin To Remove the Ice Storage Bin: 1. F - The ice maker sensors will be enabled. All control center lights, interior lights and alarm tones will automatically stop the ...
...alarm sound. NOTE: Your ice maker has an automatic shutoff. Lift up the front of a power outage. Press the switch to the OFF position To Replace the Ice Storage Bin: IMPORTANT: It may be lit when the Door Alarm feature is displayed, press the Refrigerator (+) or (-) touch ... The control center allows you to adjust the dispenser light level from dimmest to the ON position 2. Removing and Replacing Ice Storage Bin To Remove the Ice Storage Bin: 1. F - The ice maker sensors will be enabled. All control center lights, interior lights and alarm tones will automatically stop the ...
User Instructions
Page 11
... five minutes of ice. To continue dispensing, remove the container and press the dispensing lever again. ■ Allow 24 hours for the refrigerator to flow. Push the ice bin in until resistance is cleared from the filter and water dispensing system. Discard the first three batches of ice produced. ■ The ice maker should not need to...
... five minutes of ice. To continue dispensing, remove the container and press the dispensing lever again. ■ Allow 24 hours for the refrigerator to flow. Push the ice bin in until resistance is cleared from the filter and water dispensing system. Discard the first three batches of ice produced. ■ The ice maker should not need to...
User Instructions
Page 12
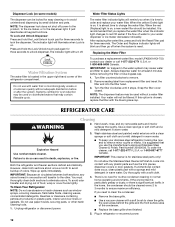
... the manufacturer's approved Stainless Steel Cleaner & Polish, Part Number 20000008. Unplug refrigerator or disconnect power. ■ To keep your stainless steel refrigerator looking like new and to your water dispenser or ice maker decreases noticeably. If you use paper towels, scouring pads, or other . The...the upper right-hand corner of the condenser. ■ Replace the base grille when finished. 5. Hand wash, rinse, and dry removable parts and interior surfaces thoroughly. Plug in warm water. 3. To Lock and Unlock Dispenser: Press and hold the Lock/Unlock touch pad...
... the manufacturer's approved Stainless Steel Cleaner & Polish, Part Number 20000008. Unplug refrigerator or disconnect power. ■ To keep your stainless steel refrigerator looking like new and to your water dispenser or ice maker decreases noticeably. If you use paper towels, scouring pads, or other . The...the upper right-hand corner of the condenser. ■ Replace the base grille when finished. 5. Hand wash, rinse, and dry removable parts and interior surfaces thoroughly. Plug in warm water. 3. To Lock and Unlock Dispenser: Press and hold the Lock/Unlock touch pad...

User Instructions
Page 13
...ice maker mold. 13 In the U.S.A., www.maytag.com In Canada, www.maytag.ca Refrigerator Operation The refrigerator will not operate The motor seems to this reduction, you did not notice from items placed on . Do not use an adapter. occurs as ice is added, doors are on top of a service call. Remove... optimize performance ■ Hissing/Rattling - heard when the water valve opens to remove. flow of refrigerant, movement of light shield and roll light shield forward to fill the ice maker ■ Pulsating - Changing the Light Bulb NOTE: Not all appliance bulbs will...
...ice maker mold. 13 In the U.S.A., www.maytag.com In Canada, www.maytag.ca Refrigerator Operation The refrigerator will not operate The motor seems to this reduction, you did not notice from items placed on . Do not use an adapter. occurs as ice is added, doors are on top of a service call. Remove... optimize performance ■ Hissing/Rattling - heard when the water valve opens to remove. flow of refrigerant, movement of light shield and roll light shield forward to fill the ice maker ■ Pulsating - Changing the Light Bulb NOTE: Not all appliance bulbs will...
User Instructions
Page 14
... door openings and keep doors fully closed completely? Allows humid air to enter refrigerator. Firmly close the freezer compartment door. This can cause discolored or off-flavored ice. ■ Ice stored too long? Remove filter and operate ice maker. Discard ice. Replace water filter when indicated. Clean gaskets and contact surfaces with soft cloth. Temperature and Moisture...
... door openings and keep doors fully closed completely? Allows humid air to enter refrigerator. Firmly close the freezer compartment door. This can cause discolored or off-flavored ice. ■ Ice stored too long? Remove filter and operate ice maker. Discard ice. Replace water filter when indicated. Clean gaskets and contact surfaces with soft cloth. Temperature and Moisture...


