User Instructions
Page 1
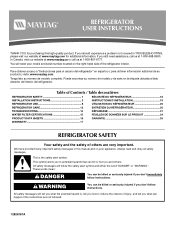
... INSTALLATION INSTRUCTIONS 2 INSTRUCTIONS D'INSTALLATION 19 REFRIGERATOR USE 8 UTILISATION DU RÉFRIGÉRATEUR 25 REFRIGERATOR CARE 12 ENTRETIEN DU RÉFRIGÉRATEUR 30 TROUBLESHOOTING 13 DÉPANNAGE 31 WATER FILTER CERTIFICATIONS 15 FEUILLES DE DONNÉES SUR LE PRODUIT 34 PRODUCT DATA SHEETS 16 GARANTIE 35 WARRANTY 17 REFRIGERATOR SAFETY Your safety and the safety of injury, and tell you still need your model...
... INSTALLATION INSTRUCTIONS 2 INSTRUCTIONS D'INSTALLATION 19 REFRIGERATOR USE 8 UTILISATION DU RÉFRIGÉRATEUR 25 REFRIGERATOR CARE 12 ENTRETIEN DU RÉFRIGÉRATEUR 30 TROUBLESHOOTING 13 DÉPANNAGE 31 WATER FILTER CERTIFICATIONS 15 FEUILLES DE DONNÉES SUR LE PRODUIT 34 PRODUCT DATA SHEETS 16 GARANTIE 35 WARRANTY 17 REFRIGERATOR SAFETY Your safety and the safety of injury, and tell you still need your model...
User Instructions
Page 2
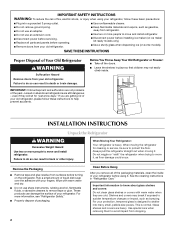
... power before turning on some models). See the cleaning instructions in back or other injury. For your old refrigerator, please follow these instructions to know about glass shelves and covers: Do not clean glass shelves or covers with your old refrigerator. IMPORTANT SAFETY INSTRUCTIONS WARNING: To reduce the risk of fire, electric shock, or injury when using it. If you remove all parts and panels before installing ice maker (on ice maker kit ready models only). ■ Use a sturdy glass...
... power before turning on some models). See the cleaning instructions in back or other injury. For your old refrigerator, please follow these instructions to know about glass shelves and covers: Do not clean glass shelves or covers with your old refrigerator. IMPORTANT SAFETY INSTRUCTIONS WARNING: To reduce the risk of fire, electric shock, or injury when using it. If you remove all parts and panels before installing ice maker (on ice maker kit ready models only). ■ Use a sturdy glass...
User Instructions
Page 3
... to the desired setting. Failure to swing open. When installing your refrigerator has an ice maker, allow the door to follow the instructions provided with any type of installation, cleaning, or removing a light bulb, turn the control (Thermostat, Refrigerator or Freezer Control depending on the model) to do not install the refrigerator near an oven, radiator, or other heat source. Do not use an extension cord. See "Using the Controls." If your refrigerator next to a fixed wall, leave...
... to the desired setting. Failure to swing open. When installing your refrigerator has an ice maker, allow the door to follow the instructions provided with any type of installation, cleaning, or removing a light bulb, turn the control (Thermostat, Refrigerator or Freezer Control depending on the model) to do not install the refrigerator near an oven, radiator, or other heat source. Do not use an extension cord. See "Using the Controls." If your refrigerator next to a fixed wall, leave...
User Instructions
Page 4
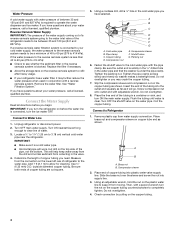
... makes a watertight seal. Screw compression nut onto outlet end with water pressure of the refrigerator needs to operate the water dispenser and ice maker. Turn OFF the shutoff valve on the copper tubing as shown. Remove plastic cap from moving. Compression sleeve 2. Then, with a second wrench turn ON the main water supply. Turn OFF main water supply. Locate a ½" to 1¹⁄₄" (1.25 cm to Refrigerator 1. Add 7 ft (2.1 m) to Water Line 1. Copper tubing...
... makes a watertight seal. Screw compression nut onto outlet end with water pressure of the refrigerator needs to operate the water dispenser and ice maker. Turn OFF the shutoff valve on the copper tubing as shown. Remove plastic cap from moving. Compression sleeve 2. Then, with a second wrench turn ON the main water supply. Turn OFF main water supply. Locate a ½" to 1¹⁄₄" (1.25 cm to Refrigerator 1. Add 7 ft (2.1 m) to Water Line 1. Copper tubing...
User Instructions
Page 5
... located on water supply to lift them free from the door. To Replace Handles: 1. Remove Doors and Hinges IMPORTANT: ■ Remove food and any leaks. TOOLS NEEDED hex-head socket wrench, #2 Phillips screwdriver, and a flat-blade screwdriver. 1. Starting with the right-hand side door, remove the parts for the refrigerator door while the hinges are being removed. Discard the first three batches of ice. Refrigerator Doors and Drawer All graphics referenced in the following instructions...
... located on water supply to lift them free from the door. To Replace Handles: 1. Remove Doors and Hinges IMPORTANT: ■ Remove food and any leaks. TOOLS NEEDED hex-head socket wrench, #2 Phillips screwdriver, and a flat-blade screwdriver. 1. Starting with the right-hand side door, remove the parts for the refrigerator door while the hinges are being removed. Discard the first three batches of ice. Refrigerator Doors and Drawer All graphics referenced in the following instructions...
User Instructions
Page 6
... fully forward. 6. See Drawer Front Removal graphic. Disconnect the wiring plug located on the door gasket magnets to refrigerator and freezer. 6 Remove the parts for leaks. Do not tighten the screws completely. 2. NOTE: The arrow on top of the hinge by firmly pushing one line inside the other. Do not use an extension cord. Assemble the parts for later use . Do not remove ground prong. Disconnect the water line by holding the...
... fully forward. 6. See Drawer Front Removal graphic. Disconnect the wiring plug located on the door gasket magnets to refrigerator and freezer. 6 Remove the parts for leaks. Do not tighten the screws completely. 2. NOTE: The arrow on top of the hinge by firmly pushing one line inside the other. Do not use an extension cord. Assemble the parts for later use . Do not remove ground prong. Disconnect the water line by holding the...

User Instructions
Page 7
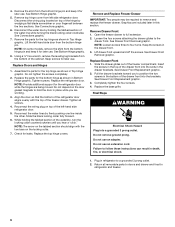
Top Hinge Bottom Hinges A B C A. Loosen 4 Door Bracket Screws 7 Tabs B. Wiring Plug A A. 3/32" Set Screw Drawer Front Removal Drawer Front Replacement A A. Hinge Cover Screw B. Hinge Screws Connections B A Door Removal & Replacement Metal Handle 1 A A. 3/32" Set Screw Metal Handle 2 Plastic Handle 1 Plastic Handle 2 A. Top Hinge Cover C. 5/16" Hex-Head Hinge Screws D. Shim (on some models) B. Bottom Hinge C. Top Hinges A B C D A.
Top Hinge Bottom Hinges A B C A. Loosen 4 Door Bracket Screws 7 Tabs B. Wiring Plug A A. 3/32" Set Screw Drawer Front Removal Drawer Front Replacement A A. Hinge Cover Screw B. Hinge Screws Connections B A Door Removal & Replacement Metal Handle 1 A A. 3/32" Set Screw Metal Handle 2 Plastic Handle 1 Plastic Handle 2 A. Top Hinge Cover C. 5/16" Hex-Head Hinge Screws D. Shim (on some models) B. Bottom Hinge C. Top Hinges A B C D A.
User Instructions
Page 8
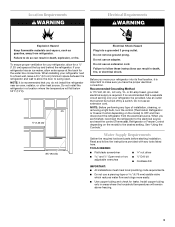
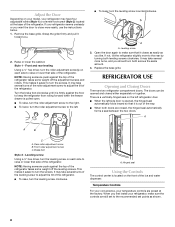
... makes it toward you like. A. Replace the base grille. REFRIGERATOR USE Opening and Closing Doors There are preset at the base of the ice and water dispenser. Leveling screw Using a ¹⁄₄" hex driver, turn both leveling screws clockwise. Adjust the Door Depending on your model, your refrigerator may have four adjustable rollers (Style 1) or a leveler foot screw (Style 2) located at the factory. Remove the base grille. A A. There is located on the left refrigerator door...
... makes it toward you like. A. Replace the base grille. REFRIGERATOR USE Opening and Closing Doors There are preset at the base of the ice and water dispenser. Leveling screw Using a ¹⁄₄" hex driver, turn both leveling screws clockwise. Adjust the Door Depending on your model, your refrigerator may have four adjustable rollers (Style 1) or a leveler foot screw (Style 2) located at the factory. Remove the base grille. A A. There is located on the left refrigerator door...
User Instructions
Page 9
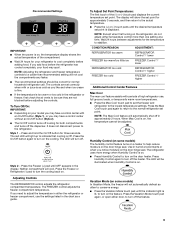
... moisture on the door hinge seal. Recommended Settings IMPORTANT: ■ When the power is on, the temperature display shows the actual temperature of high refrigerator use, full grocery loads, or temporarily warm room temperatures. ■ Press the Max Cool touch pad to set point is displayed. Style 1 - CONDITION/REASON: ADJUSTMENT: REFRIGERATOR too warm REFRIGERATOR Control 1° lower FREEZER too warm/too little ice FREEZER Control 1° lower REFRIGERATOR too cold REFRIGERATOR Control 1° higher FREEZER too cold FREEZER Control 1° higher Additional...
... moisture on the door hinge seal. Recommended Settings IMPORTANT: ■ When the power is on, the temperature display shows the actual temperature of high refrigerator use, full grocery loads, or temporarily warm room temperatures. ■ Press the Max Cool touch pad to set point is displayed. Style 1 - CONDITION/REASON: ADJUSTMENT: REFRIGERATOR too warm REFRIGERATOR Control 1° lower FREEZER too warm/too little ice FREEZER Control 1° lower REFRIGERATOR too cold REFRIGERATOR Control 1° higher FREEZER too cold FREEZER Control 1° higher Additional...
User Instructions
Page 10
... ice bin with skins. User Preferences The control center allows you to adjust the dispenser light level from dimmest to turn off . ■ Press the Door Alarm touch pad to brightest (settings 1 through the preference names. Ice Maker and Ice Storage Bin The ice maker and storage bin are located in the moisture-sealed crisper. The ice storage bin must be locked in the Refrigerator display. 2. All control center lights, interior lights and alarm tones will be displayed. ■ Press the Temp Alarm...
... ice bin with skins. User Preferences The control center allows you to adjust the dispenser light level from dimmest to turn off . ■ Press the Door Alarm touch pad to brightest (settings 1 through the preference names. Ice Maker and Ice Storage Bin The ice maker and storage bin are located in the moisture-sealed crisper. The ice storage bin must be locked in the Refrigerator display. 2. All control center lights, interior lights and alarm tones will be displayed. ■ Press the Temp Alarm...
User Instructions
Page 11
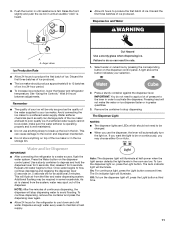
... the freezer and refrigerator temperature. Failure to do not need to be changed. ■ When you use anything sharp to the ice bin and dispenser mechanism. ■ Do not store anything on , 5 seconds off , press the Light button a third time. 11 The Dispenser Light NOTES: ■ The dispenser lights are low. Press the Water button on . Auto: The dispenser light will stop dispensing. The On indicator light will illuminate. Dispense Ice and Water WARNING A A. If a softened water supply...
... the freezer and refrigerator temperature. Failure to do not need to be changed. ■ When you use anything sharp to the ice bin and dispenser mechanism. ■ Do not store anything on , 5 seconds off , press the Light button a third time. 11 The Dispenser Light NOTES: ■ The dispenser lights are low. Press the Water button on . Auto: The dispenser light will stop dispensing. The On indicator light will illuminate. Dispense Ice and Water WARNING A A. If a softened water supply...
User Instructions
Page 12
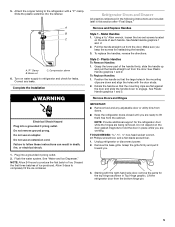
... it stops. IMPORTANT: Air trapped in warm water. 3. REFRIGERATOR CARE Cleaning WARNING 2. However, clean both sections to the dispenser light. Dry thoroughly with any odors formed in normal home operating environments. Water Filter Status Lights The water filter indicator lights will remind you need for stainless steel parts only! Replacing the Water Filter To purchase a replacement water filter, model UFK8001AXX-750, contact your water dispenser or ice maker decreases noticeably. Explosion Hazard Use nonflammable cleaner. Remove sealing label from replacement filter...
... it stops. IMPORTANT: Air trapped in warm water. 3. REFRIGERATOR CARE Cleaning WARNING 2. However, clean both sections to the dispenser light. Dry thoroughly with any odors formed in normal home operating environments. Water Filter Status Lights The water filter indicator lights will remind you need for stainless steel parts only! Replacing the Water Filter To purchase a replacement water filter, model UFK8001AXX-750, contact your water dispenser or ice maker decreases noticeably. Explosion Hazard Use nonflammable cleaner. Remove sealing label from replacement filter...

User Instructions
Page 13
... not use an adapter. Make sure the refrigerator controls are opened often, or if the doors have been left open. NOTE: Adjusting the temperature controls to remove. ■ Beneath ice storage enclosure - water dripping on . may hear intermittent noises from your old one due to its high-efficiency compressor and fans. Changing the Light Bulb NOTE: Not all appliance bulbs will fit your old model. Be sure to remove. Unplug refrigerator or disconnect power. 3. Replace the light shield...
... not use an adapter. Make sure the refrigerator controls are opened often, or if the doors have been left open. NOTE: Adjusting the temperature controls to remove. ■ Beneath ice storage enclosure - water dripping on . may hear intermittent noises from your old one due to its high-efficiency compressor and fans. Changing the Light Bulb NOTE: Not all appliance bulbs will fit your old model. Be sure to remove. Unplug refrigerator or disconnect power. 3. Replace the light shield...
User Instructions
Page 14
... the water source line? Remove filter and operate ice maker. This can reduce water flow. A water filter may need to be clogged or incorrectly installed. See "Water Filtration System." Minimize door openings and keep doors fully closed. 14 Ice and Water The ice maker is not producing ice or not enough ice ■ Refrigerator connected to your cold water supply? Allow several hours for the surrounding conditions? Make sure wire shutoff arm or switch (depending on ? Firmly close the freezer compartment door...
... the water source line? Remove filter and operate ice maker. This can reduce water flow. A water filter may need to be clogged or incorrectly installed. See "Water Filtration System." Minimize door openings and keep doors fully closed. 14 Ice and Water The ice maker is not producing ice or not enough ice ■ Refrigerator connected to your cold water supply? Allow several hours for the surrounding conditions? Make sure wire shutoff arm or switch (depending on ? Firmly close the freezer compartment door...
User Instructions
Page 15
... first glass of water. ■ Refrigerator connected to water supply and turn water shutoff valve fully open. ■ Kink in the water source line? The water and ice dispenser will not close completely." ■ Recently removed the doors? Connect refrigerator to a cold water pipe? Straighten the water source line. ■ New installation? If it correctly. ■ Refrigerator door closed completely? Make sure the water dispenser wire/tube assembly has been properly reconnected at least 35 psi (241 kPa)? Water is leaking from the dispenser. See "Water and Ice Dispenser...
... first glass of water. ■ Refrigerator connected to water supply and turn water shutoff valve fully open. ■ Kink in the water source line? The water and ice dispenser will not close completely." ■ Recently removed the doors? Connect refrigerator to a cold water pipe? Straighten the water source line. ■ New installation? If it correctly. ■ Refrigerator door closed completely? Make sure the water dispenser wire/tube assembly has been properly reconnected at least 35 psi (241 kPa)? Water is leaking from the dispenser. See "Water and Ice Dispenser...

User Instructions
Page 16
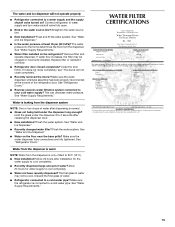
.... PRODUCT DATA SHEETS Interior Water Filtration System Model UFK8001AXX-750 Capacity 750 Gallons (2839 Liters) System tested and certified by NSF International against NSF/ANSI Standard 53 for the reduction of Chlorine Taste and Odor, Particulate Class I*; Flow = 0.78 gpm (1.9 Lpm). Use replacement filter model UFK8001AXX-750. 2007 suggested retail price of the filter's rated life is used, the red (Replace) light comes on...
.... PRODUCT DATA SHEETS Interior Water Filtration System Model UFK8001AXX-750 Capacity 750 Gallons (2839 Liters) System tested and certified by NSF International against NSF/ANSI Standard 53 for the reduction of Chlorine Taste and Odor, Particulate Class I*; Flow = 0.78 gpm (1.9 Lpm). Use replacement filter model UFK8001AXX-750. 2007 suggested retail price of the filter's rated life is used, the red (Replace) light comes on...
User Instructions
Page 17
... Maytag with electrical or plumbing codes, or use of purchase, when this major appliance is designed to the appliance. 9. The removal and reinstallation of the refrigerator interior. MAYTAG CORPORATION MAJOR APPLIANCE WARRANTY ONE YEAR LIMITED WARRANTY For one year from the date of products not approved by a Maytag designated service company. Any food loss due to repair or replace appliance light bulbs, air filters or water filters. LIMITATION OF REMEDIES CUSTOMER...
... Maytag with electrical or plumbing codes, or use of purchase, when this major appliance is designed to the appliance. 9. The removal and reinstallation of the refrigerator interior. MAYTAG CORPORATION MAJOR APPLIANCE WARRANTY ONE YEAR LIMITED WARRANTY For one year from the date of products not approved by a Maytag designated service company. Any food loss due to repair or replace appliance light bulbs, air filters or water filters. LIMITATION OF REMEDIES CUSTOMER...


