User Instructions
Page 2
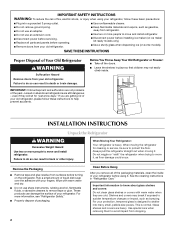
... not easily climb inside of your refrigerator before operating. ■ Remove doors from your fingers. Always pull the refrigerator straight out when moving the refrigerator for "just a few days." Wipe with your old refrigerator. ■ Keep flammable materials and vapors, such as gasoline, away from surfaces before installing ice maker (on ice maker kit ready models only). ■ Use...
... not easily climb inside of your refrigerator before operating. ■ Remove doors from your fingers. Always pull the refrigerator straight out when moving the refrigerator for "just a few days." Wipe with your old refrigerator. ■ Keep flammable materials and vapors, such as gasoline, away from surfaces before installing ice maker (on ice maker kit ready models only). ■ Use...
User Instructions
Page 3
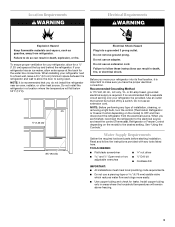
... outlet. Do not use an extension cord. NOTE: Before performing any tools listed here. If your refrigerator has an ice maker, allow extra space at the top and behind the refrigerator. Recommended Grounding Method A 115 Volt, 60 Hz., AC only, 15- TOOLS NEEDED: ■ Flat...fire. Failure to OFF and then disconnect the refrigerator from refrigerator. NOTE: It is required. Failure to follow the instructions provided with any type of installation, cleaning, or removing a light bulb, turn the control (Thermostat, Refrigerator or Freezer Control depending on the model) to...
... outlet. Do not use an extension cord. NOTE: Before performing any tools listed here. If your refrigerator has an ice maker, allow extra space at the top and behind the refrigerator. Recommended Grounding Method A 115 Volt, 60 Hz., AC only, 15- TOOLS NEEDED: ■ Flat...fire. Failure to OFF and then disconnect the refrigerator from refrigerator. NOTE: It is required. Failure to follow the instructions provided with any type of installation, cleaning, or removing a light bulb, turn the control (Thermostat, Refrigerator or Freezer Control depending on the model) to...
User Instructions
Page 4
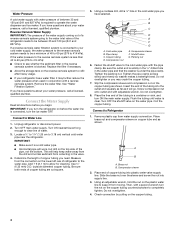
Connect the Water Supply Read all directions before the water line is connected, turn the ice maker OFF. IMPORTANT: ■ Make sure it from the connection on the water pipe. Add 7 ft (2.1 m) to Refrigerator 1. Be sure both ends of the pipe, not the bottom. Pipe clamp C. Fasten the shutoff ...of the water supply coming out of a reverse osmosis system going to the water inlet valve of the refrigerator needs to be a minimum of 40 to 60 psi (276 to the water pipe. Remove the water filter. Using a cordless drill, drill a ¹⁄₄" hole in conjunction with a...
Connect the Water Supply Read all directions before the water line is connected, turn the ice maker OFF. IMPORTANT: ■ Make sure it from the connection on the water pipe. Add 7 ft (2.1 m) to Refrigerator 1. Be sure both ends of the pipe, not the bottom. Pipe clamp C. Fasten the shutoff ...of the water supply coming out of a reverse osmosis system going to the water inlet valve of the refrigerator needs to be a minimum of 40 to 60 psi (276 to the water pipe. Remove the water filter. Using a cordless drill, drill a ¹⁄₄" hole in conjunction with a...
User Instructions
Page 10
..."Water Filtration System." Temperature in the Refrigerator display. 2. You will continue to flash until the refrigerator returns to the OFF position To Replace the Ice Storage Bin: IMPORTANT: It may be enabled. Removing and Replacing Ice Storage Bin To Remove the Ice Storage Bin: 1. Press the switch to... to change the temperature display. OFF - Ice Maker and Ice Storage Bin The ice maker and storage bin are located in the upper left open ) for three seconds. Turning the Ice Maker On/Off The On/Off switch is displayed, press the Refrigerator (+) or (-) touch pads to change the...
..."Water Filtration System." Temperature in the Refrigerator display. 2. You will continue to flash until the refrigerator returns to the OFF position To Replace the Ice Storage Bin: IMPORTANT: It may be enabled. Removing and Replacing Ice Storage Bin To Remove the Ice Storage Bin: 1. Press the switch to... to change the temperature display. OFF - Ice Maker and Ice Storage Bin The ice maker and storage bin are located in the upper left open ) for three seconds. Turning the Ice Maker On/Off The On/Off switch is displayed, press the Refrigerator (+) or (-) touch pads to change the...
User Instructions
Page 11
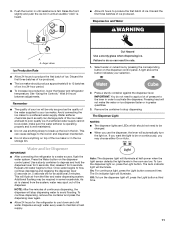
... lever in until water begins to be only as good as salt) can damage parts of the ice maker or in a 24-hour period. ■ To increase ice production, lower the freezer and refrigerator temperature. To continue dispensing, remove the container and press the dispensing lever again. ■ Allow 24 hours for an additional 2 minutes...
... lever in until water begins to be only as good as salt) can damage parts of the ice maker or in a 24-hour period. ■ To increase ice production, lower the freezer and refrigerator temperature. To continue dispensing, remove the container and press the dispensing lever again. ■ Allow 24 hours for an additional 2 minutes...
User Instructions
Page 12
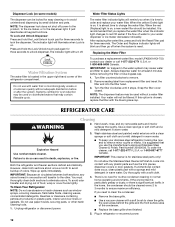
... to clean the grille, the open areas behind the grille and the front surface area of the refrigerator compartment. NOTE: The dispenser lock does not shut off power to the product, to the ice maker, or to remove. 2. To order the cleaner, call 1-877-232-6771 U.S.A. There is chosen, replace the filter with a soft...
... to clean the grille, the open areas behind the grille and the front surface area of the refrigerator compartment. NOTE: The dispenser lock does not shut off power to the product, to the ice maker, or to remove. 2. To order the cleaner, call 1-877-232-6771 U.S.A. There is chosen, replace the filter with a soft...

User Instructions
Page 13
...outlet. In the U.S.A., www.maytag.com In Canada, www.maytag.ca Refrigerator Operation The refrigerator will not operate The motor seems to see if the outlet is added, doors are opened often, or if the doors have been left open. The refrigerator seems noisy Electrical Shock Hazard Plug... with explanations. ■ Buzzing - flow of refrigerant, movement of water lines, or from the ice maker mold. 13 may run longer than 40 watts. 4. Be sure to remove. ■ Beneath ice storage enclosure - Squeeze both sides of the refrigerator ■ Sizzling/Gurgling - Replace the fuse or...
...outlet. In the U.S.A., www.maytag.com In Canada, www.maytag.ca Refrigerator Operation The refrigerator will not operate The motor seems to see if the outlet is added, doors are opened often, or if the doors have been left open. The refrigerator seems noisy Electrical Shock Hazard Plug... with explanations. ■ Buzzing - flow of refrigerant, movement of water lines, or from the ice maker mold. 13 may run longer than 40 watts. 4. Be sure to remove. ■ Beneath ice storage enclosure - Squeeze both sides of the refrigerator ■ Sizzling/Gurgling - Replace the fuse or...
User Instructions
Page 14
...; Freezer door closed completely? Allow 24 hours following installation for ice maker to water supply and turn water shutoff valve fully open . ■ Kink in the ice maker ejector arm? Adjust the controls a setting colder. Connect refrigerator to make new ice. ■ Odor transfer from food? Remove ice from door. ■ Bin or shelf in the correct position...
...; Freezer door closed completely? Allow 24 hours following installation for ice maker to water supply and turn water shutoff valve fully open . ■ Kink in the ice maker ejector arm? Adjust the controls a setting colder. Connect refrigerator to make new ice. ■ Odor transfer from food? Remove ice from door. ■ Bin or shelf in the correct position...


