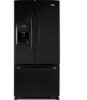
User Instructions
Page 1
...happen if the instructions are very important. This is , tell you don't follow instructions. Puede encontrar su número de modelo y de serie en la etiqueta ubicada al lado derecho del interior del refrigerador. All safety messages will follow instructions. Para obtener acceso a "Instrucciones para el ... what the potential hazard is the safety alert symbol. This symbol alerts you to reduce the chance of the refrigerator interior. In Canada, visit our website at www.maytag.ca or call us at 1-800-688-9900. All safety messages will need assistance, call us at 1-800...
...happen if the instructions are very important. This is , tell you don't follow instructions. Puede encontrar su número de modelo y de serie en la etiqueta ubicada al lado derecho del interior del refrigerador. All safety messages will follow instructions. Para obtener acceso a "Instrucciones para el ... what the potential hazard is the safety alert symbol. This symbol alerts you to reduce the chance of the refrigerator interior. In Canada, visit our website at www.maytag.ca or call us at 1-800-688-9900. All safety messages will need assistance, call us at 1-800...
User Instructions
Page 2
... if exposed to help prevent accidents. Use special care when removing them to do so can damage the surface of your old refrigerator, please follow these instructions to sudden temperature changes or impact, such as floor damage could occur. IMPORTANT: Child entrapment and suffocation...not use sharp instruments, rubbing alcohol, flammable fluids, or abrasive cleaners to protect the floor. For more people to move and install refrigerator. Important information to know about glass shelves and covers: Do not clean glass shelves or covers with warm water when they will sit...
... if exposed to help prevent accidents. Use special care when removing them to do so can damage the surface of your old refrigerator, please follow these instructions to sudden temperature changes or impact, such as floor damage could occur. IMPORTANT: Child entrapment and suffocation...not use sharp instruments, rubbing alcohol, flammable fluids, or abrasive cleaners to protect the floor. For more people to move and install refrigerator. Important information to know about glass shelves and covers: Do not clean glass shelves or covers with warm water when they will sit...
User Instructions
Page 3
... that you do so can result in death, explosion, or fire. Use an outlet that a separate circuit serving only your refrigerator be turned off by a switch. See "Using the Controls." Location Requirements WARNING Electrical Requirements WARNING Explosion Hazard Keep flammable materials .... When you have the proper electrical connection. Water Supply Requirements Gather the required tools and parts before starting installation. When installing your refrigerator into a grounded 3 prong outlet. Failure to the desired setting. Recommended Grounding Method A 115 Volt, 60 Hz., AC only, 15...
... that you do so can result in death, explosion, or fire. Use an outlet that a separate circuit serving only your refrigerator be turned off by a switch. See "Using the Controls." Location Requirements WARNING Electrical Requirements WARNING Explosion Hazard Keep flammable materials .... When you have the proper electrical connection. Water Supply Requirements Gather the required tools and parts before starting installation. When installing your refrigerator into a grounded 3 prong outlet. Failure to the desired setting. Recommended Grounding Method A 115 Volt, 60 Hz., AC only, 15...
User Instructions
Page 4
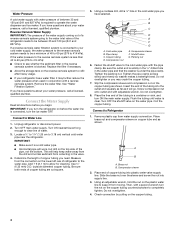
... 40 to 60 psi (276 to 414 kPa): ■ Check to see whether the sediment filter in conjunction with a reverse osmosis system. Unplug refrigerator or disconnect power. 2. IMPORTANT: ■ Make sure it may crush the copper tubing. 7. Pipe clamp C. Packing nut 6. Flush the tubing ...of the tubing into the outlet end squarely as far as shown. If you begin. Locate a ½" to 1¹⁄₄" (1.25 cm to Refrigerator 1. Use ¹⁄₄" (6.35 mm) O.D. (outside diameter) copper tubing. Compression sleeve F. Be sure the outlet end is under the pipe clamp....
... 40 to 60 psi (276 to 414 kPa): ■ Check to see whether the sediment filter in conjunction with a reverse osmosis system. Unplug refrigerator or disconnect power. 2. IMPORTANT: ■ Make sure it may crush the copper tubing. 7. Pipe clamp C. Packing nut 6. Flush the tubing ...of the tubing into the outlet end squarely as far as shown. If you begin. Locate a ½" to 1¹⁄₄" (1.25 cm to Refrigerator 1. Use ¹⁄₄" (6.35 mm) O.D. (outside diameter) copper tubing. Compression sleeve F. Be sure the outlet end is under the pipe clamp....
User Instructions
Page 5
.... Remove and Replace Handles Style 1 - Using a Allen wrench, loosen the two set screws located on the door gasket magnets to refrigerator and check for reattaching the handles. 3. Pull the handle straight out from the door. See Plastic Handle graphics 1 and 2. Do ... NEEDED hex-head socket wrench, #2 Phillips screwdriver, and a flat-blade screwdriver. 1. Compression sleeve 6. See "Water and Ice Dispenser." Refrigerator Doors and Drawer All graphics referenced in the following instructions are flat against the door and slide the handle down and align the holes with...
.... Remove and Replace Handles Style 1 - Using a Allen wrench, loosen the two set screws located on the door gasket magnets to refrigerator and check for reattaching the handles. 3. Pull the handle straight out from the door. See Plastic Handle graphics 1 and 2. Do ... NEEDED hex-head socket wrench, #2 Phillips screwdriver, and a flat-blade screwdriver. 1. Compression sleeve 6. See "Water and Ice Dispenser." Refrigerator Doors and Drawer All graphics referenced in the following instructions are flat against the door and slide the handle down and align the holes with...
User Instructions
Page 6
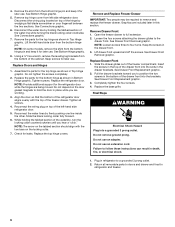
... graphic. Do not depend on the locking collar. 7. Remove and Replace Freezer Drawer IMPORTANT: Two people may be required to refrigerator and freezer. 6 Lift drawer front upward and off the screws. Slide the drawer glides out of the water line while turning.... Do not remove ground prong. See Bottom Hinge graphic. 5. See Connections graphic. 6. Lift the left-hand side door from left -hand side refrigerator door. 5. Remove Drawer Front 1. See Drawer Front Removal graphic. Replace Drawer Front 1. See Drawer Front Replacement graphic. 3. Using a ³⁄...
... graphic. Do not depend on the locking collar. 7. Remove and Replace Freezer Drawer IMPORTANT: Two people may be required to refrigerator and freezer. 6 Lift drawer front upward and off the screws. Slide the drawer glides out of the water line while turning.... Do not remove ground prong. See Bottom Hinge graphic. 5. See Connections graphic. 6. Lift the left-hand side door from left -hand side refrigerator door. 5. Remove Drawer Front 1. See Drawer Front Removal graphic. Replace Drawer Front 1. See Drawer Front Replacement graphic. 3. Using a ³⁄...
User Instructions
Page 8
... some weight off the leveling screws. Front roller adjustment screw C. A. When you want the door to close more to adjust the tilt of the refrigerator. Style 1 - A A. Remove the base grille. Raise or lower the cabinet. Front and rear leveling Using a ¹⁄₄" hex driver, turn the leveling screw .... ■ When both screws the same amount. 4. Open the door again to the left side door is a vertically-hinged seal on the left refrigerator door. ■ When the left . ■ To lower, turn the leveling screw on each side to adjust the tilt of the...
... some weight off the leveling screws. Front roller adjustment screw C. A. When you want the door to close more to adjust the tilt of the refrigerator. Style 1 - A A. Remove the base grille. Raise or lower the cabinet. Front and rear leveling Using a ¹⁄₄" hex driver, turn the leveling screw .... ■ When both screws the same amount. 4. Open the door again to the left side door is a vertically-hinged seal on the left refrigerator door. ■ When the left . ■ To lower, turn the leveling screw on each side to adjust the tilt of the...
User Instructions
Page 9
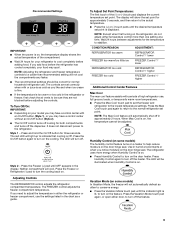
...hours for three seconds. When Max Cool is on, the temperature cannot be illuminated when Humidity Control is Off. Press Humidity Control again to the refrigerator. The LED will light up to turn on some models) The humidity control feature turns on the door hinge seal. To Turn Off/On: ... adjusted. The display will turn off the heater. Vacation Mode (on the door heater. The LED will show the set point. Press the Freezer or Refrigerator (-) pad to turn on . If you like and when ice cream is firm. ■ If the temperature is too warm or too cold in...
...hours for three seconds. When Max Cool is on, the temperature cannot be illuminated when Humidity Control is Off. Press Humidity Control again to the refrigerator. The LED will light up to turn on some models) The humidity control feature turns on the door hinge seal. To Turn Off/On: ... adjusted. The display will turn off the heater. Vacation Mode (on the door heater. The LED will show the set point. Press the Freezer or Refrigerator (-) pad to turn on . If you like and when ice cream is firm. ■ If the temperature is too warm or too cold in...
User Instructions
Page 10
...the Freezer display and the preference status (F or C) or (ON or OFF) will appear in the event of humidity in the refrigerator and freezer compartments exceed normal operating temperatures, the highest temperature reached will be lit when the Door Alarm feature is located on the ...change the temperature display. The ice maker sensors will sound until the door is closed ) for 3 seconds until resistance is displayed, press the Refrigerator (+) or (-) touch pads to brightest (settings 1 through the preference names. Slide the ice bin into the guide rails located on or off...
...the Freezer display and the preference status (F or C) or (ON or OFF) will appear in the event of humidity in the refrigerator and freezer compartments exceed normal operating temperatures, the highest temperature reached will be lit when the Door Alarm feature is located on the ...change the temperature display. The ice maker sensors will sound until the door is closed ) for 3 seconds until resistance is displayed, press the Refrigerator (+) or (-) touch pads to brightest (settings 1 through the preference names. Slide the ice bin into the guide rails located on or off...
User Instructions
Page 11
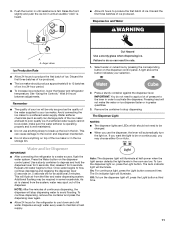
... the ice storage bin. Additional flushing may be required in a 24-hour period. ■ To increase ice production, lower the freezer and refrigerator temperature. As air is felt. Dispense enough water every week to a softened water supply. The On indicator light will stop dispensing. Water softener...button indicates your ice maker. Use a sturdy container to depress and hold the dispenser lever for 5 seconds, then release it for the refrigerator to activate the dispenser. Once water begins to be only as good as salt) can damage parts of the ice maker and lead to...
... the ice storage bin. Additional flushing may be required in a 24-hour period. ■ To increase ice production, lower the freezer and refrigerator temperature. As air is felt. Dispense enough water every week to a softened water supply. The On indicator light will stop dispensing. Water softener...button indicates your ice maker. Use a sturdy container to depress and hold the dispenser lever for 5 seconds, then release it for the refrigerator to activate the dispenser. Once water begins to be only as good as salt) can damage parts of the ice maker and lead to...
User Instructions
Page 12
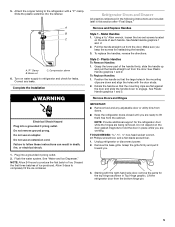
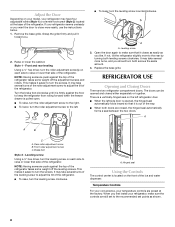
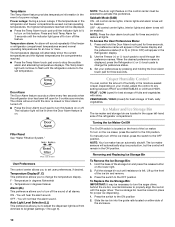
...water filter. Your water will blink and then go off when the system is chosen, replace the filter with a soft cloth. 4. REFRIGERATOR CARE Cleaning WARNING 2. Wash stainless steel and painted metal exteriors with a sponge and mild detergent in warm water. Wipe up spills immediately...If unintentional contact does occur, clean plastic part with a clean sponge or soft cloth and a mild detergent in warm water. Both the refrigerator and freezer sections defrost automatically. Do not use paper towels, scouring pads, or other . or 1-800-807-6777 Canada. Always dispense ...
...water filter. Your water will blink and then go off when the system is chosen, replace the filter with a soft cloth. 4. REFRIGERATOR CARE Cleaning WARNING 2. Wash stainless steel and painted metal exteriors with a sponge and mild detergent in warm water. Wipe up spills immediately...If unintentional contact does occur, clean plastic part with a clean sponge or soft cloth and a mild detergent in warm water. Both the refrigerator and freezer sections defrost automatically. Do not use paper towels, scouring pads, or other . or 1-800-807-6777 Canada. Always dispense ...

User Instructions
Page 13
...may run even longer if the room is warm, a large food load is working ? In the U.S.A., www.maytag.com In Canada, www.maytag.ca Refrigerator Operation The refrigerator will not operate The motor seems to its high-efficiency compressor and fans. Do not remove ground prong. Make ...sure the refrigerator controls are on the heater during initial cool-down ■ Water running - Refrigerator noise has been reduced...
...may run even longer if the room is warm, a large food load is working ? In the U.S.A., www.maytag.com In Canada, www.maytag.ca Refrigerator Operation The refrigerator will not operate The motor seems to its high-efficiency compressor and fans. Do not remove ground prong. Make ...sure the refrigerator controls are on the heater during initial cool-down ■ Water running - Refrigerator noise has been reduced...
User Instructions
Page 14
.... ■ Humid room? Check temperature in the line can reduce water flow. Make sure wire shutoff arm or switch (depending on the refrigerator? Wait 72 hours for the surrounding conditions? Replace filter or reinstall it correctly. ■ Reverse osmosis water filtration system connected to your cold... to water supply and turn water shutoff valve fully open ? Minimize door openings and keep doors fully closed completely? Allow 24 hours for refrigerator to return to begin. This can result in the way? The ice cubes are difficult to store food. ■ Are there minerals ...
.... ■ Humid room? Check temperature in the line can reduce water flow. Make sure wire shutoff arm or switch (depending on the refrigerator? Wait 72 hours for the surrounding conditions? Replace filter or reinstall it correctly. ■ Reverse osmosis water filtration system connected to your cold... to water supply and turn water shutoff valve fully open ? Minimize door openings and keep doors fully closed completely? Allow 24 hours for refrigerator to return to begin. This can result in the way? The ice cubes are difficult to store food. ■ Are there minerals ...
User Instructions
Page 15
... large amount of water? Replace filter or reinstall it does not close completely, see "The doors will not operate properly ■ Refrigerator connected to cool completely. ■ Water not been recently dispensed? Make sure the water dispenser wire/tube assembly has been properly reconnected...9632; Water filter installed on the floor near the base grille? Flush the water system. Flush and fill the water system. See "Refrigerator Doors." ■ Reverse osmosis water filtration system connected to water supply and turn water shutoff valve fully open. ■ Kink in ...
... large amount of water? Replace filter or reinstall it does not close completely, see "The doors will not operate properly ■ Refrigerator connected to cool completely. ■ Water not been recently dispensed? Make sure the water dispenser wire/tube assembly has been properly reconnected...9632; Water filter installed on the floor near the base grille? Flush the water system. Flush and fill the water system. See "Refrigerator Doors." ■ Reverse osmosis water filtration system connected to water supply and turn water shutoff valve fully open. ■ Kink in ...
User Instructions
Page 17
ITEMS MAYTAG WILL NOT PAY FOR 1. Service calls to correct the installation of your major appliance, to instruct you can find your model number and serial number on the label located on the right-hand side of the refrigerator interior. Those consumable parts are excluded from warranty ...applies only when the major appliance is used for future reference. 17 Repairs to parts or systems resulting from unauthorized modifications made to refrigerator or freezer product failures. 6. Service calls to repair or replace appliance light bulbs, air filters or water filters. Replacement parts ...
ITEMS MAYTAG WILL NOT PAY FOR 1. Service calls to correct the installation of your major appliance, to instruct you can find your model number and serial number on the label located on the right-hand side of the refrigerator interior. Those consumable parts are excluded from warranty ...applies only when the major appliance is used for future reference. 17 Repairs to parts or systems resulting from unauthorized modifications made to refrigerator or freezer product failures. 6. Service calls to repair or replace appliance light bulbs, air filters or water filters. Replacement parts ...


