
User manual, English (US)
Page 5
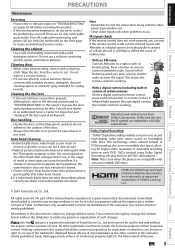
...Note • Remember to read the instructions along with actual recordable DVD discs. This means the remote control is strictly prohibited. The technology, when utilized instead of HDMI Licensing LLC. DVDs created using Dolby Digital Recording will be used herein remain the exclusive property of Dolby ...need to be construed as granting, by yourself. Cleaning the cabinet • Use a soft cloth slightly moistened with stereo sound on recordable DVD discs. Dirt accumulated on the video heads after a long period of use, or the usage of cellular phone). If a video...
...Note • Remember to read the instructions along with actual recordable DVD discs. This means the remote control is strictly prohibited. The technology, when utilized instead of HDMI Licensing LLC. DVDs created using Dolby Digital Recording will be used herein remain the exclusive property of Dolby ...need to be construed as granting, by yourself. Cleaning the cabinet • Use a soft cloth slightly moistened with stereo sound on recordable DVD discs. Dirt accumulated on the video heads after a long period of use, or the usage of cellular phone). If a video...
User manual, English (US)
Page 6
...TO A TV 16 CONNECTION TO A TV WITH AN HDMI™ COMPATIBLE PORT 17 CONNECTION TO AN AUDIO SYSTEM 18 Basic Setup THE DVD / VCR RECORDER SWITCHING 19 GUIDE TO ON-SCREEN DISPLAYS AND MENUS . . . . 20 On-Screen Display / Menu 20 Main Menu 21 INITIAL ...SETTING 22 SETTING THE CLOCK 23 Clock Setting 23 Recording INFORMATION ON DVD RECORDING 24 BEFORE RECORDING 25 Make Recording Compatible 25 Setting for Auto Chapter 25 BASIC RECORDING & ONE-TOUCH TIMER RECORDING 26 TIMER RECORDING 28 Hints for Timer Recording 31 SATELLITE LINK 32 OVERWRITING UNNECESSARY TITLE 34 Overwriting ...
...TO A TV 16 CONNECTION TO A TV WITH AN HDMI™ COMPATIBLE PORT 17 CONNECTION TO AN AUDIO SYSTEM 18 Basic Setup THE DVD / VCR RECORDER SWITCHING 19 GUIDE TO ON-SCREEN DISPLAYS AND MENUS . . . . 20 On-Screen Display / Menu 20 Main Menu 21 INITIAL ...SETTING 22 SETTING THE CLOCK 23 Clock Setting 23 Recording INFORMATION ON DVD RECORDING 24 BEFORE RECORDING 25 Make Recording Compatible 25 Setting for Auto Chapter 25 BASIC RECORDING & ONE-TOUCH TIMER RECORDING 26 TIMER RECORDING 28 Hints for Timer Recording 31 SATELLITE LINK 32 OVERWRITING UNNECESSARY TITLE 34 Overwriting ...
User manual, English (US)
Page 7
... titles. Putting name on disc: You can be possible only if the DVD disc or a cassette tape is pressed during recording, the recording time will automatically be increased by 30 minutes up to record. Recording DVD mode VCR mode This unit is con- Virtual surround system: You can enjoy MP3 files which is , we put your...
... titles. Putting name on disc: You can be possible only if the DVD disc or a cassette tape is pressed during recording, the recording time will automatically be increased by 30 minutes up to record. Recording DVD mode VCR mode This unit is con- Virtual surround system: You can enjoy MP3 files which is , we put your...
User manual, English (US)
Page 8
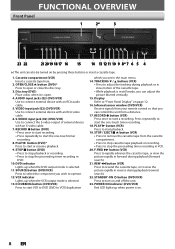
... button (DVD) • Press to stop playback or recording. • Press to stop the proceeding timer recording in VCR. 20. RECORD Ibutton (DVD) • Press once to start recording. • Press repeatedly to start the one -touch timer recording. 18. DVD indicator Lights up when the DVD output mode... compartment. • Press to stop cassette tape playback or recording. • Press to stop the proceeding timer recording in DVD. 10. Cassette compartment (VCR) Insert a cassette tape here. 2. S-VIDEO input jack (E2) (DVD/VCR) Use to connect the S-video output of the cassette...
... button (DVD) • Press to stop playback or recording. • Press to stop the proceeding timer recording in VCR. 20. RECORD Ibutton (DVD) • Press once to start recording. • Press repeatedly to start the one -touch timer recording. 18. DVD indicator Lights up when the DVD output mode... compartment. • Press to stop cassette tape playback or recording. • Press to stop the proceeding timer recording in DVD. 10. Cassette compartment (VCR) Insert a cassette tape here. 2. S-VIDEO input jack (E2) (DVD/VCR) Use to connect the S-video output of the cassette...
User manual, English (US)
Page 9
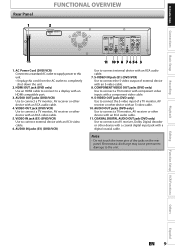
...Setup Rear Panel 1 FUNCTIONAL OVERVIEW 2 HDMI OUT DIGITAL AUDIO OUT DVD DVD/VCR AUDIO S-VIDEO COMPONENT S-VIDEO IN ---AUDIO---OUT OUT VIDEO OUT Y L L COAXIAL L OUT R PB /CB IN PR /CR R R IN ---VIDEO---OUT 1. Recording Playback Editing Function Setup VCR Functions Others Español EN 9... AC Power Cord (DVD/VCR) Connect to a standard AC outlet to supply power to this unit. • Unplug this cord from the...
...Setup Rear Panel 1 FUNCTIONAL OVERVIEW 2 HDMI OUT DIGITAL AUDIO OUT DVD DVD/VCR AUDIO S-VIDEO COMPONENT S-VIDEO IN ---AUDIO---OUT OUT VIDEO OUT Y L L COAXIAL L OUT R PB /CB IN PR /CR R R IN ---VIDEO---OUT 1. Recording Playback Editing Function Setup VCR Functions Others Español EN 9... AC Power Cord (DVD/VCR) Connect to a standard AC outlet to supply power to this unit. • Unplug this cord from the...
User manual, English (US)
Page 11
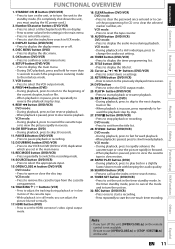
...• When playback is paused, press to stop playback or recording. PAUSE F button (DVD/VCR) • Press to switch the recording mode. 14. REC MODE button (DVD/VCR) • Press repeatedly to pause playback or recording. 12. HDMI button (DVD) • Press to start playback or resume playback. 26...mode. (To completely shut down the unit, you can adjust the picture blurred vertically. 17. Introduction Connections Basic Setup Recording Playback FUNCTIONAL OVERVIEW 1. STANDBY-ON y button (DVD/VCR) • Press to turn on the unit, or to turn the unit to turn off . 4. VCR ...
...• When playback is paused, press to stop playback or recording. PAUSE F button (DVD/VCR) • Press to switch the recording mode. 14. REC MODE button (DVD/VCR) • Press repeatedly to pause playback or recording. 12. HDMI button (DVD) • Press to start playback or resume playback. 26...mode. (To completely shut down the unit, you can adjust the picture blurred vertically. 17. Introduction Connections Basic Setup Recording Playback FUNCTIONAL OVERVIEW 1. STANDBY-ON y button (DVD/VCR) • Press to turn on the unit, or to turn the unit to turn off . 4. VCR ...
User manual, English (US)
Page 12
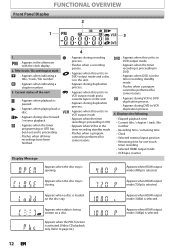
...the timer programming or OTR has been set and is proceeding. : Flashes when all timer recordings have been finished. : Appears during recording process. : Flashes when a recording pauses. : Appears when this unit is in DVD output mode and a disc is in the unit. : Appears during duplication process. : ...Appears when this unit is in VCR. : Appears when VCR is selected. VCR : Appears when this unit is in DVD output mode. : Appears when the timer recording is proceeding in the afternoon with the clock display. 2. Displays the following • Elapsed playback time • Current title ...
...the timer programming or OTR has been set and is proceeding. : Flashes when all timer recordings have been finished. : Appears during recording process. : Flashes when a recording pauses. : Appears when this unit is in DVD output mode and a disc is in the unit. : Appears during duplication process. : ...Appears when this unit is in VCR. : Appears when VCR is selected. VCR : Appears when this unit is in DVD output mode. : Appears when the timer recording is proceeding in the afternoon with the clock display. 2. Displays the following • Elapsed playback time • Current title ...
User manual, English (US)
Page 13
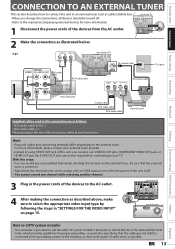
... S-VIDEO IN ---AUDIO---OUT L RCA audio cable RCA video cable HDMI OUT IN R IN ---VIDEO---OUT DIGITAL AUDIO OUT DVD AUDIO S-VIDEO COMPONENT S-VIDEO OUT VIDEO OUT Y DVD/VCR IN ---AUDIO---OUT L L PB /CB IN PR /CR R R IN ---VIDEO---OUT rear of cable entry as ... RCA video cable x 1 Please purchase the rest of the National Electrical Code, which provides guidelines for proper grounding - Introduction Connections Basic Setup Recording Playback CONNECTION TO AN EXTERNAL TUNER This section describes how to connect this unit, you can also use S-VIDEO OUT jack, COMPONENT VIDEO OUT ...
... S-VIDEO IN ---AUDIO---OUT L RCA audio cable RCA video cable HDMI OUT IN R IN ---VIDEO---OUT DIGITAL AUDIO OUT DVD AUDIO S-VIDEO COMPONENT S-VIDEO OUT VIDEO OUT Y DVD/VCR IN ---AUDIO---OUT L L PB /CB IN PR /CR R R IN ---VIDEO---OUT rear of cable entry as ... RCA video cable x 1 Please purchase the rest of the National Electrical Code, which provides guidelines for proper grounding - Introduction Connections Basic Setup Recording Playback CONNECTION TO AN EXTERNAL TUNER This section describes how to connect this unit, you can also use S-VIDEO OUT jack, COMPONENT VIDEO OUT ...
User manual, English (US)
Page 16
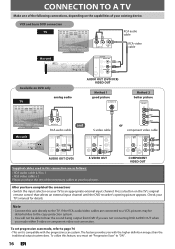
...to a VCR, pictures may be distorted due to the copy protection system. • You will not be able to hear the sound being output from DVD if you are as follows: • RCA audio cable (L/R) x 1 • RCA video cable x 1 Please purchase the rest of the necessary ...selector on the TV's original remote control that selects an external input channel until the DVD recorder's opening picture appears. CONNECTION TO A TV Make one of the following connections, depending on DVD only analog audio TV AUDIO OUT (DVD/VCR) VIDEO OUT Method 1 good picture S-VIDEO IN Method 2 better picture COMPONENT...
...to a VCR, pictures may be distorted due to the copy protection system. • You will not be able to hear the sound being output from DVD if you are as follows: • RCA audio cable (L/R) x 1 • RCA video cable x 1 Please purchase the rest of the necessary ...selector on the TV's original remote control that selects an external input channel until the DVD recorder's opening picture appears. CONNECTION TO A TV Make one of the following connections, depending on DVD only analog audio TV AUDIO OUT (DVD/VCR) VIDEO OUT Method 1 good picture S-VIDEO IN Method 2 better picture COMPONENT...
User manual, English (US)
Page 17
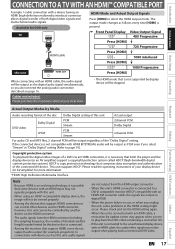
... are output in digital RGB. • When the power failure occurs, or when you try to play back the digital video images of a DVD via the HDMI connector. • The audio signals from the HDMI output connector. • When this unit cannot be controlled by another device ... is connected. • Among the monitors that both digital video signals and multi-channel audio signals. Recording Playback Editing Function Setup VCR Functions Actual Output Modes by Media Audio recording format of the disc Dolby Digital setting of this unit HDMI cable HDMI OUT HDMI Mode and Actual ...
... are output in digital RGB. • When the power failure occurs, or when you try to play back the digital video images of a DVD via the HDMI connector. • The audio signals from the HDMI output connector. • When this unit cannot be controlled by another device ... is connected. • Among the monitors that both digital video signals and multi-channel audio signals. Recording Playback Editing Function Setup VCR Functions Actual Output Modes by Media Audio recording format of the disc Dolby Digital setting of this unit HDMI cable HDMI OUT HDMI Mode and Actual ...
User manual, English (US)
Page 18
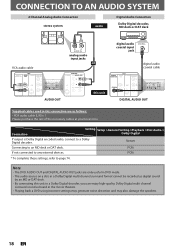
... COAXIAL L OUT R PB /CB IN PR /CR R R IN ---VIDEO---OUT DIGITAL AUDIO OUT Supplied cables used in the movie theaters. • Playing back a DVD using incorrect settings may generate noise distortion and may also damage the speakers. 18 EN Stream Connecting to a Dolby Digital decoder. Note • The... DVD AUDIO OUT and DIGITAL AUDIO OUT jacks are only useful in DVD mode. • The audio source on a disc in a Dolby Digital multi channel surround format cannot be recorded as digital sound by an MD or DAT deck. • ...
... COAXIAL L OUT R PB /CB IN PR /CR R R IN ---VIDEO---OUT DIGITAL AUDIO OUT Supplied cables used in the movie theaters. • Playing back a DVD using incorrect settings may generate noise distortion and may also damage the speakers. 18 EN Stream Connecting to a Dolby Digital decoder. Note • The... DVD AUDIO OUT and DIGITAL AUDIO OUT jacks are only useful in DVD mode. • The audio source on a disc in a Dolby Digital multi channel surround format cannot be recorded as digital sound by an MD or DAT deck. • ...
User manual, English (US)
Page 19
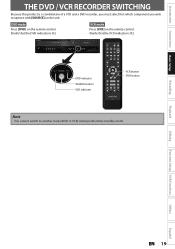
... Editing Function Setup VCR Functions Others Español EN 19 Introduction Connections Basic Setup THE DVD / VCR RECORDER SWITCHING Because this product is a combination of a VCR and a DVD recorder, you must select first which component you wish to operate with [SOURCE] on the remote control. (Verify that the VCR indicator is lit.) VCR...
... Editing Function Setup VCR Functions Others Español EN 19 Introduction Connections Basic Setup THE DVD / VCR RECORDER SWITCHING Because this product is a combination of a VCR and a DVD recorder, you must select first which component you wish to operate with [SOURCE] on the remote control. (Verify that the VCR indicator is lit.) VCR...
User manual, English (US)
Page 20
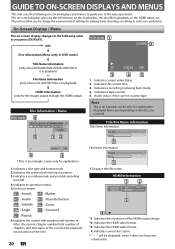
... HDMI Information 1 2 Video Info. : Audio Info. : 480p / YCbCr Bitstream 3 4 *1. Indicates a recording mode and possible recording time left. 4. Indicates current video status. 2. Indicates a recording or playing back mode. 4. Title/File Name Information Title Name Information Title Name My Title 1 File Name Information...it does not have any information. OFF VCR mode 1 12:00AM 2 Disc Information/Menu (only in DVD mode) Title Name Information (only when DVD+RW/DVD+R/DVD-RW/DVD-R is in playback) or File Name Information (only when a CD with MP3 files is an example...
... HDMI Information 1 2 Video Info. : Audio Info. : 480p / YCbCr Bitstream 3 4 *1. Indicates a recording mode and possible recording time left. 4. Indicates current video status. 2. Indicates a recording or playing back mode. 4. Title/File Name Information Title Name Information Title Name My Title 1 File Name Information...it does not have any information. OFF VCR mode 1 12:00AM 2 Disc Information/Menu (only in DVD mode) Title Name Information (only when DVD+RW/DVD+R/DVD-RW/DVD-R is in playback) or File Name Information (only when a CD with MP3 files is an example...
User manual, English (US)
Page 21
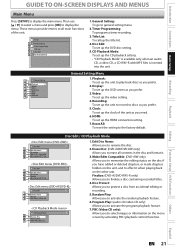
... to protect a disc from accidental editing or recording. 5. Setup 1 General Setting 2 Timer Programming 3 Title List 4 Disc Edit 5 CD Playback Mode 1. HDMI: To set up the unit to discs as you prefer. 5. Make Edits Compatible: (DVD+RW only) Allows you to memorize the editing ...Playback: To set up the video setting. 4. Finalize: (DVD+R/DVD-RW/-R only) Allows you prefer. 2. Title List: To call up the DVD disc setting. 5. Then use [K / L] to select a menu and press [OK] to finalize a disc containing recorded titles. 4. Disc Edit: To set up the OSD screen...
... to protect a disc from accidental editing or recording. 5. Setup 1 General Setting 2 Timer Programming 3 Title List 4 Disc Edit 5 CD Playback Mode 1. HDMI: To set up the unit to discs as you prefer. 5. Make Edits Compatible: (DVD+RW only) Allows you to memorize the editing ...Playback: To set up the video setting. 4. Finalize: (DVD+R/DVD-RW/-R only) Allows you prefer. 2. Title List: To call up the DVD disc setting. 5. Then use [K / L] to select a menu and press [OK] to finalize a disc containing recorded titles. 4. Disc Edit: To set up the OSD screen...
User manual, English (US)
Page 24
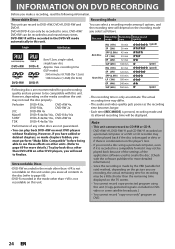
.... Recordable Discs Recording Mode This unit can only be recorded to create the disc. (Check with this unit. Logo Attributes DVD+RW DVD-RW DVD+R DVD-R 8cm/12cm, single-sided, single layer disc Approx. Verbatim JVC Maxell SONY TDK DVD+R 8x, DVD+RW 4x, DVD-R 8x, DVD-RW 2x DVD-RW 4x DVD+R 4x/8x/16x, DVD-R 8x/16x DVD+R 4x/8x/16x, DVD+RW 4x DVD...
.... Recordable Discs Recording Mode This unit can only be recorded to create the disc. (Check with this unit. Logo Attributes DVD+RW DVD-RW DVD+R DVD-R 8cm/12cm, single-sided, single layer disc Approx. Verbatim JVC Maxell SONY TDK DVD+R 8x, DVD+RW 4x, DVD-R 8x, DVD-RW 2x DVD-RW 4x DVD+R 4x/8x/16x, DVD-R 8x/16x DVD+R 4x/8x/16x, DVD+RW 4x DVD...
User manual, English (US)
Page 26
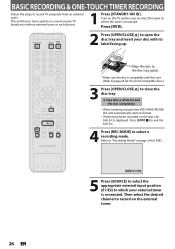
.... (Refer to which the unit is compatible with its label facing up. Then select the desired channel to record on the TV and be sure to select the input to page 24 for DVD. Press [DVD]. 2 Press [OPEN/CLOSE A] to the disc tray guide. * Make sure the disc is connected. Press [...while to load the disc completely. • When inserting a brand-new DVD+RW/DVD-RW, the unit automatically starts to format. • If titles have been recorded on page 24 for the list of compatible discs.) 3 Press [OPEN/CLOSE A] to "Recording Mode" on the disc, the title list is connected. Refer to close...
.... (Refer to which the unit is compatible with its label facing up. Then select the desired channel to record on the TV and be sure to select the input to page 24 for DVD. Press [DVD]. 2 Press [OPEN/CLOSE A] to the disc tray guide. * Make sure the disc is connected. Press [...while to load the disc completely. • When inserting a brand-new DVD+RW/DVD-RW, the unit automatically starts to format. • If titles have been recorded on page 24 for the list of compatible discs.) 3 Press [OPEN/CLOSE A] to "Recording Mode" on the disc, the title list is connected. Refer to close...
User manual, English (US)
Page 27
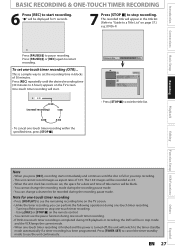
...] repeatedly until the disc is completed during VCR playback or recording, the DVD will be recorded during one -touch timer recording within the specified time, press [STOP C]. One-touch timer recording will be displayed for one-touch timer recording • Press [DISPLAY] to see the remaining recording time on the remote control. • You cannot use the...
...] repeatedly until the disc is completed during VCR playback or recording, the DVD will be recorded during one -touch timer recording within the specified time, press [STOP C]. One-touch timer recording will be displayed for one-touch timer recording • Press [DISPLAY] to see the remaining recording time on the remote control. • You cannot use the...

User manual, English (US)
Page 28
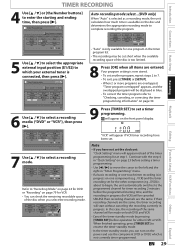
...p p SUN p JAN/31 When pressing [L] at the same time. • Set the clock before setting a timer programming. • Insert a recordable disc with enough recordable space or a cassette tape with a erase-protection tab. Timer Programming Date TUE JAN/01 11:00AM Start End New Program E1/E2 1/1 3 Use [K... / L] to select "New Program", then press [OK]. REC To DVD E1/E2 End - - : - TIMER RECORDING You can program the unit to record up to 12 programs within one channel and record another at the current date, the date will change the external tuner's channel while...
...p p SUN p JAN/31 When pressing [L] at the same time. • Set the clock before setting a timer programming. • Insert a recordable disc with enough recordable space or a cassette tape with a erase-protection tab. Timer Programming Date TUE JAN/01 11:00AM Start End New Program E1/E2 1/1 3 Use [K... / L] to select "New Program", then press [OK]. REC To DVD E1/E2 End - - : - TIMER RECORDING You can program the unit to record up to 12 programs within one channel and record another at the current date, the date will change the external tuner's channel while...
User manual, English (US)
Page 29
...[s / B] to move the cursor to the left and the right in "Timer Programming" menu. • If a basic recording or one-touch timer recording is in progress on both DVD and VCR. • Cancel the timer-standby mode by pressing [TIMER SET] before the programmed starting and ending time, then ... exit, press [TIMER] or [SETUP]. • When 2 or more programs are the same, the timer recording will start without canceling the recording currently in progress. BS CS DR CD HDD DVD "VCR" will appear instead of the disc is available on the front panel display. Timer Programming Date Date JAN...
...[s / B] to move the cursor to the left and the right in "Timer Programming" menu. • If a basic recording or one-touch timer recording is in progress on both DVD and VCR. • Cancel the timer-standby mode by pressing [TIMER SET] before the programmed starting and ending time, then ... exit, press [TIMER] or [SETUP]. • When 2 or more programs are the same, the timer recording will start without canceling the recording currently in progress. BS CS DR CD HDD DVD "VCR" will appear instead of the disc is available on the front panel display. Timer Programming Date Date JAN...
User manual, English (US)
Page 87
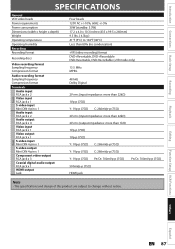
...Power consumption Dimensions (width x height x depth) Weight Operating temperature Operating humidity Recording Recording format Recording discs Video recording format Sampling frequency Compression format Audio recording format Sampling frequency Compression format Terminals Audio input RCA jack x 2 Video input...( 4.3kg ) 41°F (5°C) to 104°F (40°C) Less than 80% (no condensation) +VR (video recording) format DVD+Rewritable, DVD+Recordable DVD-Rewritable, DVD-Recordable (+VR mode only) 13.5 MHz MPEG 48 kHz Dolby Digital 2V rms (input impedance: more than 22kΩ) 1Vp-p (75...
...Power consumption Dimensions (width x height x depth) Weight Operating temperature Operating humidity Recording Recording format Recording discs Video recording format Sampling frequency Compression format Audio recording format Sampling frequency Compression format Terminals Audio input RCA jack x 2 Video input...( 4.3kg ) 41°F (5°C) to 104°F (40°C) Less than 80% (no condensation) +VR (video recording) format DVD+Rewritable, DVD+Recordable DVD-Rewritable, DVD-Recordable (+VR mode only) 13.5 MHz MPEG 48 kHz Dolby Digital 2V rms (input impedance: more than 22kΩ) 1Vp-p (75...


