Owners Manual
Page 5
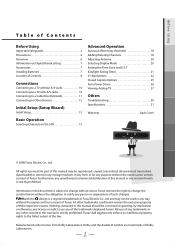
... their respective owners. Nothing contained in this document is strictly prohibited. Funai shall aggressively enforce its intellectual property rights to Other Devices 12 Initial Setup (Setup Wizard) Initial Setup 13 Basic Operation Selecting Channels on Digital Broadcasting 7 Accessories 7 Installing Batteries 7 Location of Controls 8 Connections Connecting to a TV without A/V Jacks 10 Connecting to a TV...
... their respective owners. Nothing contained in this document is strictly prohibited. Funai shall aggressively enforce its intellectual property rights to Other Devices 12 Initial Setup (Setup Wizard) Initial Setup 13 Basic Operation Selecting Channels on Digital Broadcasting 7 Accessories 7 Installing Batteries 7 Location of Controls 8 Connections Connecting to a TV without A/V Jacks 10 Connecting to a TV...
Owners Manual
Page 13
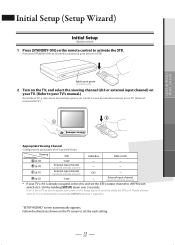
...canal que quiera ver (canal 3 o uno de entrada externo) en su TV. (Véase el manual del TV.) 1 2 3 2 6 1 5 9 4 8 7 0 CH. Initial Setup (Setup Wizard) lights up in green se vuelve verde 2 Turn on the TV, and select the viewing channel (ch3 or external input channel) on your TV... input channel Canal de entrada externo • If your TV. (Refer to set the STB's output channel to activate the STB. Initial Setup (Setup Wizard) Initial Setup Ajùste inicial 1 Press [STANDBY-ON] on the remote control to ch4. CH. C (p.11) External input channel Canal de entrada...
...canal que quiera ver (canal 3 o uno de entrada externo) en su TV. (Véase el manual del TV.) 1 2 3 2 6 1 5 9 4 8 7 0 CH. Initial Setup (Setup Wizard) lights up in green se vuelve verde 2 Turn on the TV, and select the viewing channel (ch3 or external input channel) on your TV... input channel Canal de entrada externo • If your TV. (Refer to set the STB's output channel to activate the STB. Initial Setup (Setup Wizard) Initial Setup Ajùste inicial 1 Press [STANDBY-ON] on the remote control to ch4. CH. C (p.11) External input channel Canal de entrada...
Owners Manual
Page 14
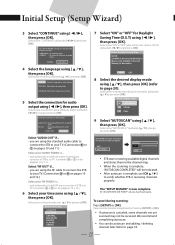
... is receiving channels properly. ahora ha finalizado. Refer to your TV. (Connection A or D on pages 10 and 12.) Seleccione "RF FUERA" si... - Initial Setup (Setup Wizard) 3 Select "CONTINUE" using [ K / L], then press [OK]. está utilizando el cable RF para conectar el STB a su TV. (conexi&#...autoscan and adding / deleting channel later. Seleccione la conexión para salida de audio mediante [s / B] y luego presione [OK]. The "SETUP WIZARD" is now scanning. NOTE: 2:00AM of the second Sunday in March until 2:00AM of the first Sunday in the channel map. •...
... is receiving channels properly. ahora ha finalizado. Refer to your TV. (Connection A or D on pages 10 and 12.) Seleccione "RF FUERA" si... - Initial Setup (Setup Wizard) 3 Select "CONTINUE" using [ K / L], then press [OK]. está utilizando el cable RF para conectar el STB a su TV. (conexi&#...autoscan and adding / deleting channel later. Seleccione la conexión para salida de audio mediante [s / B] y luego presione [OK]. The "SETUP WIZARD" is now scanning. NOTE: 2:00AM of the second Sunday in March until 2:00AM of the first Sunday in the channel map. •...
Owners Manual
Page 18
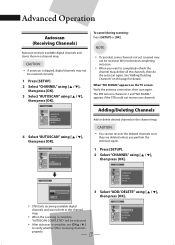
... scanned may take a while to completely refresh the channel map, delete all channels. AUTOSCAN EXIT CHANNEL TIME DETAIL INITIAL AUTOSCAN will be received correctly. 1 Press [SETUP]. 2 Select "CHANNEL" using [ K / L], then press [OK]. 3 Select "AUTOSCAN" using [ K / L], then press [OK]. See "Adding/...Deleting Channels" on the TV screen: Verify the antenna connection, then scan again. CAUTION: • If autoscan is now scanning. 1 Press [SETUP]. 2 Select "CHANNEL" using [ K / L], then press [OK]. When "NO SIGNAL" appears on this page for details. CAUTION: • ...
... scanned may take a while to completely refresh the channel map, delete all channels. AUTOSCAN EXIT CHANNEL TIME DETAIL INITIAL AUTOSCAN will be received correctly. 1 Press [SETUP]. 2 Select "CHANNEL" using [ K / L], then press [OK]. 3 Select "AUTOSCAN" using [ K / L], then press [OK]. See "Adding/...Deleting Channels" on the TV screen: Verify the antenna connection, then scan again. CAUTION: • If autoscan is now scanning. 1 Press [SETUP]. 2 Select "CHANNEL" using [ K / L], then press [OK]. When "NO SIGNAL" appears on this page for details. CAUTION: • ...
Owners Manual
Page 19
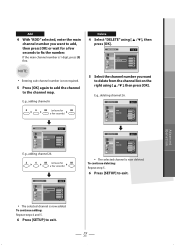
... [OK] again to add the channel to the channel map. To continue deleting: Repeat step 5. 6 Press [SETUP] to exit. NOTE: • Entering sub-channel number is now deleted. To continue adding: Repeat steps 4 and 5. 6 Press [SETUP] to exit. Advanced Operation 19 EN Delete 4 Select "DELETE" using [ K / L], then press [OK]. ADD/DELETE 10...
... [OK] again to add the channel to the channel map. To continue deleting: Repeat step 5. 6 Press [SETUP] to exit. NOTE: • Entering sub-channel number is now deleted. To continue adding: Repeat steps 4 and 5. 6 Press [SETUP] to exit. Advanced Operation 19 EN Delete 4 Select "DELETE" using [ K / L], then press [OK]. ADD/DELETE 10...
Owners Manual
Page 20
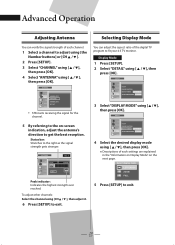
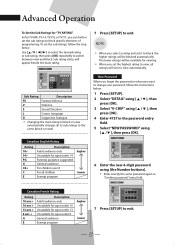
... [ K / L], then press [OK]. * Descriptions of each channel. 1 Select a channel to adjust using [the Number buttons] or [CH K / L ]. 2 Press [SETUP]. 3 Select "CHANNEL" using [ K / L], then press [OK]. 4 Select "ANTENNA" using [ K / L], then press [OK]. To adjust other channels: Select the channel... using [ K / L], then press [OK]. Display Mode 1 Press [SETUP]. 2 Select "DETAIL" using [ K / L], then press [OK]. ANTENNA EXIT CHANNEL TIME DETAIL INITIAL WEAK NOW 10 BACK 10.1 STRONG 50 PEAK Peak indicator...
... [ K / L], then press [OK]. * Descriptions of each channel. 1 Select a channel to adjust using [the Number buttons] or [CH K / L ]. 2 Press [SETUP]. 3 Select "CHANNEL" using [ K / L], then press [OK]. 4 Select "ANTENNA" using [ K / L], then press [OK]. To adjust other channels: Select the channel... using [ K / L], then press [OK]. Display Mode 1 Press [SETUP]. 2 Select "DETAIL" using [ K / L], then press [OK]. ANTENNA EXIT CHANNEL TIME DETAIL INITIAL WEAK NOW 10 BACK 10.1 STRONG 50 PEAK Peak indicator...
Owners Manual
Page 21
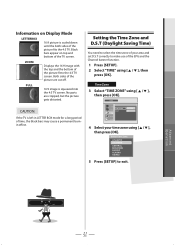
Information on top and bottom of the EPG and the Channel banner function. 1 Press [SETUP]. 2 Select "TIME" using [ K / L ], then press [OK]. FULL 16:9 image is scaled down until the both sides of the picture are cropped, but the picture gets ... effect. Setting the Time Zone and D.S.T (Daylight Saving Time) You need to exit. Advanced Operation 21 EN ATLANTIC EASTERN CENTRAL MOUNTAIN PACIFIC ALASKA HAWAII 5 Press [SETUP] to select the time zone of your time zone using [ K / L ], then press [OK]. Black bars appear on Display Mode LETTERBOX 16:9 picture is squeezed into...
Information on top and bottom of the EPG and the Channel banner function. 1 Press [SETUP]. 2 Select "TIME" using [ K / L ], then press [OK]. FULL 16:9 image is scaled down until the both sides of the picture are cropped, but the picture gets ... effect. Setting the Time Zone and D.S.T (Daylight Saving Time) You need to exit. Advanced Operation 21 EN ATLANTIC EASTERN CENTRAL MOUNTAIN PACIFIC ALASKA HAWAII 5 Press [SETUP] to select the time zone of your time zone using [ K / L ], then press [OK]. Black bars appear on Display Mode LETTERBOX 16:9 picture is squeezed into...
Owners Manual
Page 22
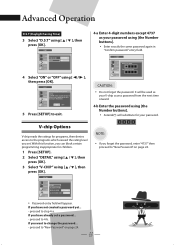
... password yet... - proceed to exit. D.S.T EXIT CHANNEL TIME Select Daylight Saving Time. V-chip Options V-chip reads the ratings for children. 1 Press [SETUP]. 2 Select "DETAIL" using [ K / L ], then press [OK]. 3 Select "V-CHIP" using [the Number buttons]. • Enter exactly ...It will appear. V-CHIP EXIT CHANNEL TIME DETAIL INITIAL Enter password. proceed to "New Password" on page 24. DETAIL INITIAL ON OFF 5 Press [SETUP] to 4-b. EXIT CHANNEL TIME TIME ZONE D.S.T DETAIL INITIAL EASTERN ON 4 Select "ON" or "OFF" using [ K / L ], then ...
... password yet... - proceed to exit. D.S.T EXIT CHANNEL TIME Select Daylight Saving Time. V-chip Options V-chip reads the ratings for children. 1 Press [SETUP]. 2 Select "DETAIL" using [ K / L ], then press [OK]. 3 Select "V-CHIP" using [the Number buttons]. • Enter exactly ...It will appear. V-CHIP EXIT CHANNEL TIME DETAIL INITIAL Enter password. proceed to "New Password" on page 24. DETAIL INITIAL ON OFF 5 Press [SETUP] to 4-b. EXIT CHANNEL TIME TIME ZONE D.S.T DETAIL INITIAL EASTERN ON 4 Select "ON" or "OFF" using [ K / L ], then ...
Owners Manual
Page 24
...using [ K / L ], then press [OK]. 4 Enter 4737 in "Confirm password." V-CHIP EXIT CHANNEL TIME DETAIL INITIAL Enter password. Confirm password. 7 Press [SETUP] to switch between view and block. Use [ K / L / s / B ] to select the desired rating or sub rating, then press [OK] repeatedly... specific elements of programming. Sub rating status will be available for ages under 8 General audience Exempt program higher lower 7 Press [SETUP] to change your password, follow the step below . 1 Press [SETUP]. 2 Select "DETAIL" using [ K / L ], then press [OK]. 3 Select "V-CHIP" using [ K / L...
...using [ K / L ], then press [OK]. 4 Enter 4737 in "Confirm password." V-CHIP EXIT CHANNEL TIME DETAIL INITIAL Enter password. Confirm password. 7 Press [SETUP] to switch between view and block. Use [ K / L / s / B ] to select the desired rating or sub rating, then press [OK] repeatedly... specific elements of programming. Sub rating status will be available for ages under 8 General audience Exempt program higher lower 7 Press [SETUP] to change your password, follow the step below . 1 Press [SETUP]. 2 Select "DETAIL" using [ K / L ], then press [OK]. 3 Select "V-CHIP" using [ K / L...
Owners Manual
Page 25
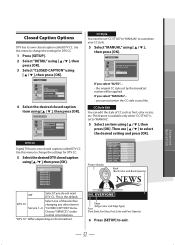
... "MANUAL"... - EEVVEERRYYOONNEE Edge (Edge Color and Edge Type) Font (Font Style, Font Size, Font Color and Font Opacity) 6 Press [SETUP] to select the desired setting and press [OK]. DETAIL EXIT CHANNEL TIME DETAIL V-CHIP CLOSED CAPTION DISPLAY MODE LETTERBOX AUTO POWER DOWN 4 HOURS.... OFF SERVICE1 SERVICE2 SERVICE3 SERVICE4 SERVICE5 SERVICE6 CC Style You need to set "CC STYLE" to "MANUAL" to change the settings for DTV CC. 1 Press [SETUP]. 2 Select "DETAIL" using [ K / L ], then press [OK]. 3 Select "CLOSED CAPTION" using [ K / L ], then press [OK]. Choose "SERVICE1" under ...
... "MANUAL"... - EEVVEERRYYOONNEE Edge (Edge Color and Edge Type) Font (Font Style, Font Size, Font Color and Font Opacity) 6 Press [SETUP] to select the desired setting and press [OK]. DETAIL EXIT CHANNEL TIME DETAIL V-CHIP CLOSED CAPTION DISPLAY MODE LETTERBOX AUTO POWER DOWN 4 HOURS.... OFF SERVICE1 SERVICE2 SERVICE3 SERVICE4 SERVICE5 SERVICE6 CC Style You need to set "CC STYLE" to "MANUAL" to change the settings for DTV CC. 1 Press [SETUP]. 2 Select "DETAIL" using [ K / L ], then press [OK]. 3 Select "CLOSED CAPTION" using [ K / L ], then press [OK]. Choose "SERVICE1" under ...
Owners Manual
Page 26
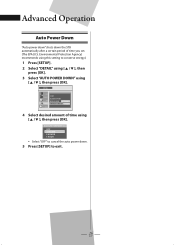
... time using this setting to exit . 26 EN Select AUTO POWER DOWN time. Advanced Operation Auto Power Down "Auto power down" shuts down . 5 Press [SETUP] to conserve energy.) 1 Press [SETUP]. 2 Select "DETAIL" using [ K / L ], then press [OK]. 3 Select "AUTO POWER DOWN" using [ K / L ], then press [OK]. Environmental Protection Agency) recommends using [ K / L ], then press [OK...
... time using this setting to exit . 26 EN Select AUTO POWER DOWN time. Advanced Operation Auto Power Down "Auto power down" shuts down . 5 Press [SETUP] to conserve energy.) 1 Press [SETUP]. 2 Select "DETAIL" using [ K / L ], then press [OK]. 3 Select "AUTO POWER DOWN" using [ K / L ], then press [OK]. Environmental Protection Agency) recommends using [ K / L ], then press [OK...

Owners Manual
Page 27
...ógica cambiando la configuración de "SALIDA RF". Usted podrá ver TV analógica en su canal de TV. ch3 3 2 6 1 5 9 4 8 7 0 CH. Holding [SETUP] down over 3 seconds does not switch the setting back to "RF THROUGH". To switch the setting back to "RF THROUGH", follow 27 the steps in...
...ógica cambiando la configuración de "SALIDA RF". Usted podrá ver TV analógica en su canal de TV. ch3 3 2 6 1 5 9 4 8 7 0 CH. Holding [SETUP] down over 3 seconds does not switch the setting back to "RF THROUGH". To switch the setting back to "RF THROUGH", follow 27 the steps in...
Owners Manual
Page 30
.... • You may be received. • The selected channel does not exist at step 5 in the "Initial Setup (Setup Wizard)". ( Page 14.) • Make sure to complete autoscan in "SETUP WIZARD" or in the correct direction (+ and -). ( Page 7.) • The batteries may not be depleted. When...the problem. No audio / picture Blocked noise on your TV's manual for further information. • Make sure the cables are installed in "SETUP" menu. Remedy • Make sure that time. Replace them with weak signal may be received properly. There are not always sub-channels being...
.... • You may be received. • The selected channel does not exist at step 5 in the "Initial Setup (Setup Wizard)". ( Page 14.) • Make sure to complete autoscan in "SETUP WIZARD" or in the correct direction (+ and -). ( Page 7.) • The batteries may not be depleted. When...the problem. No audio / picture Blocked noise on your TV's manual for further information. • Make sure the cables are installed in "SETUP" menu. Remedy • Make sure that time. Replace them with weak signal may be received properly. There are not always sub-channels being...


