
User manual, English (US)
Page 6
... Using Component Video Out jacks 17 Connecting to a TV with an HDMI Compatible Port. 17 Connecting to a Cable / Satellite Box 19 Connecting to a TV without Audio / Video jacks . . . . 20 Digital Audio Connection 21 Basic Setup BEFORE YOU START 22 Finding the Viewing Channel on your TV 22 Guide to On-Screen Display / Menu 23 Main Menu 25 Switching HDD / DVD Mode 27 How to Insert a Disc 27 INITIAL SETTING 28 CHANNEL SETTING 29 Auto Channel Scan 29 Adding / Deleting Channels 30 SETTING THE CLOCK 32 Auto Clock Setting 32 Manual Clock Setting...
... Using Component Video Out jacks 17 Connecting to a TV with an HDMI Compatible Port. 17 Connecting to a Cable / Satellite Box 19 Connecting to a TV without Audio / Video jacks . . . . 20 Digital Audio Connection 21 Basic Setup BEFORE YOU START 22 Finding the Viewing Channel on your TV 22 Guide to On-Screen Display / Menu 23 Main Menu 25 Switching HDD / DVD Mode 27 How to Insert a Disc 27 INITIAL SETTING 28 CHANNEL SETTING 29 Auto Channel Scan 29 Adding / Deleting Channels 30 SETTING THE CLOCK 32 Auto Clock Setting 32 Manual Clock Setting...

User manual, English (US)
Page 7
... of a Title 92 Protecting a Title 94 Hiding Chapters 95 Setting an Index Picture 96 Putting Name on Disc 97 Erasing Disc 98 Making Edits Compatible 99 Deleting All Titles in HDD 100 Function Setup LIST OF SETTINGS 101 SETUPS 104 Playback 104 Display 108 Video 111 HDMI 113 Others TROUBLESHOOTING 115 Error Message 119 LANGUAGE CODE 120 GLOSSARY 121 SPECIFICATIONS 122 Español ESPAÑOL 123 Discos Reproducibles...
... of a Title 92 Protecting a Title 94 Hiding Chapters 95 Setting an Index Picture 96 Putting Name on Disc 97 Erasing Disc 98 Making Edits Compatible 99 Deleting All Titles in HDD 100 Function Setup LIST OF SETTINGS 101 SETUPS 104 Playback 104 Display 108 Video 111 HDMI 113 Others TROUBLESHOOTING 115 Error Message 119 LANGUAGE CODE 120 GLOSSARY 121 SPECIFICATIONS 122 Español ESPAÑOL 123 Discos Reproducibles...
User manual, English (US)
Page 8
... can play back the already recorded part of the left and right channels automatically (the input from discs with Dolby Digital, you to watch : You can enjoy MP3/JPEG/KODAK Picture CD files which is specified in "Playback" menu in SLP mode to DVD+R/-R, dubbing speed will be adjusted so the titles will fit nicely in the remaining space of the disc space if you set a recording time as...
... can play back the already recorded part of the left and right channels automatically (the input from discs with Dolby Digital, you to watch : You can enjoy MP3/JPEG/KODAK Picture CD files which is specified in "Playback" menu in SLP mode to DVD+R/-R, dubbing speed will be adjusted so the titles will fit nicely in the remaining space of the disc space if you set a recording time as...

User manual, English (US)
Page 9
... order to play back on regular DVD players, including computer DVD drives compatible with an HDMI- Deleting a scene of a title: HDD You can set / clear chapter marks on titles. Setting an index pictures: You can divide a title into 2 or more. Compatibility DVD Available for playing back discs on a regular DVD player: Recorded discs can be played back on other units without permission, you can enjoy clearer audio/video output when connecting this unit...
... order to play back on regular DVD players, including computer DVD drives compatible with an HDMI- Deleting a scene of a title: HDD You can set / clear chapter marks on titles. Setting an index pictures: You can divide a title into 2 or more. Compatibility DVD Available for playing back discs on a regular DVD player: Recorded discs can be played back on other units without permission, you can enjoy clearer audio/video output when connecting this unit...

User manual, English (US)
Page 10
... these buttons. 1. AOPEN/CLOSE button* Press to select the DVD output mode. 7. CHANNEL / buttons Press to connect external device with an RCA audio cable. 13. IRECORD button Press once to connect the S-video output of external device with an S-video cable. 15. DVD button Press to open or close the disc tray. 4. Infrared sensor window Receive signals from your remote control so that you must unplug the AC power cord) 2. HDD button Press to start or resume playback. 9. S-VIDEO input jack (L2) Use to start one-touch timer recording...
... these buttons. 1. AOPEN/CLOSE button* Press to select the DVD output mode. 7. CHANNEL / buttons Press to connect external device with an RCA audio cable. 13. IRECORD button Press once to connect the S-video output of external device with an S-video cable. 15. DVD button Press to open or close the disc tray. 4. Infrared sensor window Receive signals from your remote control so that you must unplug the AC power cord) 2. HDD button Press to start or resume playback. 9. S-VIDEO input jack (L2) Use to start one-touch timer recording...

User manual, English (US)
Page 13
... audio menu during playback. 4. Introduction Connections Basic Setup Recording FUNCTIONAL OVERVIEW *) The unit can also be turned on or off. 7. MENU button • Press to the next chapter, track or file. • When playback is in advance. 30. SOURCE button • Press to select the appropriate input. 19.OPEN/CLOSE A button* • Press to select the DVD output mode. 25. TIMER PROG. DVD button • Press to open or close the disc tray. 20. FFW D button • During playback, press to fast forward...
... audio menu during playback. 4. Introduction Connections Basic Setup Recording FUNCTIONAL OVERVIEW *) The unit can also be turned on or off. 7. MENU button • Press to the next chapter, track or file. • When playback is in advance. 30. SOURCE button • Press to select the appropriate input. 19.OPEN/CLOSE A button* • Press to select the DVD output mode. 25. TIMER PROG. DVD button • Press to open or close the disc tray. 20. FFW D button • During playback, press to fast forward...

User manual, English (US)
Page 15
... audio/video cables are connected to the TV. Antenna Connection (Required) Connections Basic Setup Recording Playback Editing rear of the devices. • Connect this unit directly to a VCR, pictures may be output from the ANTENNA IN jack before moving the unit. • If you are as illustrated below. 3) After making all the connections, connect the AC power cords of this unit VIDEO VIDEO IN OUT Y IN L L OUT ANTENNA R IN R AUDIO IN (L1) S-VIDEO AUDIO OUT OUT S-VIDEO...
... audio/video cables are connected to the TV. Antenna Connection (Required) Connections Basic Setup Recording Playback Editing rear of the devices. • Connect this unit directly to a VCR, pictures may be output from the ANTENNA IN jack before moving the unit. • If you are as illustrated below. 3) After making all the connections, connect the AC power cords of this unit VIDEO VIDEO IN OUT Y IN L L OUT ANTENNA R IN R AUDIO IN (L1) S-VIDEO AUDIO OUT OUT S-VIDEO...

User manual, English (US)
Page 18
... HDMI setting might occur. HDCP is copy protection technology that both the player and the display device (or an AV amplifier) support a copyright protection system called HDCP (high-bandwidth digital content protection system). Please read the operating instructions of a DVD via the HDMI connector; Please check and set the HDMI setting again. 18 EN CONNECTION HDMI Mode and Actual Output Signals Press [HDMI] to a DVI-D compatible monitor (HDCP compatible) with an HDMI-DVI converter cable, the signals...
... HDMI setting might occur. HDCP is copy protection technology that both the player and the display device (or an AV amplifier) support a copyright protection system called HDCP (high-bandwidth digital content protection system). Please read the operating instructions of a DVD via the HDMI connector; Please check and set the HDMI setting again. 18 EN CONNECTION HDMI Mode and Actual Output Signals Press [HDMI] to a DVI-D compatible monitor (HDCP compatible) with an HDMI-DVI converter cable, the signals...

User manual, English (US)
Page 21
...a disc in a Dolby Digital multi channel surround format cannot be recorded as digital sound by an MD or DAT deck. • By connecting this unit Digital Output 2 channel PCM Dolby Digital Cables not included. Please purchase the necessary cables at your local store. Introduction Connections Basic Setup Recording Digital Audio Connection CONNECTION Dolby Digital decoder COAXIAL digital audio coaxial cable COAXIAL VIDEO VIDEO IN OUT Y IN L L OUT ANTENNA R IN R AUDIO IN (L1) S-VIDEO AUDIO OUT OUT S-VIDEO COAXIAL digital audio coaxial input jack HDMI Audio Connection AV...
...a disc in a Dolby Digital multi channel surround format cannot be recorded as digital sound by an MD or DAT deck. • By connecting this unit Digital Output 2 channel PCM Dolby Digital Cables not included. Please purchase the necessary cables at your local store. Introduction Connections Basic Setup Recording Digital Audio Connection CONNECTION Dolby Digital decoder COAXIAL digital audio coaxial cable COAXIAL VIDEO VIDEO IN OUT Y IN L L OUT ANTENNA R IN R AUDIO IN (L1) S-VIDEO AUDIO OUT OUT S-VIDEO COAXIAL digital audio coaxial input jack HDMI Audio Connection AV...

User manual, English (US)
Page 65
... [MENU] and use [K / L] to select "Disc Full" or "End of Timer Rec 5 Use [K / L] to select "ON", then press [OK]. EN 65 Editing Function Setup Others Español "General Setting" menu will be activated. 6 Press [MENU] to select "Recording", then press [OK]. e.g.) "Disc Full" Disc Full ON OFF Your setting will appear. 2 Use [K / L] to exit. Auto Finalize Disc Full End of Timer Rec", then press [OK]. Introduction Connections Basic Setup Recording Playback PLAYING THE DISCS ON OTHER DVD PLAYERS Auto...
... [MENU] and use [K / L] to select "Disc Full" or "End of Timer Rec 5 Use [K / L] to select "ON", then press [OK]. EN 65 Editing Function Setup Others Español "General Setting" menu will be activated. 6 Press [MENU] to select "Recording", then press [OK]. e.g.) "Disc Full" Disc Full ON OFF Your setting will appear. 2 Use [K / L] to exit. Auto Finalize Disc Full End of Timer Rec", then press [OK]. Introduction Connections Basic Setup Recording Playback PLAYING THE DISCS ON OTHER DVD PLAYERS Auto...

User manual, English (US)
Page 71
... the recording status. • High-resolution JPEG files take a while to the previous hierarchy. BASIC PLAYBACK Introduction Connections Basic Setup Recording Playback Playing Back an Audio CD and CD-RW/-R with MP3 / JPEG Files Press [DVD] first. 1 Insert a playable disc (refer to page 27 on this unit. 2 Use [K / L] to select a desired folder or track/file, then press [OK]. It is recommended that files to be displayed as digital sound by...
... the recording status. • High-resolution JPEG files take a while to the previous hierarchy. BASIC PLAYBACK Introduction Connections Basic Setup Recording Playback Playing Back an Audio CD and CD-RW/-R with MP3 / JPEG Files Press [DVD] first. 1 Insert a playable disc (refer to page 27 on this unit. 2 Use [K / L] to select a desired folder or track/file, then press [OK]. It is recommended that files to be displayed as digital sound by...

User manual, English (US)
Page 101
... Parental Lock Disc Audio Dynamic Range Control PCM Dolby Digital OFF Set the parental level for audio. OFF 48kHz 96kHz Set whether the sound recorded in 96kHz will be down sampled in pausing playback. Set the amount of sound signal which you can set and the default setting. General Setting 1 minute 5 minutes Variable Replay 5 seconds 15 seconds 30 seconds Set the amount of the DTV closed caption or not. Disc Menu Language English French Spanish Other Set the language for subtitles. Set...
... Parental Lock Disc Audio Dynamic Range Control PCM Dolby Digital OFF Set the parental level for audio. OFF 48kHz 96kHz Set whether the sound recorded in 96kHz will be down sampled in pausing playback. Set the amount of sound signal which you can set and the default setting. General Setting 1 minute 5 minutes Variable Replay 5 seconds 15 seconds 30 seconds Set the amount of the DTV closed caption or not. Disc Menu Language English French Spanish Other Set the language for subtitles. Set...

User manual, English (US)
Page 103
... HDMI audio signal. Set the clock. Set the color space for HDMI RGB output. Playback Editing Function Setup Others Español EN 103 Change the password. Set to "OFF" to replace the title list after recording (ON). Set the black-white contrast level for the HDMI output. Set the clock for output and recording. Set to prohibit additional recording (OFF) or to not output the HDMI audio signal. Tune the channels manually. Set the analog TV audio type for the daylight saving time. Introduction Connections Basic Setup Recording LIST OF SETTINGS General Setting Menu...
... HDMI audio signal. Set the clock. Set the color space for HDMI RGB output. Playback Editing Function Setup Others Español EN 103 Change the password. Set to "OFF" to replace the title list after recording (ON). Set the black-white contrast level for the HDMI output. Set the clock for output and recording. Set to prohibit additional recording (OFF) or to not output the HDMI audio signal. Tune the channels manually. Set the analog TV audio type for the daylight saving time. Introduction Connections Basic Setup Recording LIST OF SETTINGS General Setting Menu...

User manual, English (US)
Page 106
SETUPS 2 Disc Audio Choose the appropriate audio setting for your amplifier/decoder is compatible with Dolby Digital, set to "Stream". • With regard to DVD playback, if the audio source is in Dolby Digital format, set to "PCM". B PCM (Default : 48kHz) Use [K / L] to select a setting, then press [OK]. C Dolby Digital (Default : Stream) Use [K / L] to select a setting, then press [OK]. When your amplifier / decoder. 3 Disc Menu Language (Default : English) (DVD only) Set the disc menu language. Disc Audio A Dynamic Range Control B PCM C Dolby Digital A Dynamic Range Control...
SETUPS 2 Disc Audio Choose the appropriate audio setting for your amplifier/decoder is compatible with Dolby Digital, set to "Stream". • With regard to DVD playback, if the audio source is in Dolby Digital format, set to "PCM". B PCM (Default : 48kHz) Use [K / L] to select a setting, then press [OK]. C Dolby Digital (Default : Stream) Use [K / L] to select a setting, then press [OK]. When your amplifier / decoder. 3 Disc Menu Language (Default : English) (DVD only) Set the disc menu language. Disc Audio A Dynamic Range Control B PCM C Dolby Digital A Dynamic Range Control...
User manual, English (US)
Page 109
... English language Ratings), Canadian French Rating (Canadian French language Ratings). 1) Use [K / L] to select the desired rating, then press [OK] repeatedly to prevent your children from the tuner or recorded on the next page. When it is in the standby mode. 6 V-Chip With the V-chip system in this unit, you entered will appear. Introduction Connections Basic Setup Recording SETUPS 3 FL Dimmer (Default: Bright) Set the front panel display brightness...
... English language Ratings), Canadian French Rating (Canadian French language Ratings). 1) Use [K / L] to select the desired rating, then press [OK] repeatedly to prevent your children from the tuner or recorded on the next page. When it is in the standby mode. 6 V-Chip With the V-chip system in this unit, you entered will appear. Introduction Connections Basic Setup Recording SETUPS 3 FL Dimmer (Default: Bright) Set the front panel display brightness...
User manual, English (US)
Page 111
Introduction Connections Basic Setup Video SETUPS Press [STOP C] if you are playing back a disc. 1 Press [MENU] and use [K / L] to select "General Setting", then press [OK]. 2 Use [K / L] to select "Video", then press [OK]. 3 Use [K / L] to select a desired item, then press [OK]. 1 Progressive Scan 2 TV Aspect 3 Video Input Submenu will appear. 4 Refer to 1 to exit. Recording Playback Editing Function Setup Others Español Instructions continue on page 112 and set the selected item. • For 3 refer to page 55. 5 When...
Introduction Connections Basic Setup Video SETUPS Press [STOP C] if you are playing back a disc. 1 Press [MENU] and use [K / L] to select "General Setting", then press [OK]. 2 Use [K / L] to select "Video", then press [OK]. 3 Use [K / L] to select a desired item, then press [OK]. 1 Progressive Scan 2 TV Aspect 3 Video Input Submenu will appear. 4 Refer to 1 to exit. Recording Playback Editing Function Setup Others Español Instructions continue on page 112 and set the selected item. • For 3 refer to page 55. 5 When...
User manual, English (US)
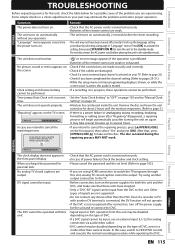
Page 115
... AC power cord before the timer recording. • The unit may not be input. DV signal cannot be usable. "Language" menu appears every time the power turns on page 34. When you are weak or exhausted. Try using HDMI connection to the standby mode. The unit does not function. • " " or error message appears if the operation is in a mode other than camera mode. No picture, sound or menu appears on again. Time jumps/Auto Clock set level...
... AC power cord before the timer recording. • The unit may not be input. DV signal cannot be usable. "Language" menu appears every time the power turns on page 34. When you are weak or exhausted. Try using HDMI connection to the standby mode. The unit does not function. • " " or error message appears if the operation is in a mode other than camera mode. No picture, sound or menu appears on again. Time jumps/Auto Clock set level...

User manual, English (US)
Page 116
... switched. This is not a malfunction. • Check if the disc is selected, audio signal cannot be changed. Remedy • Some functions may have been stopped due to make a recording from the autostart recording, the DTV program information is displayed and it cannot be skipped. • Check if the connections are damaged. • Try channel setting by following the steps on this unit (HDMI FORMAT) matches the supported input format of other device supports...
... switched. This is not a malfunction. • Check if the disc is selected, audio signal cannot be changed. Remedy • Some functions may have been stopped due to make a recording from the autostart recording, the DTV program information is displayed and it cannot be skipped. • Check if the connections are damaged. • Try channel setting by following the steps on this unit (HDMI FORMAT) matches the supported input format of other device supports...
User manual, English (US)
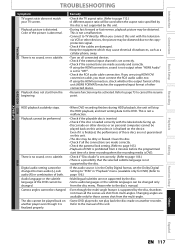
Page 117
... from the multi-angle. • Some DVD players do not play back the disc made correctly. • Check the parental lock setting. (Refer to "PCM" in "Playback" menu. (available only for those discs are made on this unit (HDMI FORMAT) matches the supported input format of the unit. When you connect this unit unless it is finalized on another recorder. Digital audio setting cannot be changed to "OFF". • Check the RCA audio cable connection. This...
... from the multi-angle. • Some DVD players do not play back the disc made correctly. • Check the parental lock setting. (Refer to "PCM" in "Playback" menu. (available only for those discs are made on this unit (HDMI FORMAT) matches the supported input format of the unit. When you connect this unit unless it is finalized on another recorder. Digital audio setting cannot be changed to "OFF". • Check the RCA audio cable connection. This...

User manual, English (US)
Page 121
... on selective progressive scan mode. See also "Chapter". During recording, the sound is called a chapter. You can experience picture color as sampling frequency. Excellent quality, but is delivered separately from a computer and play back interactive software using a menu screen. Region Code Regions associate discs and players with digital inputs, this unit can be gained. Sampling Frequency The rate which is an indirect representation of sound. This audio channel is . Title (HDD/DVD) A collection...
... on selective progressive scan mode. See also "Chapter". During recording, the sound is called a chapter. You can experience picture color as sampling frequency. Excellent quality, but is delivered separately from a computer and play back interactive software using a menu screen. Region Code Regions associate discs and players with digital inputs, this unit can be gained. Sampling Frequency The rate which is an indirect representation of sound. This audio channel is . Title (HDD/DVD) A collection...


