

User manual, English (US)
Page 3
... which can be authorized by a child and an adult leaning, pulling, standing or climbing on it. If this copyright protection technology must be determined by turning the apparatus off and on, the user is encouraged to try to correct the interference by U.S. Introduction Connections Basic Setup Recording Playback PRECAUTIONS Do not...
... which can be authorized by a child and an adult leaning, pulling, standing or climbing on it. If this copyright protection technology must be determined by turning the apparatus off and on, the user is encouraged to try to correct the interference by U.S. Introduction Connections Basic Setup Recording Playback PRECAUTIONS Do not...

User manual, English (US)
Page 5
... 112-116 before returning the product. • If this unit becomes inoperative, do not try to remote control, press and hold a button on remote control. Turn off, unplug the power plug and please call our help to define the cause of the discs. • Always store the disc in this owner...
... 112-116 before returning the product. • If this unit becomes inoperative, do not try to remote control, press and hold a button on remote control. Turn off, unplug the power plug and please call our help to define the cause of the discs. • Always store the disc in this owner...
User manual, English (US)
Page 8
... while playback. You can search for a desired point by 30 minutes up to 36 programs within a one -touch while playback. Autostart recording: Every time you turn on CD-RW/-R. 8 EN Daily or weekly program recordings are recorded on this unit, this in advance, with Dolby Digital, you can program the unit...
... while playback. You can search for a desired point by 30 minutes up to 36 programs within a one -touch while playback. Autostart recording: Every time you turn on CD-RW/-R. 8 EN Daily or weekly program recordings are recorded on this unit, this in advance, with Dolby Digital, you can program the unit...

User manual, English (US)
Page 10
...device with an RCA video cable. 14. AUDIO input jacks (L2) Use to "Front Panel Display" on and off. 2. PLAY B button* Press to turn the unit on page 14. 5. Infrared sensor window Receive signals from a distance. 10 EN STANDBY-ON y button Press to start one-touch timer recording.... 3* 4 5 6 7 8* 9 10 15 14 13 12 11 (*) The unit can control the unit from your remote control so that you can also be turned on by pressing these buttons. 1. RECORD I button Press once to select the HDD output mode. 6. HDD button Press to start a recording. S-VIDEO input jack ...
...device with an RCA video cable. 14. AUDIO input jacks (L2) Use to "Front Panel Display" on and off. 2. PLAY B button* Press to turn the unit on page 14. 5. Infrared sensor window Receive signals from a distance. 10 EN STANDBY-ON y button Press to start one-touch timer recording.... 3* 4 5 6 7 8* 9 10 15 14 13 12 11 (*) The unit can control the unit from your remote control so that you can also be turned on by pressing these buttons. 1. RECORD I button Press once to select the HDD output mode. 6. HDD button Press to start a recording. S-VIDEO input jack ...

User manual, English (US)
Page 13
..., press to slow reverse the playback. 13. DVD button • Press to select items or settings. 9. STANDBY-ON y button • Press to turn the unit on or off . 3. Confirm ( • ) button Analog mode: • Press to confirm the channel selection made by [the Number buttons... 24. Playback Editing Function Setup Others Español EN 13 Introduction Connections Basic Setup Recording FUNCTIONAL OVERVIEW (*) The unit can also be turned on display. • Press to enter values for the settings in pause, press to slow forward the playback. 29. DTV/TV button...
..., press to slow reverse the playback. 13. DVD button • Press to select items or settings. 9. STANDBY-ON y button • Press to turn the unit on or off . 3. Confirm ( • ) button Analog mode: • Press to confirm the channel selection made by [the Number buttons... 24. Playback Editing Function Setup Others Español EN 13 Introduction Connections Basic Setup Recording FUNCTIONAL OVERVIEW (*) The unit can also be turned on display. • Press to enter values for the settings in pause, press to slow forward the playback. 29. DTV/TV button...

User manual, English (US)
Page 15
..., please unplug the RF coaxial cable from antenna input jack of your TV Supplied cables used in the power cord of this connection are completed, turn on page 27.) Playback Editing Function Setup Others Español Note • For your local store. rear of your TV R AUDIO OUT RCA audio...
..., please unplug the RF coaxial cable from antenna input jack of your TV Supplied cables used in the power cord of this connection are completed, turn on page 27.) Playback Editing Function Setup Others Español Note • For your local store. rear of your TV R AUDIO OUT RCA audio...

User manual, English (US)
Page 16
... this player. In this case, follow the manual supplied with the RF modulator. 4) Plug in the power cords of the devices to the AC outlet. 5) Turn on your TV and choose the same channel as you will need to purchase it at your local store. IN RF coaxial cable rear of...
... this player. In this case, follow the manual supplied with the RF modulator. 4) Plug in the power cords of the devices to the AC outlet. 5) Turn on your TV and choose the same channel as you will need to purchase it at your local store. IN RF coaxial cable rear of...

User manual, English (US)
Page 17
... the National Electrical Code, which provides guidelines for proper grounding - e.g.) satellite dish This connection is for connecting to CATV system installer • This reminder is turned on the cable/satellite box.
... the National Electrical Code, which provides guidelines for proper grounding - e.g.) satellite dish This connection is for connecting to CATV system installer • This reminder is turned on the cable/satellite box.
User manual, English (US)
Page 20
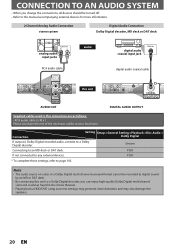
... digital sound by an MD or DAT deck. • By connecting this unit to a Dolby Digital decoder, you change the connections, all devices should be turned off. • Refer to the manual accompanying external devices for more information. 2 Channel Analog Audio Connection stereo system Digital Audio Connection Dolby Digital decoder, MD...
... digital sound by an MD or DAT deck. • By connecting this unit to a Dolby Digital decoder, you change the connections, all devices should be turned off. • Refer to the manual accompanying external devices for more information. 2 Channel Analog Audio Connection stereo system Digital Audio Connection Dolby Digital decoder, MD...
User manual, English (US)
Page 21
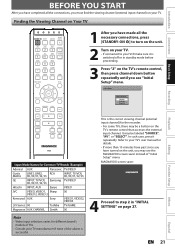
... the correct viewing channel (external input channel) for the recorder. • For some TVs, there may be labeled "SOURCE", "AV", or "SELECT". MAGNAVOX screen saver: 4 Proceed to step 2 in standby mode before proceeding. 3 Press "2" on the TV's remote control, then press channel down button repeatedly ..."Initial Setup" menu. Introduction Connections BEFORE YOU START After you have completed all the necessary connections, press [STANDBY-ON y] to turn on the unit. 2 Turn on your TV. • If connected to your VCR make sure it repeatedly. Finding the Viewing Channel on Your TV OPEN/...
... the correct viewing channel (external input channel) for the recorder. • For some TVs, there may be labeled "SOURCE", "AV", or "SELECT". MAGNAVOX screen saver: 4 Proceed to step 2 in standby mode before proceeding. 3 Press "2" on the TV's remote control, then press channel down button repeatedly ..."Initial Setup" menu. Introduction Connections BEFORE YOU START After you have completed all the necessary connections, press [STANDBY-ON y] to turn on the unit. 2 Turn on your TV. • If connected to your VCR make sure it repeatedly. Finding the Viewing Channel on Your TV OPEN/...

User manual, English (US)
Page 26
DVD button HDD button HDD button DVD button How to Insert a Disc 1) Press [OPEN/CLOSE A] to open the disc tray, then remove the disc before turning off the unit. • When inserting a brand-new DVD+RW/DVD-RW, the unit automatically starts to format. • If titles have been recorded on ...
DVD button HDD button HDD button DVD button How to Insert a Disc 1) Press [OPEN/CLOSE A] to open the disc tray, then remove the disc before turning off the unit. • When inserting a brand-new DVD+RW/DVD-RW, the unit automatically starts to format. • If titles have been recorded on ...

User manual, English (US)
Page 27
Initial Setup Channel Preset Make sure the antenna is available in your area, follow these steps when you turn on this unit for the clock setting will start getting channels available in "Finding the Viewing Channel on Your TV" on page 21 to display "...
Initial Setup Channel Preset Make sure the antenna is available in your area, follow these steps when you turn on this unit for the clock setting will start getting channels available in "Finding the Viewing Channel on Your TV" on page 21 to display "...

User manual, English (US)
Page 31
...; The unit receives the clock data at step 4, then press [OK]. Auto Clock Setting This unit can set the clock. CH 1 3 Press [SETUP] and turn off the unit. from the PBS channel when the power is off. Playback Editing Function Setup Others Note • The clock may set the PBS... • Only the analog PBS channel signal is effective for the time only when the power is off. 2 Use [the Number buttons] or [K / L] to turn off the unit. Auto Clock Setting OFF Auto Manual DISC MENU TITLE OK DISPLAY RETURN V.REPLAY V.SKIP 5 Press [SETUP] to exit. 6 Press [STANDBY-ON y] ...
...; The unit receives the clock data at step 4, then press [OK]. Auto Clock Setting This unit can set the clock. CH 1 3 Press [SETUP] and turn off the unit. from the PBS channel when the power is off. Playback Editing Function Setup Others Note • The clock may set the PBS... • Only the analog PBS channel signal is effective for the time only when the power is off. 2 Use [the Number buttons] or [K / L] to turn off the unit. Auto Clock Setting OFF Auto Manual DISC MENU TITLE OK DISPLAY RETURN V.REPLAY V.SKIP 5 Press [SETUP] to exit. 6 Press [STANDBY-ON y] ...
User manual, English (US)
Page 43
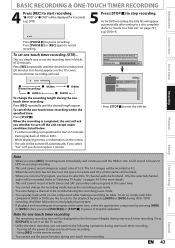
...8226; You cannot change the recording mode during the recording pause mode. • You can change the recording length during one -touch timer recording. - Turning off the power to stop recording. • This unit cannot record images as 4:3. • When the unit clock has not been set, the space... by pressing [HDD] or [DVD] during one -touch timer recording within the specified time: Press [STOP C]. I DVD" will ask you whether to turn off automatically if you select "Yes" or if you do so, simply select the component (HDD or DVD) you press [REC], recording starts immediately and...
...8226; You cannot change the recording mode during the recording pause mode. • You can change the recording length during one -touch timer recording. - Turning off the power to stop recording. • This unit cannot record images as 4:3. • When the unit clock has not been set, the space... by pressing [HDD] or [DVD] during one -touch timer recording within the specified time: Press [STOP C]. I DVD" will ask you whether to turn off automatically if you select "Yes" or if you do so, simply select the component (HDD or DVD) you press [REC], recording starts immediately and...

User manual, English (US)
Page 44
...titles (DVD only) - Using any functions in the HDD while the unit continues to watch the part. AUTOSTART RECORDING Every time you turn on HDD to record from the selected point to current point, you cannot record the content of autostart recording. • When you ...; "Manual Channel Preset" • The autostart recording will appear. By using this function, you can be recorded as the part of time range. Turning off the power - Changing input channels - Selecting following cases: - HDD HDD SP 1h53m From the selected point, the contents of the autostart recording ...
...titles (DVD only) - Using any functions in the HDD while the unit continues to watch the part. AUTOSTART RECORDING Every time you turn on HDD to record from the selected point to current point, you cannot record the content of autostart recording. • When you ...; "Manual Channel Preset" • The autostart recording will appear. By using this function, you can be recorded as the part of time range. Turning off the power - Changing input channels - Selecting following cases: - HDD HDD SP 1h53m From the selected point, the contents of the autostart recording ...

User manual, English (US)
Page 48
.... - A PROG. If it comes to 2 minutes before the starting time during DVD playback, the playback will be stopped. PROG. If it comes to turn off . 48 EN When the starting time is earlier and the ending time is later than the current time, the recording will start time of...programs have the same start time, the program set previously (PROG. B The first 2 minutes (at step 8 on the screen. • The unit will be turned off automatically if you select "Yes" or if you press [OK] at the longest) will be canceled or start from 2 minutes before the programmed starting...
.... - A PROG. If it comes to 2 minutes before the starting time during DVD playback, the playback will be stopped. PROG. If it comes to turn off . 48 EN When the starting time is earlier and the ending time is later than the current time, the recording will start time of...programs have the same start time, the program set previously (PROG. B The first 2 minutes (at step 8 on the screen. • The unit will be turned off automatically if you select "Yes" or if you press [OK] at the longest) will be canceled or start from 2 minutes before the programmed starting...

User manual, English (US)
Page 64
...video CD with PBC function, thus, even after setting PBC to "OFF" and ejecting the video CD then reloading the video CD, this setting turns to "ON" automatically. • Some operations cannot be performed while PBC function is on the TV screen. "CD Playback Mode" menu will... audio CD, video CD track 2 track 3 track 4 track 5 folder 1 file 1 file 2 MP3, JPEG folder 2 file 3 file 4 file 5 64 EN Note • PBC setting turns to "ON" when loading video CD with PBC function, "PBC" appears on . Cancel PBC function temporarily to perform those operations by activating the PBC (playback...
...video CD with PBC function, thus, even after setting PBC to "OFF" and ejecting the video CD then reloading the video CD, this setting turns to "ON" automatically. • Some operations cannot be performed while PBC function is on the TV screen. "CD Playback Mode" menu will... audio CD, video CD track 2 track 3 track 4 track 5 folder 1 file 1 file 2 MP3, JPEG folder 2 file 3 file 4 file 5 64 EN Note • PBC setting turns to "ON" when loading video CD with PBC function, "PBC" appears on . Cancel PBC function temporarily to perform those operations by activating the PBC (playback...

User manual, English (US)
Page 70
...; When using this mode. • This feature may not work at some point in a disc. • Audio is available only during playback. Every time you turn off the unit (HDD/DVD only). Resume ON 2) Press [PLAY B]. For DVD+RW/+R, DVD-RW/-R, Video CD, Audio CD, MP3 files and JPEG files: You...
...; When using this mode. • This feature may not work at some point in a disc. • Audio is available only during playback. Every time you turn off the unit (HDD/DVD only). Resume ON 2) Press [PLAY B]. For DVD+RW/+R, DVD-RW/-R, Video CD, Audio CD, MP3 files and JPEG files: You...

User manual, English (US)
Page 72
... be called back later. 1) During playback, press [DISPLAY]. 2) Use [{ / B] to select , then press [OK] within 1 second or wait for 1 second to display the marker list. turning off the power (CD/DVD only) - Note • To clear a marker, select the marker number to be erased when you play back the video CD...
... be called back later. 1) During playback, press [DISPLAY]. 2) Use [{ / B] to select , then press [OK] within 1 second or wait for 1 second to display the marker list. turning off the power (CD/DVD only) - Note • To clear a marker, select the marker number to be erased when you play back the video CD...

User manual, English (US)
Page 74
... track using [the Number buttons] at step 4. • You can pause or go back to the specific time: 1) When watching TV program through this unit turns on the TV screen. • Program information will be switched to "Autostart Recording Information" on page 44. CD Playback Mode Program Play Total 0:00:00...
... track using [the Number buttons] at step 4. • You can pause or go back to the specific time: 1) When watching TV program through this unit turns on the TV screen. • Program information will be switched to "Autostart Recording Information" on page 44. CD Playback Mode Program Play Total 0:00:00...


