

User manual, English (US)
Page 2
... or frayed. PRECAUTIONS The model and serial numbers of this indicates a need for service. 20. When installing an outside antenna or cable system is connected to the apparatus, be adhered to rain or water. OBJECT AND LIQUID ENTRY - CAUTION RISK OF ELECTRIC SHOCK DO NOT OPEN CAUTION: TO REDUCE THE RISK OF ELECTRIC SHOCK, DO NOT REMOVE COVER (OR BACK...
... or frayed. PRECAUTIONS The model and serial numbers of this indicates a need for service. 20. When installing an outside antenna or cable system is connected to the apparatus, be adhered to rain or water. OBJECT AND LIQUID ENTRY - CAUTION RISK OF ELECTRIC SHOCK DO NOT OPEN CAUTION: TO REDUCE THE RISK OF ELECTRIC SHOCK, DO NOT REMOVE COVER (OR BACK...

User manual, English (US)
Page 5
... when the players are trademarks of PCM recording, also saves recordable disc space, allowing for inspection and cleaning of HDMI Licensing LLC. No part of the recording / replaying program may not be lost. • HDD rotates at home. EN 5 Español Wipe the disc from Dolby Laboratories. Consult your dealer or an Authorized Service Center for higher video resolution or extended recording time on the installation environment...
... when the players are trademarks of PCM recording, also saves recordable disc space, allowing for inspection and cleaning of HDMI Licensing LLC. No part of the recording / replaying program may not be lost. • HDD rotates at home. EN 5 Español Wipe the disc from Dolby Laboratories. Consult your dealer or an Authorized Service Center for higher video resolution or extended recording time on the installation environment...
User manual, English (US)
Page 6
... the Viewing Channel on Your TV 21 Guide to On-Screen Display / Menu 22 Main Menu 24 Switching HDD / DVD Mode 26 How to Insert a Disc 26 INITIAL SETTING 27 CHANNEL SETTING 28 Auto Channel Scan 28 Adding / Deleting Channels 29 SETTING THE CLOCK 31 Auto Clock Setting 31 Manual Clock Setting 32 Daylight Saving Time 32 TUNER SETTINGS 33 Switching Analog Mode / Digital Mode 33 Channel Selection 33 Selecting TV Audio 34 DTV Closed Caption 36 Closed Caption Style 37 Recording INFORMATION ON RECORDING 39 BEFORE RECORDING 41 Make Recording Compatible 41 Setting for Auto Chapter...
... the Viewing Channel on Your TV 21 Guide to On-Screen Display / Menu 22 Main Menu 24 Switching HDD / DVD Mode 26 How to Insert a Disc 26 INITIAL SETTING 27 CHANNEL SETTING 28 Auto Channel Scan 28 Adding / Deleting Channels 29 SETTING THE CLOCK 31 Auto Clock Setting 31 Manual Clock Setting 32 Daylight Saving Time 32 TUNER SETTINGS 33 Switching Analog Mode / Digital Mode 33 Channel Selection 33 Selecting TV Audio 34 DTV Closed Caption 36 Closed Caption Style 37 Recording INFORMATION ON RECORDING 39 BEFORE RECORDING 41 Make Recording Compatible 41 Setting for Auto Chapter...

User manual, English (US)
Page 7
... Chapters 92 Setting an Index Picture 93 Putting Name on Disc 94 Erasing Disc 95 Making Edits Compatible 96 Deleting All Titles in HDD 97 Function Setup LIST OF SETTINGS 98 SETUPS 101 Playback 101 Display 105 Video 108 HDMI 110 Reset All 111 Others TROUBLESHOOTING 112 Frequently Asked Questions 115 LANGUAGE CODE 117 GLOSSARY 118 SPECIFICATIONS 119 Español ESPAÑOL 120 LIMITED WARRANTY Back cover Playback Editing Function Setup Others...
... Chapters 92 Setting an Index Picture 93 Putting Name on Disc 94 Erasing Disc 95 Making Edits Compatible 96 Deleting All Titles in HDD 97 Function Setup LIST OF SETTINGS 98 SETUPS 101 Playback 101 Display 105 Video 108 HDMI 110 Reset All 111 Others TROUBLESHOOTING 112 Frequently Asked Questions 115 LANGUAGE CODE 117 GLOSSARY 118 SPECIFICATIONS 119 Español ESPAÑOL 120 LIMITED WARRANTY Back cover Playback Editing Function Setup Others...
User manual, English (US)
Page 8
... set the recording mode to "Auto", the recording mode will automatically be adjusted so the titles will fit nicely in the DVD+VR mode. The recording automatically stops when the recording time you want to watch using this function, you can record the sound of the disc. Left channel stereo recording: This unit can pause or go back the TV program you are also available. By using the search functions. Automatic chapter mark setting...
... set the recording mode to "Auto", the recording mode will automatically be adjusted so the titles will fit nicely in the DVD+VR mode. The recording automatically stops when the recording time you want to watch using this function, you can record the sound of the disc. Left channel stereo recording: This unit can pause or go back the TV program you are also available. By using the search functions. Automatic chapter mark setting...

User manual, English (US)
Page 9
... disc name. Setting an index pictures: You can change pictures for playing back discs on a regular DVD player: Recorded discs can be played back on regular DVD players, including computer DVD drives compatible with DVD-video playback. Putting name on disc: You can put your favorite names on titles. Others Progressive scan system: HDD DVD Unlike conventional interlace scanning, the progressive scan system provides less flickering and images in higher resolution than that of traditional television signals. Introduction Connections Basic Setup...
... disc name. Setting an index pictures: You can change pictures for playing back discs on a regular DVD player: Recorded discs can be played back on regular DVD players, including computer DVD drives compatible with DVD-video playback. Putting name on disc: You can put your favorite names on titles. Others Progressive scan system: HDD DVD Unlike conventional interlace scanning, the progressive scan system provides less flickering and images in higher resolution than that of traditional television signals. Introduction Connections Basic Setup...

User manual, English (US)
Page 10
Disc tray Place a disc when opening the disc tray. 3. PLAY B button* Press to start or resume playback. 9. Press repeatedly to start one-touch timer recording. 10. AUDIO input jacks (L2) Use to "Front Panel Display" on and off. 2. Display Refer to connect external device with an RCA video cable. 14. DVD button Press to stop playback or recording. 8. STOP C button Press to select the DVD output mode. 7. VIDEO input jack (L2) Use to connect the DV output of external device with a DV cable. 12. Infrared sensor window Receive signals from your remote control so that...
Disc tray Place a disc when opening the disc tray. 3. PLAY B button* Press to start or resume playback. 9. Press repeatedly to start one-touch timer recording. 10. AUDIO input jacks (L2) Use to "Front Panel Display" on and off. 2. Display Refer to connect external device with an RCA video cable. 14. DVD button Press to stop playback or recording. 8. STOP C button Press to select the DVD output mode. 7. VIDEO input jack (L2) Use to connect the DV output of external device with a DV cable. 12. Infrared sensor window Receive signals from your remote control so that...

User manual, English (US)
Page 11
... receiver, Dolby Digital decoder or other device with a digital audio coaxial cable. 7. S-VIDEO IN jack (L1) Use to connect external device with an HDMI compatible port. 5. ANTENNA OUT jack Use to connect an RF coaxial cable to pass the signal from the ANTENNA IN to this unit. 6. Recording Playback Editing Function Setup Others Español EN 11 VIDEO IN jack (L1) Use to connect the S-video output of the jacks on the rear panel. HDMI OUT jack Use an HDMI cable...
... receiver, Dolby Digital decoder or other device with a digital audio coaxial cable. 7. S-VIDEO IN jack (L1) Use to connect external device with an HDMI compatible port. 5. ANTENNA OUT jack Use to connect an RF coaxial cable to pass the signal from the ANTENNA IN to this unit. 6. Recording Playback Editing Function Setup Others Español EN 11 VIDEO IN jack (L1) Use to connect the S-video output of the jacks on the rear panel. HDMI OUT jack Use an HDMI cable...

User manual, English (US)
Page 13
... recording. • Press to exit from the title list. 31. OPEN/CLOSE A button* • Press to play back in a slightly faster/slower mode while keeping the sound output. 15. OK button • Press to confirm the channel selection made by [the Number buttons]. 5. FFW D button • During playback, press to fast forward the playback. • When playback is in pause, press repeatedly to forward the playback step by [the Number buttons]. Number/Character buttons • Press to select channel numbers...
... recording. • Press to exit from the title list. 31. OPEN/CLOSE A button* • Press to play back in a slightly faster/slower mode while keeping the sound output. 15. OK button • Press to confirm the channel selection made by [the Number buttons]. 5. FFW D button • During playback, press to fast forward the playback. • When playback is in pause, press repeatedly to forward the playback step by [the Number buttons]. Number/Character buttons • Press to select channel numbers...

User manual, English (US)
Page 15
... R L AUDIO IN VIDEO IN 4 Plug in the power cord of this connection are completed, turn on page 27.) Playback Editing Function Setup Others Español Note • For your safety and to avoid damage to the device, please unplug the RF coaxial cable from antenna input jack of your TV. rear of your TV Supplied cables used in your area. (Refer to "INITIAL SETTING" on...
... R L AUDIO IN VIDEO IN 4 Plug in the power cord of this connection are completed, turn on page 27.) Playback Editing Function Setup Others Español Note • For your safety and to avoid damage to the device, please unplug the RF coaxial cable from antenna input jack of your TV. rear of your TV Supplied cables used in your area. (Refer to "INITIAL SETTING" on...

User manual, English (US)
Page 19
... both digital video signals and multi-channel audio signals. Basic Setup Recording Playback Editing Function Setup Actual Output Modes by Media Audio recording format of the disc Dolby Digital setting of this unit, audio signals are output in digital RGB. • When the power failure occurs, or when you select "Stream" in the HDMI setting might occur. Please read the operating instructions of the "Dolby Digital" setting. EN 19 Others Español Introduction Connections CONNECTION TO A TV WITH AN HDMI™ COMPATIBLE PORT A simple 1-cable connection with a device...
... both digital video signals and multi-channel audio signals. Basic Setup Recording Playback Editing Function Setup Actual Output Modes by Media Audio recording format of the disc Dolby Digital setting of this unit, audio signals are output in digital RGB. • When the power failure occurs, or when you select "Stream" in the HDMI setting might occur. Please read the operating instructions of the "Dolby Digital" setting. EN 19 Others Español Introduction Connections CONNECTION TO A TV WITH AN HDMI™ COMPATIBLE PORT A simple 1-cable connection with a device...
User manual, English (US)
Page 20
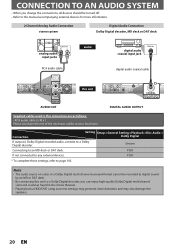
...Connection Setting Setup >General Setting >Playback >Disc Audio > Dolby Digital If output is Dolby Digital encoded audio, connect to page 103. Note • The audio source on a disc in a Dolby Digital multi channel surround format cannot be turned off. • Refer to the manual accompanying external devices for more information. 2 Channel Analog Audio Connection stereo system Digital Audio Connection Dolby Digital decoder, MD deck or DAT deck analog audio input jacks AUDIO IN R L audio digital audio coaxial input jack COAXIAL RCA audio cable digital audio coaxial cable VIDEO...
...Connection Setting Setup >General Setting >Playback >Disc Audio > Dolby Digital If output is Dolby Digital encoded audio, connect to page 103. Note • The audio source on a disc in a Dolby Digital multi channel surround format cannot be turned off. • Refer to the manual accompanying external devices for more information. 2 Channel Analog Audio Connection stereo system Digital Audio Connection Dolby Digital decoder, MD deck or DAT deck analog audio input jacks AUDIO IN R L audio digital audio coaxial input jack COAXIAL RCA audio cable digital audio coaxial cable VIDEO...
User manual, English (US)
Page 29
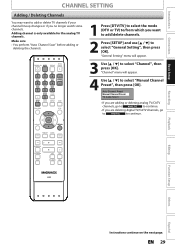
... Setting" menu will appear. 4 Use [K / L] to add or delete TV channels if your channel lineup changes or if you no longer watch some channels. EN 29 Make sure • You perform "Auto Channel Scan" before adding or deleting the channels. OPEN/ STANDBY-ON DTV/TV SOURCE CLOSE .@/: ABC DEF GHI JKL MNO CHANNEL PQRS TUV WXYZ SPACE CLEAR SETUP AUDIO REPEAT HDMI DISC MENU TITLE OK DISPLAY RETURN 1 Press [DTV/TV] to select the mode...
... Setting" menu will appear. 4 Use [K / L] to add or delete TV channels if your channel lineup changes or if you no longer watch some channels. EN 29 Make sure • You perform "Auto Channel Scan" before adding or deleting the channels. OPEN/ STANDBY-ON DTV/TV SOURCE CLOSE .@/: ABC DEF GHI JKL MNO CHANNEL PQRS TUV WXYZ SPACE CLEAR SETUP AUDIO REPEAT HDMI DISC MENU TITLE OK DISPLAY RETURN 1 Press [DTV/TV] to select the mode...
User manual, English (US)
Page 47
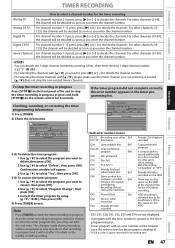
...]. 2 Use [K / L] to "OFF". To stop the timer recording in the timer programming list. • Timer program with [K / L], please make sure the minor channel your are selecting is impossible to decide the channels. HDD recording is canceled due to the insufficiency of the disc space on the HDD. • E23, E27, E28, E31, E32, E33 and E34 are not displayed. • A program with the error number is grayed in progress or...
...]. 2 Use [K / L] to "OFF". To stop the timer recording in the timer programming list. • Timer program with [K / L], please make sure the minor channel your are selecting is impossible to decide the channels. HDD recording is canceled due to the insufficiency of the disc space on the HDD. • E23, E27, E28, E31, E32, E33 and E34 are not displayed. • A program with the error number is grayed in progress or...
User manual, English (US)
Page 99
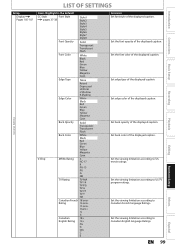
... the displayed caption. Set the viewing limitation according to US TV program ratings. Set edge type of the displayed caption. Set back color of the displayed caption. LIST OF SETTINGS Introduction Connections Basic Setup Recording Playback General Setting Setup Display Pages 105-107 Items (highlight is the default) CC Style Font Style pages 37-38 Style1 Style2 Style3 Style4 Style5 Style6 Style7 Style8 Font Opacity Solid Transparent Translucent Flash Font Color White Black...
... the displayed caption. Set the viewing limitation according to US TV program ratings. Set edge type of the displayed caption. Set back color of the displayed caption. LIST OF SETTINGS Introduction Connections Basic Setup Recording Playback General Setting Setup Display Pages 105-107 Items (highlight is the default) CC Style Font Style pages 37-38 Style1 Style2 Style3 Style4 Style5 Style6 Style7 Style8 Font Opacity Solid Transparent Translucent Flash Font Color White Black...
User manual, English (US)
Page 100
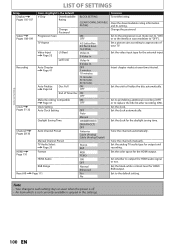
... video input type for output and recording. Set to prohibiting additional recording (OFF) or to the default setting. Set the clock automatically. Set to replace the title list after recording (ON). Insert chapter marks at even time interval. Set the analog TV audio type for the external input. Set the color space for HDMI RGB output. Note • Your change to "OFF"). LIST OF SETTINGS Setup Display Pages 105-107 Items (highlight is grayed in the settings. 100 EN Set the black-white...
... video input type for output and recording. Set to prohibiting additional recording (OFF) or to the default setting. Set the clock automatically. Set to replace the title list after recording (ON). Insert chapter marks at even time interval. Set the analog TV audio type for the external input. Set the color space for HDMI RGB output. Note • Your change to "OFF"). LIST OF SETTINGS Setup Display Pages 105-107 Items (highlight is grayed in the settings. 100 EN Set the black-white...

User manual, English (US)
Page 103
... Introduction Connections Basic Setup Recording SETUPS Playback (cont'd) 2 Disc Audio Choose the appropriate audio setting for disc menu. Use [K / L] to compress the range between soft and loud sounds. Note When playing back disc with 96kHz PCM, select "96kHz". 96kHz sound will be in the Dolby Digital format. Playback Editing Function Setup Others Español EN 103 It will be output. Use [K / L] to main audio (L), sub audio (R), or a combination of both (L / R) using your amplifier / decoder. 3 Disc Menu Language (Default : English) (DVD only) Set the language for...
... Introduction Connections Basic Setup Recording SETUPS Playback (cont'd) 2 Disc Audio Choose the appropriate audio setting for disc menu. Use [K / L] to compress the range between soft and loud sounds. Note When playing back disc with 96kHz PCM, select "96kHz". 96kHz sound will be in the Dolby Digital format. Playback Editing Function Setup Others Español EN 103 It will be output. Use [K / L] to main audio (L), sub audio (R), or a combination of both (L / R) using your amplifier / decoder. 3 Disc Menu Language (Default : English) (DVD only) Set the language for...

User manual, English (US)
Page 112
... selecting a language in the front panel display. No picture, sound or menu appears on for both this unit. Remove the disc and leave the unit turned on • Check if the connections are experiencing. Repairing • If there is connected securely. • (In case of DVC. • If a DVC signal cannot be input, use an external input (L1/L2) for parental lock. Do you forget the password for analog connection via audio/video cables...
... selecting a language in the front panel display. No picture, sound or menu appears on for both this unit. Remove the disc and leave the unit turned on • Check if the connections are experiencing. Repairing • If there is connected securely. • (In case of DVC. • If a DVC signal cannot be input, use an external input (L1/L2) for parental lock. Do you forget the password for analog connection via audio/video cables...

User manual, English (US)
Page 114
... RCA audio cable connection. Digital audio setting cannot be changed only from the multi-angle. • Some DVD players do not play back the disc made securely and correctly. • If using the HDMI connection, check whether the output format of this unit (HDMI FORMAT) matches the supported input format of a timer recording when the recording media is DVD. • Check if the "Disc Audio" is set correctly. (Refer to page 103.) • Multilingual subtitles are not guaranteed on the device. Changing...
... RCA audio cable connection. Digital audio setting cannot be changed only from the multi-angle. • Some DVD players do not play back the disc made securely and correctly. • If using the HDMI connection, check whether the output format of this unit (HDMI FORMAT) matches the supported input format of a timer recording when the recording media is DVD. • Check if the "Disc Audio" is set correctly. (Refer to page 103.) • Multilingual subtitles are not guaranteed on the device. Changing...

User manual, English (US)
Page 118
... compatibility with one cable connection. It offers you can transmit component video, audio, and control signal with progressive video (525p/480p), you to -analog converter generates an analog signal based on the rear panel. Finalize To make DVD, which sound is used as Dolby Digital and MPEG audio. For compatibility with digital audio recorders (CD, MD and DAT) and AV amplifiers with particular areas of compressing files. See also "Digital Audio". Region Code Regions associate discs and players with digital inputs, this unit can copy...
... compatibility with one cable connection. It offers you can transmit component video, audio, and control signal with progressive video (525p/480p), you to -analog converter generates an analog signal based on the rear panel. Finalize To make DVD, which sound is used as Dolby Digital and MPEG audio. For compatibility with digital audio recorders (CD, MD and DAT) and AV amplifiers with particular areas of compressing files. See also "Digital Audio". Region Code Regions associate discs and players with digital inputs, this unit can copy...


