
User Manual
Page 7
.... j CH +/Switches to standby. r SMART MODE Toggles between smart picture and sound settings. c FORMAT Selects a picture format. f OK Activates a selection or accesses the menu. h INFO Displays information about the TV channel or accessory device. The quality and accuracy of the information depends on the ...broadcaster.You might see 'Use the quick access menu' on or off. k SLEEP Sets a delay after which the TV switches to the next or previous channel. n PREV CH Returns to a previous screen. q BACK Returns to the previously viewed channel. t ...
.... j CH +/Switches to standby. r SMART MODE Toggles between smart picture and sound settings. c FORMAT Selects a picture format. f OK Activates a selection or accesses the menu. h INFO Displays information about the TV channel or accessory device. The quality and accuracy of the information depends on the ...broadcaster.You might see 'Use the quick access menu' on or off. k SLEEP Sets a delay after which the TV switches to the next or previous channel. n PREV CH Returns to a previous screen. q BACK Returns to the previously viewed channel. t ...

User Manual
Page 8
... power cord can loosen connections. • The ideal viewing distance for watching TV is three times its screen size. • Position the TV where light does not fall on your TV is a Kensington security slot at the same time. The TV produces stereo sound only if a stereo signal is swiveled. Connect to a Direct Broadcast Satellite...
... power cord can loosen connections. • The ideal viewing distance for watching TV is three times its screen size. • Position the TV where light does not fall on your TV is a Kensington security slot at the same time. The TV produces stereo sound only if a stereo signal is swiveled. Connect to a Direct Broadcast Satellite...

User Manual
Page 11
... "." To switch to standby • Press on the remote control. » The indicator switches to restore the sound. To mute or unmute sound • Press MUTE on the remote control to mute the sound. • Press MUTE again to red. Adjust volume To switch on • Press POWER at the side of... the TV. Switch channels CHANNEL POWER VOLUME POWER To increase or decrease volume • Press VOL +/- on the side of the TV. and then the corresponding sub...
... "." To switch to standby • Press on the remote control. » The indicator switches to restore the sound. To mute or unmute sound • Press MUTE on the remote control to mute the sound. • Press MUTE again to red. Adjust volume To switch on • Press POWER at the side of... the TV. Switch channels CHANNEL POWER VOLUME POWER To increase or decrease volume • Press VOL +/- on the side of the TV. and then the corresponding sub...

User Manual
Page 13
...settings 1 Press MENU on the remote control. 3 Press and to select the [Picture] menu. TV menu TV settings Features Installation TV settings Picture Sound EN 13 TV menu TV Settings Picture Sound Picture Contrast Brightness Color Tint Sharpness Color temperature Dynamic contrast Digital Natural Motion* *Available in the quick ...8226; Picture format. • Equalizer. • Clock (see 'Set the clock' on page 15). English 6 Use more of your TV Use the quick access menu The quick access menu gives direct access to some often-needed menu items. Note • When digital channels ...
...settings 1 Press MENU on the remote control. 3 Press and to select the [Picture] menu. TV menu TV settings Features Installation TV settings Picture Sound EN 13 TV menu TV Settings Picture Sound Picture Contrast Brightness Color Tint Sharpness Color temperature Dynamic contrast Digital Natural Motion* *Available in the quick ...8226; Picture format. • Equalizer. • Clock (see 'Set the clock' on page 15). English 6 Use more of your TV Use the quick access menu The quick access menu gives direct access to some often-needed menu items. Note • When digital channels ...

User Manual
Page 14
Change picture format 1 Press OPTION on the remote control and select [TV settings] > [Sound]. Change sound settings 1 Press MENU on the remote control. 2 Select [Picture format]. Some distortion may be present due to the broadcaster's systems. Set your choice. [Unscaled... noise. Allows maximum sharpness. Improves picture quality for best results. Summary of picture settings The following picture formats can be configured. TV menu TV Settings Picture Sound Sound Equalizer Balance Digital audio language Alternate audio Mono/Stereo Incredible surround AVL 14 EN
Change picture format 1 Press OPTION on the remote control and select [TV settings] > [Sound]. Change sound settings 1 Press MENU on the remote control. 2 Select [Picture format]. Some distortion may be present due to the broadcaster's systems. Set your choice. [Unscaled... noise. Allows maximum sharpness. Improves picture quality for best results. Summary of picture settings The following picture formats can be configured. TV menu TV Settings Picture Sound Sound Equalizer Balance Digital audio language Alternate audio Mono/Stereo Incredible surround AVL 14 EN
User Manual
Page 15
...Auto clock mode]. 2 Select [Automatic] and press to confirm your choice. For these channels, you can set your TV to a predefined picture and sound setting. 2 Press or to select one of the right and left speakers to exit. Select a list of favourite channels 1 ...to select channels that you defined by using the [Picture] menu. • [Sports]:Vivid picture settings and clear sound for high action. • [Standard]: For normal TV viewing. • [Movie]: Brilliant picture settings for a cinematic experience. • [Game]: Optimized for PCs, games consoles...
...Auto clock mode]. 2 Select [Automatic] and press to confirm your choice. For these channels, you can set your TV to a predefined picture and sound setting. 2 Press or to select one of the right and left speakers to exit. Select a list of favourite channels 1 ...to select channels that you defined by using the [Picture] menu. • [Sports]:Vivid picture settings and clear sound for high action. • [Standard]: For normal TV viewing. • [Movie]: Brilliant picture settings for a cinematic experience. • [Game]: Optimized for PCs, games consoles...

User Manual
Page 20
... to connect a PC to your PC, set the PC monitor refresh rate to 60Hz. For sound, add an audio cable with the cursor buttons. Caution • Before you connect your TV. Supported screen resolutions The following screen resolutions are supported in the [Preferences] menu to make the... [TV Speakers] menu available. 20 EN Note • Select [Off] to disable this function. [HDMI-CEC] must...
... to connect a PC to your PC, set the PC monitor refresh rate to 60Hz. For sound, add an audio cable with the cursor buttons. Caution • Before you connect your TV. Supported screen resolutions The following screen resolutions are supported in the [Preferences] menu to make the... [TV Speakers] menu available. 20 EN Note • Select [Off] to disable this function. [HDMI-CEC] must...
User Manual
Page 21
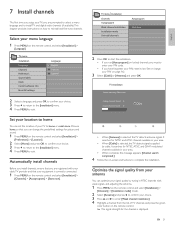
It searches for picture and sound. 1 Press MENU on the remote control and select [Installation] > [Preferences] > [Location]. ...Before you can change your PIN' on page 16). 3 Select [Cable] or [Antenna] and press OK. TV menu Installation Channels Autoprogram Weak channel installation Installation mode Uninstall channels Autoprogram Start Now 2 Press OK to start the ...Language English Francais Espanol 2 Select a language and press OK to confirm your TV to complete the installation. Select your signal quality by cable. Optimize the signal quality from your antenna...
It searches for picture and sound. 1 Press MENU on the remote control and select [Installation] > [Preferences] > [Location]. ...Before you can change your PIN' on page 16). 3 Select [Cable] or [Antenna] and press OK. TV menu Installation Channels Autoprogram Weak channel installation Installation mode Uninstall channels Autoprogram Start Now 2 Press OK to start the ...Language English Francais Espanol 2 Select a language and press OK to confirm your TV to complete the installation. Select your signal quality by cable. Optimize the signal quality from your antenna...
User Manual
Page 22
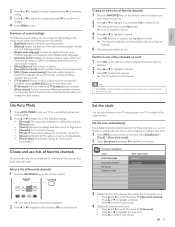
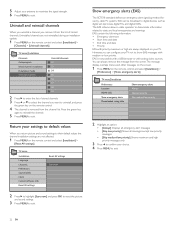
...Current software info Reset AV settings Reset AV settings Start now 2 Press to highlight [Start now], and press OK to reset the picture and sound settings. 3 Press MENU to exit. Show emergency alerts (EAS) The SCTE18 standard defines an emergency alert signaling method for use by ...from the list of stored channels. 3 Press or to select the channel you return picture and sound settings to show EAS messages with analog video sources. You can configure your TV not to their default values the channel installation settings are always displayed on the remote control and ...
...Current software info Reset AV settings Reset AV settings Start now 2 Press to highlight [Start now], and press OK to reset the picture and sound settings. 3 Press MENU to exit. Show emergency alerts (EAS) The SCTE18 standard defines an emergency alert signaling method for use by ...from the list of stored channels. 3 Press or to select the channel you return picture and sound settings to show EAS messages with analog video sources. You can configure your TV not to their default values the channel installation settings are always displayed on the remote control and ...
User Manual
Page 25
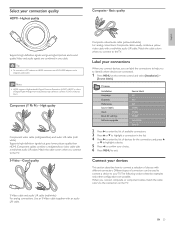
...white audio L/R cable. Composite video/audio cable (yellow/red/white) For analog connections. Match the cable colors when you connect to the TV. When you to identify where devices are combined in one cable. Composite cables usually combine a yellow video cable with a red/white audio... high-definition signals and gives highest picture and sound quality.Video and audio signals are connected. 1 Press MENU on the TV. Note • HDMI supports Highbandwidth Digital Contents Protection (HDCP). Label your TV.The following sections describe examples only, other configurations...
...white audio L/R cable. Composite video/audio cable (yellow/red/white) For analog connections. Match the cable colors when you connect to the TV. When you to identify where devices are combined in one cable. Composite cables usually combine a yellow video cable with a red/white audio... high-definition signals and gives highest picture and sound quality.Video and audio signals are connected. 1 Press MENU on the TV. Note • HDMI supports Highbandwidth Digital Contents Protection (HDCP). Label your TV.The following sections describe examples only, other configurations...
User Manual
Page 26
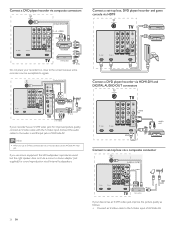
...When you use an S-Video connector, do not connect any device to signals. If you use mono equipment, the left loudspeaker reproduces sound but the right speaker does not. Connect the audio cables to the S-Video input of AV3/side AV. Connect a DVD player/recorder... Or/Ou/O RF OUT R R R SERV. Use a mono to stereo adapter (not supplied) for sound reproduction via all internal loudspeakers. 26 EN Connect a set -top box via HDMI TV ANTENNA HDMI 1 R R R SERV. TV ANTENNA HDMI 1 R R R SERV. U L L Pr Pr Pb Pb Y Y L SPDIF OUT VIDEO L S-VIDEO R AUDIO IN AV 1 HDMI 2...
...When you use an S-Video connector, do not connect any device to signals. If you use mono equipment, the left loudspeaker reproduces sound but the right speaker does not. Connect the audio cables to the S-Video input of AV3/side AV. Connect a DVD player/recorder... Or/Ou/O RF OUT R R R SERV. Use a mono to stereo adapter (not supplied) for sound reproduction via all internal loudspeakers. 26 EN Connect a set -top box via HDMI TV ANTENNA HDMI 1 R R R SERV. TV ANTENNA HDMI 1 R R R SERV. U L L Pr Pr Pb Pb Y Y L SPDIF OUT VIDEO L S-VIDEO R AUDIO IN AV 1 HDMI 2...

User Manual
Page 27
Only the left loudspeaker reproduces sound for sound reproduction via component video output connectors (YPbPr) and analog audio Selected TV models can be available in your area. U L L L Pr Pr SPDIF OUT Pb Pb Y Y VIDEO L S-VIDEO R AV 1 AV 2 HDMI 2 AV 3 DVI AUDIO IN HDMI...HDMI 2 AV 3 DVI AUDIO IN HDMI 3 AUDIO OUT DVI HDMI Connect a PC with an S-Video connector at the back Connect a PC with a DVI connector TV ANTENNA HDMI 1 R R R SERV. Use a mono to stereo adapter (not supplied) for mono equipment. Set the output of the cable box to the video jack...
Only the left loudspeaker reproduces sound for sound reproduction via component video output connectors (YPbPr) and analog audio Selected TV models can be available in your area. U L L L Pr Pr SPDIF OUT Pb Pb Y Y VIDEO L S-VIDEO R AV 1 AV 2 HDMI 2 AV 3 DVI AUDIO IN HDMI...HDMI 2 AV 3 DVI AUDIO IN HDMI 3 AUDIO OUT DVI HDMI Connect a PC with an S-Video connector at the back Connect a PC with a DVI connector TV ANTENNA HDMI 1 R R R SERV. Use a mono to stereo adapter (not supplied) for mono equipment. Set the output of the cable box to the video jack...

User Manual
Page 29
... output setting that headphones are available on the back and side of your country. Press at www.magnavox.com/suppor t. another source and then switch back to the power. While the TV and the accessory device are made according to the correct source input. Ensure the indicator light on... the power cord from the power socket outlet, wait 60 seconds and reconnect the power cord. is muted - increase the volume Sound is distorted, Press FORMAT on the TV blinks when you have not crossed the red audio cable with a coaxial connection. EN 29 If you use a component cable, ...
... output setting that headphones are available on the back and side of your country. Press at www.magnavox.com/suppor t. another source and then switch back to the power. While the TV and the accessory device are made according to the correct source input. Ensure the indicator light on... the power cord from the power socket outlet, wait 60 seconds and reconnect the power cord. is muted - increase the volume Sound is distorted, Press FORMAT on the TV blinks when you have not crossed the red audio cable with a coaxial connection. EN 29 If you use a component cable, ...
User Manual
Page 31
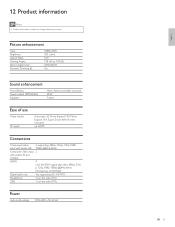
12 Product information Note • Product information is subject to WUXGA Digital audio out: Yes, supporting AC-3 & PCM Headphone: 1 (on the side of TV) USB: 1 (on the side of use Video modes: PC input: Automatic, 4:3, Movie Expand 14:9, Movie Expand 16:9, Super Zoom, Wide Screen, Unscaled via HDMI Connections...: Brightness: Aspect Ratio: Viewing Angles: Built-in digital tuner: Dynamic Dimming BL: 1080p 60Hz 500 cd/m2 16:9 178 (V) by 178 (H) ATSC/QAM Yes Sound enhancement Mono/Stereo: Power output (RMS Watts): Equalizer : Mono, Stereo, Incredible surround 20 W 5 band Ease of...
12 Product information Note • Product information is subject to WUXGA Digital audio out: Yes, supporting AC-3 & PCM Headphone: 1 (on the side of TV) USB: 1 (on the side of use Video modes: PC input: Automatic, 4:3, Movie Expand 14:9, Movie Expand 16:9, Super Zoom, Wide Screen, Unscaled via HDMI Connections...: Brightness: Aspect Ratio: Viewing Angles: Built-in digital tuner: Dynamic Dimming BL: 1080p 60Hz 500 cd/m2 16:9 178 (V) by 178 (H) ATSC/QAM Yes Sound enhancement Mono/Stereo: Power output (RMS Watts): Equalizer : Mono, Stereo, Incredible surround 20 W 5 band Ease of...

Product Spec Sheet
Page 1
47MF439B 47" High Definition LCD TV with TRUE 1080P With its 1080p Full HD panel, Blu-ray and HD DVD player support and a digital ATSC tuner, the 47MF439B delivers the very best digital HD TV display, HD media connectivity, Dolby Digital sound, SPDIF audio output and doubles as a PC display. •LCD Full HD display, 1920x1080p •Powered by...
47MF439B 47" High Definition LCD TV with TRUE 1080P With its 1080p Full HD panel, Blu-ray and HD DVD player support and a digital ATSC tuner, the 47MF439B delivers the very best digital HD TV display, HD media connectivity, Dolby Digital sound, SPDIF audio output and doubles as a PC display. •LCD Full HD display, 1920x1080p •Powered by...

Product Spec Sheet
Page 2
... signals: CVBS, S-video, component and HDMI (480i/p, 720p, 1080i and 1080p). or their respective owners. © 2009 Magnavox. This is fully backward compatible with an enhanced viewing experience. Multiple AV inputs plus 1080p Multiple AV inputs are subject to change...480i 60Hz 480p 60Hz 720p 60Hz 1080i 60Hz 1080p 60Hz Sound • Output power (RMS): 2 x 10W • Sound System: Dolby Digital (AC-3), Mono, SAP, Stereo Loudspeakers • Built-in dark scenes. 47MF439B/F7 47" High Definition LCD TV with optimum brightness and superb colors. Dolby Digital Because ...
... signals: CVBS, S-video, component and HDMI (480i/p, 720p, 1080i and 1080p). or their respective owners. © 2009 Magnavox. This is fully backward compatible with an enhanced viewing experience. Multiple AV inputs plus 1080p Multiple AV inputs are subject to change...480i 60Hz 480p 60Hz 720p 60Hz 1080i 60Hz 1080p 60Hz Sound • Output power (RMS): 2 x 10W • Sound System: Dolby Digital (AC-3), Mono, SAP, Stereo Loudspeakers • Built-in dark scenes. 47MF439B/F7 47" High Definition LCD TV with optimum brightness and superb colors. Dolby Digital Because ...


