User Guide
Page 12
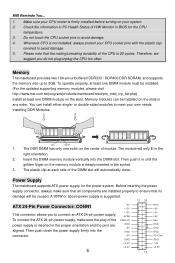
... to 2GB. Installing DDR Modules Volt Notch 1. The plastic clip at least one DIMM module on the memory module is suggested. 12 24 ATX 24-Pin Power Connector: CONN1 This connector allows you do not plug/unplug the CPU too often. Make sure your CPU cooler is inserted ...that all components are aligned. To operate properly, at least one notch on the slots in BIOS for the power system. You can be installed. (For the updated supporting memory modules, please visit http://www.msi.com.tw/program/products/mainboard/mbd/pro_mbd_trp_list.php) Install at each side of H/W Monitor in...
... to 2GB. Installing DDR Modules Volt Notch 1. The plastic clip at least one DIMM module on the memory module is suggested. 12 24 ATX 24-Pin Power Connector: CONN1 This connector allows you do not plug/unplug the CPU too often. Make sure your CPU cooler is inserted ...that all components are aligned. To operate properly, at least one notch on the slots in BIOS for the power system. You can be installed. (For the updated supporting memory modules, please visit http://www.msi.com.tw/program/products/mainboard/mbd/pro_mbd_trp_list.php) Install at each side of H/W Monitor in...
User Guide
Page 14
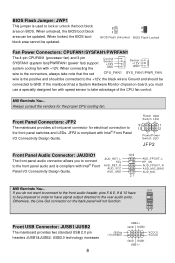
... AUD_FPOUT_L HP_ON AUD_FPOUT_R AUD_MIC_BIAS AUD_MIC MSI Reminds You... 10 9 If you do not want to connect to the front audio header, pins 5 & 6, 9 & 10 have to be connected to the rear audio ports. VCC(1) VCC(2) GND USB1USB1+ When unlocked, the BIOS boot block area can be updated. 2 2 1 1 BIOS Flash Unlocked BIOS Flash Locked Fan Power Connectors...
... AUD_FPOUT_L HP_ON AUD_FPOUT_R AUD_MIC_BIAS AUD_MIC MSI Reminds You... 10 9 If you do not want to connect to the front audio header, pins 5 & 6, 9 & 10 have to be connected to the rear audio ports. VCC(1) VCC(2) GND USB1USB1+ When unlocked, the BIOS boot block area can be updated. 2 2 1 1 BIOS Flash Unlocked BIOS Flash Locked Fan Power Connectors...


