User Guide
Page 3
...notice. Alternatively, please try the following help resources for FAQ, technical guide, BIOS updates, driver updates, and other information: http://www.msi.com.tw/ Contact our technical staff at: support@msi.com.tw iii We take every care in this document, but no solution can... please contact your place of purchase or local distributor. AMI® is the intellectual property of MICRO-STAR INTERNATIONAL. Visit the MSI website for further guidance. Trademarks All trademarks are registered trademarks of International Business Machines Corporation. PS/2 and OS®/2 are the ...
...notice. Alternatively, please try the following help resources for FAQ, technical guide, BIOS updates, driver updates, and other information: http://www.msi.com.tw/ Contact our technical staff at: support@msi.com.tw iii We take every care in this document, but no solution can... please contact your place of purchase or local distributor. AMI® is the intellectual property of MICRO-STAR INTERNATIONAL. Visit the MSI website for further guidance. Trademarks All trademarks are registered trademarks of International Business Machines Corporation. PS/2 and OS®/2 are the ...
User Guide
Page 5
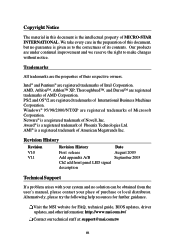
... Copyright Notice iii Revision History iii Technical Support iii Safety Instructions v Chapter 1. Getting Started 1-1 Mainboard Specifications 1-2 Mainboard Layout 1-4 MSI Special Features 1-5 Color Management 1-5 Core Center 1-6 Core Cell™ Chip 1-9 Dynamic Overclocking Technology 1-10 Live BIOS™/Live Driver 1-11 Live Monitor 1-12 D-Bracket™ 2 (Optional 1-13 Chapter 2. Hardware Setup 2-1 Quick Components Guide...
... Copyright Notice iii Revision History iii Technical Support iii Safety Instructions v Chapter 1. Getting Started 1-1 Mainboard Specifications 1-2 Mainboard Layout 1-4 MSI Special Features 1-5 Color Management 1-5 Core Center 1-6 Core Cell™ Chip 1-9 Dynamic Overclocking Technology 1-10 Live BIOS™/Live Driver 1-11 Live Monitor 1-12 D-Bracket™ 2 (Optional 1-13 Chapter 2. Hardware Setup 2-1 Quick Components Guide...
User Guide
Page 7
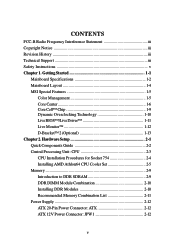
Using 4- VIA VT8237 Serial ATA RAID Introduction B-1 vii or 6-Channel Audio Function A-1 AppendixB. Chapter 3. BIOS Setup 3-1 Entering Setup 3-2 Selecting the First Boot Device 3-2 Control Keys 3-3 Getting Help 3-3 The Main Menu 3-4 Standard CMOS Features 3-6 Advanced BIOS Features 3-8 Advanced Chipset Features 3-12 Power Management Features 3-15 PNP/PCI Configurations 3-19 Integrated Peripherals 3-21 PC Health Status 3-24 Frequency/Voltage Control 3-25 Set Supervisor/User Password 3-27 Load High Performance/BIOS Setup Defaults 3-28 AppendixA.
Using 4- VIA VT8237 Serial ATA RAID Introduction B-1 vii or 6-Channel Audio Function A-1 AppendixB. Chapter 3. BIOS Setup 3-1 Entering Setup 3-2 Selecting the First Boot Device 3-2 Control Keys 3-3 Getting Help 3-3 The Main Menu 3-4 Standard CMOS Features 3-6 Advanced BIOS Features 3-8 Advanced Chipset Features 3-12 Power Management Features 3-15 PNP/PCI Configurations 3-19 Integrated Peripherals 3-21 PC Health Status 3-24 Frequency/Voltage Control 3-25 Set Supervisor/User Password 3-27 Load High Performance/BIOS Setup Defaults 3-28 AppendixA.
User Guide
Page 10
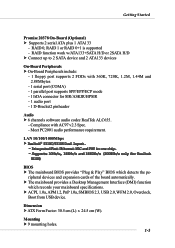
... pinheader Audio h 6 channels software audio codec RealTek ALC655. - SSuuppppoorrttss 1100MMbb//ss,, 110000MMbb//ss aanndd 11000000MMbb//ss ((11000000MMbb//ss oonnllyy ffoorr RReeaalltteekk 88111100SS)) BIOS h The mainboard BIOS provides "Plug & Play" BIOS which records your mainboard specifications. LAN 10/100/1000Mbps h RReeaalltteekk®® 88111100CC//88111100SSDDuuaallllaayyoouutt.. --IInntteeggrraatteeddFFaassttEEtthheerrnneettMMAACCaannddPPHHYYiinnoonneecchhiipp.. -- ripheral devices and expansion cards of the board...
... pinheader Audio h 6 channels software audio codec RealTek ALC655. - SSuuppppoorrttss 1100MMbb//ss,, 110000MMbb//ss aanndd 11000000MMbb//ss ((11000000MMbb//ss oonnllyy ffoorr RReeaalltteekk 88111100SS)) BIOS h The mainboard BIOS provides "Plug & Play" BIOS which records your mainboard specifications. LAN 10/100/1000Mbps h RReeaalltteekk®® 88111100CC//88111100SSDDuuaallllaayyoouutt.. --IInntteeggrraatteeddFFaassttEEtthheerrnneettMMAACCaannddPPHHYYiinnoonneecchhiipp.. -- ripheral devices and expansion cards of the board...
User Guide
Page 11
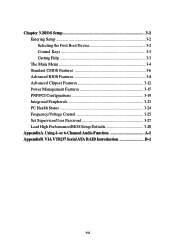
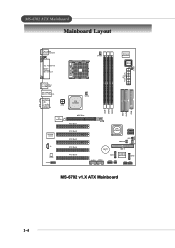
O u t M:Line-Out B:SPDIF Out JPW1 VIA K8T800 SFAN1 DDR 1 DDR 2 DDR 3 IDE 1 IDE 2 FDD 1 VIA VT6307 R e al Te k 8 110 S J4 Codec JAUD1 AGP Slot PCI Slot 1 PCI Slot 2 PCI Slot 3 PCI Slot 4 ... v1.X ATX Mainboard 1-4 MS-6702 ATX Mainboard Mainboard Layout Top : mouse Bottom: keyboard Top : Parallel P ort Bottom: 1394 port Mini 1394 port CFAN1 Winbond W83697HF BIOS JP1 ATX Power Supply JCASE1 T: SPDIF Out B: USB ports Top: LAN jack Bottom: USB ports T: L i n e- I n M:Line-Out B:Mic...
O u t M:Line-Out B:SPDIF Out JPW1 VIA K8T800 SFAN1 DDR 1 DDR 2 DDR 3 IDE 1 IDE 2 FDD 1 VIA VT6307 R e al Te k 8 110 S J4 Codec JAUD1 AGP Slot PCI Slot 1 PCI Slot 2 PCI Slot 3 PCI Slot 4 ... v1.X ATX Mainboard 1-4 MS-6702 ATX Mainboard Mainboard Layout Top : mouse Bottom: keyboard Top : Parallel P ort Bottom: 1394 port Mini 1394 port CFAN1 Winbond W83697HF BIOS JP1 ATX Power Supply JCASE1 T: SPDIF Out B: USB ports Top: LAN jack Bottom: USB ports T: L i n e- I n M:Line-Out B:Mic...
User Guide
Page 15
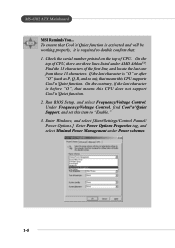
... "Enable." 3. On the top of CPU, there are three lines listed under Power schemes. 1-8 Find the 13 characters of CPU. Run BIOS Setup, and select Frequency/Voltage Control. Enter Windows, and select [Start/Settings/Control Pannel/ Power Options.] Enter Power Options Properties tag, and ...CPU does not support Cool'n'Quiet function. 2. If the last character is before "O", that means this CPU supports Cool'n'Quiet function. MS-6702 ATX Mainboard MSI Reminds You... Check the serial number printed on ), that : 1. On the contrary, if the last character is "O" or after "O" (such as ...
... "Enable." 3. On the top of CPU, there are three lines listed under Power schemes. 1-8 Find the 13 characters of CPU. Run BIOS Setup, and select Frequency/Voltage Control. Enter Windows, and select [Start/Settings/Control Pannel/ Power Options.] Enter Power Options Properties tag, and ...CPU does not support Cool'n'Quiet function. 2. If the last character is before "O", that means this CPU supports Cool'n'Quiet function. MS-6702 ATX Mainboard MSI Reminds You... Check the serial number printed on ), that : 1. On the contrary, if the last character is "O" or after "O" (such as ...
User Guide
Page 18
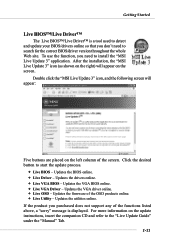
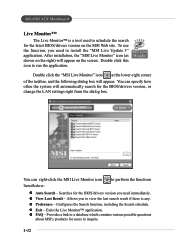
... whole Web site. For more information on the left column of the screen. Getting Started Live BIOS™/Live Driver™ The Live BIOS™/Live Driver™ is displayed. Double click the "MSI Live Update 3" icon, and the following screen will appear on the screen. To use the ...of the OSD products online. Ø Live Utility - If the product you need to install the "MSI Live Update 3" application. Updates the VGA BIOS online. Ø Live VGA Driver - After the installation, the "MSI Live Update 3" icon (as shown on the right) will appear: Five buttons are placed on the...
... whole Web site. For more information on the left column of the screen. Getting Started Live BIOS™/Live Driver™ The Live BIOS™/Live Driver™ is displayed. Double click the "MSI Live Update 3" icon, and the following screen will appear on the screen. To use the ...of the OSD products online. Ø Live Utility - If the product you need to install the "MSI Live Update 3" application. Updates the VGA BIOS online. Ø Live VGA Driver - After the installation, the "MSI Live Update 3" icon (as shown on the right) will appear: Five buttons are placed on the...
User Guide
Page 19
...box. Provides a link to a database which contains various possible questions about MSI's products for the latest BIOS/drivers version on the screen. After installation, the "MSI Live Monitor" icon (as shown on the right) will appear on the MSI Web site. z Preference - Exits the Live Monitor™ application. ...inquire. 1-12 z View Last Result - z FAQ - Double click the "MSI Live Monitor" icon at the lower-right corner of the taskbar, and the following dialog box will automatically search for the BIOS/drivers version you to view the last search result if there is a tool used...
...box. Provides a link to a database which contains various possible questions about MSI's products for the latest BIOS/drivers version on the screen. After installation, the "MSI Live Monitor" icon (as shown on the right) will appear on the MSI Web site. z Preference - Exits the Live Monitor™ application. ...inquire. 1-12 z View Last Result - z FAQ - Double click the "MSI Live Monitor" icon at the lower-right corner of the taskbar, and the following dialog box will automatically search for the BIOS/drivers version you to view the last search result if there is a tool used...
User Guide
Page 20
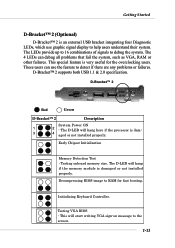
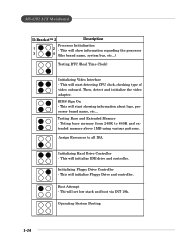
... feature is very useful for fast booting. The 4 LEDs can use graphic signal display to debug the system. Decompressing BIOS image to RAM for the overclocking users. The D-LED will hang if the memory module is damaged or not installed properly.... Initializing Keyboard Controller. Testing onboard memory size. Testing VGA BIOS - D-Bracket™ 2 1 2 3 4 Red Green D-Bracket™ 2 Description System Power ON 1 2 - The LEDs provide up to 16 combinations of...
... feature is very useful for fast booting. The 4 LEDs can use graphic signal display to debug the system. Decompressing BIOS image to RAM for the overclocking users. The D-LED will hang if the memory module is damaged or not installed properly.... Initializing Keyboard Controller. Testing onboard memory size. Testing VGA BIOS - D-Bracket™ 2 1 2 3 4 Red Green D-Bracket™ 2 Description System Power ON 1 2 - The LEDs provide up to 16 combinations of...
User Guide
Page 21
Testing Base and Extended Memory - Initializing Floppy Drive Controller - Boot Attempt - Operating System Booting 1-14 BIOS Sign On - Thi will show information regarding the processor 3 4 (like brand name, system bus, etc...) Testing RTC (Real Time Clock) Initializing Video Interface - This will ...
Testing Base and Extended Memory - Initializing Floppy Drive Controller - Boot Attempt - Operating System Booting 1-14 BIOS Sign On - Thi will show information regarding the processor 3 4 (like brand name, system bus, etc...) Testing RTC (Real Time Clock) Initializing Video Interface - This will ...

User Guide
Page 39
... FDD1 The mainboard provides a standard floppy disk drive connector that supports 360K, 720K, 1.2M, 1.44M and 2.88M floppy disk types. You must enter the BIOS utility and clear the record. MS-6702 ATX Mainboard Connectors The mainboard provides connectors to connect to use the IR function. FDD1 IrDA Infrared Module... Header: JIR1 The connector allows you must configure the setting through the BIOS setup to FDD, IDE HDD, case, modem, LAN, USB Ports, IR module and CPU/System/Power Supply FAN. The system will be short...
... FDD1 The mainboard provides a standard floppy disk drive connector that supports 360K, 720K, 1.2M, 1.44M and 2.88M floppy disk types. You must enter the BIOS utility and clear the record. MS-6702 ATX Mainboard Connectors The mainboard provides connectors to connect to use the IR function. FDD1 IrDA Infrared Module... Header: JIR1 The connector allows you must configure the setting through the BIOS setup to FDD, IDE HDD, case, modem, LAN, USB Ports, IR module and CPU/System/Power Supply FAN. The system will be short...

User Guide
Page 42
MSI Reminds You... Press the switch once to this connector. Press any key to wake up to four hard disk drives, CD-ROM, 120MB Floppy (reserved .... 1 2 JGS1 2-21 IDE1 IDE2 IDE1 (Primary IDE Connector) The first hard drive should always be connected to Slave mode by hard disk vendors for future BIOS) and other devices. If you install two hard disks on cable, you must configure second hard drive to the hard disk documentation supplied by setting...
MSI Reminds You... Press the switch once to this connector. Press any key to wake up to four hard disk drives, CD-ROM, 120MB Floppy (reserved .... 1 2 JGS1 2-21 IDE1 IDE2 IDE1 (Primary IDE Connector) The first hard drive should always be connected to Slave mode by hard disk vendors for future BIOS) and other devices. If you install two hard disks on cable, you must configure second hard drive to the hard disk documentation supplied by setting...
User Guide
Page 48
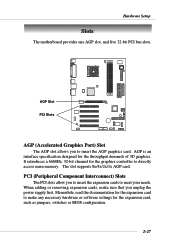
...32-bit channel for the throughput demands of 3D graphics. Meanwhile, read the documentation for the expansion card, such as jumpers, switches or BIOS configuration. 2-27 AGP is an interface specification designed for the graphics controller to make sure that you unplug the power supply first. When adding...to directly access main memory. PCI (Peripheral Component Interconnect) Slots The PCI slots allow you to meet your needs. Hardware Setup Slots The motherboard provides one AGP slot, and five 32-bit PCI bus slots. AGP Slot PCI Slots AGP (Accelerated Graphics Port) Slot The AGP slot...
...32-bit channel for the throughput demands of 3D graphics. Meanwhile, read the documentation for the expansion card, such as jumpers, switches or BIOS configuration. 2-27 AGP is an interface specification designed for the graphics controller to make sure that you unplug the power supply first. When adding...to directly access main memory. PCI (Peripheral Component Interconnect) Slots The PCI slots allow you to meet your needs. Hardware Setup Slots The motherboard provides one AGP slot, and five 32-bit PCI bus slots. AGP Slot PCI Slots AGP (Accelerated Graphics Port) Slot The AGP slot...
User Guide
Page 50
BIOS Setup BIOS Setup This chapter provides information on the screen during the system booting up, and requests you to change the default settings for optimum use. BIOS Setup Chapter 3. You may need to run the Setup program when: ” An error message appears on the BIOS Setup program and allows you to run SETUP. ” You want to configure the system for customized features. 3-1
BIOS Setup BIOS Setup This chapter provides information on the screen during the system booting up, and requests you to change the default settings for optimum use. BIOS Setup Chapter 3. You may need to run the Setup program when: ” An error message appears on the BIOS Setup program and allows you to run SETUP. ” You want to configure the system for customized features. 3-1

User Guide
Page 51
DEL:Setup F11:Boot Menu F12:Network boot TAB:Logo If the message disappears before you respond and you to respond in the BIOS setup utility, so next time when you want to boot from the selected device. The POST messages might pass by too quickly for you still ... not make changes to the settings in time. Selecting the First Boot Device You are allowed to select the 1st boot device without entering the BIOS setup utility by simultaneously pressing , , and keys. The selection will still use the original first boot device to boot up. 3-2 You may also restart the...
DEL:Setup F11:Boot Menu F12:Network boot TAB:Logo If the message disappears before you respond and you to respond in the BIOS setup utility, so next time when you want to boot from the selected device. The POST messages might pass by too quickly for you still ... not make changes to the settings in time. Selecting the First Boot Device You are allowed to select the 1st boot device without entering the BIOS setup utility by simultaneously pressing , , and keys. The selection will still use the original first boot device to boot up. 3-2 You may also restart the...
User Guide
Page 52
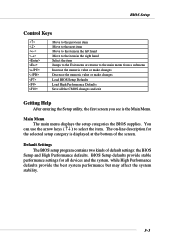
... ↑↓ ) to the main menu from a submenu Increase the numeric value or make changes Decrease the numeric value or make changes Load BIOS Setup Defaults Load High Performance Defaults Save all devices and the system, while High Performance defaults provide the best system performance but may affect the...Getting Help After entering the Setup utility, the first screen you see is displayed at the bottom of default settings: the BIOS Setup and High Performance defaults. BIOS Setup Control Keys Enter> Move to the previous item Move to the next item Move to the item in the left ...
... ↑↓ ) to the main menu from a submenu Increase the numeric value or make changes Decrease the numeric value or make changes Load BIOS Setup Defaults Load High Performance Defaults Save all devices and the system, while High Performance defaults provide the best system performance but may affect the...Getting Help After entering the Setup utility, the first screen you see is displayed at the bottom of default settings: the BIOS Setup and High Performance defaults. BIOS Setup Control Keys Enter> Move to the previous item Move to the next item Move to the item in the left ...
User Guide
Page 53
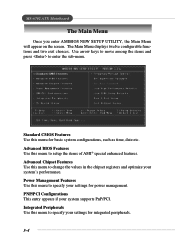
... on the screen. Standard CMOS Features Use this menu to change the values in the chipset registers and optimize your system supports PnP/PCI. Advanced BIOS Features Use this menu for power management. The Main Menu displays twelve configurable functions and two exit choices. Power Management Features Use this menu to...
... on the screen. Standard CMOS Features Use this menu to change the values in the chipset registers and optimize your system supports PnP/PCI. Advanced BIOS Features Use this menu for power management. The Main Menu displays twelve configurable functions and two exit choices. Power Management Features Use this menu to...

User Guide
Page 54
.... Save & Exit Setup Save changes to load factory default settings into the BIOS for frequency/voltage control. Load BIOS Setup Defaults Use this menu to load the BIOS values for the best system performance, but the system stability may be affected. BIOS Setup PC Health Status This entry shows your settings for stable system...
.... Save & Exit Setup Save changes to load factory default settings into the BIOS for frequency/voltage control. Load BIOS Setup Defaults Use this menu to load the BIOS values for the best system performance, but the system stability may be affected. BIOS Setup PC Health Status This entry shows your settings for stable system...

User Guide
Page 55
The format is . year The year can be adjusted by BIOS. System Date This allows you to set the system time that you want to modify and use the or keys to switch to Sat, determined ...
The format is . year The year can be adjusted by BIOS. System Date This allows you to set the system time that you want to modify and use the or keys to switch to Sat, determined ...
User Guide
Page 56
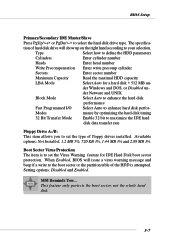
... performance Fast Programmed I/O Select Auto to select the hard disk drive type. When Enabled, BIOS will show up on the right hand according to set the type of floppy drives installed. BIOS Setup Primary/Secondary IDE Master/Slave Press PgUp/ or PgDn/ to enhance hard disk perfor...- MSI Reminds You... Setting options: Disabled and Enabled. This feature only protects the boot sector, not the ...
... performance Fast Programmed I/O Select Auto to select the hard disk drive type. When Enabled, BIOS will show up on the right hand according to set the type of floppy drives installed. BIOS Setup Primary/Secondary IDE Master/Slave Press PgUp/ or PgDn/ to enhance hard disk perfor...- MSI Reminds You... Setting options: Disabled and Enabled. This feature only protects the boot sector, not the ...


