
Getting Started
Page 1
... cartridge - Jams and misfeeds troubleshooting - Ordering supplies - 2400 Series Getting Started See the complete User's Guide on the CD for more detailed information about the following tasks: • Setting up the printer • Learning about the printer • Loading paper and original documents • Printing • Working with photos 5 Copying 4 x 6 photos 5 Using a PictBridge-enabled...
... cartridge - Jams and misfeeds troubleshooting - Ordering supplies - 2400 Series Getting Started See the complete User's Guide on the CD for more detailed information about the following tasks: • Setting up the printer • Learning about the printer • Loading paper and original documents • Printing • Working with photos 5 Copying 4 x 6 photos 5 Using a PictBridge-enabled...
Getting Started
Page 3
...the installation. If necessary, double-click setup.exe. or Click Start Æ Control Panel Æ Printers and Other Hardware Æ Printers and Faxes. 2 Double-click the Lexmark 2400 Series icon. 3 Click Printer, and make sure no check mark appears next to Pause Printing. 4 Make sure a check mark does... port of the USB cable into an electrical outlet that the print cartridge has been installed properly. Make sure the tape has been removed from the print cartridge and that other device such as the default printer and is marked with . b Double-click the CD-ROM drive ...
...the installation. If necessary, double-click setup.exe. or Click Start Æ Control Panel Æ Printers and Other Hardware Æ Printers and Faxes. 2 Double-click the Lexmark 2400 Series icon. 3 Click Printer, and make sure no check mark appears next to Pause Printing. 4 Make sure a check mark does... port of the USB cable into an electrical outlet that the print cartridge has been installed properly. Make sure the tape has been removed from the print cartridge and that other device such as the default printer and is marked with . b Double-click the CD-ROM drive ...
Getting Started
Page 6
...Web Toolbar The Lexmark Web Toolbar can open Print Properties from a Web page. • Preview a Web page before stacking. Use the Web Toolbar to print printer-friendly Web pages. Transparencies may take up to 15 minutes to a computer. To open the All-In-One Center, use one of paper. ...You can reduce red-eye, crop your photos, resize your photos, adjust brightness and contrast, and use one of the page Check the ink level, and install a new print cartridge if necessary. Note: The Web Toolbar launches automatically whenever you want to create. Each paper brand accepts ...
...Web Toolbar The Lexmark Web Toolbar can open Print Properties from a Web page. • Preview a Web page before stacking. Use the Web Toolbar to print printer-friendly Web pages. Transparencies may take up to 15 minutes to a computer. To open the All-In-One Center, use one of paper. ...You can reduce red-eye, crop your photos, resize your photos, adjust brightness and contrast, and use one of the page Check the ink level, and install a new print cartridge if necessary. Note: The Web Toolbar launches automatically whenever you want to create. Each paper brand accepts ...
Getting Started
Page 7
...Click the Maintain/Troubleshoot button. 4 Click Maintenance. 5 Click Clean to clean them. An alignment page prints. 7 Follow the instructions on aligning the print cartridge without a computer, see the Setup sheet. 1 Load paper. 2 From the desktop, double-click the Imaging Studio icon. 3 Click the Maintain/Troubleshoot .... 6 Click Print. Aligning the print cartridge using the computer For instructions on the computer screen. If the document still does not have the print quality you : • Use the appropriate paper for the document. Use Lexmark Premium Photo Paper if you are not ...
...Click the Maintain/Troubleshoot button. 4 Click Maintenance. 5 Click Clean to clean them. An alignment page prints. 7 Follow the instructions on aligning the print cartridge without a computer, see the Setup sheet. 1 Load paper. 2 From the desktop, double-click the Imaging Studio icon. 3 Click the Maintain/Troubleshoot .... 6 Click Print. Aligning the print cartridge using the computer For instructions on the computer screen. If the document still does not have the print quality you : • Use the appropriate paper for the document. Use Lexmark Premium Photo Paper if you are not ...
Getting Started
Page 8
...specific warranty information that user. Extent of remedies are not cumulative. The replacement may be available for repair or replacement (at http:// support.lexmark.com. US Statement of , or damage to, a product in the following paragraph. Lexington, KY This limited warranty applies to in ...free of original purchase and this limited warranty is true even if you specific legal rights. You should transfer proof of all print cartridges, programs, data, and removable storage media (unless directed otherwise by you may recover actual damages up to you present for resale,...
...specific warranty information that user. Extent of remedies are not cumulative. The replacement may be available for repair or replacement (at http:// support.lexmark.com. US Statement of , or damage to, a product in the following paragraph. Lexington, KY This limited warranty applies to in ...free of original purchase and this limited warranty is true even if you specific legal rights. You should transfer proof of all print cartridges, programs, data, and removable storage media (unless directed otherwise by you may recover actual damages up to you present for resale,...
Getting Started
Page 9
...on the date of original purchase as warranted during the warranty period, contact a Remarketer or Lexmark for which perform like new parts • Is, during normal use, free from any print cartridge(s), programs, data, and removable storage media (unless otherwise directed by you based on a ... or option with the product for repair or replacement (at http://support.lexmark.com. The replacement may be required to present proof of original purchase and a copy of this statement as toner cartridges, inkjet cartridges, and ribbons), except where such mandatory use , and not for by...
...on the date of original purchase as warranted during the warranty period, contact a Remarketer or Lexmark for which perform like new parts • Is, during normal use, free from any print cartridge(s), programs, data, and removable storage media (unless otherwise directed by you based on a ... or option with the product for repair or replacement (at http://support.lexmark.com. The replacement may be required to present proof of original purchase and a copy of this statement as toner cartridges, inkjet cartridges, and ribbons), except where such mandatory use , and not for by...

User's Guide
Page 4
...first (reverse page order 29 Working with photos 30 Printing photos...30 Printing photos stored on the computer...30 Using a PictBridge-enabled digital camera to control printing photos 31 Customizing photos...31 Creating and printing a scrapbook or album page 31 Adding ...using the software...39 Receiving a fax using the software...40 Networking the printer 41 Shared printing...41 Maintaining the printer 42 Changing a print cartridge...42 Removing a used print cartridge...42 Installing a print cartridge...42 Achieving better print quality...44 Improving print quality...44 Aligning the ...
...first (reverse page order 29 Working with photos 30 Printing photos...30 Printing photos stored on the computer...30 Using a PictBridge-enabled digital camera to control printing photos 31 Customizing photos...31 Creating and printing a scrapbook or album page 31 Adding ...using the software...39 Receiving a fax using the software...40 Networking the printer 41 Shared printing...41 Maintaining the printer 42 Changing a print cartridge...42 Removing a used print cartridge...42 Installing a print cartridge...42 Achieving better print quality...44 Improving print quality...44 Aligning the ...
User's Guide
Page 5
...supplies...46 Using genuine Lexmark print cartridges 46 Refilling a print cartridge...47 Recycling Lexmark products...47 Troubleshooting...48 Setup troubleshooting...48 Power button is not lit...48 Software does not install...48 Page does not print...49 Cannot print from digital camera using PictBridge 51 Print troubleshooting...51... Improving print quality...51 Poor text and graphic quality...52 Poor quality at the edges of the page...53 Printer does not print or respond...53 Print speed is ...
...supplies...46 Using genuine Lexmark print cartridges 46 Refilling a print cartridge...47 Recycling Lexmark products...47 Troubleshooting...48 Setup troubleshooting...48 Power button is not lit...48 Software does not install...48 Page does not print...49 Cannot print from digital camera using PictBridge 51 Print troubleshooting...51... Improving print quality...51 Poor text and graphic quality...52 Poor quality at the edges of the page...53 Printer does not print or respond...53 Print speed is ...

User's Guide
Page 9
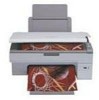
Setting up the printer Checking the box contents Name 1 Color print cartridge 2 Power supply cord 3 Installation software CD 4 Getting Started or Setup Solutions 5 Setup Sheet Description Cartridge to be installed in the printer Attaches to the power supply port located at the back of the printer • Installation software for the printer • Help • User's Guide in electronic format Additional information depending on your country or region Instructions on setting up printer hardware and software, and information on setup troubleshooting 9
Setting up the printer Checking the box contents Name 1 Color print cartridge 2 Power supply cord 3 Installation software CD 4 Getting Started or Setup Solutions 5 Setup Sheet Description Cartridge to be installed in the printer Attaches to the power supply port located at the back of the printer • Installation software for the printer • Help • User's Guide in electronic format Additional information depending on your country or region Instructions on setting up printer hardware and software, and information on setup troubleshooting 9

User's Guide
Page 10
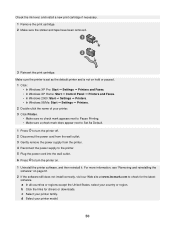
Connect a PictBridge-enabled digital camera to the printer. Operate the printer. Stack paper as it exits. Install or replace a print cartridge. 10 Access the scanner glass. Align paper when feeding. Scan, copy, or remove an item. 3 Use the 1 Scanner support 2 Print cartridge carrier 1 2 4 5 To Hold up the scanner unit. Learning about the printer Understanding the parts of the printer 6 1 5 7 4 Use the 1 Paper support 2 Control panel 3 PictBridge port 4 Paper exit tray 5 Top cover 6 Paper guide 7 Scanner glass 32 To Load paper.
Connect a PictBridge-enabled digital camera to the printer. Operate the printer. Stack paper as it exits. Install or replace a print cartridge. 10 Access the scanner glass. Align paper when feeding. Scan, copy, or remove an item. 3 Use the 1 Scanner support 2 Print cartridge carrier 1 2 4 5 To Hold up the scanner unit. Learning about the printer Understanding the parts of the printer 6 1 5 7 4 Use the 1 Paper support 2 Control panel 3 PictBridge port 4 Paper exit tray 5 Top cover 6 Paper guide 7 Scanner glass 32 To Load paper.

User's Guide
Page 11
... Connect the printer to a power source. Using the control panel Press 1 2 3 4 To Make a color copy. Make a 4 x 6 in. or 10 x 15 cm borderless, color copy of a photo. • Open the All-In-One Center and preview... the scan on and off. • Cancel a copy, scan, or print job. • Reset the printer. • Feed or eject paper. Note: To ... back alignment process, follow the instructions on the computer screen. • Turn the printer on the computer screen. • Print an alignment page if the button is held...
... Connect the printer to a power source. Using the control panel Press 1 2 3 4 To Make a color copy. Make a 4 x 6 in. or 10 x 15 cm borderless, color copy of a photo. • Open the All-In-One Center and preview... the scan on and off. • Cancel a copy, scan, or print job. • Reset the printer. • Feed or eject paper. Note: To ... back alignment process, follow the instructions on the computer screen. • Turn the printer on the computer screen. • Print an alignment page if the button is held...

User's Guide
Page 12
... task you to complete a task. The Photo Editor Edit photos and graphics. The All-In-One Center Scan, copy, print, or fax. The Solution Center Find troubleshooting, maintenance, and cartridge ordering information. Share photos • Scan and e-mail images or photos. • Find and... the desktop, double-click the Imaging Studio icon. 1 Click StartŒPrograms or All ProgramsŒLexmark 2400 Series. 2 Select Imaging Studio. Learning about the software Using the printer software Use this software To The Imaging Studio Open the software component necessary for you want to complete....
... task you to complete a task. The Photo Editor Edit photos and graphics. The All-In-One Center Scan, copy, print, or fax. The Solution Center Find troubleshooting, maintenance, and cartridge ordering information. Share photos • Scan and e-mail images or photos. • Find and... the desktop, double-click the Imaging Studio icon. 1 Click StartŒPrograms or All ProgramsŒLexmark 2400 Series. 2 Select Imaging Studio. Learning about the software Using the printer software Use this software To The Imaging Studio Open the software component necessary for you want to complete....

User's Guide
Page 16
... printing settings. • Share information with us regarding how you use the printer. • Obtain software version information. Advanced • Change the appearance of the printer. For example, while printing, the status of the printer is complete before installing a new print cartridge. • View shopping options for more information, click Help in the lower...
... printing settings. • Share information with us regarding how you use the printer. • Obtain software version information. Advanced • Change the appearance of the printer. For example, while printing, the status of the printer is complete before installing a new print cartridge. • View shopping options for more information, click Help in the lower...
User's Guide
Page 42
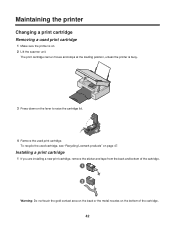
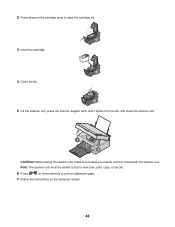
... to raise the cartridge lid. 4 Remove the used print cartridge 1 Make sure the printer is on. 2 Lift the scanner unit. Warning: Do not touch the gold contact area on the back or the metal nozzles on page 47. Maintaining the printer Changing a print cartridge Removing a used print cartridge. To recycle the used cartridge, see "Recycling Lexmark products" on...
... to raise the cartridge lid. 4 Remove the used print cartridge 1 Make sure the printer is on. 2 Lift the scanner unit. Warning: Do not touch the gold contact area on the back or the metal nozzles on page 47. Maintaining the printer Changing a print cartridge Removing a used print cartridge. To recycle the used cartridge, see "Recycling Lexmark products" on...
User's Guide
Page 43
Note: The scanner unit must be closed to start a new scan, print, copy, or fax job. 6 Press for three seconds to print an alignment page. 7 Follow the instructions on the cartridge lever to raise the cartridge lid. 3 Insert the cartridge. 4 Close the lid. 5 Lift the scanner unit, press the scanner support back until it slides into the slot, and close the scanner unit. 1 3 2 CAUTION: When closing the scanner unit, make sure to keep your hands out from underneath the scanner unit. 2 Press down on the computer screen. 43
Note: The scanner unit must be closed to start a new scan, print, copy, or fax job. 6 Press for three seconds to print an alignment page. 7 Follow the instructions on the cartridge lever to raise the cartridge lid. 3 Insert the cartridge. 4 Close the lid. 5 Lift the scanner unit, press the scanner support back until it slides into the slot, and close the scanner unit. 1 3 2 CAUTION: When closing the scanner unit, make sure to keep your hands out from underneath the scanner unit. 2 Press down on the computer screen. 43

User's Guide
Page 44
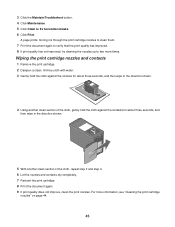
... print quality If you are not sure which side is the printable side, see the instructions that is still not satisfactory, replace the print cartridge. If print quality has not improved, continue to step 4. 4 Wipe the print nozzles and contacts. If print quality is a heavier weight... Click Align to step 3. 3 Remove and reinsert the print cartridge. If print quality has not improved, continue to step 2. 2 Clean the print cartridge nozzles. If the document still does not have the print quality you install it. Use Lexmark Premium Photo Paper if you are printing photos or other high-...
... print quality If you are not sure which side is the printable side, see the instructions that is still not satisfactory, replace the print cartridge. If print quality has not improved, continue to step 4. 4 Wipe the print nozzles and contacts. If print quality is a heavier weight... Click Align to step 3. 3 Remove and reinsert the print cartridge. If print quality has not improved, continue to step 2. 2 Clean the print cartridge nozzles. If the document still does not have the print quality you install it. Use Lexmark Premium Photo Paper if you are printing photos or other high-...
User's Guide
Page 45
...3 Click the Maintain/Troubleshoot button. 4 Click Maintenance. 5 Click Clean to two more information, see "Cleaning the print cartridge nozzles" on page 44. 45 Wiping the print cartridge nozzles and contacts 1 Remove the print cartridge. 2 Dampen a clean, lint-free cloth with water. 3 Gently hold the cloth against the nozzles for about three ... shown. 5 With another clean section of the cloth, repeat step 3 and step 4. 6 Let the nozzles and contacts dry completely. 7 Reinsert the print cartridge. 8 Print the document again. 9 If print quality does not improve, clean the print nozzles.
...3 Click the Maintain/Troubleshoot button. 4 Click Maintenance. 5 Click Clean to two more information, see "Cleaning the print cartridge nozzles" on page 44. 45 Wiping the print cartridge nozzles and contacts 1 Remove the print cartridge. 2 Dampen a clean, lint-free cloth with water. 3 Gently hold the cloth against the nozzles for about three ... shown. 5 With another clean section of the cloth, repeat step 3 and step 4. 6 Let the nozzles and contacts dry completely. 7 Reinsert the print cartridge. 8 Print the document again. 9 If print quality does not improve, clean the print nozzles.

User's Guide
Page 46
... does not cover damage caused by country or region Using genuine Lexmark print cartridges Lexmark printers, print cartridges, and photo paper are designed to replace, clean, or store it . • Do not remove a cartridge from appearing again for the indicated cartridge(s): • Replace your cartridge(s) with water. 2 Gently wipe the scanner glass clean. Cleaning the scanner glass 1 Dampen...
... does not cover damage caused by country or region Using genuine Lexmark print cartridges Lexmark printers, print cartridges, and photo paper are designed to replace, clean, or store it . • Do not remove a cartridge from appearing again for the indicated cartridge(s): • Replace your cartridge(s) with water. 2 Gently wipe the scanner glass clean. Cleaning the scanner glass 1 Dampen...

User's Guide
Page 47
Refilling a cartridge can affect print quality and may cause damage to Lexmark for recycling: 1 Visit our Web site at www.lexmark.com/recycle. 2 Follow the instructions on the computer screen. 47 For best results, use of failures or damage caused by a refilled cartridge. Recycling Lexmark products To return Lexmark products to the printer. Lexmark does not recommend use Lexmark supplies. Refilling a print cartridge The warranty does not cover repair of a refilled cartridge.
Refilling a cartridge can affect print quality and may cause damage to Lexmark for recycling: 1 Visit our Web site at www.lexmark.com/recycle. 2 Follow the instructions on the computer screen. 47 For best results, use of failures or damage caused by a refilled cartridge. Recycling Lexmark products To return Lexmark products to the printer. Lexmark does not recommend use Lexmark supplies. Refilling a print cartridge The warranty does not cover repair of a refilled cartridge.
User's Guide
Page 50
... to the printer. 5 Plug the power cord into the wall outlet. 6 Press to turn the printer on page 61. 2 If the software still does not install correctly, visit our Web site at www.lexmark.com to check for drivers or downloads. Check the ink level, and install a new print cartridge if necessary.... 1 Remove the print cartridge. 2 Make sure the sticker and ...
... to the printer. 5 Plug the power cord into the wall outlet. 6 Press to turn the printer on page 61. 2 If the software still does not install correctly, visit our Web site at www.lexmark.com to check for drivers or downloads. Check the ink level, and install a new print cartridge if necessary.... 1 Remove the print cartridge. 2 Make sure the sticker and ...


