
Getting Started
Page 1
...the following tasks: • Setting up the printer • Learning about the printer • Loading paper and original documents • Printing • Working with photos 5 Copying 4 x 6 photos 5 Using a PictBridge-enabled camera to print photos 5 Understanding the software 5 Using the Imaging Studio 5 Using the All-In-One Center 5 Using the Solution Center 6 Using... the print cartridge nozzles 7 Wiping the print cartridge nozzles and contacts 7 US Statement of Limited Warranty 8 Canadian Statement of Limited Warranty 9 Recycling Lexmark products • Troubleshooting -
...the following tasks: • Setting up the printer • Learning about the printer • Loading paper and original documents • Printing • Working with photos 5 Copying 4 x 6 photos 5 Using a PictBridge-enabled camera to print photos 5 Understanding the software 5 Using the Imaging Studio 5 Using the All-In-One Center 5 Using the Solution Center 6 Using... the print cartridge nozzles 7 Wiping the print cartridge nozzles and contacts 7 US Statement of Limited Warranty 8 Canadian Statement of Limited Warranty 9 Recycling Lexmark products • Troubleshooting -

Getting Started
Page 2
... documentation developed exclusively at any time. these available in all countries in China UNITED STATES GOVERNMENT RIGHTS This software and any existing intellectual property right may be used . Comments about this statement may not apply to you. In other ...periodically made at private expense. Federal Communications Commission (FCC) compliance information statement This product has been tested and found to comply with local law: LEXMARK INTERNATIONAL, INC., PROVIDES THIS PUBLICATION "AS IS" WITHOUT WARRANTY OF ANY KIND, EITHER EXPRESS OR IMPLIED, INCLUDING, BUT NOT LIMITED TO, ...
... documentation developed exclusively at any time. these available in all countries in China UNITED STATES GOVERNMENT RIGHTS This software and any existing intellectual property right may be used . Comments about this statement may not apply to you. In other ...periodically made at private expense. Federal Communications Commission (FCC) compliance information statement This product has been tested and found to comply with local law: LEXMARK INTERNATIONAL, INC., PROVIDES THIS PUBLICATION "AS IS" WITHOUT WARRANTY OF ANY KIND, EITHER EXPRESS OR IMPLIED, INCLUDING, BUT NOT LIMITED TO, ...
Getting Started
Page 3
...Æ Control Panel Æ Printers and Other Hardware Æ Printers and Faxes. 2 Double-click the Lexmark 2400 Series icon. 3 Click Printer, and make sure no check mark appears next to Pause Printing. 4 Make sure a check mark does appear next to remove the printer software. 3 Restart the computer. 4 ... the square end of the USB cable into the back of the printer. 3 Firmly plug the rectangular end of the computer. Removing and reinstalling the software 1 From the desktop, click Start Æ Programs Æ Lexmark 2400 Series Æ Uninstall. 2 Follow the instructions on the computer...
...Æ Control Panel Æ Printers and Other Hardware Æ Printers and Faxes. 2 Double-click the Lexmark 2400 Series icon. 3 Click Printer, and make sure no check mark appears next to Pause Printing. 4 Make sure a check mark does appear next to remove the printer software. 3 Restart the computer. 4 ... the square end of the USB cable into the back of the printer. 3 Firmly plug the rectangular end of the computer. Removing and reinstalling the software 1 From the desktop, click Start Æ Programs Æ Lexmark 2400 Series Æ Uninstall. 2 Follow the instructions on the computer...

Getting Started
Page 5
Method 2 1 Click Start Æ Programs or All programs Æ Lexmark 2400 Series. 2 Select Imaging Studio. Scanning Scanning an item 1 Make sure the printer is connected to a computer, and both the printer and the computer are on. 2 Load an original document facedown on a page, enlarging or... can connect a PictBridge-enabled camera to the printer and use one of the preview image to scan. 5 From the "Send scanned image to select a specific area of these methods: Method 1 From the desktop, double-click the Imaging Studio icon. Understanding the software Using the Imaging ...
Method 2 1 Click Start Æ Programs or All programs Æ Lexmark 2400 Series. 2 Select Imaging Studio. Scanning Scanning an item 1 Make sure the printer is connected to a computer, and both the printer and the computer are on. 2 Load an original document facedown on a page, enlarging or... can connect a PictBridge-enabled camera to the printer and use one of the preview image to scan. 5 From the "Send scanned image to select a specific area of these methods: Method 1 From the desktop, double-click the Imaging Studio icon. Understanding the software Using the Imaging ...
Getting Started
Page 6
... Using Print Properties Print Properties is the software that controls the printing function when the printer is connected to edit graphics or photos. Using the Photo Editor Use the Photo Editor software to a computer. Using the Web Toolbar The Lexmark Web Toolbar can open , click File ... 1 Click Start Æ Programs or All programs Æ Lexmark 2400 Series. 2 Select Solution Center. Use only new, unwrinkled paper. To open the Solution Center, use one of these methods: Method 1 Press . Use Lexmark Premium Photo Paper if you browse the Web using the borderless ...
... Using Print Properties Print Properties is the software that controls the printing function when the printer is connected to edit graphics or photos. Using the Photo Editor Use the Photo Editor software to a computer. Using the Web Toolbar The Lexmark Web Toolbar can open , click File ... 1 Click Start Æ Programs or All programs Æ Lexmark 2400 Series. 2 Select Solution Center. Use only new, unwrinkled paper. To open the Solution Center, use one of these methods: Method 1 Press . Use Lexmark Premium Photo Paper if you browse the Web using the borderless ...
Getting Started
Page 8
...provided for this product does not function as ink) not furnished by Lexmark • Products, components, parts, materials, software, or interfaces not furnished by Lexmark TO THE EXTENT PERMITTED BY APPLICABLE LAW, NEITHER LEXMARK NOR ITS THIRD PARTY SUPPLIERS OR REMARKETERS MAKE ANY OTHER WARRANTY OR ...product you transfer this product to that user for resale, from state to the country-specific warranty information that vary from Lexmark or a Lexmark remarketer, referred to in this statement is available to another user, warranty service under this limited warranty is set forth ...
...provided for this product does not function as ink) not furnished by Lexmark • Products, components, parts, materials, software, or interfaces not furnished by Lexmark TO THE EXTENT PERMITTED BY APPLICABLE LAW, NEITHER LEXMARK NOR ITS THIRD PARTY SUPPLIERS OR REMARKETERS MAKE ANY OTHER WARRANTY OR ...product you transfer this product to that user for resale, from state to the country-specific warranty information that vary from Lexmark or a Lexmark remarketer, referred to in this statement is available to another user, warranty service under this limited warranty is set forth ...

User's Guide
Page 2
... supply cord to an electrical outlet that the manufacturer intends to make any country where such provisions are commercial computer software and documentation developed exclusively at private expense. these available in all countries in which it believes appropriate without incurring any...property right may use or distribute any of operation in this product, visit the Lexmark Web site at any time. UNITED STATES GOVERNMENT RIGHTS This software and any obligation to Lexmark International Ltd., Marketing and Services Department, Westhorpe House, Westhorpe, Marlow Bucks SL7 ...
... supply cord to an electrical outlet that the manufacturer intends to make any country where such provisions are commercial computer software and documentation developed exclusively at private expense. these available in all countries in which it believes appropriate without incurring any...property right may use or distribute any of operation in this product, visit the Lexmark Web site at any time. UNITED STATES GOVERNMENT RIGHTS This software and any obligation to Lexmark International Ltd., Marketing and Services Department, Westhorpe House, Westhorpe, Marlow Bucks SL7 ...
User's Guide
Page 3
... information about the printer 7 Setting up the printer...9 Checking the box contents...9 Learning about the printer 10 Understanding the parts of the printer 10 Using the control panel...11 Learning about the software 12 Using the printer software...12 Using the Imaging Studio...12 Using the All-In-One Center...13 Opening the All-In-One Center...13 Using...
... information about the printer 7 Setting up the printer...9 Checking the box contents...9 Learning about the printer 10 Understanding the parts of the printer 10 Using the control panel...11 Learning about the software 12 Using the printer software...12 Using the Imaging Studio...12 Using the All-In-One Center...13 Opening the All-In-One Center...13 Using...

User's Guide
Page 4
...page first (reverse page order 29 Working with photos 30 Printing photos...30 Printing photos stored on the computer...30 Using a PictBridge-enabled digital camera to control printing photos 31 Customizing photos...31 Creating and printing a scrapbook or album page 31 Adding text ...37 Scanning clear images from magazines or newspapers 38 Faxing...39 Sending a fax using the software...39 Receiving a fax using the software...40 Networking the printer 41 Shared printing...41 Maintaining the printer 42 Changing a print cartridge...42 Removing a used print cartridge...42 Installing a print ...
...page first (reverse page order 29 Working with photos 30 Printing photos...30 Printing photos stored on the computer...30 Using a PictBridge-enabled digital camera to control printing photos 31 Customizing photos...31 Creating and printing a scrapbook or album page 31 Adding text ...37 Scanning clear images from magazines or newspapers 38 Faxing...39 Sending a fax using the software...39 Receiving a fax using the software...40 Networking the printer 41 Shared printing...41 Maintaining the printer 42 Changing a print cartridge...42 Removing a used print cartridge...42 Installing a print ...
User's Guide
Page 5
...glass...46 Ordering supplies...46 Using genuine Lexmark print cartridges 46 Refilling a print cartridge...47 Recycling Lexmark products...47 Troubleshooting...48 Setup troubleshooting...48 Power button is not lit...48 Software does not install...48 Page does not print...49 Cannot print from digital camera using PictBridge 51 Print troubleshooting...51 Improving print ... print a fax or received fax has poor print quality 58 Received fax is blank...58 Jams and misfeeds troubleshooting 59 Paper jam in the printer...59 Paper jam in the paper support...59 Paper or specialty media misfeeds...59 5
...glass...46 Ordering supplies...46 Using genuine Lexmark print cartridges 46 Refilling a print cartridge...47 Recycling Lexmark products...47 Troubleshooting...48 Setup troubleshooting...48 Power button is not lit...48 Software does not install...48 Page does not print...49 Cannot print from digital camera using PictBridge 51 Print troubleshooting...51 Improving print ... print a fax or received fax has poor print quality 58 Received fax is blank...58 Jams and misfeeds troubleshooting 59 Paper jam in the printer...59 Paper jam in the paper support...59 Paper or specialty media misfeeds...59 5
User's Guide
Page 7
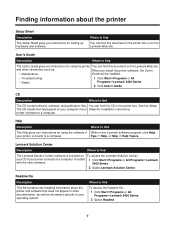
... find To access the Readme file: 1 Click StartŒPrograms or All ProgramsŒLexmark 2400 Series. 2 Select Readme. 7 printer connects to find this CD in any Lexmark software program, click Help, your Sheet for using the software if While in the printer box. Where to a computer. User's Guide Description Where to a computer. Readme file Description...
... find To access the Readme file: 1 Click StartŒPrograms or All ProgramsŒLexmark 2400 Series. 2 Select Readme. 7 printer connects to find this CD in any Lexmark software program, click Help, your Sheet for using the software if While in the printer box. Where to a computer. User's Guide Description Where to a computer. Readme file Description...

User's Guide
Page 9
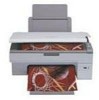
Setting up the printer Checking the box contents Name 1 Color print cartridge 2 Power supply cord 3 Installation software CD 4 Getting Started or Setup Solutions 5 Setup Sheet Description Cartridge to be installed in the printer Attaches to the power supply port located at the back of the printer • Installation software for the printer • Help • User's Guide in electronic format Additional information depending on your country or region Instructions on setting up printer hardware and software, and information on setup troubleshooting 9
Setting up the printer Checking the box contents Name 1 Color print cartridge 2 Power supply cord 3 Installation software CD 4 Getting Started or Setup Solutions 5 Setup Sheet Description Cartridge to be installed in the printer Attaches to the power supply port located at the back of the printer • Installation software for the printer • Help • User's Guide in electronic format Additional information depending on your country or region Instructions on setting up printer hardware and software, and information on setup troubleshooting 9

User's Guide
Page 12
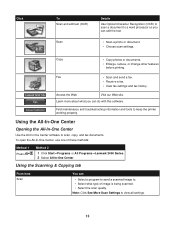
...Toolbar Create printer-friendly versions of these methods: Method 1 Method 2 From the desktop, double-click the Imaging Studio icon. 1 Click StartŒPrograms or All ProgramsŒLexmark 2400 Series.... Editor Edit photos and graphics. Learning about the software Using the printer software Use this software To The Imaging Studio Open the software component necessary for you with the following tasks:... tips on using the software • Finding maintenance and troubleshooting information To open the Imaging Studio, use one of Web pages. The All-In-One Center Scan, copy, print, ...
...Toolbar Create printer-friendly versions of these methods: Method 1 Method 2 From the desktop, double-click the Imaging Studio icon. 1 Click StartŒPrograms or All ProgramsŒLexmark 2400 Series.... Editor Edit photos and graphics. Learning about the software Using the printer software Use this software To The Imaging Studio Open the software component necessary for you with the following tasks:... tips on using the software • Finding maintenance and troubleshooting information To open the Imaging Studio, use one of Web pages. The All-In-One Center Scan, copy, print, ...
User's Guide
Page 13
... these methods: Method 1 Press Method 2 . 1 Click StartŒPrograms or All ProgramsŒLexmark 2400 Series. 2 Select All-In-One Center. Using the All-In-One Center Opening the All-In-One Center Use the All-In-One Center software to keep the printer working properly. Copy • Copy photos or documents. • Enlarge, reduce, or change...
... these methods: Method 1 Press Method 2 . 1 Click StartŒPrograms or All ProgramsŒLexmark 2400 Series. 2 Select All-In-One Center. Using the All-In-One Center Opening the All-In-One Center Use the All-In-One Center software to keep the printer working properly. Copy • Copy photos or documents. • Enlarge, reduce, or change...

User's Guide
Page 15
... level • More printing ideas and how to's • Contact information • Advanced • View the software version and copyright information Using the Solution Center The Solution Center provides help, as well as a multiple-page poster....One Center. 3 Click Maintain/Troubleshoot. 4 Select from these methods: Method 1 Method 2 From the desktop, double-click the Imaging Studio icon, and then click the Maintain/Troubleshoot button. 1 Click StartŒPrograms or All ProgramsŒLexmark 2400 Series. 2 Select Solution Center. 15 Note: For more information about the printer...
... level • More printing ideas and how to's • Contact information • Advanced • View the software version and copyright information Using the Solution Center The Solution Center provides help, as well as a multiple-page poster....One Center. 3 Click Maintain/Troubleshoot. 4 Select from these methods: Method 1 Method 2 From the desktop, double-click the Imaging Studio icon, and then click the Maintain/Troubleshoot button. 1 Click StartŒPrograms or All ProgramsŒLexmark 2400 Series. 2 Select Solution Center. 15 Note: For more information about the printer...

User's Guide
Page 16
... or on or off. • Change network printing settings. • Share information with us regarding how you use the printer. • Obtain software version information. For example, while printing, the status of the printer is complete before installing a new print cartridge. • View shopping options for more information, click Help in the lower...
... or on or off. • Change network printing settings. • Share information with us regarding how you use the printer. • Obtain software version information. For example, while printing, the status of the printer is complete before installing a new print cartridge. • View shopping options for more information, click Help in the lower...
User's Guide
Page 17
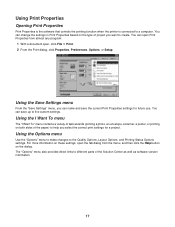
You can change the settings in Print Properties based on the type of the Solution Center as well as software version information. 17 Using the Options menu Use the "Options" menu to make changes to a computer. The "Options" menu also provides direct ... photo, an envelope, a banner, a poster, or printing on the dialog. Using Print Properties Opening Print Properties Print Properties is the software that controls the printing function when the printer is connected to the Quality Options, Layout Options, and Printing Status Options settings. You can name and save up to help you...
You can change the settings in Print Properties based on the type of the Solution Center as well as software version information. 17 Using the Options menu Use the "Options" menu to make changes to a computer. The "Options" menu also provides direct ... photo, an envelope, a banner, a poster, or printing on the dialog. Using Print Properties Opening Print Properties Print Properties is the software that controls the printing function when the printer is connected to the Quality Options, Layout Options, and Printing Status Options settings. You can name and save up to help you...
User's Guide
Page 18
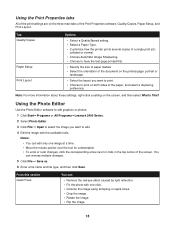
... • Select a Quality/Speed setting. • Select a Paper Type. • Customize how the printer prints several copies of a single print job: collated or normal. • Choose Automatic Image Sharpening. •...available tools. Using the Photo Editor Use the Photo Editor software to edit graphics or photos. 1 Click StartŒPrograms or All ProgramsŒLexmark 2400 Series. 2 Select Photo Editor. 3 Click File...print on the screen, and then select What's This? Notes: • You can edit only one click. • Colorize the image using antiquing or sepia tones. • Crop the image. ...
... • Select a Quality/Speed setting. • Select a Paper Type. • Customize how the printer prints several copies of a single print job: collated or normal. • Choose Automatic Image Sharpening. •...available tools. Using the Photo Editor Use the Photo Editor software to edit graphics or photos. 1 Click StartŒPrograms or All ProgramsŒLexmark 2400 Series. 2 Select Photo Editor. 3 Click File...print on the screen, and then select What's This? Notes: • You can edit only one click. • Colorize the image using antiquing or sepia tones. • Crop the image. ...
User's Guide
Page 28
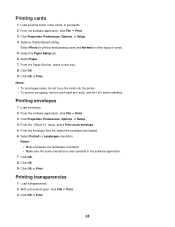
... jams, do not force the cards into the printer. • To prevent smudging, remove each card as it exits, and let it dry before stacking. Notes: • Most envelopes use landscape orientation. • Make sure the same orientation is also selected in the software application. 7 Click OK. 8 Click OK. 9 Click OK or...
... jams, do not force the cards into the printer. • To prevent smudging, remove each card as it exits, and let it dry before stacking. Notes: • Most envelopes use landscape orientation. • Make sure the same orientation is also selected in the software application. 7 Click OK. 8 Click OK. 9 Click OK or...
User's Guide
Page 36
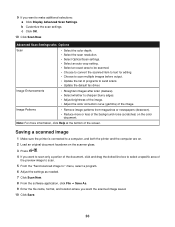
b Customize the scan settings. Saving a scanned image 1 Make sure the printer is connected to make additional selections: a Click Display Advanced Scan Settings. Note..."Send scanned image to:" menu, select a program. 6 Adjust the settings as needed. 7 Click Scan Now. 8 From the software application, click File ΠSave As. 9 Enter the file name, format, and location where you want the scanned image saved....Update the default fax driver. 9 If you want to a computer, and both the printer and the computer are on. 2 Load an original document facedown on the color document.
b Customize the scan settings. Saving a scanned image 1 Make sure the printer is connected to make additional selections: a Click Display Advanced Scan Settings. Note..."Send scanned image to:" menu, select a program. 6 Adjust the settings as needed. 7 Click Scan Now. 8 From the software application, click File ΠSave As. 9 Enter the file name, format, and location where you want the scanned image saved....Update the default fax driver. 9 If you want to a computer, and both the printer and the computer are on. 2 Load an original document facedown on the color document.


