Getting Started
Page 3
Contents Finding information about the printer 5 Setting up the printer...9 Setting up the printer on a Windows operating system 9 Setting up the printer on a Macintosh operating system 10 Setting up the printer for wireless printing 14 Setting up the printer using a USB cable...15 Installing the printer on additional network computers 16 Wireless networking...17 Networking overview...17 Learning about the...
Contents Finding information about the printer 5 Setting up the printer...9 Setting up the printer on a Windows operating system 9 Setting up the printer on a Macintosh operating system 10 Setting up the printer for wireless printing 14 Setting up the printer using a USB cable...15 Installing the printer on additional network computers 16 Wireless networking...17 Networking overview...17 Learning about the...
Getting Started
Page 4
... light is orange ...39 Wi-Fi indicator light is blinking orange during installation 39 Wireless network printer does not print ...42 Wireless printer is no longer working...44 Changing wireless settings after installation 49 Finding your MAC address...50 Resetting an internal wireless print server to factory default 50 Uninstalling and reinstalling the software 50 Advanced...
... light is orange ...39 Wi-Fi indicator light is blinking orange during installation 39 Wireless network printer does not print ...42 Wireless printer is no longer working...44 Changing wireless settings after installation 49 Finding your MAC address...50 Resetting an internal wireless print server to factory default 50 Uninstalling and reinstalling the software 50 Advanced...
Getting Started
Page 9
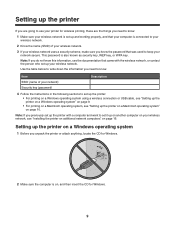
... instructions in the following sections to know. Setting up on another computer on your wireless network, see "Installing the printer on additional network computers" on page 16. Item SSID (name of your wireless network. 3 If your wireless network uses a security scheme, make sure you know the password that came with...WEP key, or WPA key. Note: If you previously set up the printer with the wireless network, or contact the person who set up your wireless network. Setting up the printer If you are going to use your printer for Windows. 9 Note: If you do not know this information, see ...
... instructions in the following sections to know. Setting up on another computer on your wireless network, see "Installing the printer on additional network computers" on page 16. Item SSID (name of your wireless network. 3 If your wireless network uses a security scheme, make sure you know the password that came with...WEP key, or WPA key. Note: If you previously set up the printer with the wireless network, or contact the person who set up your wireless network. Setting up the printer If you are going to use your printer for Windows. 9 Note: If you do not know this information, see ...
Getting Started
Page 11
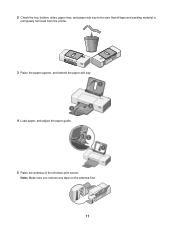
Note: Make sure you remove any tape on the antenna first. 11 2 Check the top, bottom, sides, paper tray, and paper exit tray to be sure that all tape and packing material is completely removed from the printer. 3 Raise the paper support, and extend the paper exit tray. 4 Load paper, and adjust the paper guide. 5 Raise the antenna of the wireless print server.
Note: Make sure you remove any tape on the antenna first. 11 2 Check the top, bottom, sides, paper tray, and paper exit tray to be sure that all tape and packing material is completely removed from the printer. 3 Raise the paper support, and extend the paper exit tray. 4 Load paper, and adjust the paper guide. 5 Raise the antenna of the wireless print server.
Getting Started
Page 13
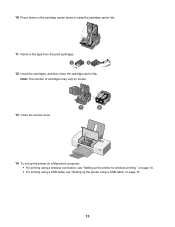
Note: The number of cartridges may vary by model. 13 Close the access cover. 1 2 14 To set up the printer on a Macintosh computer: • For printing using a wireless connection, see "Setting up the printer for wireless printing " on page 14. • For printing using a USB cable, see "Setting up the printer using a USB cable" on the cartridge carrier levers to raise the cartridge carrier lids. 11 Remove the tape from the print cartridges. 1 2 12 Insert the cartridges, and then close the cartridge carrier lids. 10 Press down on page 15. 13
Note: The number of cartridges may vary by model. 13 Close the access cover. 1 2 14 To set up the printer on a Macintosh computer: • For printing using a wireless connection, see "Setting up the printer for wireless printing " on page 14. • For printing using a USB cable, see "Setting up the printer using a USB cable" on the cartridge carrier levers to raise the cartridge carrier lids. 11 Remove the tape from the print cartridges. 1 2 12 Insert the cartridges, and then close the cartridge carrier lids. 10 Press down on page 15. 13
Getting Started
Page 14
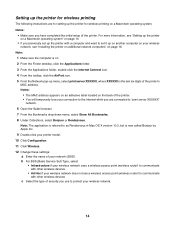
... menu, select print server XXXXXX, where XXXXXX is the last six digits of the printer's MAC address. Setting up the printer for wireless printing The following instructions are for setting up the printer for wireless printing on the back of the printer. • You will temporarily lose your connection to the Internet while you are connected...
... menu, select print server XXXXXX, where XXXXXX is the last six digits of the printer's MAC address. Setting up the printer for wireless printing The following instructions are for setting up the printer for wireless printing on the back of the printer. • You will temporarily lose your connection to the Internet while you are connected...
Getting Started
Page 15
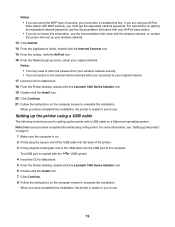
For instructions on a Macintosh operating system. Note: Make sure you have completed the installation, the printer is ready for Macintosh. 18 From the Finder desktop, double-click the Lexmark 1400 Series Installer icon 19 Double-click the Install icon. 20 Click Continue. 21 Follow the instructions on the...computer screen to your original network. If you are using an AirPort base station with the USB symbol. 4 Insert the CD for your wireless network security. • Your connection to the Internet will be restored when you to complete the installation. Notes: • You may ...
For instructions on a Macintosh operating system. Note: Make sure you have completed the installation, the printer is ready for Macintosh. 18 From the Finder desktop, double-click the Lexmark 1400 Series Installer icon 19 Double-click the Install icon. 20 Click Continue. 21 Follow the instructions on the...computer screen to your original network. If you are using an AirPort base station with the USB symbol. 4 Insert the CD for your wireless network security. • Your connection to the Internet will be restored when you to complete the installation. Notes: • You may ...
Getting Started
Page 17
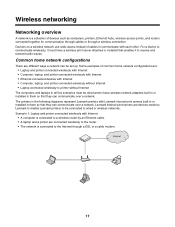
... Internet through a wireless connection. The printers in the following diagrams represent Lexmark printers with each other. Wireless networking Networking overview A network is connected to a wireless router by an Ethernet cable. • A laptop and a printer are devices made by Lexmark to enable Lexmark printers to be connected to printer without Internet • Laptop connected wirelessly to wired or wireless networks. Devices on a wireless network use...
... Internet through a wireless connection. The printers in the following diagrams represent Lexmark printers with each other. Wireless networking Networking overview A network is connected to a wireless router by an Ethernet cable. • A laptop and a printer are devices made by Lexmark to enable Lexmark printers to be connected to printer without Internet • Laptop connected wirelessly to wired or wireless networks. Devices on a wireless network use...
Getting Started
Page 18
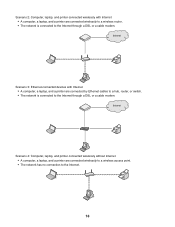
... point. • The network has no connection to the Internet through a DSL or a cable modem. Scenario 2: Computer, laptop, and printer connected wirelessly with Internet • A computer, a laptop, and a printer are connected by Ethernet cables to a hub, router, or switch. • The network is connected to the Internet. 18 Scenario 3: Ethernet-connected devices with...
... point. • The network has no connection to the Internet through a DSL or a cable modem. Scenario 2: Computer, laptop, and printer connected wirelessly with Internet • A computer, a laptop, and a printer are connected by Ethernet cables to a hub, router, or switch. • The network is connected to the Internet. 18 Scenario 3: Ethernet-connected devices with...

Getting Started
Page 19
...as 192.168.0.100. The IP address appears as four sets of numbers separated by your operating system or wireless network software. Devices on the printer network setup page indicates how strongly a transmitted signal is being received. A unique IP address means no ... used by printing out the network setup page. Scenario 5: Laptop connected wirelessly to printer without Internet • A laptop is directly connected wirelessly to a printer without going through a wireless router. • The network has no two devices on a wireless device that allows devices to join the same...
...as 192.168.0.100. The IP address appears as four sets of numbers separated by your operating system or wireless network software. Devices on the printer network setup page indicates how strongly a transmitted signal is being received. A unique IP address means no ... used by printing out the network setup page. Scenario 5: Laptop connected wirelessly to printer without Internet • A laptop is directly connected wirelessly to a printer without going through a wireless router. • The network has no two devices on a wireless device that allows devices to join the same...

Getting Started
Page 20
... an IP address. A test page and a network setup page print. Pinging your printer To test whether your computer can communicate properly with matching MAC addresses can be allowed to the "Wireless troubleshooting" section of MAC addresses can be included in the MAC filter list. b Check... that only devices with your configuration settings. To print a network setup page: 1 Make sure the printer is listed as Connected. For example: 10....
... an IP address. A test page and a network setup page print. Pinging your printer To test whether your computer can communicate properly with matching MAC addresses can be allowed to the "Wireless troubleshooting" section of MAC addresses can be included in the MAC filter list. b Check... that only devices with your configuration settings. To print a network setup page: 1 Make sure the printer is listed as Connected. For example: 10....

Getting Started
Page 21
... Determined by range and number of access points Restricted to ad hoc mode. Lexmark recommends setting up in one where a PC with a wireless print server communicates directly with a printer equipped for each device communicates with the same SSID and channel. A wireless network where each Yes device Mode set to Infrastructure mode Same SSID Yes...
... Determined by range and number of access points Restricted to ad hoc mode. Lexmark recommends setting up in one where a PC with a wireless print server communicates directly with a printer equipped for each device communicates with the same SSID and channel. A wireless network where each Yes device Mode set to Infrastructure mode Same SSID Yes...
Getting Started
Page 22
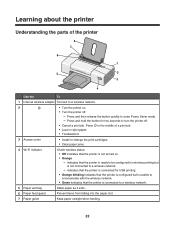
... USB printing • Orange blinking indicates that the printer is configured but is not connected to a wireless network - Press in the middle of the printer 8 7 6 1 5 2 3 4 Use the To 1 Internal wireless adapter Connect to a wireless network. 2 • Turn the printer on . • Orange - indicates that the printer is connected to a wireless network. 5 Paper exit tray Stack paper as it...
... USB printing • Orange blinking indicates that the printer is configured but is not connected to a wireless network - Press in the middle of the printer 8 7 6 1 5 2 3 4 Use the To 1 Internal wireless adapter Connect to a wireless network. 2 • Turn the printer on . • Orange - indicates that the printer is connected to a wireless network. 5 Paper exit tray Stack paper as it...

Getting Started
Page 23
Use the 8 Paper support To Load paper. 1 Use the 1 USB port 2 Power supply 2 3 To Connect the printer to a computer using . 2 1 3 If the light is not on the printer. 2 Plug the power cord into the power supply on , press . 3 Internal wireless adapter Connect to a power source using the power cord. 1 Plug the power cord all the way into an electrical outlet that other electrical devices have been using a USB cable. Connect the printer to a wireless network. 23
Use the 8 Paper support To Load paper. 1 Use the 1 USB port 2 Power supply 2 3 To Connect the printer to a computer using . 2 1 3 If the light is not on the printer. 2 Plug the power cord into the power supply on , press . 3 Internal wireless adapter Connect to a power source using the power cord. 1 Plug the power cord all the way into an electrical outlet that other electrical devices have been using a USB cable. Connect the printer to a wireless network. 23
Getting Started
Page 34
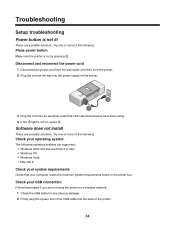
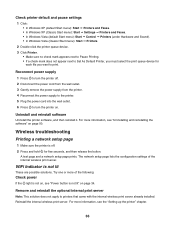
... • Mac OS X Check your system requirements Check that other electrical devices have been using the printer on by pressing . Try one or more of the following: Press power button Make sure the printer is on a wireless network: 1 Check the USB cable for any obvious damage. 2 Firmly plug the square end of the...
... • Mac OS X Check your system requirements Check that other electrical devices have been using the printer on by pressing . Try one or more of the following: Press power button Make sure the printer is on a wireless network: 1 Check the USB cable for any obvious damage. 2 Firmly plug the square end of the...
Getting Started
Page 36
..., see "Uninstalling and reinstalling the software" on . Uninstall and reinstall software Uninstall the printer software, and then reinstall it. Wireless troubleshooting Printing a network setup page 1 Make sure the printer is not lit These are possible solutions. Try one or more information, see the ..."Setting up the printer" chapter. 36 For more of the internal wireless print server. Reconnect power supply 1 Press to turn the printer off . 2 Press and hold for each file you want to printers that came with the internal wireless print server already installed. A ...
..., see "Uninstalling and reinstalling the software" on . Uninstall and reinstall software Uninstall the printer software, and then reinstall it. Wireless troubleshooting Printing a network setup page 1 Make sure the printer is not lit These are possible solutions. Try one or more information, see the ..."Setting up the printer" chapter. 36 For more of the internal wireless print server. Reconnect power supply 1 Press to turn the printer off . 2 Press and hold for each file you want to printers that came with the internal wireless print server already installed. A ...
Getting Started
Page 37
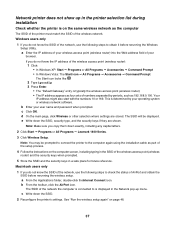
... typing in the Network pop-up in the printer selection list during installation Check whether the printer is typically the wireless access point (wireless router). • The IP address appears as four sets of the wireless access point (wireless router) and the security keys when prompted.... the SSID. 2 Reconfigure the printer's settings. d On the main page, click Wireless or other selection where settings are shown. c Write down exactly, including any capital letters. 2 Click Start Œ Programs or All Programs Œ Lexmark 1400 Series. 3 Click Wireless Setup. b From the toolbar,...
... typing in the Network pop-up in the printer selection list during installation Check whether the printer is typically the wireless access point (wireless router). • The IP address appears as four sets of the wireless access point (wireless router) and the security keys when prompted.... the SSID. 2 Reconfigure the printer's settings. d On the main page, click Wireless or other selection where settings are shown. c Write down exactly, including any capital letters. 2 Click Start Œ Programs or All Programs Œ Lexmark 1400 Series. 3 Click Wireless Setup. b From the toolbar,...
Getting Started
Page 38
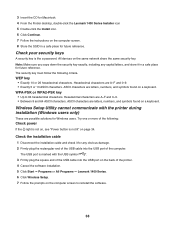
... . 3 Firmly plug the square end of the USB cable into the USB port of the printer. 4 Cancel the software installation. 5 Click Start ΠPrograms or All Programs ΠLexmark 1400 Series. 6 Click Wireless Setup. 7 Follow the prompts on the computer screen. 8 Store the SSID in a safe..., and store it in a safe place for future reference. 3 Insert the CD for Macintosh. 4 From the Finder desktop, double-click the Lexmark 1400 Series Installer icon 5 Double-click the Install icon. 6 Click Continue. 7 Follow the instructions on the computer screen to 64 hexadecimal characters....
... . 3 Firmly plug the square end of the USB cable into the USB port of the printer. 4 Cancel the software installation. 5 Click Start ΠPrograms or All Programs ΠLexmark 1400 Series. 6 Click Wireless Setup. 7 Follow the prompts on the computer screen. 8 Store the SSID in a safe..., and store it in a safe place for future reference. 3 Insert the CD for Macintosh. 4 From the Finder desktop, double-click the Lexmark 1400 Series Installer icon 5 Double-click the Install icon. 6 Click Continue. 7 Follow the instructions on the computer screen to 64 hexadecimal characters....
Getting Started
Page 39
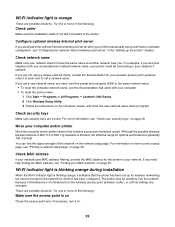
... example, if you are not using a unique network name, consult the documentation for your computer. • To reset the printer name: 1 Click Start Œ Programs or All Programs Œ Lexmark 1400 Series. 2 Click Wireless Setup Utility. 3 Follow the instructions on page 50. If you and your neighbor both use a manufacturer's default network name...
... example, if you are not using a unique network name, consult the documentation for your computer. • To reset the printer name: 1 Click Start Œ Programs or All Programs Œ Lexmark 1400 Series. 2 Click Wireless Setup Utility. 3 Follow the instructions on page 50. If you and your neighbor both use a manufacturer's default network name...
Getting Started
Page 44
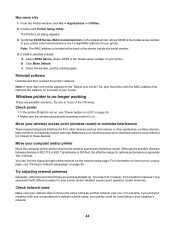
... the serial number. 4 If USB is selected instead: a Select XXXX Series, where XXXX is generally 100-150 feet. Wireless printer is 300 feet, the effective range for your printer could be temporary interference from other appliances, cordless phones, baby monitors, and security system cameras. You can find , however, that reception improves if you...
... the serial number. 4 If USB is selected instead: a Select XXXX Series, where XXXX is generally 100-150 feet. Wireless printer is 300 feet, the effective range for your printer could be temporary interference from other appliances, cordless phones, baby monitors, and security system cameras. You can find , however, that reception improves if you...


