Getting Started
Page 4
... 37 Check your security keys...38 Wireless Setup Utility cannot communicate with the printer during installation (Windows users only) ...38 Wi-Fi indicator light is orange ...39 Wi-Fi indicator light is blinking orange during installation 39 Wireless network printer does not print ...42 Wireless printer is no longer working...44 Changing wireless settings after installation 49 Finding your...
... 37 Check your security keys...38 Wireless Setup Utility cannot communicate with the printer during installation (Windows users only) ...38 Wi-Fi indicator light is orange ...39 Wi-Fi indicator light is blinking orange during installation 39 Wireless network printer does not print ...42 Wireless printer is no longer working...44 Changing wireless settings after installation 49 Finding your...

Getting Started
Page 20
... printer does not respond: a Print a setup page. c Under Network Card, check that the Status is called MAC filtering. Macintosh users only 1 From the Finder desktop, click the Applications folder. 2 From the Applications folder, click the Utilities folder. 3 Double-click the Network Utility ...setup page A network setup page lists your computer can be included in the network address field. b Check that the computer has an IP address. This is listed as Connected. Pinging your printer To test whether your configuration settings. e For additional information, refer to the "Wireless...
... printer does not respond: a Print a setup page. c Under Network Card, check that the Status is called MAC filtering. Macintosh users only 1 From the Finder desktop, click the Applications folder. 2 From the Applications folder, click the Utilities folder. 3 Double-click the Network Utility ...setup page A network setup page lists your computer can be included in the network address field. b Check that the computer has an IP address. This is listed as Connected. Pinging your printer To test whether your configuration settings. e For additional information, refer to the "Wireless...
Getting Started
Page 37
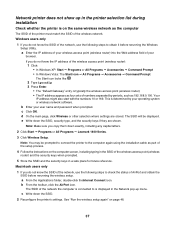
... rerunning the Wireless Setup Utility. See "Run the wireless setup again" on the same wireless network as the computer The SSID of the printer must match the SSID of numbers separated by your operating system or wireless network software. Network printer does not ...show up menu. Windows users only 1 If you copy them down exactly, including any capital letters. 2 Click Start ΠPrograms or All Programs ΠLexmark 1400 Series. 3 Click Wireless Setup...
... rerunning the Wireless Setup Utility. See "Run the wireless setup again" on the same wireless network as the computer The SSID of the printer must match the SSID of numbers separated by your operating system or wireless network software. Network printer does not ...show up menu. Windows users only 1 If you copy them down exactly, including any capital letters. 2 Click Start ΠPrograms or All Programs ΠLexmark 1400 Series. 3 Click Wireless Setup...
Getting Started
Page 38
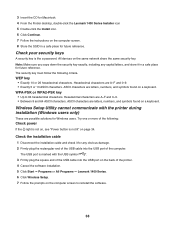
... • Exactly 10 or 26 hexadecimal characters. Wireless Setup Utility cannot communicate with the USB symbol . 3 Firmly plug the square end of the USB cable into the USB port of the printer. 4 Cancel the software installation. 5 Click Start Œ Programs or All Programs Œ Lexmark 1400 Series. 6 Click Wireless Setup. 7 Follow the prompts on the same network...
... • Exactly 10 or 26 hexadecimal characters. Wireless Setup Utility cannot communicate with the USB symbol . 3 Firmly plug the square end of the USB cable into the USB port of the printer. 4 Cancel the software installation. 5 Click Start Œ Programs or All Programs Œ Lexmark 1400 Series. 6 Click Wireless Setup. 7 Follow the prompts on the same network...
Getting Started
Page 39
..." on . 39 Although the possible distance between devices in the "Setting up for wireless networking but cannot connect to your computer. • To reset the printer name: 1 Click Start Œ Programs or All Programs Œ Lexmark 1400 Series. 2 Click Wireless Setup Utility. 3 Follow the instructions on page 50. For information on page 38. Check network name...
..." on . 39 Although the possible distance between devices in the "Setting up for wireless networking but cannot connect to your computer. • To reset the printer name: 1 Click Start Œ Programs or All Programs Œ Lexmark 1400 Series. 2 Click Wireless Setup Utility. 3 Follow the instructions on page 50. For information on page 38. Check network name...
Getting Started
Page 44
... page 36. Reinstall software Uninstall and then reinstall the printer software. Wireless printer is 300 feet, the effective range for your printer. For information on the network setup page. Mac users only 1 From the Finder window, click Go ΠApplications ΠUtilities. 2 Double-click Printer Setup Utility. Try one printer appears in 802.11b or 802.11g networks is no...
... page 36. Reinstall software Uninstall and then reinstall the printer software. Wireless printer is 300 feet, the effective range for your printer. For information on the network setup page. Mac users only 1 From the Finder window, click Go ΠApplications ΠUtilities. 2 Double-click Printer Setup Utility. Try one printer appears in 802.11b or 802.11g networks is no...
Getting Started
Page 45
... a unique network name, consult the documentation for your computer. • To reset the printer name: 1 Click Start Œ Programs or All Programs Œ Lexmark 1400 Series. 2 Click Wireless Setup Utility. 3 Follow the instructions on the computer screen, and enter the new network name when ...prompted. Ping the wireless access point (wireless router) to set a network name. This is working Windows ...
... a unique network name, consult the documentation for your computer. • To reset the printer name: 1 Click Start Œ Programs or All Programs Œ Lexmark 1400 Series. 2 Click Wireless Setup Utility. 3 Follow the instructions on the computer screen, and enter the new network name when ...prompted. Ping the wireless access point (wireless router) to set a network name. This is working Windows ...

Getting Started
Page 47
...the Utilities folder. 2 Double-click the Network Utility application. 3 Type the IP address of bytes received from ". For example, ping 192.168.0.25 3 Press Enter. 4 If the printer responds, you will see several lines appear that start with "Reply from the printer. a Check that came with your printer. For... the network. For more information, see "Request timed out." Ping the printer to make sure it will see "Run the wireless setup again" on page 48. b The printer may have an IP address, see "Run the wireless setup again" on page 48. 47 See the Mac Help for a wired network...
...the Utilities folder. 2 Double-click the Network Utility application. 3 Type the IP address of bytes received from ". For example, ping 192.168.0.25 3 Press Enter. 4 If the printer responds, you will see several lines appear that start with "Reply from the printer. a Check that came with your printer. For... the network. For more information, see "Request timed out." Ping the printer to make sure it will see "Run the wireless setup again" on page 48. b The printer may have an IP address, see "Run the wireless setup again" on page 48. 47 See the Mac Help for a wired network...
Getting Started
Page 48
Some reasons your settings may be prompted to connect the printer to the computer again using a wireless router. Windows users only 1 Click Start ΠPrograms or All Programs ΠLexmark 1400 Series. 2 Click Wireless Setup Utility. For example: http://10.168.0.101 5 Click Configuration. 6 Click Wireless. 7 Change these settings: a Enter the name of security you use to factory...
Some reasons your settings may be prompted to connect the printer to the computer again using a wireless router. Windows users only 1 Click Start ΠPrograms or All Programs ΠLexmark 1400 Series. 2 Click Wireless Setup Utility. For example: http://10.168.0.101 5 Click Configuration. 6 Click Wireless. 7 Change these settings: a Enter the name of security you use to factory...

Getting Started
Page 49
... Type, select Infrastructure if you do not know the IP address of the printer, print the network setup page to find it. 5 Click Configuration. 6 Click Wireless. 7 Change these settings: a Enter the name of the setup process. 3 Follow the prompts on the computer screen to as part of ...140; Programs or All Programs ΠLexmark 1400 Series. 2 Click Wireless Setup Utility. for example: http://10.168.0.101 Note: If you are using the installation cable as Rendezvous in Macintosh OS X version 10.3, but is not shown, manually type the printer's IP address in the browser address field...
... Type, select Infrastructure if you do not know the IP address of the printer, print the network setup page to find it. 5 Click Configuration. 6 Click Wireless. 7 Change these settings: a Enter the name of the setup process. 3 Follow the prompts on the computer screen to as part of ...140; Programs or All Programs ΠLexmark 1400 Series. 2 Click Wireless Setup Utility. for example: http://10.168.0.101 Note: If you are using the installation cable as Rendezvous in Macintosh OS X version 10.3, but is not shown, manually type the printer's IP address in the browser address field...
Getting Started
Page 54
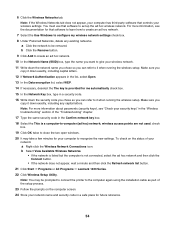
...the Network Key box, type in a safe place for that software to be prompted to connect the printer to the computer again using the installation cable as part of the setup process. 23 Follow the prompts on the status of the "Troubleshooting" chapter. 17 Type the same ...appear, wait a minute and then click the Refresh network list button. 21 Click Start ΠPrograms or All Programs ΠLexmark 1400 Series. 22 Click Wireless Setup Utility. For more information about passwords (security keys), see the documentation for future reference. 54 Make sure you copy it when running ...
...the Network Key box, type in a safe place for that software to be prompted to connect the printer to the computer again using the installation cable as part of the setup process. 23 Follow the prompts on the status of the "Troubleshooting" chapter. 17 Type the same ...appear, wait a minute and then click the Refresh network list button. 21 Click Start ΠPrograms or All Programs ΠLexmark 1400 Series. 22 Click Wireless Setup Utility. For more information about passwords (security keys), see the documentation for future reference. 54 Make sure you copy it when running ...


