
Technical Reference
Page 8
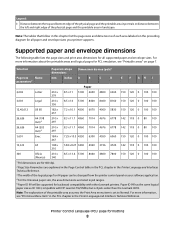
... and dimensions of each area labeled on page 7. Note: The explanation of the printable area assumes the Print Area menu item is 8 pels wider than the Lexmark 4039. Supported paper and envelope dimensions The following table lists the page sizes and print area dimensions for backward compatibility ...with HP LaserJet 5Si/5SiMx) but is set to Normal. Paper ID 99 has the same logical paper size as ID 100 (compatible with other Lexmark printers. Printer Control Language (PCL) page formatting 8 Legend: I parameters2 Paper 2,602 Letter 216 x 279 8.5 x 11 5100 6600 4800 6360 150 120 0...
... and dimensions of each area labeled on page 7. Note: The explanation of the printable area assumes the Print Area menu item is 8 pels wider than the Lexmark 4039. Supported paper and envelope dimensions The following table lists the page sizes and print area dimensions for backward compatibility ...with HP LaserJet 5Si/5SiMx) but is set to Normal. Paper ID 99 has the same logical paper size as ID 100 (compatible with other Lexmark printers. Printer Control Language (PCL) page formatting 8 Legend: I parameters2 Paper 2,602 Letter 216 x 279 8.5 x 11 5100 6600 4800 6360 150 120 0...
Technical Reference
Page 9
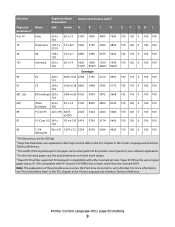
... backward compatibility with HP LaserJet 5Si/5SiMx) but is set to Normal. Printer Control Language (PCL) page formatting 9 For more information, see "Print Area Menu Item" in the PCL chapter in pel ranges. 5 Paper ID 99 will be changed from the printer control panel or your software application. 4 For the...Page Control table in the PCL chapter in the Printer Language and Interfaces Technical Reference. 3 The width of the printable area assumes the Print Area menu item is 8 pels wider than the Lexmark 4039. Paper ID 99 has the same logical paper size as ID 100 (compatible with other...
... backward compatibility with HP LaserJet 5Si/5SiMx) but is set to Normal. Printer Control Language (PCL) page formatting 9 For more information, see "Print Area Menu Item" in the PCL chapter in pel ranges. 5 Paper ID 99 will be changed from the printer control panel or your software application. 4 For the...Page Control table in the PCL chapter in the Printer Language and Interfaces Technical Reference. 3 The width of the printable area assumes the Print Area menu item is 8 pels wider than the Lexmark 4039. Paper ID 99 has the same logical paper size as ID 100 (compatible with other...
User Guide
Page 2
or 550-sheet drawer...50 Attaching cables...51 Verifying printer setup...52 Printing a menu settings page...52 Printing a network setup page ...53 Setting up the printer software...53 Installing printer software ...53 Updating available options in the printer driver......
or 550-sheet drawer...50 Attaching cables...51 Verifying printer setup...52 Printing a menu settings page...52 Printing a network setup page ...53 Setting up the printer software...53 Installing printer software ...53 Updating available options in the printer driver......

User Guide
Page 8
... Network Card menu...167 TCP/IP menu ...168 IPv6 menu...169 Wireless menu...169 AppleTalk menu ...170 NetWare menu...170 LexLink menu ...171 Standard USB menu...172 Parallel menu...173 Serial menu ...175 Security menu...178 Miscellaneous menu...178 Confidential Print menu ...178 Disk Wiping menu ...179 Security Audit Log menu ...180 Set Date/Time menu...181 Settings menu...182 General Settings menu ...182 Copy Settings menu ...188 Contents...
... Network Card menu...167 TCP/IP menu ...168 IPv6 menu...169 Wireless menu...169 AppleTalk menu ...170 NetWare menu...170 LexLink menu ...171 Standard USB menu...172 Parallel menu...173 Serial menu ...175 Security menu...178 Miscellaneous menu...178 Confidential Print menu ...178 Disk Wiping menu ...179 Security Audit Log menu ...180 Set Date/Time menu...181 Settings menu...182 General Settings menu ...182 Copy Settings menu ...188 Contents...
User Guide
Page 9
Fax Settings menu...194 E-mail Settings menu ...203 FTP Settings menu...208 Flash Drive menu ...211 Print Settings ...216 Help menu...227 Maintaining the printer 228 Cleaning the exterior of the printer...228 Cleaning the scanner glass...228 Cleaning the ADF separator rollers...229 Adjusting scanner ...
Fax Settings menu...194 E-mail Settings menu ...203 FTP Settings menu...208 Flash Drive menu ...211 Print Settings ...216 Help menu...227 Maintaining the printer 228 Cleaning the exterior of the printer...228 Cleaning the scanner glass...228 Cleaning the ADF separator rollers...229 Adjusting scanner ...
User Guide
Page 23
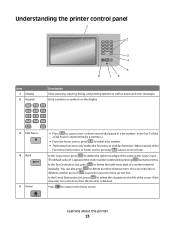
...a comma (,). • From the home screen, press to delete the right-most digit of a number entered manually. The default value of the Fax menu, fax function, or home screen, pressing causes an error beep. In the Fax Destination List, press to redial a fax number. • The button... functions only within the Fax menu or with fax functions. If the character is represented by pressing numerous times. In the Copy menu, press to cause a two- Enter numbers or symbols on the display. 3 DEF 6 MNO 9 WXYZ #...
...a comma (,). • From the home screen, press to delete the right-most digit of a number entered manually. The default value of the Fax menu, fax function, or home screen, pressing causes an error beep. In the Fax Destination List, press to redial a fax number. • The button... functions only within the Fax menu or with fax functions. If the character is represented by pressing numerous times. In the Copy menu, press to cause a two- Enter numbers or symbols on the display. 3 DEF 6 MNO 9 WXYZ #...
User Guide
Page 24
... warm-up , processing data, or printing. • Solid green-The printer is on, but idle. • Blinking red-Operator intervention is referred to open the menu screen; These menus are available only when the printer is offered once Stopped appears on the display. to as copying, faxing, or scanning; Opens the...
... warm-up , processing data, or printing. • Solid green-The printer is on, but idle. • Blinking red-Operator intervention is referred to open the menu screen; These menus are available only when the printer is offered once Stopped appears on the display. to as copying, faxing, or scanning; Opens the...

User Guide
Page 28
... words to return to the previous screen Opens the next related menu or menu item Features Feature Description Menu trail line: Menus Settings Copy Settings Number of Copies A Menu trail line is located at the current menu. This feature acts as copy or fax, then a solid ... light blinks. Button Cancel Select Function • Cancels an action or a selection • Cancels out of a screen and returns to that menu or menu item. Attendance message alert If an attendance message occurs which affects a function, such as a trail, showing the path taken to arrive at ...
... words to return to the previous screen Opens the next related menu or menu item Features Feature Description Menu trail line: Menus Settings Copy Settings Number of Copies A Menu trail line is located at the current menu. This feature acts as copy or fax, then a solid ... light blinks. Button Cancel Select Function • Cancels an action or a selection • Cancels out of a screen and returns to that menu or menu item. Attendance message alert If an attendance message occurs which affects a function, such as a trail, showing the path taken to arrive at ...
User Guide
Page 52
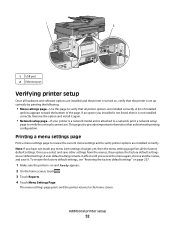
...and is on and Ready appears. 2 On the home screen, touch . 3 Touch Reports. 4 Touch Menu Settings Page. Printing a menu settings page Print a menu settings page to review the current menu settings and to the home screen. Once you installed is not listed, then it . Additional printer setup 52... save it is not installed correctly. A user default setting remains in effect until you have not made any menu item settings changes yet, then the menu settings page lists all printer options are installed correctly. This page also provides important information that all the factory default...
...and is on and Ready appears. 2 On the home screen, touch . 3 Touch Reports. 4 Touch Menu Settings Page. Printing a menu settings page Print a menu settings page to review the current menu settings and to the home screen. Once you installed is not listed, then it . Additional printer setup 52... save it is not installed correctly. A user default setting remains in effect until you have not made any menu item settings changes yet, then the menu settings page lists all printer options are installed correctly. This page also provides important information that all the factory default...
User Guide
Page 53
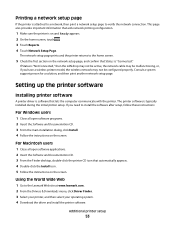
.... Setting up the printer software Installing printer software A printer driver is attached to a network, then print a network setup page to the Lexmark Web site at www.lexmark.com. 2 From the Drivers & Downloads menu, click Driver Finder. 3 Select your printer, and then select your operating system. 4 Download the driver and install the printer software...
.... Setting up the printer software Installing printer software A printer driver is attached to a network, then print a network setup page to the Lexmark Web site at www.lexmark.com. 2 From the Drivers & Downloads menu, click Driver Finder. 3 Select your printer, and then select your operating system. 4 Download the driver and install the printer software...
User Guide
Page 54
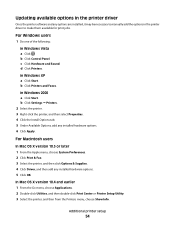
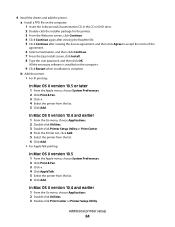
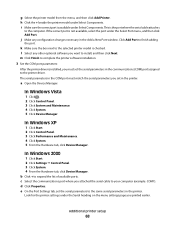
... to make them available for print jobs. b Click Control Panel. In Mac OS X version 10.4 and earlier 1 From the Go menu, choose Applications. 2 Double-click Utilities, and then double-click Print Center or Printer Setup Utility. 3 Select the printer, and then from the Printers... Windows users 1 Do one of the following: In Windows Vista a Click . For Macintosh users In Mac OS X version 10.5 or later 1 From the Apple menu, choose System Preferences. 2 Click Print & Fax. 3 Select the printer, and then click Options & Supplies. 4 Click Driver, and then add any installed hardware ...
... to make them available for print jobs. b Click Control Panel. In Mac OS X version 10.4 and earlier 1 From the Go menu, choose Applications. 2 Double-click Utilities, and then double-click Print Center or Printer Setup Utility. 3 Select the printer, and then from the Printers... Windows users 1 Do one of the following: In Windows Vista a Click . For Macintosh users In Mac OS X version 10.5 or later 1 From the Apple menu, choose System Preferences. 2 Click Print & Fax. 3 Select the printer, and then click Options & Supplies. 4 Click Driver, and then add any installed hardware ...
User Guide
Page 55
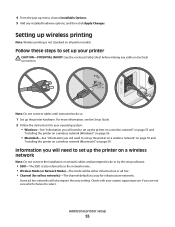
...-The SSID is not standard on page 59. For more information, see the Setup Guide. 2 Follow the instructions for infrastructure networks. 4 From the pop-up menu, choose Installable Options. 5 Add any cable or electrical connection. Setting up wireless printing Note: Wireless printing is also referred to as the network name. •...
...-The SSID is not standard on page 59. For more information, see the Setup Guide. 2 Follow the instructions for infrastructure networks. 4 From the pop-up menu, choose Installable Options. 5 Add any cable or electrical connection. Setting up wireless printing Note: Wireless printing is also referred to as the network name. •...

User Guide
Page 60
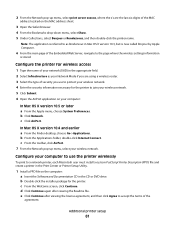
... Enter. For more information on fax station name and number, see your system support person; In Mac OS X version 10.5 or later a From the Apple menu, choose System Preferences. Enter the printer information 1 Access the AirPort options. c Click AirPort. c From the toolbar, click AirPort.
... Enter. For more information on fax station name and number, see your system support person; In Mac OS X version 10.5 or later a From the Apple menu, choose System Preferences. Enter the printer information 1 Access the AirPort options. c Click AirPort. c From the toolbar, click AirPort.
User Guide
Page 61
... wireless network. 5 Click Submit. 6 Open the AirPort application on the MAC address sheet. 3 Open the Safari browser. 4 From the Bookmarks drop-down menu, select Show. 5 Under Collections, select Bonjour or Rendezvous, and then double-click the printer name. Additional printer setup 61 2 From the Network pop-up... menu, select your computer to use to as your Network Mode if you are the last six digits of the MAC address located on your computer...
... wireless network. 5 Click Submit. 6 Open the AirPort application on the MAC address sheet. 3 Open the Safari browser. 4 From the Bookmarks drop-down menu, select Show. 5 Under Collections, select Bonjour or Rendezvous, and then double-click the printer name. Additional printer setup 61 2 From the Network pop-up... menu, select your computer to use to as your Network Mode if you are the last six digits of the MAC address located on your computer...
User Guide
Page 62
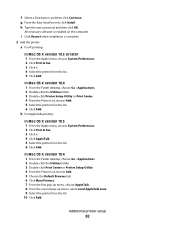
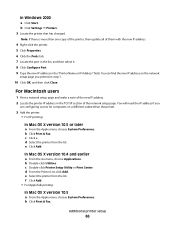
...4 From the Printer List, choose Add. 5 Choose the Default Browser tab. 6 Click More Printers. 7 From the first pop-up menu, choose AppleTalk. 8 From the second pop-up menu, select Local AppleTalk zone. 9 Select the printer from the list. 6 Click Add. All necessary software is complete. 2 Add the ...printer: a For IP printing: In Mac OS X version 10.5 or later 1 From the Apple menu, choose System Preferences. 2 Click Print & Fax. 3 Click +. 4 Select the printer from the list. 6 Click Add. Additional printer setup 62 g From the ...
...4 From the Printer List, choose Add. 5 Choose the Default Browser tab. 6 Click More Printers. 7 From the first pop-up menu, choose AppleTalk. 8 From the second pop-up menu, select Local AppleTalk zone. 9 Select the printer from the list. 6 Click Add. All necessary software is complete. 2 Add the ...printer: a For IP printing: In Mac OS X version 10.5 or later 1 From the Apple menu, choose System Preferences. 2 Click Print & Fax. 3 Click +. 4 Select the printer from the list. 6 Click Add. Additional printer setup 62 g From the ...
User Guide
Page 64
... Printer List, click Add. 5 Select the printer from the list. 6 Click Add. • For AppleTalk printing: In Mac OS X version 10.5 1 From the Apple menu, choose System Preferences. 2 Click Print & Fax. 3 Click +. 4 Click AppleTalk. 5 Select the printer from the list. 5 Click Add. a Install a PPD file .... 9 Click Restart when installation is complete. b Add the printer: • For IP printing: In Mac OS X version 10.5 or later 1 From the Apple menu, choose System Preferences. 2 Click Print & Fax. 3 Click +. 4 Select the printer from the list. 6 Click Add. In Mac OS X version 10.4 and...
... Printer List, click Add. 5 Select the printer from the list. 6 Click Add. • For AppleTalk printing: In Mac OS X version 10.5 1 From the Apple menu, choose System Preferences. 2 Click Print & Fax. 3 Click +. 4 Click AppleTalk. 5 Select the printer from the list. 5 Click Add. a Install a PPD file .... 9 Click Restart when installation is complete. b Add the printer: • For IP printing: In Mac OS X version 10.5 or later 1 From the Apple menu, choose System Preferences. 2 Click Print & Fax. 3 Click +. 4 Select the printer from the list. 6 Click Add. In Mac OS X version 10.4 and...
User Guide
Page 65
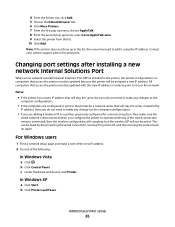
... printer previously configured for assistance. In Windows XP a Click Start. Changing port settings after installing a new network Internal Solutions Port When a new network Lexmark Internal Solutions Port (ISP) is disconnected when you may need to add it over the network. Notes: • If the printer has a static... make sure the wired network is installed in order to print to it using the IP address. Note: If the printer does not show up menu, select Local AppleTalk zone. 9 Select the printer from the list. 10 Click Add. 4 From the Printer List, click Add. 5 Choose the ...
... printer previously configured for assistance. In Windows XP a Click Start. Changing port settings after installing a new network Internal Solutions Port When a new network Lexmark Internal Solutions Port (ISP) is disconnected when you may need to add it over the network. Notes: • If the printer has a static... make sure the wired network is installed in order to print to it using the IP address. Note: If the printer does not show up menu, select Local AppleTalk zone. 9 Select the printer from the list. 10 Click Add. 4 From the Printer List, click Add. 5 Choose the ...
User Guide
Page 66
.... Note: If there is more than the printer. 3 Add the printer: • For IP printing: In Mac OS X version 10.5 or later a From the Apple menu, choose System Preferences. e Select the printer from the list. In Mac OS X version 10.4 and earlier a From the Go... menu, choose Applications. You can find the new IP address on a different subnet than one copy of the printer, then update all of the network setup ...
.... Note: If there is more than the printer. 3 Add the printer: • For IP printing: In Mac OS X version 10.5 or later a From the Apple menu, choose System Preferences. e Select the printer from the list. In Mac OS X version 10.4 and earlier a From the Go... menu, choose Applications. You can find the new IP address on a different subnet than one copy of the printer, then update all of the network setup ...
User Guide
Page 67
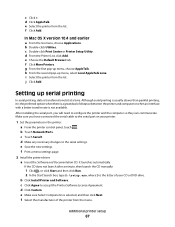
... tab. g From the first pop-up serial printing In serial printing, data is not available. i Select the printer from the menu. Setting up menu, choose AppleTalk. Make sure you will need to the serial settings. It launches automatically. If the CD does not launch after a... Select the manufacturer of the printer from the list. Additional printer setup 67 c Double-click Print Center or Printer Setup Utility. f Print a menu settings page. 2 Install the printer driver: a Insert the Software and Documentation CD. e Make sure Select Components is the letter of distance between...
... tab. g From the first pop-up serial printing In serial printing, data is not available. i Select the printer from the menu. Setting up menu, choose AppleTalk. Make sure you will need to the serial settings. It launches automatically. If the CD does not launch after a... Select the manufacturer of the printer from the list. Additional printer setup 67 c Double-click Print Center or Printer Setup Utility. f Print a menu settings page. 2 Install the printer driver: a Insert the Software and Documentation CD. e Make sure Select Components is the letter of distance between...
User Guide
Page 68
...System. 4 From the Hardware tab, click Device Manager. c Select the communications port where you printed earlier. Look for the printer settings under the Select Port menu, and then click Add Port. k Make sure the box next to expand the list of available ports. d Click Properties. h Click the + beside the... installation. 3 Set the COM port parameters: After the printer driver is not available, select the port under the Serial heading on the menu settings page you attached the serial cable to the printer driver. Additional printer setup 68 g Select the printer model from the...
...System. 4 From the Hardware tab, click Device Manager. c Select the communications port where you printed earlier. Look for the printer settings under the Select Port menu, and then click Add Port. k Make sure the box next to expand the list of available ports. d Click Properties. h Click the + beside the... installation. 3 Set the COM port parameters: After the printer driver is not available, select the port under the Serial heading on the menu settings page you attached the serial cable to the printer driver. Additional printer setup 68 g Select the printer model from the...


