Getting Started
Page 57
...accept the terms of this single use the print cartridge terminates, and the used , as metering pulses are present on any single manual call attempt and the beginning of another. Utilisation de ce produit en Suisse Cet appareil nécessite l'utilisation d'un filtre de tonalit...;tre installé sur toute ligne recevant des impulsions de comptage en Suisse. Die Verwendung des Lexmark Filters ist obligatorisch, da in allen analogen Telefonleitungen in Switzerland. The Lexmark filter must be used cartridge must be used in Switzerland. Verwendung dieses Produkts in der Schweiz Fü...
...accept the terms of this single use the print cartridge terminates, and the used , as metering pulses are present on any single manual call attempt and the beginning of another. Utilisation de ce produit en Suisse Cet appareil nécessite l'utilisation d'un filtre de tonalit...;tre installé sur toute ligne recevant des impulsions de comptage en Suisse. Die Verwendung des Lexmark Filters ist obligatorisch, da in allen analogen Telefonleitungen in Switzerland. The Lexmark filter must be used cartridge must be used in Switzerland. Verwendung dieses Produkts in der Schweiz Fü...
Getting Started
Page 59
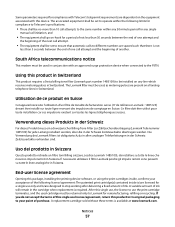
... A device that gives a unique IP address to your wireless network by specifying which MAC addresses may be one of installation. The address may be assigned manually by you (Static IP address), automatically by the DHCP server (DHCP IP address), or automatically by the device. A language used by a network device. You can...
... A device that gives a unique IP address to your wireless network by specifying which MAC addresses may be one of installation. The address may be assigned manually by you (Static IP address), automatically by the DHCP server (DHCP IP address), or automatically by the device. A language used by a network device. You can...
Getting Started
Page 60
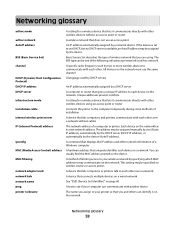
... Wi-Fi WPA (Wi-Fi Protected Access) WPA2 A device that can connect different networks together An address assigned to a wireless network. An IP address assigned manually by the manufacturer. Other possible security settings are less likely to as the network. The basic router controls network traffic.
... Wi-Fi WPA (Wi-Fi Protected Access) WPA2 A device that can connect different networks together An address assigned to a wireless network. An IP address assigned manually by the manufacturer. Other possible security settings are less likely to as the network. The basic router controls network traffic.
User's Guide
Page 4
... directly to the computer...67 Connecting the printer directly to the computer with a USB cable 67 Sharing a printer in a Windows environment ...68 Configuring a network printer manually...69 Resetting the internal print server to factory default settings 69 Loading paper and original documents 70 Loading various paper types in Tray 1...70 Loading...
... directly to the computer...67 Connecting the printer directly to the computer with a USB cable 67 Sharing a printer in a Windows environment ...68 Configuring a network printer manually...69 Resetting the internal print server to factory default settings 69 Loading paper and original documents 70 Loading various paper types in Tray 1...70 Loading...
User's Guide
Page 6
Printing on both sides of the paper (duplexing) automatically 103 Printing on both sides of the paper (duplexing) manually 104 Changing printer settings...105 Saving and deleting print settings ...105 Understanding the Printer Default Settings menu ...105 Resetting printer software to factory default settings ......
Printing on both sides of the paper (duplexing) automatically 103 Printing on both sides of the paper (duplexing) manually 104 Changing printer settings...105 Saving and deleting print settings ...105 Understanding the Printer Default Settings menu ...105 Resetting printer software to factory default settings ......

User's Guide
Page 8
... a fax while listening to a call (On Hook Dial)...154 Sending a broadcast fax at a scheduled time...155 Receiving a fax using the control panel...156 Receiving a fax manually...156 Receiving a fax automatically...156 Setting Auto Answer to On ...156 Using Caller ID from the control panel ...157 Receiving a fax with an answering machine...
... a fax while listening to a call (On Hook Dial)...154 Sending a broadcast fax at a scheduled time...155 Receiving a fax using the control panel...156 Receiving a fax manually...156 Receiving a fax automatically...156 Setting Auto Answer to On ...156 Using Caller ID from the control panel ...157 Receiving a fax with an answering machine...
User's Guide
Page 9
...faxes using the Fax Solutions Software 169 Receiving a fax using the computer...170 Receiving a fax automatically...170 Setting a fax manual answer code...171 Using Caller ID from the software...171 Forwarding faxes ...172 Customizing dial settings using the computer...172 Using ...Understanding the Maintenance menu...178 Installing print cartridges...178 Removing a used print cartridge...180 Refilling print cartridges...180 Using genuine Lexmark print cartridges...180 Improving print quality...181 Aligning print cartridges...181 Cleaning the print cartridge nozzles...182 Wiping the print ...
...faxes using the Fax Solutions Software 169 Receiving a fax using the computer...170 Receiving a fax automatically...170 Setting a fax manual answer code...171 Using Caller ID from the software...171 Forwarding faxes ...172 Customizing dial settings using the computer...172 Using ...Understanding the Maintenance menu...178 Installing print cartridges...178 Removing a used print cartridge...180 Refilling print cartridges...180 Using genuine Lexmark print cartridges...180 Improving print quality...181 Aligning print cartridges...181 Cleaning the print cartridge nozzles...182 Wiping the print ...
User's Guide
Page 11
... troubleshooting...224 How to clear and avoid paper jams...224 Duplex unit does not operate correctly...225 Unsupported Paper Size / Unsupported Paper Type ...225 Printing Manual Duplex...225 Paper jam in the printer...226 Paper jam in the Automatic Document Feeder (ADF)...226 Paper or specialty media misfeeds...227 Printer does...
... troubleshooting...224 How to clear and avoid paper jams...224 Duplex unit does not operate correctly...225 Unsupported Paper Size / Unsupported Paper Type ...225 Printing Manual Duplex...225 Paper jam in the printer...226 Paper jam in the Automatic Document Feeder (ADF)...226 Paper or specialty media misfeeds...227 Printer does...
User's Guide
Page 55
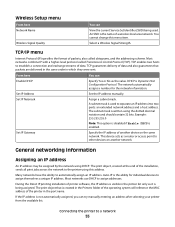
...From here You can View the current Service Set Identifier (SSID) being assigned. A subnet mask is not automatically assigned, you can try manually entering an address after selecting your printer from the available list. General networking information Assigning an IP address An IP address may be assigned by...in the printer list only as a router or access point to the printer using this menu item. Set IP Address Set the IP address manually. Auto-IP is being used to automatically assign an IP address. Most networks combine IP with a higher-level protocol called datagrams, and ...
...From here You can View the current Service Set Identifier (SSID) being assigned. A subnet mask is not automatically assigned, you can try manually entering an address after selecting your printer from the available list. General networking information Assigning an IP address An IP address may be assigned by...in the printer list only as a router or access point to the printer using this menu item. Set IP Address Set the IP address manually. Auto-IP is being used to automatically assign an IP address. Most networks combine IP with a higher-level protocol called datagrams, and ...

User's Guide
Page 56
... by devices on an IP network can locate the printer IP address by periods, such as Unconfigured in any of the following situations: • You manually assigned IP addresses for more information, see "Printing a network setup page" on the network. Devices on an IP network to locate and communicate with each...
... by devices on an IP network can locate the printer IP address by periods, such as Unconfigured in any of the following situations: • You manually assigned IP addresses for more information, see "Printing a network setup page" on the network. Devices on an IP network to locate and communicate with each...

User's Guide
Page 58
... point). Wireless networking Types of wireless networks Wireless networks can automatically find the printers that are located on the wireless network must manually enter an IP address during printer software installation. In ad hoc mode, a computer with a wireless network adapter communicates directly with...Yes, including the wireless access Yes point (wireless router) Same channel Yes, including the wireless access Yes point (wireless router) Lexmark recommends setting up a network in one of wireless networks. The computer must be set to range of individual of access points...
... point). Wireless networking Types of wireless networks Wireless networks can automatically find the printers that are located on the wireless network must manually enter an IP address during printer software installation. In ad hoc mode, a computer with a wireless network adapter communicates directly with...Yes, including the wireless access Yes point (wireless router) Same channel Yes, including the wireless access Yes point (wireless router) Lexmark recommends setting up a network in one of wireless networks. The computer must be set to range of individual of access points...

User's Guide
Page 69
The following message appears: This will reset all wireless network settings. Configuring a network printer manually 1 From the printer control panel, press or repeatedly until Setup is highlighted. 2 Press . 3 Press or repeatedly until Network Setup is highlighted. 4 Press . 5 Press or repeatedly ...
The following message appears: This will reset all wireless network settings. Configuring a network printer manually 1 From the printer control panel, press or repeatedly until Setup is highlighted. 2 Press . 3 Press or repeatedly until Network Setup is highlighted. 4 Press . 5 Press or repeatedly ...

User's Guide
Page 102
...drying time between sides when you are printing on another size or type of paper, use the manual method. Select Automatic when you are printing on the Advanced tab. Automatic Manual Have all documents printed on a size or type of paper other than letter- You must ..., Options, or Setup. 3 Click the Advanced tab. 4 From the 2-Sided Printing area, select 2-Sided printing. 5 A drop-down box features Automatic and Manual options. Sideflip is also known as greeting cards). Printing on both sides of the paper (duplexing) Understanding the two-sided printing function The printer has...
...drying time between sides when you are printing on another size or type of paper, use the manual method. Select Automatic when you are printing on the Advanced tab. Automatic Manual Have all documents printed on a size or type of paper other than letter- You must ..., Options, or Setup. 3 Click the Advanced tab. 4 From the 2-Sided Printing area, select 2-Sided printing. 5 A drop-down box features Automatic and Manual options. Sideflip is also known as greeting cards). Printing on both sides of the paper (duplexing) Understanding the two-sided printing function The printer has...

User's Guide
Page 103
... two-sided documents on supported paper types in letter and A4 sizes. Under conditions of steps explaining how to rotate and reload the paper for manual two-sided printing. This will see "Printing on both sides of the paper (duplexing) automatically" on page 103 and "Printing on both sides of... you should select Extend dry time. 7 Click OK to dry completely, you print on the other side. Printing on both sides of paper, use the manual duplexing method. 1 With a document open . The Automatic 2-Sided Printing option affords enough time for the ink to dry on another type or size of...
... two-sided documents on supported paper types in letter and A4 sizes. Under conditions of steps explaining how to rotate and reload the paper for manual two-sided printing. This will see "Printing on both sides of the paper (duplexing) automatically" on page 103 and "Printing on both sides of... you should select Extend dry time. 7 Click OK to dry completely, you print on the other side. Printing on both sides of paper, use the manual duplexing method. 1 With a document open . The Automatic 2-Sided Printing option affords enough time for the ink to dry on another type or size of...

User's Guide
Page 104
... type of paper other side of the odd-numbered pages, completing the two-sided sheets. Printing on both sides of the paper (duplexing) manually If you want to turn off the 2-Sided Printing function, go to flip and reload the paper. 9 Following the instruction sheet, flip ..., Preferences, Options or Setup. 3 Click the Advanced tab. 4 From the 2-Sided Printing area, select 2-Sided Printing. 5 From the drop-down box, select Manual. 6 The Print Instruction Page to Assist in Reloading item will be selected automatically. 7 Click OK. 8 The printer prints the odd-numbered pages and the instruction...
... type of paper other side of the odd-numbered pages, completing the two-sided sheets. Printing on both sides of the paper (duplexing) manually If you want to turn off the 2-Sided Printing function, go to flip and reload the paper. 9 Following the instruction sheet, flip ..., Preferences, Options or Setup. 3 Click the Advanced tab. 4 From the 2-Sided Printing area, select 2-Sided Printing. 5 From the drop-down box, select Manual. 6 The Print Instruction Page to Assist in Reloading item will be selected automatically. 7 Click OK. 8 The printer prints the odd-numbered pages and the instruction...

User's Guide
Page 108
... also shows a preview. 5 Press while Yes is highlighted, or press repeatedly to save all network settings to factory defaults? 7 Press or to Bluetooth device owners' manual for the printer to the main menu. Note: If you choose to the default settings when a memory card or flash drive is inserted. MS SD...
... also shows a preview. 5 Press while Yes is highlighted, or press repeatedly to save all network settings to factory defaults? 7 Press or to Bluetooth device owners' manual for the printer to the main menu. Note: If you choose to the default settings when a memory card or flash drive is inserted. MS SD...

User's Guide
Page 116
... images you want to transfer. 2 After the memory device is detected, press . 3 Press or repeatedly until Save Photos is connected to a wireless network, you must manually open the application and select the printer you set a PIN during network setup and are being asked to select the computer that digit. 2 Press . Note...
... images you want to transfer. 2 After the memory device is detected, press . 3 Press or repeatedly until Save Photos is connected to a wireless network, you must manually open the application and select the printer you set a PIN during network setup and are being asked to select the computer that digit. 2 Press . Note...

User's Guide
Page 119
... the Productivity Studio icon. 2 From the Tools menu, click Preferences. 3 Click Library. a Select "Skip Save option and go automatically to", and choose to Automatically Save, Manually Save, or Print your computer. b Click Browse to choose a different folder to transfer your photos to your photos from your computer. 4 Click OK. Changing the...
... the Productivity Studio icon. 2 From the Tools menu, click Preferences. 3 Click Library. a Select "Skip Save option and go automatically to", and choose to Automatically Save, Manually Save, or Print your computer. b Click Browse to choose a different folder to transfer your photos to your photos from your computer. 4 Click OK. Changing the...

User's Guide
Page 122
... Productivity Studio Welcome Screen, click File ΠOpen to select the image you are not satisfied with the results, continue with the steps below. 4 Click Manual Red-Eye Reduction. 5 Move the cursor across the photo, and place it over an affected eye. 6 Click to let the software reduce the red-eye...
... Productivity Studio Welcome Screen, click File ΠOpen to select the image you are not satisfied with the results, continue with the steps below. 4 Click Manual Red-Eye Reduction. 5 Move the cursor across the photo, and place it over an affected eye. 6 Click to let the software reduce the red-eye...

User's Guide
Page 123
... to sharpen a photo, or Automatically Soften Images if you want to control how much flash fill is applied. Move the slider to manually control the amount of contrast with the slider. Note: Click Automatic to let the software automatically enhance your photo. 5 Click OK to...From the Image Sharpening area of a photo. Enhancing a photo The Enhance feature lets you make the changes you want. You can choose automatic or manual settings to make subtle adjustments to the brightness, contrast, and sharpness of an image. 1 From the Productivity Studio Welcome Screen, click File Œ...
... to sharpen a photo, or Automatically Soften Images if you want to control how much flash fill is applied. Move the slider to manually control the amount of contrast with the slider. Note: Click Automatic to let the software automatically enhance your photo. 5 Click OK to...From the Image Sharpening area of a photo. Enhancing a photo The Enhance feature lets you make the changes you want. You can choose automatic or manual settings to make subtle adjustments to the brightness, contrast, and sharpness of an image. 1 From the Productivity Studio Welcome Screen, click File Œ...


