Clearing Jams Guide
Page 3
... down the latches. If the jam error message persists, go to release the fuser. 4 Pull the fuser out, and set it on a clean, flat surface. 7 Close the fuser roller cover. 8 Snap the housing back onto the fuser. 9 Insert the fuser back into the printer. 10 Slide the latches out, and then pull up... to step 2. 2 Open both the upper right and the lower right access doors (Areas K and L). 5 Unsnap the housing and set it aside. Clearing fuser jams 1 Clear the paper path. Clearing image transfer unit jams 1 Open the front access door and the left access door and the front access door...
... down the latches. If the jam error message persists, go to release the fuser. 4 Pull the fuser out, and set it on a clean, flat surface. 7 Close the fuser roller cover. 8 Snap the housing back onto the fuser. 9 Insert the fuser back into the printer. 10 Slide the latches out, and then pull up... to step 2. 2 Open both the upper right and the lower right access doors (Areas K and L). 5 Unsnap the housing and set it aside. Clearing fuser jams 1 Clear the paper path. Clearing image transfer unit jams 1 Open the front access door and the left access door and the front access door...
Troubleshooting Guide
Page 5
... the color displayed on the control panel. • Replace the transfer roller. • Replace the image transfer unit. • Replace the fuser. • Call for service. Vertical or horizontal lines are using . • The default Paper Weight setting in the Paper Menu is stiff...sure the printer paper type, paper texture, and paper weight settings match the type of paper you still have the problem, replace the fuser. Black text is visible Adjust the Background Removal setting under Copy Options Content. Solving copy quality problems Unwanted background ...
... the color displayed on the control panel. • Replace the transfer roller. • Replace the image transfer unit. • Replace the fuser. • Call for service. Vertical or horizontal lines are using . • The default Paper Weight setting in the Paper Menu is stiff...sure the printer paper type, paper texture, and paper weight settings match the type of paper you still have the problem, replace the fuser. Black text is visible Adjust the Background Removal setting under Copy Options Content. Solving copy quality problems Unwanted background ...
User's Guide
Page 68
Thick paper may contaminate the printer • Preprinted papers that can be affected by the temperature in the printer fuser • Preprinted papers that may also require a longer conditioning period because of the mass of 230°C (446°F) without carbon paper, also known as ... in the Copies & Pages pop-up menu. For 60 to 90 g/m2 (16 to withstand temperatures of material. Always print samples on the Lexmark Web site at www.lexmark.com. For detailed information, see the Card Stock & Label Guide, which is either grain long, running the length of the paper, or grain...
Thick paper may contaminate the printer • Preprinted papers that can be affected by the temperature in the printer fuser • Preprinted papers that may also require a longer conditioning period because of the mass of 230°C (446°F) without carbon paper, also known as ... in the Copies & Pages pop-up menu. For 60 to 90 g/m2 (16 to withstand temperatures of material. Always print samples on the Lexmark Web site at www.lexmark.com. For detailed information, see the Card Stock & Label Guide, which is either grain long, running the length of the paper, or grain...
User's Guide
Page 86
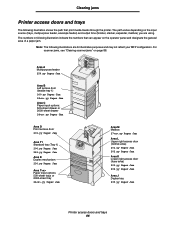
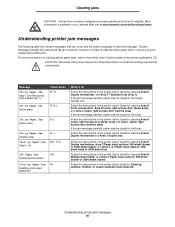
... M Mailbox 27.yy Paper Jam Area L Upper right access door (redrive area) 201.yy Paper Jam 202.yy Paper Jam Area K Lower right access door (fuser area) 201.yy Paper Jam 202.yy Paper Jam Area J Duplex tray 230.yy Paper Jam Printer access doors and trays 86 Note: The following...
... M Mailbox 27.yy Paper Jam Area L Upper right access door (redrive area) 201.yy Paper Jam 202.yy Paper Jam Area K Lower right access door (fuser area) 201.yy Paper Jam 202.yy Paper Jam Area J Duplex tray 230.yy Paper Jam Printer access doors and trays 86 Note: The following...
User's Guide
Page 87
...input options: 500sheet trays or 2000-sheet tray. Allow the printer to do Follow the instructions in the fuser. However, it is available on our Lexmark Web site at www.lexmark.com/multifunctionprinters. Follow the instructions in the printer User's Guide for clearing Area D Front access door, Area... K Lower right access door (fuser area), and Area L Upper right access door (redrive area). If the jam message...
...input options: 500sheet trays or 2000-sheet tray. Allow the printer to do Follow the instructions in the fuser. However, it is available on our Lexmark Web site at www.lexmark.com/multifunctionprinters. Follow the instructions in the printer User's Guide for clearing Area D Front access door, Area... K Lower right access door (fuser area), and Area L Upper right access door (redrive area). If the jam message...


