IPDS Printer and Host Setup Guide
Page 10
USRDRVPGM *NONE Library System driver program SYSDRVPGM Secure connection SECURECNN *NO Validation list VLDL *NONE Library Publishing information PUBLISHINF Support duplex *UNKNOWN Support color *UNKNOWN Pages per minute black *UNKNOWN ... do this on MFPs just touch Network/Ports. 4 Now you will see a list of the following settings and change shown in bold. Library User defined driver program........... Check each of menus. on printers, press the Select button ;
USRDRVPGM *NONE Library System driver program SYSDRVPGM Secure connection SECURECNN *NO Validation list VLDL *NONE Library Publishing information PUBLISHINF Support duplex *UNKNOWN Support color *UNKNOWN Pages per minute black *UNKNOWN ... do this on MFPs just touch Network/Ports. 4 Now you will see a list of the following settings and change shown in bold. Library User defined driver program........... Check each of menus. on printers, press the Select button ;
IPDS Printer and Host Setup Guide
Page 19
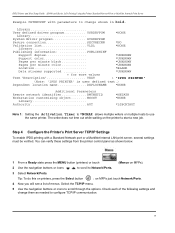
... Paper source 1 PPRSRC1 *MFRTYPMDL Paper source 2 PPRSRC2 *MFRTYPMDL Envelope source ENVELOPE *MFRTYPMDL ASCII code page 899 support....... USRDRVPGM *NONE Library System driver program SYSDRVPGM Secure connection SECURECNN *NO Validation list VLDL *NONE Library Publishing information: ..........PUBLISHINF Support duplex *UNKNOWN Support color *UNKNOWN Pages per minute... *NONE User-defined object: USRDFNOBJ Object > *NONE Library > Object type > Data transform program............USRDTATFM *NONE Library User-defined driver program ......
... Paper source 1 PPRSRC1 *MFRTYPMDL Paper source 2 PPRSRC2 *MFRTYPMDL Envelope source ENVELOPE *MFRTYPMDL ASCII code page 899 support....... USRDRVPGM *NONE Library System driver program SYSDRVPGM Secure connection SECURECNN *NO Validation list VLDL *NONE Library Publishing information: ..........PUBLISHINF Support duplex *UNKNOWN Support color *UNKNOWN Pages per minute... *NONE User-defined object: USRDFNOBJ Object > *NONE Library > Object type > Data transform program............USRDTATFM *NONE Library User-defined driver program ......
Troubleshooting Guide
Page 2
... for network printing. Note: Setting Collation to print. The specified output bin is not connected properly Verify that you selected the printer driver associated with the Lexmark ABC. • If you are using a recommended interface cable. See the Software and Documentation CD or go to the Ready state..., see the Menus and Messages Guide. For more information, see the Menus and Messages Guide. Press to return the printer to the Lexmark Web site for the standard parallel port. The printer has received invalid data Delete the job. Job takes longer than expected to Off ...
... for network printing. Note: Setting Collation to print. The specified output bin is not connected properly Verify that you selected the printer driver associated with the Lexmark ABC. • If you are using a recommended interface cable. See the Software and Documentation CD or go to the Ready state..., see the Menus and Messages Guide. For more information, see the Menus and Messages Guide. Press to return the printer to the Lexmark Web site for the standard parallel port. The printer has received invalid data Delete the job. Job takes longer than expected to Off ...
Troubleshooting Guide
Page 5
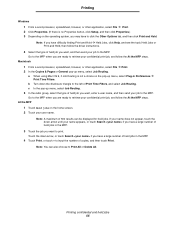
... 28 lb bond to 47 lb bond (105 g/m2 to 175 g/m2 ), choose the Heavy setting. • Select a different Toner Darkness setting from the printer driver before sending the job to print. • Scroll to the Color Adjust setting in the Quality Menu and press Select to adjust the color. •...; Load paper from the printer driver before sending the job to print. • Scroll to the Color Adjust setting in the Quality Menu and press Select to adjust the color. •...
... 28 lb bond to 47 lb bond (105 g/m2 to 175 g/m2 ), choose the Heavy setting. • Select a different Toner Darkness setting from the printer driver before sending the job to print. • Scroll to the Color Adjust setting in the Quality Menu and press Select to adjust the color. •...; Load paper from the printer driver before sending the job to print. • Scroll to the Color Adjust setting in the Quality Menu and press Select to adjust the color. •...
User's Guide
Page 8
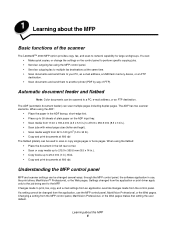
... document feeder and flatbed Note: Color documents can scan multiple pages including duplex pages. Changing a setting from the application, use , the print driver, MarkVision™ Professional, or the Web pages. Understanding the MFP control panel MFP and scanner settings can be changed from the control panel. When... using the ADF: • Place the paper in the ADF faceup, short-edge first. • Place up to 50 sheets of the scanner The Lexmark™ 4600 MFP option provides copy, fax, and scan-to 25.3 mm (1 in .). • Copy books up to 215.9 x 355.6 mm (8.5 x 14 in...
... document feeder and flatbed Note: Color documents can scan multiple pages including duplex pages. Changing a setting from the application, use , the print driver, MarkVision™ Professional, or the Web pages. Understanding the MFP control panel MFP and scanner settings can be changed from the control panel. When... using the ADF: • Place the paper in the ADF faceup, short-edge first. • Place up to 50 sheets of the scanner The Lexmark™ 4600 MFP option provides copy, fax, and scan-to 25.3 mm (1 in .). • Copy books up to 215.9 x 355.6 mm (8.5 x 14 in...

User's Guide
Page 37
... you'd like the speed dial numbers on a telephone or fax machine. Sending faxes from a computer Faxing from your computer, you must use the PostScript printer driver for multiple names at the same time.) 5 Touch Enter. 6 Touch the name to add it to the Fax to: list. 7 Repeat steps 5 through 6 to perform...
... you'd like the speed dial numbers on a telephone or fax machine. Sending faxes from a computer Faxing from your computer, you must use the PostScript printer driver for multiple names at the same time.) 5 Touch Enter. 6 Touch the name to add it to the Fax to: list. 7 Repeat steps 5 through 6 to perform...
User's Guide
Page 53
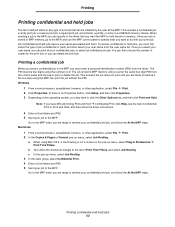
When sending a job to the MFP, you can specify in the driver that can be four digits using the numbers 0-9. To access confidential or held jobs,...the number of copies for the print job, or you are ready to retrieve your confidential print job, and follow the driver instructions. 4 Enter a User Name and PIN. 5 Send your job to the MFP. This ensures the job does... user name associated with your print job. Go to the MFP when you enter the same four-digit PIN from the driver. All confidential and held jobs have to click the Other Options tab, and then click Print and Hold. Macintosh 1 ...
When sending a job to the MFP, you can specify in the driver that can be four digits using the numbers 0-9. To access confidential or held jobs,...the number of copies for the print job, or you are ready to retrieve your confidential print job, and follow the driver instructions. 4 Enter a User Name and PIN. 5 Send your job to the MFP. This ensures the job does... user name associated with your print job. Go to the MFP when you enter the same four-digit PIN from the driver. All confidential and held jobs have to click the Other Options tab, and then click Print and Hold. Macintosh 1 ...
User's Guide
Page 55
... may have difficulty finding Print and Hold Æ Held Jobs, click Help, and see the topic Held Jobs or Print and Hold, then follow the driver instructions. 4 Select the type of held job you want , and then send your name appears, or touch Search if you have a large number of held...
... may have difficulty finding Print and Hold Æ Held Jobs, click Help, and see the topic Held Jobs or Print and Hold, then follow the driver instructions. 4 Select the type of held job you want , and then send your name appears, or touch Search if you have a large number of held...
User's Guide
Page 56
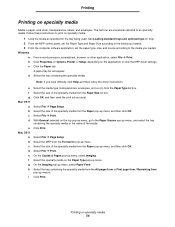
...the computer software application, set the paper type, size, and source according to the media you have difficulty, click Help, and then follow the driver instructions. With General selected on the application) to the Paper Source pop-up menu, and select the tray containing the specialty media or the name... File Æ Page Setup. b Click Properties (or Options, Printer, or Setup, depending on the top pop-up menu, go to view the MFP driver settings. Select File Æ Page Setup. Click Print. Select the size of the media. Select the specialty media on specialty media. 1 Load the media...
...the computer software application, set the paper type, size, and source according to the media you have difficulty, click Help, and then follow the driver instructions. With General selected on the application) to the Paper Source pop-up menu, and select the tray containing the specialty media or the name... File Æ Page Setup. b Click Properties (or Options, Printer, or Setup, depending on the top pop-up menu, go to view the MFP driver settings. Select File Æ Page Setup. Click Print. Select the size of the media. Select the specialty media on specialty media. 1 Load the media...
User's Guide
Page 69
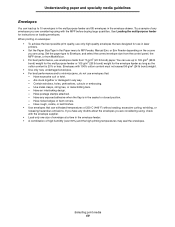
... cotton content is in the envelope drawer. Set the paper type to Envelope, and select the correct envelope size from the control panel, the MFP driver, or from 75 g/m2 (20 lb bond) paper. Have rough, cockle, or laid finishes. • Use envelopes that can load up to 10 envelopes in...
... cotton content is in the envelope drawer. Set the paper type to Envelope, and select the correct envelope size from the control panel, the MFP driver, or from 75 g/m2 (20 lb bond) paper. Have rough, cockle, or laid finishes. • Use envelopes that can load up to 10 envelopes in...
User's Guide
Page 70
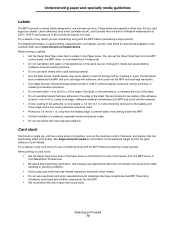
... aware that may release hazardous emissions when heated. • Do not use of the adhesive at www.lexmark.com/publications. You can set the Paper Size/Type from the MFP control panel, the MFP driver, or from peeling inside the MFP. • Portrait orientation is single ply, and has a large array of...
... aware that may release hazardous emissions when heated. • Do not use of the adhesive at www.lexmark.com/publications. You can set the Paper Size/Type from the MFP control panel, the MFP driver, or from peeling inside the MFP. • Portrait orientation is single ply, and has a large array of...
User's Guide
Page 92
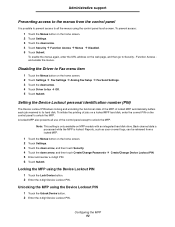
... the down arrow, and then touch Create/Change Passwords Æ Create/Change Device Lockout PIN. 5 Enter and reenter a 4-digit PIN. 6 Touch Submit. Disabling the Driver to Fax menu item 1 Touch the Menus button on the web page, and then go to Security - Configuring the MFP 92 To enable the menus...address on the home screen. 2 Touch Settings Æ Fax Settings Æ Analog Fax Setup Æ Fax Send Settings. 3 Touch the down arrow. 4 Touch Driver to all use of the MFP. Back channel data is processed while the MFP is possible to prevent access to fax Æ Off. 5 Touch Submit...
... the down arrow, and then touch Create/Change Passwords Æ Create/Change Device Lockout PIN. 5 Enter and reenter a 4-digit PIN. 6 Touch Submit. Disabling the Driver to Fax menu item 1 Touch the Menus button on the web page, and then go to Security - Configuring the MFP 92 To enable the menus...address on the home screen. 2 Touch Settings Æ Fax Settings Æ Analog Fax Setup Æ Fax Send Settings. 3 Touch the down arrow. 4 Touch Driver to all use of the MFP. Back channel data is processed while the MFP is possible to prevent access to fax Æ Off. 5 Touch Submit...
User's Guide
Page 112
... MFP 92 setting 92 unlocking the MFP 92 Dial Pause button 10 disabling ports 95 protocols 95 SNMPv1 94 SNMPv2 94 down arrow button 16 Driver to Fax disabling 92 duplex 23 advanced 23 duplex copying 26 E edge erase 23 edition notice 2 electrical emission statement 102 email address book 30 addresses...
... MFP 92 setting 92 unlocking the MFP 92 Dial Pause button 10 disabling ports 95 protocols 95 SNMPv1 94 SNMPv2 94 down arrow button 16 Driver to Fax disabling 92 duplex 23 advanced 23 duplex copying 26 E edge erase 23 edition notice 2 electrical emission statement 102 email address book 30 addresses...
User's Guide
Page 113
LCD touch-screen features Attendance message alert 19 Menu trail line 19 left arrow button 15 left scroll decrease button 14 letterhead copying 24 Lexmark Authorized Supplies Dealers 78 light, indicator 9 linking 62 trays 62 loading 2000-sheet tray 59 500-sheet trays 57 multipurpose feeder 61 ...Password 93 Password Protect, setting for the menus 91 photoconductor kit recycling 80 pick pad 79 PIN entering at the MFP 54 entering from the driver 53 for confidential jobs 53 ports, disabling 95 Pound button 9 Power Saver, adjusting 90 print media guidelines 67 paper 67 transparencies guidelines 68...
LCD touch-screen features Attendance message alert 19 Menu trail line 19 left arrow button 15 left scroll decrease button 14 letterhead copying 24 Lexmark Authorized Supplies Dealers 78 light, indicator 9 linking 62 trays 62 loading 2000-sheet tray 59 500-sheet trays 57 multipurpose feeder 61 ...Password 93 Password Protect, setting for the menus 91 photoconductor kit recycling 80 pick pad 79 PIN entering at the MFP 54 entering from the driver 53 for confidential jobs 53 ports, disabling 95 Pound button 9 Power Saver, adjusting 90 print media guidelines 67 paper 67 transparencies guidelines 68...
PKI-Enabled MFP Installation and Configuration Guide
Page 5
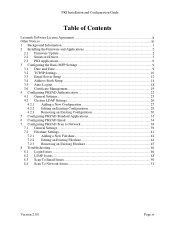
PKI Installation and Configuration Guide Table of Contents Lexmark Software License Agreement ii Other Notices ...iii 1 Background Information...1 2 Installing the Firmware and Applications 2 2.1 Firmware Update ...2 2.2 Smartcard Driver...3 2.3 PKI Applications...6 3 Configuring the Basic MFP Settings 9 3.1 Date and Time...9 3.2 TCP/IP Settings...10 3.3 Email Server Setup ...12 3.4 Address Book Setup...14 3.5 Auto-Logout...18 3.6 ...
PKI Installation and Configuration Guide Table of Contents Lexmark Software License Agreement ii Other Notices ...iii 1 Background Information...1 2 Installing the Firmware and Applications 2 2.1 Firmware Update ...2 2.2 Smartcard Driver...3 2.3 PKI Applications...6 3 Configuring the Basic MFP Settings 9 3.1 Date and Time...9 3.2 TCP/IP Settings...10 3.3 Email Server Setup ...12 3.4 Address Book Setup...14 3.5 Auto-Logout...18 3.6 ...
PKI-Enabled MFP Installation and Configuration Guide
Page 8
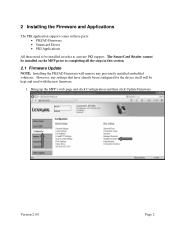
... and used with the new firmware. 1. 2 Installing the Firmware and Applications The PKI application support comes in three parts: • PKI/AD Firmware • Smartcard Driver • PKI Applications All three need to activate PKI support.
... and used with the new firmware. 1. 2 Installing the Firmware and Applications The PKI application support comes in three parts: • PKI/AD Firmware • Smartcard Driver • PKI Applications All three need to activate PKI support.
PKI-Enabled MFP Installation and Configuration Guide
Page 9
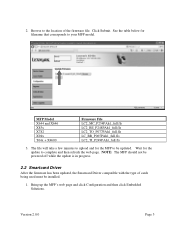
...table below for filename that corresponds to be installed. 1. Click Submit. Version 2.0.0 Page 3 MFP Model X644 and X646 X85x X782 X94x T64x + X4600 Firmware File LC2_MC_P254PAh1_full.fls LC2_BE_P248PAh1_full.fls LC2_TO_P077PAh1_full.fls LC_BR_P065PAh1_full.fls LC2_TI_P249PAh1_full.fls 3. NOTE: The MFP should not... be powered off while the update is in progress. 2.2 Smartcard Driver After the firmware has been updated, the Smartcard Driver compatible with the type of the firmware file. The file will take a few minutes to upload and for...
...table below for filename that corresponds to be installed. 1. Click Submit. Version 2.0.0 Page 3 MFP Model X644 and X646 X85x X782 X94x T64x + X4600 Firmware File LC2_MC_P254PAh1_full.fls LC2_BE_P248PAh1_full.fls LC2_TO_P077PAh1_full.fls LC_BR_P065PAh1_full.fls LC2_TI_P249PAh1_full.fls 3. NOTE: The MFP should not... be powered off while the update is in progress. 2.2 Smartcard Driver After the firmware has been updated, the Smartcard Driver compatible with the type of the firmware file. The file will take a few minutes to upload and for...
PKI-Enabled MFP Installation and Configuration Guide
Page 11
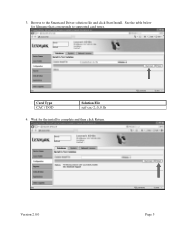
See the table below for the install to complete and then click Return. Wait for filename that corresponds to the Smartcard Driver solution file and click Start Install. 3. Browse to supported card types. Card Type CAC / DOD Solution File scif-cac-2_0_0.fls 4. Version 2.0.0 Page 5
See the table below for the install to complete and then click Return. Wait for filename that corresponds to the Smartcard Driver solution file and click Start Install. 3. Browse to supported card types. Card Type CAC / DOD Solution File scif-cac-2_0_0.fls 4. Version 2.0.0 Page 5

PKI-Enabled MFP Installation and Configuration Guide
Page 12
Continuing from what is displayed on the MFP. Note: The Name and Version of the Smartcard Driver Application displayed here may differ from the previous install step for the Smartcard Driver, click Install. 5. There should now be two embedded solutions installed on your MFP. 2.3 PKI Applications Once the firmware and Smartcard Driver have been installed, the application files can then be installed. 1. Version 2.0.0 Page 6
Continuing from what is displayed on the MFP. Note: The Name and Version of the Smartcard Driver Application displayed here may differ from the previous install step for the Smartcard Driver, click Install. 5. There should now be two embedded solutions installed on your MFP. 2.3 PKI Applications Once the firmware and Smartcard Driver have been installed, the application files can then be installed. 1. Version 2.0.0 Page 6
PKI-Enabled MFP Installation and Configuration Guide
Page 52
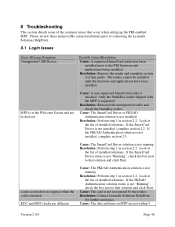
...section details some of the common issues that solution and click Start. Please review these and possible causes/resolutions prior to contacting the Lexmark Solutions HelpDesk. 8.1 Login Issues Error Message/Symptom Unsupported USB Device Possible Cause/Resolution Cause: A supported SmartCard reader has been installed... reader shipped with the MFP is attached. If the SmartCard Driver status is not "Running", check the box next to that occur when setting up the PKI-enabled MFP. Resolution: Contact Lexmark Solutions HelpDesk for further assistance. The reader cannot be installed until...
...section details some of the common issues that solution and click Start. Please review these and possible causes/resolutions prior to contacting the Lexmark Solutions HelpDesk. 8.1 Login Issues Error Message/Symptom Unsupported USB Device Possible Cause/Resolution Cause: A supported SmartCard reader has been installed... reader shipped with the MFP is attached. If the SmartCard Driver status is not "Running", check the box next to that occur when setting up the PKI-enabled MFP. Resolution: Contact Lexmark Solutions HelpDesk for further assistance. The reader cannot be installed until...


