X4500, X7500 MFP Options User's Guide
Page 4
... page 28 How do I change the fax resolution 29 How do I adjust the lighter/darker setting 29 Chapter 4: Printing 30 How do I access the virtual printer operator panel 30 How do I cancel a print job 31 How do I print confidential jobs 32 How do I delete confidential jobs 33 How do I print Verify...
... page 28 How do I change the fax resolution 29 How do I adjust the lighter/darker setting 29 Chapter 4: Printing 30 How do I access the virtual printer operator panel 30 How do I cancel a print job 31 How do I print confidential jobs 32 How do I delete confidential jobs 33 How do I print Verify...
X4500, X7500 MFP Options User's Guide
Page 6
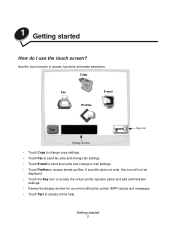
... do I use the touch screen? If a profile does not exist, this icon will not be displayed. • Touch the Key icon to access the virtual printer operator panel and add administrator settings. • Review the display window for current multifunction printer (MFP) status and messages. • Touch Tips to access online help.
... do I use the touch screen? If a profile does not exist, this icon will not be displayed. • Touch the Key icon to access the virtual printer operator panel and add administrator settings. • Review the display window for current multifunction printer (MFP) status and messages. • Touch Tips to access online help.
X4500, X7500 MFP Options User's Guide
Page 10
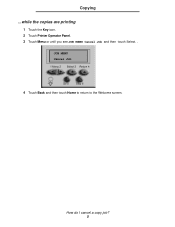
Copying ...while the copies are printing 1 Touch the Key icon. 2 Touch Printer Operator Panel. 3 Touch Menu or until you see JOB MENU Cancel Job and then touch Select. . How do I cancel a copy job? 5 JOB MENU Cancel Job 1 Menu 2 Select 3 Return 4 Go 5 Stop 6 4 Touch Back and then touch Home to return to the Welcome screen.
Copying ...while the copies are printing 1 Touch the Key icon. 2 Touch Printer Operator Panel. 3 Touch Menu or until you see JOB MENU Cancel Job and then touch Select. . How do I cancel a copy job? 5 JOB MENU Cancel Job 1 Menu 2 Select 3 Return 4 Go 5 Stop 6 4 Touch Back and then touch Home to return to the Welcome screen.
X4500, X7500 MFP Options User's Guide
Page 13
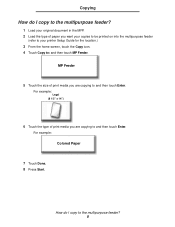
... feeder? 8 Copying How do I copy to the multipurpose feeder? 1 Load your original document in the MFP. 2 Load the type of paper you want your copies to be printed on into the multipurpose feeder (refer to your printer Setup Guide for the location.) 3 From the home screen, touch the Copy icon. 4 Touch Copy...
... feeder? 8 Copying How do I copy to the multipurpose feeder? 1 Load your original document in the MFP. 2 Load the type of paper you want your copies to be printed on into the multipurpose feeder (refer to your printer Setup Guide for the location.) 3 From the home screen, touch the Copy icon. 4 Touch Copy...
X4500, X7500 MFP Options User's Guide
Page 28
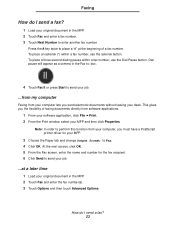
... screen, click OK. 5 From the Fax screen, enter the name and number for your original document in the MFP. 2 Touch Fax and enter the fax number(s). 3 Touch Options and then touch Advanced Options. This gives you the flexibility of a fax number. How do I send a fax? 23 Press the # ...key twice to place a "#" at a later time 1 Load your MFP. 3 Choose the Paper tab and change Output format: to perform this function from your computer lets you must have a PostScript printer driver...
... screen, click OK. 5 From the Fax screen, enter the name and number for your original document in the MFP. 2 Touch Fax and enter the fax number(s). 3 Touch Options and then touch Advanced Options. This gives you the flexibility of a fax number. How do I send a fax? 23 Press the # ...key twice to place a "#" at a later time 1 Load your MFP. 3 Choose the Paper tab and change Output format: to perform this function from your computer lets you must have a PostScript printer driver...
X4500, X7500 MFP Options User's Guide
Page 35
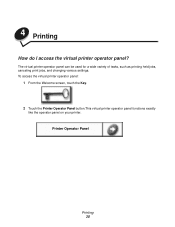
Printer Operator Panel Printing 30 To access the virtual printer operator panel: 1 From the Welcome screen, touch the Key. 2 Touch the Printer Operator Panel button.This virtual printer operator panel functions exactly like the operator panel on your printer. 4 Printing How do I access the virtual printer operator panel? The virtual printer operator panel can be used for a wide variety of tasks, such as printing held jobs, canceling print jobs, and changing various settings.
Printer Operator Panel Printing 30 To access the virtual printer operator panel: 1 From the Welcome screen, touch the Key. 2 Touch the Printer Operator Panel button.This virtual printer operator panel functions exactly like the operator panel on your printer. 4 Printing How do I access the virtual printer operator panel? The virtual printer operator panel can be used for a wide variety of tasks, such as printing held jobs, canceling print jobs, and changing various settings.
X4500, X7500 MFP Options User's Guide
Page 36
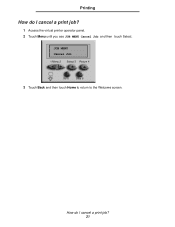
How do I cancel a print job? 31 Printing How do I cancel a print job? 1 Access the virtual printer operator panel. 2 Touch Menu until you see JOB MENU Cancel Job and then touch Select. JOB MENU Cancel Job 1 Menu 2 Select 3 Return 4 Go 5 Stop 6 3 Touch Back and then touch Home to return to the Welcome screen.
How do I cancel a print job? 31 Printing How do I cancel a print job? 1 Access the virtual printer operator panel. 2 Touch Menu until you see JOB MENU Cancel Job and then touch Select. JOB MENU Cancel Job 1 Menu 2 Select 3 Return 4 Go 5 Stop 6 3 Touch Back and then touch Home to return to the Welcome screen.
X4500, X7500 MFP Options User's Guide
Page 37
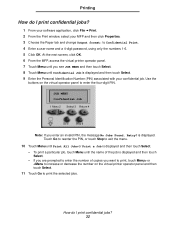
... name and a 4-digit password, using only the numbers 1-6. 5 Click OK. Retry? At the next screen, click OK. 6 From the MFP, access the virtual printer operator panel. 7 Touch Menu until Confidential Job is displayed and then touch Select. 9 Enter the Personal Identification Number (PIN) associated with your... MFP and then click Properties. 3 Choose the Paper tab and change Output format: to enter the number of the ...
... name and a 4-digit password, using only the numbers 1-6. 5 Click OK. Retry? At the next screen, click OK. 6 From the MFP, access the virtual printer operator panel. 7 Touch Menu until Confidential Job is displayed and then touch Select. 9 Enter the Personal Identification Number (PIN) associated with your... MFP and then click Properties. 3 Choose the Paper tab and change Output format: to enter the number of the ...
X4500, X7500 MFP Options User's Guide
Page 38
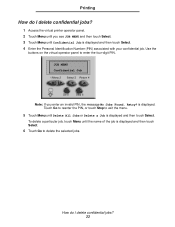
... Menu until Confidential Job is displayed and then touch Select. How do I delete confidential jobs? 33 Printing How do I delete confidential jobs? 1 Access the virtual printer operator panel. 2 Touch Menu until you enter an invalid PIN, the message No Jobs Found. Use the buttons on the virtual operator panel to exit...
... Menu until Confidential Job is displayed and then touch Select. How do I delete confidential jobs? 33 Printing How do I delete confidential jobs? 1 Access the virtual printer operator panel. 2 Touch Menu until you enter an invalid PIN, the message No Jobs Found. Use the buttons on the virtual operator panel to exit...

X4500, X7500 MFP Options User's Guide
Page 39
... you to print more copies for printing at a later time. At the next screen, click OK. 6 From the MFP, access the virtual printer operator panel. 7 Access the virtual printer operator panel. 8 Touch Menu until Print All Jobs or Print a Job is displayed and then touch Select. To print..., or presentations used by several people. JOB MENU Print All Jobs Menu Select Return Go Stop - For example, this option makes it easy for you store a print job on the printer for presentations, meetings, and general handouts. How do I print Verify, Reserve, and Repeat jobs? 34
... you to print more copies for printing at a later time. At the next screen, click OK. 6 From the MFP, access the virtual printer operator panel. 7 Access the virtual printer operator panel. 8 Touch Menu until Print All Jobs or Print a Job is displayed and then touch Select. To print..., or presentations used by several people. JOB MENU Print All Jobs Menu Select Return Go Stop - For example, this option makes it easy for you store a print job on the printer for presentations, meetings, and general handouts. How do I print Verify, Reserve, and Repeat jobs? 34
X4500, X7500 MFP Options User's Guide
Page 40
If you are prompted to enter the number of copies you want to print, touch Menu> or Printing -
If you are prompted to enter the number of copies you want to print, touch Menu> or Printing -
X4500, X7500 MFP Options User's Guide
Page 41
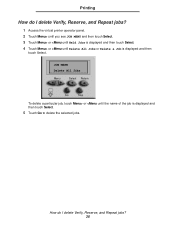
Printing How do I delete Verify, Reserve, and Repeat jobs? 1 Access the virtual printer operator panel. 2 Touch Menu> until you see JOB MENU and then touch Select. 3 Touch Menu> or or or
Printing How do I delete Verify, Reserve, and Repeat jobs? 1 Access the virtual printer operator panel. 2 Touch Menu> until you see JOB MENU and then touch Select. 3 Touch Menu> or or or
X4500, X7500 MFP Options User's Guide
Page 47
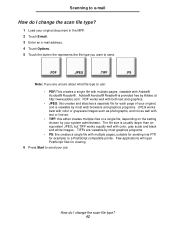
How do I change the scan file type? 1 Load your original document in the MFP. 2 Touch E-mail. 3 Enter an e-mail address. 4 Touch Options. 5 Touch the button the represents the file type you want to send. .PDF .JPEG .TIFF .PS Note: If you are viewable by most graphics ...TIFF works equally well with text or line art. • TIFF: this creates and attaches a separate file for viewing. 6 Press Start to a PostScript compatible printer. Few applications will open PostScript files for each page of your original, and is provided free by your job. PDF works well with both text...
How do I change the scan file type? 1 Load your original document in the MFP. 2 Touch E-mail. 3 Enter an e-mail address. 4 Touch Options. 5 Touch the button the represents the file type you want to send. .PDF .JPEG .TIFF .PS Note: If you are viewable by most graphics ...TIFF works equally well with text or line art. • TIFF: this creates and attaches a separate file for viewing. 6 Press Start to a PostScript compatible printer. Few applications will open PostScript files for each page of your original, and is provided free by your job. PDF works well with both text...
X4500, X7500 MFP Options User's Guide
Page 52
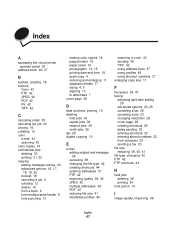
Index A accessing the virtual printer operator panel 30 address book 22, 37 B booklet, creating 18 buttons Color 43 FTP...12 color e-mail 43 scanning 43 color copies 14 confidential jobs deleting 33 printing 31, 32 copying adding message overlay 20 advanced options 16, 17, 18, 19, 20 booklet 18 canceling a job 4 collating 12 duplex 10 from a book 9 from multipurpose... using shortcut numbers 37 enlarging copy size 11 F fax queue 24, 47 faxing adjusting light/dark setting 29 advanced options 23, 25 canceling a fax 25 canceling a job 23 changing resolution 29 cover page 28 creating shortcuts 26 delay...
Index A accessing the virtual printer operator panel 30 address book 22, 37 B booklet, creating 18 buttons Color 43 FTP...12 color e-mail 43 scanning 43 color copies 14 confidential jobs deleting 33 printing 31, 32 copying adding message overlay 20 advanced options 16, 17, 18, 19, 20 booklet 18 canceling a job 4 collating 12 duplex 10 from a book 9 from multipurpose... using shortcut numbers 37 enlarging copy size 11 F fax queue 24, 47 faxing adjusting light/dark setting 29 advanced options 23, 25 canceling a fax 25 canceling a job 23 changing resolution 29 cover page 28 creating shortcuts 26 delay...
X4500, X7500 MFP Options User's Guide
Page 53
... M message overlay 20 multipurpose feeder 8 multi-up 16 N N-up 16 P page borders 16 paper saver 16 PDF 42 photographs 14, 15 print job canceling 31 printer operator panel, accessing 30 printing held jobs 34 repeat jobs 34 reserve jobs 34 verify jobs 34 profiles 45, 46 Q quick copying 4 R reducing copy size...
... M message overlay 20 multipurpose feeder 8 multi-up 16 N N-up 16 P page borders 16 paper saver 16 PDF 42 photographs 14, 15 print job canceling 31 printer operator panel, accessing 30 printing held jobs 34 repeat jobs 34 reserve jobs 34 verify jobs 34 profiles 45, 46 Q quick copying 4 R reducing copy size...
Setup Guide
Page 5
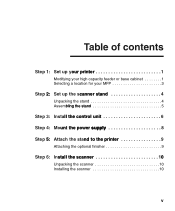
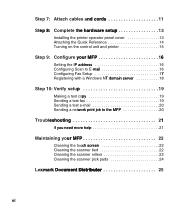
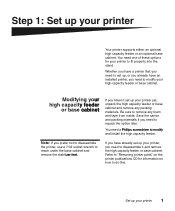
Step 1: Set up your printer 1 Modifying your high capacity feeder or base cabinet 1 Selecting a location for your MFP 3 Step 2: Set up the scanner stand 4 Unpacking the stand 4 Assembling the stand 5 Step 3: Install the control unit 6 Step 4: Mount the power supply 8 Step 5: Attach the stand to the printer 9 Attaching the optional finisher 9 Step 6: Install the scanner 10 Unpacking the scanner 10 Installing the scanner 10 v
Step 1: Set up your printer 1 Modifying your high capacity feeder or base cabinet 1 Selecting a location for your MFP 3 Step 2: Set up the scanner stand 4 Unpacking the stand 4 Assembling the stand 5 Step 3: Install the control unit 6 Step 4: Mount the power supply 8 Step 5: Attach the stand to the printer 9 Attaching the optional finisher 9 Step 6: Install the scanner 10 Unpacking the scanner 10 Installing the scanner 10 v
Setup Guide
Page 6
... the printer operator panel cover 13 Attaching the Quick Reference 14 Turning on the control unit and printer 15 Step 9: Configure your MFP 16 ...Setting the IP address 16 Configuring Scan to E-mail 16 Configuring Fax Setup 17 Registering with a Windows NT domain server 18 Step 10: Verify setup 19 Making a test copy 19 Sending a test fax 19 Sending a test e-mail 20 Sending a network print job to the MFP... 20 Troubleshooting 21 If you need more help 21 Maintaining your MFP 22 Cleaning the touch screen 22...
... the printer operator panel cover 13 Attaching the Quick Reference 14 Turning on the control unit and printer 15 Step 9: Configure your MFP 16 ...Setting the IP address 16 Configuring Scan to E-mail 16 Configuring Fax Setup 17 Registering with a Windows NT domain server 18 Step 10: Verify setup 19 Making a test copy 19 Sending a test fax 19 Sending a test e-mail 20 Sending a network print job to the MFP... 20 Troubleshooting 21 If you need more help 21 Maintaining your MFP 22 Cleaning the touch screen 22...
Setup Guide
Page 9
... remove the stabilizer feet. Refer to "Removing printer parts" on the printer publications CD for your printer yet, unpack the high capacity feeder or base cabinet and remove any foam and tape from inside. You need one of these options for information on how to modify and install... the stand. Be sure to repack the option later. Whether you have an installed printer, you need to modify your printer, you need to remove any packing materials. If you have already set up your printer 1 Set up , or you already have a printer that you need a Phillips screwdriver to do...
... remove the stabilizer feet. Refer to "Removing printer parts" on the printer publications CD for your printer yet, unpack the high capacity feeder or base cabinet and remove any foam and tape from inside. You need one of these options for information on how to modify and install... the stand. Be sure to repack the option later. Whether you have an installed printer, you need to modify your printer, you need to remove any packing materials. If you have already set up your printer 1 Set up , or you already have a printer that you need a Phillips screwdriver to do...
Setup Guide
Page 10
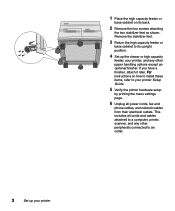
...Set up the drawer or high capacity feeder, your printer If you have a finisher, attach it later. Remove the stabilizer feet. 3 Return the high capacity feeder or base cabinet to your printer Setup Guide. 5 Verify the printer hardware setup by printing the menu settings page. 6 ...Unplug all cords and cables attached to a computer, printer, scanner, and any other paper handling options except an optional finisher. 1 Place the high capacity feeder or...
...Set up the drawer or high capacity feeder, your printer If you have a finisher, attach it later. Remove the stabilizer feet. 3 Return the high capacity feeder or base cabinet to your printer Setup Guide. 5 Verify the printer hardware setup by printing the menu settings page. 6 ...Unplug all cords and cables attached to a computer, printer, scanner, and any other paper handling options except an optional finisher. 1 Place the high capacity feeder or...

Setup Guide
Page 11
Selecting a location for your MFP When choosing a place to set up your MFP, make sure you have the minimum amount of space indicated in the figure. Set up your printer 3
Selecting a location for your MFP When choosing a place to set up your MFP, make sure you have the minimum amount of space indicated in the figure. Set up your printer 3


