User's Guide
Page 4
......66 Loading original documents on the scanner glass 70 Loading original documents into the Automatic Document Feeder 71 Using the automatic paper type sensor...73 Printing 74 Printing basic documents...74 Printing a document...74 Printing Web pages...74 Printing multiple copies of a document...75 Contents 4
......66 Loading original documents on the scanner glass 70 Loading original documents into the Automatic Document Feeder 71 Using the automatic paper type sensor...73 Printing 74 Printing basic documents...74 Printing a document...74 Printing Web pages...74 Printing multiple copies of a document...75 Contents 4
User's Guide
Page 5
... pages on one sheet (N-Up)...76 Printing documents from a memory card or flash drive 77 Printing specialty documents...78 Choosing compatible specialty paper types ...78 Printing envelopes ...79 Printing labels ...79 Printing on custom-size paper...80 Managing print jobs...81 Pausing print jobs...81 Resuming print jobs...82 Canceling print jobs...83 Working with photos 85 Connecting photo...
... pages on one sheet (N-Up)...76 Printing documents from a memory card or flash drive 77 Printing specialty documents...78 Choosing compatible specialty paper types ...78 Printing envelopes ...79 Printing labels ...79 Printing on custom-size paper...80 Managing print jobs...81 Pausing print jobs...81 Resuming print jobs...82 Canceling print jobs...83 Working with photos 85 Connecting photo...
User's Guide
Page 6
... settings...110 Maintaining the printer 111 Maintaining print cartridges...111 Installing print cartridges...111 Removing a used print cartridge ...112 Refilling print cartridges...113 Using genuine Lexmark print cartridges...113 Aligning print cartridges ...114 Cleaning the print cartridge nozzles...114 Checking ink levels...115 Wiping the print cartridge nozzles and contacts ...116 Preserving the print cartridges ...117 Cleaning the scanner glass...
... settings...110 Maintaining the printer 111 Maintaining print cartridges...111 Installing print cartridges...111 Removing a used print cartridge ...112 Refilling print cartridges...113 Using genuine Lexmark print cartridges...113 Aligning print cartridges ...114 Cleaning the print cartridge nozzles...114 Checking ink levels...115 Wiping the print cartridge nozzles and contacts ...116 Preserving the print cartridges ...117 Cleaning the scanner glass...
User's Guide
Page 7
...121 Incorrect language appears on the display...121 Power button is not lit ...122 Software did not install...122 Page does not print...123 Solving printer power problems ...126 Removing and reinstalling the software ...126 Enabling the USB port in Windows ...127 Wireless troubleshooting......128 Wireless troubleshooting checklist ...128 Printing a network setup page ...129 Wireless configuration does not continue after the USB cable is attached 129 Why isn't my printer in ...
...121 Incorrect language appears on the display...121 Power button is not lit ...122 Software did not install...122 Page does not print...123 Solving printer power problems ...126 Removing and reinstalling the software ...126 Enabling the USB port in Windows ...127 Wireless troubleshooting......128 Wireless troubleshooting checklist ...128 Printing a network setup page ...129 Wireless configuration does not continue after the USB cable is attached 129 Why isn't my printer in ...

User's Guide
Page 10
... of the Help. Note: If you have several applications open, then make sure that the application that you want to make it the active application. Printed Networking Guide / Fax Guide Additional setup instructions. Windows Help Additional instructions for using the printer. Mac Help Note: Your printer may not have this Help...
... of the Help. Note: If you have several applications open, then make sure that the application that you want to make it the active application. Printed Networking Guide / Fax Guide Additional setup instructions. Windows Help Additional instructions for using the printer. Mac Help Note: Your printer may not have this Help...
User's Guide
Page 11
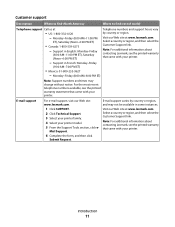
...link. For the most recent telephone numbers available, see the printed warranty statement that came with your printer. Visit our Web site at www.lexmark.com. E-mail support For e-mail support, visit our Web site: www.lexmark.com. 1 Click SUPPORT. 2 Click Technical Support. 3 Select... family. 4 Select your printer. Note: For additional information about contacting Lexmark, see the printed warranty that came with your printer model. 5 From the Support Tools section, click e- Visit our Web site at www.lexmark.com. Mail Support. 6 Complete the form, and then click Submit ...
...link. For the most recent telephone numbers available, see the printed warranty statement that came with your printer. Visit our Web site at www.lexmark.com. E-mail support For e-mail support, visit our Web site: www.lexmark.com. 1 Click SUPPORT. 2 Click Technical Support. 3 Select... family. 4 Select your printer. Note: For additional information about contacting Lexmark, see the printed warranty that came with your printer model. 5 From the Support Tools section, click e- Visit our Web site at www.lexmark.com. Mail Support. 6 Complete the form, and then click Submit ...
User's Guide
Page 12
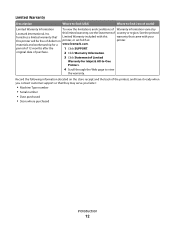
period of Warranty information varies by Lexmark International, Inc. See the printed furnishes a limited warranty that Limited Warranty included with this warranty that they may serve you contact customer support so that came with your this limited ... the back of defects in printer, or set forth at printer. original date of purchase. 2 Click Warranty Information. 3 Click Statement of Limited Warranty for a www.lexmark.com.
period of Warranty information varies by Lexmark International, Inc. See the printed furnishes a limited warranty that Limited Warranty included with this warranty that they may serve you contact customer support so that came with your this limited ... the back of defects in printer, or set forth at printer. original date of purchase. 2 Click Warranty Information. 3 Click Statement of Limited Warranty for a www.lexmark.com.
User's Guide
Page 13
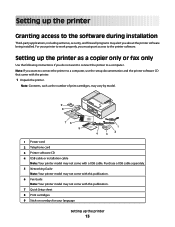
Note: If you do not want to connect the printer to the printer software. Setting up the printer as the number of print cartridges, may vary by model. 9 8 1 2 3 76 5 1 4 2 3 1 Power cord 2 Telephone cord 3 Printer software CD 4 USB cable or installation cable Note...the software during installation Third-party applications, including antivirus, security, and firewall programs may not come with this publication. 7 Quick Setup sheet 8 Print cartridges 9 Stick-on overlays for your printer to a computer. Note: Contents, such as a copier only or fax only Use the following ...
Note: If you do not want to connect the printer to the printer software. Setting up the printer as the number of print cartridges, may vary by model. 9 8 1 2 3 76 5 1 4 2 3 1 Power cord 2 Telephone cord 3 Printer software CD 4 USB cable or installation cable Note...the software during installation Third-party applications, including antivirus, security, and firewall programs may not come with this publication. 7 Quick Setup sheet 8 Print cartridges 9 Stick-on overlays for your printer to a computer. Note: Contents, such as a copier only or fax only Use the following ...
User's Guide
Page 17
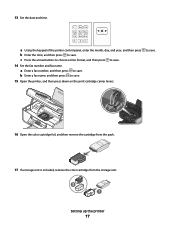
to save . a Enter a fax number, and then press to save . 15 Open the printer, and then press down on the print cartridge carrier levers. a Using the keypad of the printer control panel, enter the month, day, and year, and then press b Enter the time, and then ...
to save . a Enter a fax number, and then press to save . 15 Open the printer, and then press down on the print cartridge carrier levers. a Using the keypad of the printer control panel, enter the month, day, and year, and then press b Enter the time, and then ...
User's Guide
Page 18
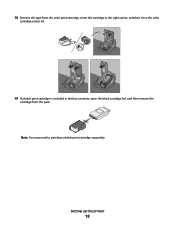
18 Remove the tape from the color print cartridge, insert the cartridge in the right carrier, and then close the color cartridge carrier lid. 19 If a black print cartridge is included in the box contents, open the black cartridge foil, and then remove the cartridge from the pack. Note: You may need to purchase a black print cartridge separately. Setting up the printer 18
18 Remove the tape from the color print cartridge, insert the cartridge in the right carrier, and then close the color cartridge carrier lid. 19 If a black print cartridge is included in the box contents, open the black cartridge foil, and then remove the cartridge from the pack. Note: You may need to purchase a black print cartridge separately. Setting up the printer 18
User's Guide
Page 19
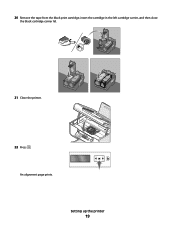
An alignment page prints. Setting up the printer 19 20 Remove the tape from the black print cartridge, insert the cartridge in the left cartridge carrier, and then close the black cartridge carrier lid. 21 Close the printer. 22 Press .
An alignment page prints. Setting up the printer 19 20 Remove the tape from the black print cartridge, insert the cartridge in the left cartridge carrier, and then close the black cartridge carrier lid. 21 Close the printer. 22 Press .
User's Guide
Page 20
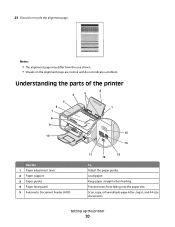
.... Scan, copy, or fax multiple-page letter-, legal-, and A4-size documents. Setting up the printer 20 Understanding the parts of the printer 2 4 3 5 6 1 7 8 9 10 W I F I PRINTING WI F I PRINTING 15 14 Use the 1 Paper adjustment lever 2 Paper support 3 Paper guides 4 Paper feed guard 5 Automatic Document Feeder (ADF) 11 13 12 To Adjust the paper...
.... Scan, copy, or fax multiple-page letter-, legal-, and A4-size documents. Setting up the printer 20 Understanding the parts of the printer 2 4 3 5 6 1 7 8 9 10 W I F I PRINTING WI F I PRINTING 15 14 Use the 1 Paper adjustment lever 2 Paper support 3 Paper guides 4 Paper feed guard 5 Automatic Document Feeder (ADF) 11 13 12 To Adjust the paper...
User's Guide
Page 22
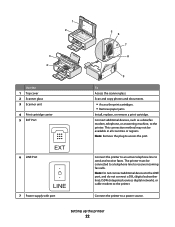
Scan and copy photos and documents. • Access the print cartridges. • Remove paper jams. Install, replace, or remove a print cartridge. Connect the printer to an active telephone line to a power source. Connect the printer to send and receive faxes. Setting ... Remove the plug to the printer. The printer must be available in all countries or regions. 1 2 3 4 Use the 1 Top cover 2 Scanner glass 3 Scanner unit 4 Print cartridge carrier 5 EXT Port 6 LINE Port EXT LINE 7 Power supply with port 5 6 7 8 9 To Access the scanner glass. Connect additional devices, such as a data...
Scan and copy photos and documents. • Access the print cartridges. • Remove paper jams. Install, replace, or remove a print cartridge. Connect the printer to an active telephone line to a power source. Connect the printer to send and receive faxes. Setting ... Remove the plug to the printer. The printer must be available in all countries or regions. 1 2 3 4 Use the 1 Top cover 2 Scanner glass 3 Scanner unit 4 Print cartridge carrier 5 EXT Port 6 LINE Port EXT LINE 7 Power supply with port 5 6 7 8 9 To Access the scanner glass. Connect additional devices, such as a data...
User's Guide
Page 23
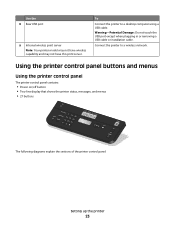
... or installation cable. To Connect the printer to a wireless network. Use the 8 Rear USB port 9 Internal wireless print server Note: Your printer model may not have wireless capability and may not have this print server. Using the printer control panel buttons and menus Using the printer control panel The printer control panel...
... or installation cable. To Connect the printer to a wireless network. Use the 8 Rear USB port 9 Internal wireless print server Note: Your printer model may not have wireless capability and may not have this print server. Using the printer control panel buttons and menus Using the printer control panel The printer control panel...
User's Guide
Page 24
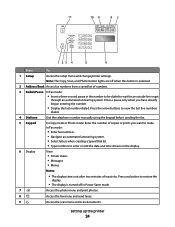
.... 6 Display View: • Printer status • Messages • Menus Notes: • The display times out after two minutes of copies or prints you have already begun entering the number. • Display the last number dialed. Press the arrow buttons to restore the display. • The display ... list of numbers. 3 Redial/Pause In Fax mode: • Insert a three-second pause in Power Saver mode. 7 Access the photo menu and print photos. 8 Access the fax menu and send faxes. 9 Access the scan menu and scan documents. Press any button to view the last five numbers ...
.... 6 Display View: • Printer status • Messages • Menus Notes: • The display times out after two minutes of copies or prints you have already begun entering the number. • Display the last number dialed. Press the arrow buttons to restore the display. • The display ... list of numbers. 3 Redial/Pause In Fax mode: • Insert a three-second pause in Power Saver mode. 7 Access the photo menu and print photos. 8 Access the fax menu and send faxes. 9 Access the scan menu and scan documents. Press any button to view the last five numbers ...
User's Guide
Page 26
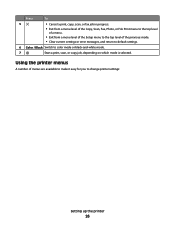
... settings or error messages, and return to default settings. 6 Color / Black Switch to change printer settings: Setting up the printer 26 Press To 5 • Cancel a print, copy, scan, or fax job in progress. • Exit from a menu level of the Copy, Scan, Fax, Photo, or File... Print menu to the top level of a menu. • Exit from a menu level of the Setup menu to the top level of menus are available to ...
... settings or error messages, and return to default settings. 6 Color / Black Switch to change printer settings: Setting up the printer 26 Press To 5 • Cancel a print, copy, scan, or fax job in progress. • Exit from a menu level of the Copy, Scan, Fax, Photo, or File... Print menu to the top level of a menu. • Exit from a menu level of the Setup menu to the top level of menus are available to ...
User's Guide
Page 27
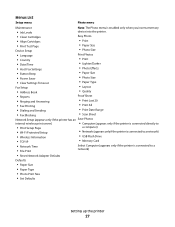
...; Date/Time • Host Fax Settings • Button Beep • Power Saver • Clear Settings Timeout Fax Setup • Address Book Print Photos • Print • Lighter/Darker • Photo Effects • Paper Size • Photo Size • Paper Type • Layout • Quality &#...(appears only if the printer is connected to a network) • USB Flash Drive • Memory Card • Network Time • File Print Select Computer (appears only if the printer is connected to a network) • Reset Network Adapter Defaults Defaults • Paper Size • Paper...
...; Date/Time • Host Fax Settings • Button Beep • Power Saver • Clear Settings Timeout Fax Setup • Address Book Print Photos • Print • Lighter/Darker • Photo Effects • Paper Size • Photo Size • Paper Type • Layout • Quality &#...(appears only if the printer is connected to a network) • USB Flash Drive • Memory Card • Network Time • File Print Select Computer (appears only if the printer is connected to a network) • Reset Network Adapter Defaults Defaults • Paper Size • Paper...
User's Guide
Page 28
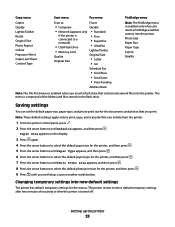
...menus. Note: These default settings apply only to select the default photo print size for the printer, and then press . 7 Press the arrow buttons until Photo Print Size appears, and then press . 8 Press the arrow buttons to print, copy, and scan jobs that you insert a PictBridge-enabled camera ... is connected to these default temporary settings after the printer is turned off: Setting up the printer 28 The menu is enabled only when you print. The printer reverts to a network) • USB Flash Drive • Memory Card Quality Original Size • Fine • Superfine • ...
...menus. Note: These default settings apply only to select the default photo print size for the printer, and then press . 7 Press the arrow buttons until Photo Print Size appears, and then press . 8 Press the arrow buttons to print, copy, and scan jobs that you insert a PictBridge-enabled camera ... is connected to these default temporary settings after the printer is turned off: Setting up the printer 28 The menu is enabled only when you print. The printer reverts to a network) • USB Flash Drive • Memory Card Quality Original Size • Fine • Superfine • ...
User's Guide
Page 32
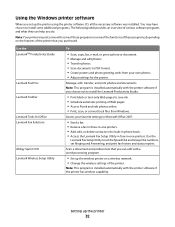
...; Change the wireless settings of the printer. Use the LexmarkTM Productivity Studio Lexmark Fast Pics Lexmark Toolbar Lexmark Tools for Office Lexmark Fax Solutions Abbyy Sprint OCR Lexmark Wireless Setup Utility To • Scan, copy, fax, e-mail, or print a photo or document. • Manage and edit photos. • ... When you choose not to install the Lexmark Productivity Studio. • Print black or text-only Web pages to save ink. • Schedule automatic printing of Web pages. • Access Picnik and edit photos online. • Print, scan, or convert local files from ...
...; Change the wireless settings of the printer. Use the LexmarkTM Productivity Studio Lexmark Fast Pics Lexmark Toolbar Lexmark Tools for Office Lexmark Fax Solutions Abbyy Sprint OCR Lexmark Wireless Setup Utility To • Scan, copy, fax, e-mail, or print a photo or document. • Manage and edit photos. • ... When you choose not to install the Lexmark Productivity Studio. • Print black or text-only Web pages to save ink. • Schedule automatic printing of Web pages. • Access Picnik and edit photos online. • Print, scan, or convert local files from ...
User's Guide
Page 33
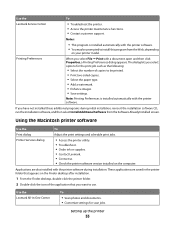
... select Install Additional Software from the Web, depending on the computer. These applications are also installed with a document open and then click Properties, a Printing Preferences dialog appears. Use the Lexmark Service Center To • Troubleshoot the printer. • Access the printer maintenance functions. • Contact customer support. Using the Macintosh printer software...
... select Install Additional Software from the Web, depending on the computer. These applications are also installed with a document open and then click Properties, a Printing Preferences dialog appears. Use the Lexmark Service Center To • Troubleshoot the printer. • Access the printer maintenance functions. • Contact customer support. Using the Macintosh printer software...


