
Wireless Setup Guide
Page 7
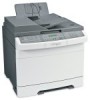
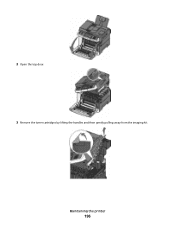
Setting up the printer 7 Slide the release latch to the left and lift to release the side panel, and then remove it. Push in the green touch points on each side of the cartridges to open the top cover. Remove the toner cartridges by lifting the handles and then gently pulling away from the imaging kit.
Setting up the printer 7 Slide the release latch to the left and lift to release the side panel, and then remove it. Push in the green touch points on each side of the cartridges to open the top cover. Remove the toner cartridges by lifting the handles and then gently pulling away from the imaging kit.
User's Guide
Page 7
... of supplies from a network computer 176 Ordering supplies...177 Ordering toner cartridges...177 Ordering imaging kits ...178 Ordering a waste toner bottle...178 Replacing supplies...179 Replacing the waste toner bottle ...179 Replacing a black imaging kit ...182 Replacing a black and color imaging kit ...188 Replacing a toner cartridge...193 Replacing a developer unit ...195 Cleaning the exterior of the...
... of supplies from a network computer 176 Ordering supplies...177 Ordering toner cartridges...177 Ordering imaging kits ...178 Ordering a waste toner bottle...178 Replacing supplies...179 Replacing the waste toner bottle ...179 Replacing a black imaging kit ...182 Replacing a black and color imaging kit ...188 Replacing a toner cartridge...193 Replacing a developer unit ...195 Cleaning the exterior of the...

User's Guide
Page 122
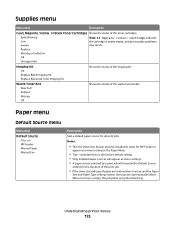
... is the current default setting. Notes: • Certain menus are available to change printer settings. Supplies Menu Cyan Cartridge Magenta Cartridge Yellow Cartridge Black Cartridge Imaging Kit Waste Toner Bottle Paper Menu Default Source Size/Type Paper Texture Paper Weight Paper Loading Custom Type Custom Scan Sizes Universal Setup Reports Menu Settings...
... is the current default setting. Notes: • Certain menus are available to change printer settings. Supplies Menu Cyan Cartridge Magenta Cartridge Yellow Cartridge Black Cartridge Imaging Kit Waste Toner Bottle Paper Menu Default Source Size/Type Paper Texture Paper Weight Paper Loading Custom Type Custom Scan Sizes Universal Setup Reports Menu Settings...
User's Guide
Page 123
..., Yellow, or Black Toner Cartridges Shows the status of paper are automatically linked. Replace Missing or Defective OK Unsupported Imaging Kit OK Replace Black Imaging Kit Replace Black and Color Imaging Kit Shows the status of the imaging kit Waste Toner Box Near Full Replace Missing OK Shows the status of the waste toner bottle Paper menu Default...
..., Yellow, or Black Toner Cartridges Shows the status of paper are automatically linked. Replace Missing or Defective OK Unsupported Imaging Kit OK Replace Black Imaging Kit Replace Black and Color Imaging Kit Shows the status of the imaging kit Waste Toner Box Near Full Replace Missing OK Shows the status of the waste toner bottle Paper menu Default...
User's Guide
Page 163
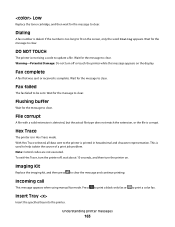
... help isolate the source of a print job problem. Wait for the message to clear. Hex Trace The printer is too long to fit on . Imaging Kit Replace the imaging kit, and then press to be sent. Understanding printer messages 163 Wait for the message to clear. DO NOT TOUCH The printer is printed in...
... help isolate the source of a print job problem. Wait for the message to clear. Hex Trace The printer is too long to fit on . Imaging Kit Replace the imaging kit, and then press to be sent. Understanding printer messages 163 Wait for the message to clear. DO NOT TOUCH The printer is printed in...
User's Guide
Page 168
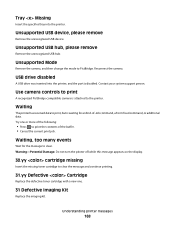
... command, a Form Feed command, or additional data. Unsupported Mode Remove the camera, and then change the mode to the printer. Try one . 31 Defective Imaging Kit Replace the imaging kit. Unsupported USB device, please remove Remove the unrecognized USB device. Reconnect the camera. Waiting The printer has received data to clear. Understanding printer messages...
... command, a Form Feed command, or additional data. Unsupported Mode Remove the camera, and then change the mode to the printer. Try one . 31 Defective Imaging Kit Replace the imaging kit. Unsupported USB device, please remove Remove the unrecognized USB device. Reconnect the camera. Waiting The printer has received data to clear. Understanding printer messages...
User's Guide
Page 178
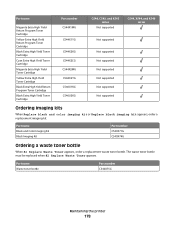
...printer 178 The waste toner bottle must be replaced when 82 Replace Waste Toner appears. Part name Black and Color Imaging Kit Black Imaging Kit Part number C540X71G C540X74G Ordering a waste toner bottle When 82 Replace Waste Toner appears, order a replacement waste toner... C546U2KG C540, C543, and X543 series Not supported C544, X544, and X546 series Not supported Not supported Not supported Not supported Not supported Not supported Not supported Ordering imaging kits When Replace black and color imaging kit or Replace black imaging kit appears, order a replacement imaging kit.
...printer 178 The waste toner bottle must be replaced when 82 Replace Waste Toner appears. Part name Black and Color Imaging Kit Black Imaging Kit Part number C540X71G C540X74G Ordering a waste toner bottle When 82 Replace Waste Toner appears, order a replacement waste toner... C546U2KG C540, C543, and X543 series Not supported C544, X544, and X546 series Not supported Not supported Not supported Not supported Not supported Not supported Not supported Ordering imaging kits When Replace black and color imaging kit or Replace black imaging kit appears, order a replacement imaging kit.

User's Guide
Page 182
Replacing a black imaging kit Replace the black imaging kit when Replace Black Imaging Kit appears. 1 Grasp the front door at the side handholds, and then pull it toward you. CAUTION-HOT SURFACE: The inside of injury from a hot component, allow the surface to cool before touching. 2 Open the top door. Maintaining the printer 182 To reduce the risk of the printer might be hot.
Replacing a black imaging kit Replace the black imaging kit when Replace Black Imaging Kit appears. 1 Grasp the front door at the side handholds, and then pull it toward you. CAUTION-HOT SURFACE: The inside of injury from a hot component, allow the surface to cool before touching. 2 Open the top door. Maintaining the printer 182 To reduce the risk of the printer might be hot.
User's Guide
Page 183
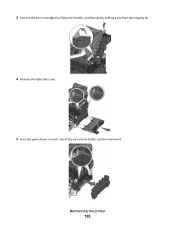
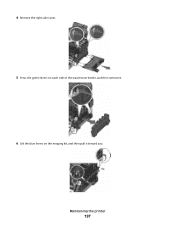
3 Remove the toner cartridges by lifting the handles, and then gently pulling away from the imaging kit. 4 Remove the right side cover. 5 Press the green levers on each side of the waste toner bottle, and then remove it. Maintaining the printer 183
3 Remove the toner cartridges by lifting the handles, and then gently pulling away from the imaging kit. 4 Remove the right side cover. 5 Press the green levers on each side of the waste toner bottle, and then remove it. Maintaining the printer 183

User's Guide
Page 184
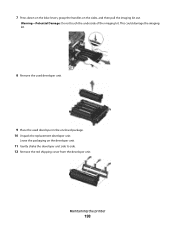
Maintaining the printer 184 6 Lift the blue levers on the imaging kit, and then pull it toward you. 7 Press down on the blue levers, grasp the green handles on the black developer unit. 10 Gently shake the black developer unit side to side. Warning-Potential Damage: Do not touch the underside of the imaging kit. Leave the packaging on the sides, and then pull the imaging kit out. This could damage the imaging kit. 8 Remove the yellow, cyan, and magenta developer units. 9 Unpack the replacement black imaging kit.
Maintaining the printer 184 6 Lift the blue levers on the imaging kit, and then pull it toward you. 7 Press down on the blue levers, grasp the green handles on the black developer unit. 10 Gently shake the black developer unit side to side. Warning-Potential Damage: Do not touch the underside of the imaging kit. Leave the packaging on the sides, and then pull the imaging kit out. This could damage the imaging kit. 8 Remove the yellow, cyan, and magenta developer units. 9 Unpack the replacement black imaging kit.
User's Guide
Page 185
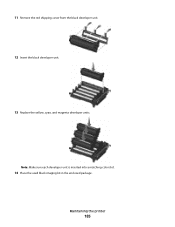
Note: Make sure each developer unit is inserted into a matching color slot. 14 Place the used black imaging kit in the enclosed package. 11 Remove the red shipping cover from the black developer unit. 12 Insert the black developer unit. 13 Replace the yellow, cyan, and magenta developer units. Maintaining the printer 185
Note: Make sure each developer unit is inserted into a matching color slot. 14 Place the used black imaging kit in the enclosed package. 11 Remove the red shipping cover from the black developer unit. 12 Insert the black developer unit. 13 Replace the yellow, cyan, and magenta developer units. Maintaining the printer 185

User's Guide
Page 186
Maintaining the printer 186 15 Align and insert the imaging kit. 16 Rotate the blue levers down until the imaging kit drops into place. 17 Replace the waste toner bottle.
Maintaining the printer 186 15 Align and insert the imaging kit. 16 Rotate the blue levers down until the imaging kit drops into place. 17 Replace the waste toner bottle.
User's Guide
Page 188
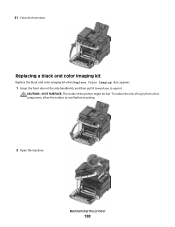
CAUTION-HOT SURFACE: The inside of injury from a hot component, allow the surface to open it. Maintaining the printer 188 Replacing a black and color imaging kit Replace the black and color imaging kit when Replace Color Imaging Kit appears. 1 Grasp the front door at the side handholds, and then pull it toward you to cool before touching. 2 Open the top door. To reduce the risk of the printer might be hot. 21 Close the front door.
CAUTION-HOT SURFACE: The inside of injury from a hot component, allow the surface to open it. Maintaining the printer 188 Replacing a black and color imaging kit Replace the black and color imaging kit when Replace Color Imaging Kit appears. 1 Grasp the front door at the side handholds, and then pull it toward you to cool before touching. 2 Open the top door. To reduce the risk of the printer might be hot. 21 Close the front door.

User's Guide
Page 189
3 Remove the toner cartridges by lifting the handles, and then gently pulling away from the imaging kit. 4 Remove the right side cover. 5 Press the green levers on each side of the waste toner bottle, and remove it. Maintaining the printer 189
3 Remove the toner cartridges by lifting the handles, and then gently pulling away from the imaging kit. 4 Remove the right side cover. 5 Press the green levers on each side of the waste toner bottle, and remove it. Maintaining the printer 189
User's Guide
Page 190
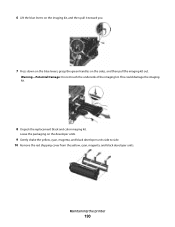
Leave the packaging on the sides, and then pull the imaging kit out. Warning-Potential Damage: Do not touch the underside of the imaging kit. 6 Lift the blue levers on the imaging kit, and then pull it toward you. 7 Press down on the blue levers, grasp the green handles on the developer units. 9 Gently shake the yellow, cyan, magenta, and black developer units side to side. 10 Remove the red shipping cover from the yellow, cyan, magenta, and black developer units. This could damage the imaging kit. 8 Unpack the replacement black and color imaging kit. Maintaining the printer 190
Leave the packaging on the sides, and then pull the imaging kit out. Warning-Potential Damage: Do not touch the underside of the imaging kit. 6 Lift the blue levers on the imaging kit, and then pull it toward you. 7 Press down on the blue levers, grasp the green handles on the developer units. 9 Gently shake the yellow, cyan, magenta, and black developer units side to side. 10 Remove the red shipping cover from the yellow, cyan, magenta, and black developer units. This could damage the imaging kit. 8 Unpack the replacement black and color imaging kit. Maintaining the printer 190
User's Guide
Page 191
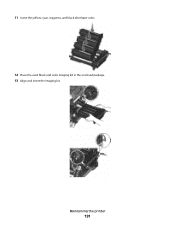
11 Insert the yellow, cyan, magenta, and black developer units. 12 Place the used black and color imaging kit in the enclosed package. 13 Align and insert the imaging kit. Maintaining the printer 191
11 Insert the yellow, cyan, magenta, and black developer units. 12 Place the used black and color imaging kit in the enclosed package. 13 Align and insert the imaging kit. Maintaining the printer 191
User's Guide
Page 194
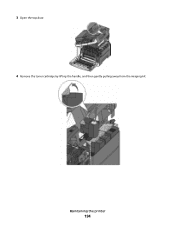
Maintaining the printer 194 3 Open the top door. 4 Remove the toner cartridge by lifting the handle, and then gently pulling away from the imaging kit.
Maintaining the printer 194 3 Open the top door. 4 Remove the toner cartridge by lifting the handle, and then gently pulling away from the imaging kit.
User's Guide
Page 196
Maintaining the printer 196 2 Open the top door. 3 Remove the toner cartridges by lifting the handles and then gently pulling away from the imaging kit.
Maintaining the printer 196 2 Open the top door. 3 Remove the toner cartridges by lifting the handles and then gently pulling away from the imaging kit.
User's Guide
Page 197
4 Remove the right side cover. 5 Press the green levers on each side of the waste toner bottle, and then remove it. 6 Lift the blue levers on the imaging kit, and then pull it toward you. Maintaining the printer 197
4 Remove the right side cover. 5 Press the green levers on each side of the waste toner bottle, and then remove it. 6 Lift the blue levers on the imaging kit, and then pull it toward you. Maintaining the printer 197
User's Guide
Page 198
Warning-Potential Damage: Do not touch the underside of the imaging kit. Leave the packaging on the sides, and then pull the imaging kit out. 7 Press down on the blue levers, grasp the handles on the developer unit. 11 Gently shake the developer unit side to side. 12 Remove the red shipping cover from the developer unit. This could damage the imaging kit. 8 Remove the used developer unit. 9 Place the used developer in the enclosed package. 10 Unpack the replacement developer unit. Maintaining the printer 198
Warning-Potential Damage: Do not touch the underside of the imaging kit. Leave the packaging on the sides, and then pull the imaging kit out. 7 Press down on the blue levers, grasp the handles on the developer unit. 11 Gently shake the developer unit side to side. 12 Remove the red shipping cover from the developer unit. This could damage the imaging kit. 8 Remove the used developer unit. 9 Place the used developer in the enclosed package. 10 Unpack the replacement developer unit. Maintaining the printer 198


