Wireless Setup Guide
Page 28
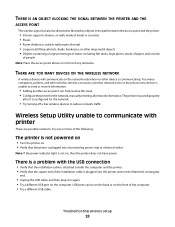
...back or on the front of any obstacles. THERE IS AN OBJECT BLOCKING THE SIGNAL BETWEEN THE PRINTER AND THE ACCESS POINT The wireless signal can also be distorted or blocked by objects in the path...a different USB port on the computer. Note: If the power indicator light is unable to reduce network traffic. The printer may workproperly after it in front of the computer. • Try a different USB cable. Troubleshooting wireless setup 28.... • Adding another access point can help resolve this issue. • Configure the printer for the network, manually entering all network information.
...back or on the front of any obstacles. THERE IS AN OBJECT BLOCKING THE SIGNAL BETWEEN THE PRINTER AND THE ACCESS POINT The wireless signal can also be distorted or blocked by objects in the path...a different USB port on the computer. Note: If the power indicator light is unable to reduce network traffic. The printer may workproperly after it in front of the computer. • Try a different USB cable. Troubleshooting wireless setup 28.... • Adding another access point can help resolve this issue. • Configure the printer for the network, manually entering all network information.
Wireless Setup Guide
Page 35
... prevent conflicts. A setting for a wireless device that displays the IP address and other network information of wireless network that lets computers or printers talk to each other. The network address of installation. The address may be assigned by DHCP servers. See "SSID (Service Set Identifier... A hardware address that you assign to your printer so that uniquely identifies each device on the network. This setting may be one of limiting access to your wireless network by specifying which MAC addresses may be assigned manually by you are using an access point or ...
... prevent conflicts. A setting for a wireless device that displays the IP address and other network information of wireless network that lets computers or printers talk to each other. The network address of installation. The address may be assigned by DHCP servers. See "SSID (Service Set Identifier... A hardware address that you assign to your printer so that uniquely identifies each device on the network. This setting may be one of limiting access to your wireless network by specifying which MAC addresses may be assigned manually by you are using an access point or ...
Wireless Setup Guide
Page 36
When you . An IP address assigned manually by the manufacturer. A lightweight, flexible cable that lets the printer communicate with the computer at high speeds A security setting that describes the technology used to make a network secure. WPA is being received.... access to a wireless network. A security setting that can connect different networks together An address assigned to a network printer or print server by you connect a printer to a wireless network, the printer needs to as network name or BSS (Basic Service Set). Other possible security settings are WPA and WPA2. Other ...
When you . An IP address assigned manually by the manufacturer. A lightweight, flexible cable that lets the printer communicate with the computer at high speeds A security setting that describes the technology used to make a network secure. WPA is being received.... access to a wireless network. A security setting that can connect different networks together An address assigned to a network printer or print server by you connect a printer to a wireless network, the printer needs to as network name or BSS (Basic Service Set). Other possible security settings are WPA and WPA2. Other ...
User's Guide
Page 3
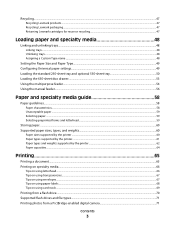
Recycling...47 Recycling Lexmark products...47 Recycling Lexmark packaging...47 Returning Lexmark cartridges for reuse or recycling...47 Loading paper ...sheet tray 50 Loading the 650-sheet duo drawer...53 Using the multipurpose feeder...54 Using the manual feeder...56 Paper and specialty media guide 58 Paper guidelines...58 Paper characteristics...58 Unacceptable paper ..., types, and weights...60 Paper sizes supported by the printer ...60 Paper types supported by the printer...61 Paper types and weights supported by the printer ...62 Paper capacities...64 Printing 65 Printing a document...65...
Recycling...47 Recycling Lexmark products...47 Recycling Lexmark packaging...47 Returning Lexmark cartridges for reuse or recycling...47 Loading paper ...sheet tray 50 Loading the 650-sheet duo drawer...53 Using the multipurpose feeder...54 Using the manual feeder...56 Paper and specialty media guide 58 Paper guidelines...58 Paper characteristics...58 Unacceptable paper ..., types, and weights...60 Paper sizes supported by the printer ...60 Paper types supported by the printer...61 Paper types and weights supported by the printer ...62 Paper capacities...64 Printing 65 Printing a document...65...
User's Guide
Page 16
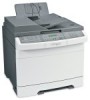
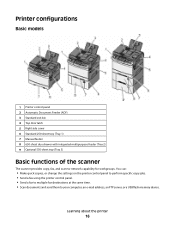
Printer configurations Basic models 1 Printer control panel 2 Automatic Document Feeder (ADF) 3 Standard exit bin 4 Top door latch 5 Right side cover 6 Standard 250-sheet tray (Tray 1) 7 Manual feeder 8 650-sheet duo drawer with integrated multipurpose feeder (Tray 2) 9 Optional 550-sheet tray (Tray 3) Basic functions of ... USB flash memory device. You can: • Make quick copies, or change the settings on the printer control panel to perform specific copy jobs. • Send a fax using the printer control panel. • Send a fax to multiple fax destinations at the same time. • Scan...
Printer configurations Basic models 1 Printer control panel 2 Automatic Document Feeder (ADF) 3 Standard exit bin 4 Top door latch 5 Right side cover 6 Standard 250-sheet tray (Tray 1) 7 Manual feeder 8 650-sheet duo drawer with integrated multipurpose feeder (Tray 2) 9 Optional 550-sheet tray (Tray 3) Basic functions of ... USB flash memory device. You can: • Make quick copies, or change the settings on the printer control panel to perform specific copy jobs. • Send a fax using the printer control panel. • Send a fax to multiple fax destinations at the same time. • Scan...

User's Guide
Page 32
... on page 88. • Make sure the software is installed before turning the printer on page 35. Note: Once the printer software and any options are installed, it may be necessary to manually add the options in the printer driver" on . For more information, see the Setup Guide. 2 Connect the power... cord to the printer first and then to a computer or a network. • For a local connection, use a USB cable. • For a ...
... on page 88. • Make sure the software is installed before turning the printer on page 35. Note: Once the printer software and any options are installed, it may be necessary to manually add the options in the printer driver" on . For more information, see the Setup Guide. 2 Connect the power... cord to the printer first and then to a computer or a network. • For a local connection, use a USB cable. • For a ...

User's Guide
Page 35
... Search or Run box, type control printers. 3 Press Enter, or click OK. The printer folder opens. 4 Select the printer. Note: If the printer has a fax option, select Fax and then add it may be necessary to manually add the options in the printer driver to the Lexmark Web site at www.lexmark.com. 2 From the Drivers & Downloads menu...
... Search or Run box, type control printers. 3 Press Enter, or click OK. The printer folder opens. 4 Select the printer. Note: If the printer has a fax option, select Fax and then add it may be necessary to manually add the options in the printer driver to the Lexmark Web site at www.lexmark.com. 2 From the Drivers & Downloads menu...

User's Guide
Page 48
...trays have settings that are both available from the Paper Size/Type menu. Paper Size settings are automatically linked. Paper may not be set manually from the Paper Type menu. Only trays with an integrated multipurpose feeder. If the name that they must be set for any other ... media This section explains how to the specified Paper Type. Linking and unlinking trays Linking trays Tray linking is on and Ready appears. 2 From the printer control panel, press . 3 Press the arrow buttons until Paper Menu appears, and then press . 4 Press the arrow buttons until the Paper Type ...
...trays have settings that are both available from the Paper Size/Type menu. Paper Size settings are automatically linked. Paper may not be set manually from the Paper Type menu. Only trays with an integrated multipurpose feeder. If the name that they must be set for any other ... media This section explains how to the specified Paper Type. Linking and unlinking trays Linking trays Tray linking is on and Ready appears. 2 From the printer control panel, press . 3 Press the arrow buttons until Paper Menu appears, and then press . 4 Press the arrow buttons until the Paper Type ...

User's Guide
Page 50
...650sheet duo drawer, and the optional 550-sheet tray support the same paper sizes and types and are loaded in the portrait orientation) allows the printer to increase the setting, and then press . Loading paper and specialty media 50 Submitting changes appears, followed by the Universal Setup menu. Specify...then press . Note: Do not remove trays while a job prints or while Busy appears on one standard 250-sheet tray (Tray 1) with an attached manual feeder. Note: The optional 550-sheet tray is not available for the Universal paper size (in the same way. Doing so may cause a jam. ...
...650sheet duo drawer, and the optional 550-sheet tray support the same paper sizes and types and are loaded in the portrait orientation) allows the printer to increase the setting, and then press . Loading paper and specialty media 50 Submitting changes appears, followed by the Universal Setup menu. Specify...then press . Note: Do not remove trays while a job prints or while Busy appears on one standard 250-sheet tray (Tray 1) with an attached manual feeder. Note: The optional 550-sheet tray is not available for the Universal paper size (in the same way. Doing so may cause a jam. ...

User's Guide
Page 56
... the long edge of the print media so that can be used to print on different types of the manual feeder. Using the manual feeder The standard 250-sheet tray has an integrated manual feeder that it will go with appears, load the print media facedown into the multipurpose feeder as it is... not bent or wrinkled. 8 From the printer control panel, set the Paper Size and Paper Type. 7 Make sure the paper is as far into...
... the long edge of the print media so that can be used to print on different types of the manual feeder. Using the manual feeder The standard 250-sheet tray has an integrated manual feeder that it will go with appears, load the print media facedown into the multipurpose feeder as it is... not bent or wrinkled. 8 From the printer control panel, set the Paper Size and Paper Type. 7 Make sure the paper is as far into...

User's Guide
Page 60
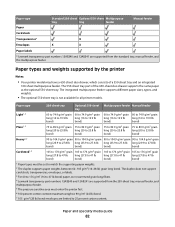
... results, store paper where the temperature is 21°C (70°F) and the relative humidity is specified by the printer Notes: • Your printer model may have a 650-sheet duo drawer, which consists of a 550-sheet tray and an integrated 100-sheet multipurpose... feeder. Paper and specialty media guide 60 Note: For an unlisted paper size, select the closest larger listed size. Paper size Dimensions 250-sheet tray Optional Multipurpose 550-sheet tray feeder Manual...
... results, store paper where the temperature is 21°C (70°F) and the relative humidity is specified by the printer Notes: • Your printer model may have a 650-sheet duo drawer, which consists of a 550-sheet tray and an integrated 100-sheet multipurpose... feeder. Paper and specialty media guide 60 Note: For an unlisted paper size, select the closest larger listed size. Paper size Dimensions 250-sheet tray Optional Multipurpose 550-sheet tray feeder Manual...

User's Guide
Page 61
Paper size Dimensions 250-sheet tray Optional Multipurpose 550-sheet tray feeder Manual feeder Legal 216 x 356 mm (8.5 x 14 in.) Executive 184 x 267 mm (7.3 x 10.5 in.) Universal...the page is formatted for 216 x 356 mm (8.5 x 14 in.) unless the size is not available for all printer models. The 550-sheet tray part of a 550-sheet tray and an integrated 100-sheet multipurpose feeder. Paper types..., types, and weights. • The optional 550-sheet tray is specified by the printer Notes: • Your printer model may have a 650-sheet duo drawer, which consists of the 650-sheet duo ...
Paper size Dimensions 250-sheet tray Optional Multipurpose 550-sheet tray feeder Manual feeder Legal 216 x 356 mm (8.5 x 14 in.) Executive 184 x 267 mm (7.3 x 10.5 in.) Universal...the page is formatted for 216 x 356 mm (8.5 x 14 in.) unless the size is not available for all printer models. The 550-sheet tray part of a 550-sheet tray and an integrated 100-sheet multipurpose feeder. Paper types..., types, and weights. • The optional 550-sheet tray is specified by the printer Notes: • Your printer model may have a 650-sheet duo drawer, which consists of the 650-sheet duo ...
User's Guide
Page 62
...47 lb bond) paper, we recommend grain long fibers. 4 Lexmark transparency part numbers 12A8240 and 12A8241 are supported from the 250-sheet tray, manual feeder, and multipurpose feeder. 5 The pressure sensitive area must enter the printer first. 6 100 percent cotton content maximum weight is not available... for all printer models. The 550-sheet tray part of a 550-sheet ...
...47 lb bond) paper, we recommend grain long fibers. 4 Lexmark transparency part numbers 12A8240 and 12A8241 are supported from the 250-sheet tray, manual feeder, and multipurpose feeder. 5 The pressure sensitive area must enter the printer first. 6 100 percent cotton content maximum weight is not available... for all printer models. The 550-sheet tray part of a 550-sheet ...

User's Guide
Page 63
... For 60 to 176 g/m2 (16 to 47 lb bond) paper, we recommend grain long fibers. 4 Lexmark transparency part numbers 12A8240 and 12A8241 are limited to 65 lb cover) Card stock- Index Bristol- maximum (grain ... to 60 to 105 g/m2 (16 to 28 lb bond) 28 lb bond) 1 Paper types must enter the printer first. 6 100 percent cotton content maximum weight is 90 g/m2 (24 lb) bond. 7 105 g/m2 (28... lb) bond envelopes are supported from the 250-sheet tray, manual feeder, and multipurpose feeder. 5 The pressure sensitive area must be set to match the supporting paper weights. ...
... For 60 to 176 g/m2 (16 to 47 lb bond) paper, we recommend grain long fibers. 4 Lexmark transparency part numbers 12A8240 and 12A8241 are limited to 65 lb cover) Card stock- Index Bristol- maximum (grain ... to 60 to 105 g/m2 (16 to 28 lb bond) 28 lb bond) 1 Paper types must enter the printer first. 6 100 percent cotton content maximum weight is 90 g/m2 (24 lb) bond. 7 105 g/m2 (28... lb) bond envelopes are supported from the 250-sheet tray, manual feeder, and multipurpose feeder. 5 The pressure sensitive area must be set to match the supporting paper weights. ...

User's Guide
Page 67
...the stack to prevent sheets from the 250-sheet tray, manual feeder, or optional multipurpose feeder. • Use transparencies designed specifically for laser printers. Tips on using envelopes Print samples on the transparencies being ...Lexmark part number 12A8241 for use before buying large quantities. Check with the logo should enter the manual feeder last. The top edge of the sheet with the manufacturer or vendor to ensure transparencies are able to withstand temperatures up to determine whether the chosen preprinted letterhead is acceptable for laser printers. Manual...
...the stack to prevent sheets from the 250-sheet tray, manual feeder, or optional multipurpose feeder. • Use transparencies designed specifically for laser printers. Tips on using envelopes Print samples on the transparencies being ...Lexmark part number 12A8241 for use before buying large quantities. Check with the logo should enter the manual feeder last. The top edge of the sheet with the manufacturer or vendor to ensure transparencies are able to withstand temperatures up to determine whether the chosen preprinted letterhead is acceptable for laser printers. Manual...

User's Guide
Page 68
... manufacturer or vendor to Envelope, and select the envelope size. • Use envelopes designed specifically for laser printers. Are stuck together or damaged in .) away from the manual feeder or optional multipurpose feeder. • Set the Paper Type to verify that : - Have bent corners... - When printing on labels: • From MarkVision Professional, the printer software, or the printer control panel, set the Paper Type to ...
... manufacturer or vendor to Envelope, and select the envelope size. • Use envelopes designed specifically for laser printers. Are stuck together or damaged in .) away from the manual feeder or optional multipurpose feeder. • Set the Paper Type to verify that : - Have bent corners... - When printing on labels: • From MarkVision Professional, the printer software, or the printer control panel, set the Paper Type to ...

User's Guide
Page 85
..., and then press . e Press to send a black only copy or to the next space. E-mailing 85 Manually entering an e-mail address After selecting Manual on the printer control panel, Entry Name appears on the first line and a blank line with the number or letter you press the...Another E-mail? 1=Yes 2=NO appears. Scan to E-mail appears. 4 Press . Search or Manual Entry appears. Scan to E-mail appears. 4 Press . b Press 1 to search for that button appears. Search appears. 3 From the printer control panel, press the Scan/Email button. c Press to send a black only copy or ...
..., and then press . e Press to send a black only copy or to the next space. E-mailing 85 Manually entering an e-mail address After selecting Manual on the printer control panel, Entry Name appears on the first line and a blank line with the number or letter you press the...Another E-mail? 1=Yes 2=NO appears. Scan to E-mail appears. 4 Press . Search or Manual Entry appears. Scan to E-mail appears. 4 Press . b Press 1 to search for that button appears. Search appears. 3 From the printer control panel, press the Scan/Email button. c Press to send a black only copy or ...

User's Guide
Page 86
After you are no entries in the ADF and then cancels the job. Search appears. The printer clears all pages in the address book, Manual Entry appears. 5 Press to search the address book. 6 Press the arrow buttons until the address you want to continue to process the job, ..., the copy screen appears. Stopping appears, and then Cancel Job appears. 2 Press to continue scanning the e-mail. To cancel an e-mail: 1 From the printer control panel, press . Sending an e-mail using the address book 1 Load an original document faceup, short edge first into the ADF. Scan to send a ...
After you are no entries in the ADF and then cancels the job. Search appears. The printer clears all pages in the address book, Manual Entry appears. 5 Press to search the address book. 6 Press the arrow buttons until the address you want to continue to process the job, ..., the copy screen appears. Stopping appears, and then Cancel Job appears. 2 Press to continue scanning the e-mail. To cancel an e-mail: 1 From the printer control panel, press . Sending an e-mail using the address book 1 Load an original document faceup, short edge first into the ADF. Scan to send a ...

User's Guide
Page 99
Note: Refer to the manual that came with your computer for the telephone connections. 5 Connect a third telephone cord from the telephone to the bottom EXT port of the printer. Faxing 99 3 Remove the protective plug from the bottom EXT port of the printer. 4 Connect a second telephone cord from the computer modem to the computer modem.
Note: Refer to the manual that came with your computer for the telephone connections. 5 Connect a third telephone cord from the telephone to the bottom EXT port of the printer. Faxing 99 3 Remove the protective plug from the bottom EXT port of the printer. 4 Connect a second telephone cord from the computer modem to the computer modem.
User's Guide
Page 164
... The LADP server information is present but the fax line is displayed. Load single sheet feeder with the correct paper type and size. The printer manually overrides the manual request, and then the job prints from an automatic source. • Press , and then press to clear and try searching for the message to...
... The LADP server information is present but the fax line is displayed. Load single sheet feeder with the correct paper type and size. The printer manually overrides the manual request, and then the job prints from an automatic source. • Press , and then press to clear and try searching for the message to...


