User's Guide
Page 9
... of supplies from the printer control panel 234 Checking the status of supplies from a network computer 234 Ordering supplies...235 Ordering toner cartridges...235 Ordering a photoconductor kit ...235 Ordering ADF replacement parts...236 Moving the printer to another location...236 Shipping the printer...237 Administrative support 238 Finding advanced networking and...
... of supplies from the printer control panel 234 Checking the status of supplies from a network computer 234 Ordering supplies...235 Ordering toner cartridges...235 Ordering a photoconductor kit ...235 Ordering ADF replacement parts...236 Moving the printer to another location...236 Shipping the printer...237 Administrative support 238 Finding advanced networking and...
User's Guide
Page 235
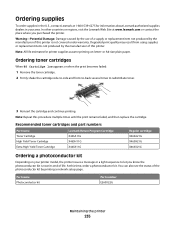
... and part numbers Part name Toner Cartridge High Yield Toner Cartridge Extra High Yield Toner Cartridge Lexmark Return Program Cartridge X463A11G X463H11G X463X11G Regular cartridge X463A21G X463H21G X463X21G Ordering a photoconductor kit Depending on letter- You can also see the status of life. Note: Repeat this... printer is near its end of the photoconductor kit by printing a network setup page. or A4-size plain paper. In other countries or regions, visit the Lexmark Web Site at 1-800-539-6275 for printer supplies assume printing on your...
... and part numbers Part name Toner Cartridge High Yield Toner Cartridge Extra High Yield Toner Cartridge Lexmark Return Program Cartridge X463A11G X463H11G X463X11G Regular cartridge X463A21G X463H21G X463X21G Ordering a photoconductor kit Depending on letter- You can also see the status of life. Note: Repeat this... printer is near its end of the photoconductor kit by printing a network setup page. or A4-size plain paper. In other countries or regions, visit the Lexmark Web Site at 1-800-539-6275 for printer supplies assume printing on your...
User's Guide
Page 238
... you do not know the IP address of the printer, then print a network setup page and locate the IP address in the photoconductor kit, and capacity measurements of life remaining in the TCP/IP section. • For more advanced system support tasks, see the ...Networking Guide on the Software and Documentation CD and the Embedded Web Server Administrator's Guide on the Lexmark Web site at www.lexmark.com. Administrative support 238 Administrative support Finding advanced networking and administrator information This chapter covers basic administrative support tasks. Notes...
... you do not know the IP address of the printer, then print a network setup page and locate the IP address in the photoconductor kit, and capacity measurements of life remaining in the TCP/IP section. • For more advanced system support tasks, see the ...Networking Guide on the Software and Documentation CD and the Embedded Web Server Administrator's Guide on the Lexmark Web site at www.lexmark.com. Administrative support 238 Administrative support Finding advanced networking and administrator information This chapter covers basic administrative support tasks. Notes...
User's Guide
Page 240
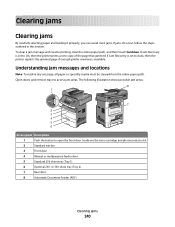
...) Clearing jams 240 To clear a jam message and resume printing, clear the entire paper path, and then touch Continue. Inside are the toner cartridge and photoconductor kit. 2 Standard exit bin 3 Front door 4 Manual or multipurpose feeder door 5 Standard 250-sheet tray (Tray 1) 6 Optional 250- If Jam Recovery is available. The following...
...) Clearing jams 240 To clear a jam message and resume printing, clear the entire paper path, and then touch Continue. Inside are the toner cartridge and photoconductor kit. 2 Standard exit bin 3 Front door 4 Manual or multipurpose feeder door 5 Standard 250-sheet tray (Tray 1) 6 Optional 250- If Jam Recovery is available. The following...
User's Guide
Page 241
... open the rear door. Remove Tray 2. Try one or more of the following: • Remove Tray 1. • Open the front door, and then remove the photoconductor kit. Open the multipurpose feeder door. Jam message numbers and how to access each jam Jam number 200-201 202 231 233 234 235 240...
... open the rear door. Remove Tray 2. Try one or more of the following: • Remove Tray 1. • Open the front door, and then remove the photoconductor kit. Open the multipurpose feeder door. Jam message numbers and how to access each jam Jam number 200-201 202 231 233 234 235 240...
User's Guide
Page 242
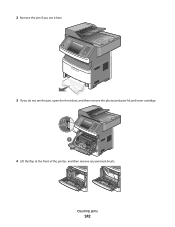
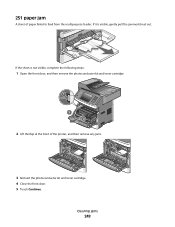
2 Remove the jam if you see it here. 3 If you do not see the jam, open the front door, and then remove the photoconductor kit and toner cartridge. 4 Lift the flap at the front of the printer, and then remove any jammed sheets. Clearing jams 242
2 Remove the jam if you see it here. 3 If you do not see the jam, open the front door, and then remove the photoconductor kit and toner cartridge. 4 Lift the flap at the front of the printer, and then remove any jammed sheets. Clearing jams 242
User's Guide
Page 243
5 If you do not see any jammed sheets, open the rear door. 6 Remove the jam. 7 Close the rear door. 8 Insert the photoconductor kit and toner cartridge. 9 Close the front door. 10 Touch Continue. 202 paper jam Touch Status/Supplies to identify the location of the jam. If the paper is exiting the printer, then pull the paper out, and then touch Continue. Clearing jams 243
5 If you do not see any jammed sheets, open the rear door. 6 Remove the jam. 7 Close the rear door. 8 Insert the photoconductor kit and toner cartridge. 9 Close the front door. 10 Touch Continue. 202 paper jam Touch Status/Supplies to identify the location of the jam. If the paper is exiting the printer, then pull the paper out, and then touch Continue. Clearing jams 243
User's Guide
Page 249
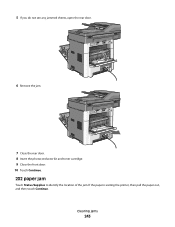
If it is not visible, complete the following steps: 1 Open the front door, and then remove the photoconductor kit and toner cartridge. 2 Lift the flap at the front of paper failed to feed from the multipurpose feeder. Clearing jams 249 251 paper jam A sheet of the printer, and then remove any jams. 3 Reinsert the photoconductor kit and toner cartridge. 4 Close the front door. 5 Touch Continue. If the sheet is visible, gently pull the jammed sheet out.
If it is not visible, complete the following steps: 1 Open the front door, and then remove the photoconductor kit and toner cartridge. 2 Lift the flap at the front of paper failed to feed from the multipurpose feeder. Clearing jams 249 251 paper jam A sheet of the printer, and then remove any jams. 3 Reinsert the photoconductor kit and toner cartridge. 4 Close the front door. 5 Touch Continue. If the sheet is visible, gently pull the jammed sheet out.
User's Guide
Page 265
Try one or more of the following : • Replace the photoconductor kit. • Touch Continue to clear the message and continue printing. 88 Cartridge low The toner is low. If the error message remains, the hard ... to replace the pick rollers, the charge roll, the transfer roller, and the fuser. 84 Replace PC Kit The photoconductor kit is near exhaustion. Install a new photoconductor kit. 84 PC Kit life warning The photoconductor kit is exhausted. Order a maintenance kit, which contains all the items necessary to have routine maintenance done. Replace...
Try one or more of the following : • Replace the photoconductor kit. • Touch Continue to clear the message and continue printing. 88 Cartridge low The toner is low. If the error message remains, the hard ... to replace the pick rollers, the charge roll, the transfer roller, and the fuser. 84 Replace PC Kit The photoconductor kit is near exhaustion. Install a new photoconductor kit. 84 PC Kit life warning The photoconductor kit is exhausted. Order a maintenance kit, which contains all the items necessary to have routine maintenance done. Replace...
User's Guide
Page 316
... load 93 Paper Weight menu 161 Parallel menu 175 pausing the current print job to make copies 110 PCL Emul menu 225 PDF menu 224 photoconductor kit ordering 235 photos copying 105 port settings configuring 65 PostScript menu 224 Power Saver adjusting 71 print job canceling from Macintosh 102 canceling from...
... load 93 Paper Weight menu 161 Parallel menu 175 pausing the current print job to make copies 110 PCL Emul menu 225 PDF menu 224 photoconductor kit ordering 235 photos copying 105 port settings configuring 65 PostScript menu 224 Power Saver adjusting 71 print job canceling from Macintosh 102 canceling from...

User's Guide
Page 318
... 282 job prints from wrong tray 270 job prints on using recycled paper 69 supplies, ordering 235 ADF pick assembly 236 ADF separator roll 236 photoconductor kit 235 system board accessing 30 System busy, preparing resources for job. 260 System busy, preparing resources for job.
... 282 job prints from wrong tray 270 job prints on using recycled paper 69 supplies, ordering 235 ADF pick assembly 236 ADF separator roll 236 photoconductor kit 235 system board accessing 30 System busy, preparing resources for job. 260 System busy, preparing resources for job.
Service Manual
Page 5
... second-level support 2-68 Diagnostic aids 3-1 Accessing service menus 3-1 Configuration menu (CONFIG MENU 3-2 Available menus 3-2 Maintenance Count Value (Maint Cnt Value 3-3 Reset Maintenance Counter 3-3 Reset Photoconductor Maintenance Counter (Reset PC Cnt 3-4 USB Scan to Local 3-4 Print Quality Pages 3-4 Menu Settings Page 3-4 Event Log 3-4 Panel Menus 3-4 PPDS Emulation 3-5 Download Emuls 3-5 Factory Defaults...
... second-level support 2-68 Diagnostic aids 3-1 Accessing service menus 3-1 Configuration menu (CONFIG MENU 3-2 Available menus 3-2 Maintenance Count Value (Maint Cnt Value 3-3 Reset Maintenance Counter 3-3 Reset Photoconductor Maintenance Counter (Reset PC Cnt 3-4 USB Scan to Local 3-4 Print Quality Pages 3-4 Menu Settings Page 3-4 Event Log 3-4 Panel Menus 3-4 PPDS Emulation 3-5 Download Emuls 3-5 Factory Defaults...
Service Manual
Page 26
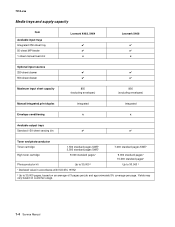
...Lexmark X466 ✔ ✔ x Optional input sources 250-sheet drawer ✔ ✔ 550-sheet drawer ✔ ✔ Maximum input sheet capacity 850 (excluding envelopes) 850 (excluding envelopes) Manual/integrated print duplex Integrated Integrated Envelope conditioning x x Available output trays Standard 150-sheet sensing bin ✔ ✔ Toner and photoconductor...High toner cartridge 9,000 standard pages¹ 9,000 standard pages¹ 15,000 standard pages¹ Photoconductor kit Up to 30,000 ² Up to 30,000 ² ¹ Declared value in ...
...Lexmark X466 ✔ ✔ x Optional input sources 250-sheet drawer ✔ ✔ 550-sheet drawer ✔ ✔ Maximum input sheet capacity 850 (excluding envelopes) 850 (excluding envelopes) Manual/integrated print duplex Integrated Integrated Envelope conditioning x x Available output trays Standard 150-sheet sensing bin ✔ ✔ Toner and photoconductor...High toner cartridge 9,000 standard pages¹ 9,000 standard pages¹ 15,000 standard pages¹ Photoconductor kit Up to 30,000 ² Up to 30,000 ² ¹ Declared value in ...
Service Manual
Page 37
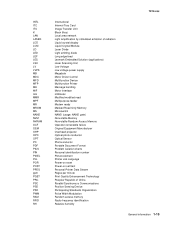
...by stimulated emission of radiation Liquid crystal display Liquid Crystal Module Laser Diode Light emitting diode Long edge feed Lexmark Embedded Solution (applications) Laser Scanning Unit Low Voltage Low voltage power supply Megabyte Motor Driver Control Multifunction Device... Memory Nonvolatile Random Access Memory Operator correctable failure Original Equipment Manufacturer Overhead projector Optical photo conductor Optical Sensor Photoconductor Portable Document Format Problem isolation charts Personal identification number Picture element Printer Job Language Power-on reset Power-on...
...by stimulated emission of radiation Liquid crystal display Liquid Crystal Module Laser Diode Light emitting diode Long edge feed Lexmark Embedded Solution (applications) Laser Scanning Unit Low Voltage Low voltage power supply Megabyte Motor Driver Control Multifunction Device... Memory Nonvolatile Random Access Memory Operator correctable failure Original Equipment Manufacturer Overhead projector Optical photo conductor Optical Sensor Photoconductor Portable Document Format Problem isolation charts Personal identification number Picture element Printer Job Language Power-on reset Power-on...
Service Manual
Page 85
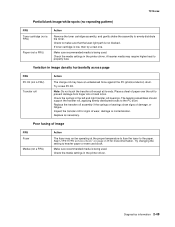
... humidity will POR. Touch Print Quality Pages to print out the quality pages. Four pages print to these problems. 3. Scroll down to expose the photoconductor, resulting in that order. d. Also, see "Solving print quality problems" on the printer while pressing and holding 2 and 6. Enter Configuration Menu. Try a different toner cartridge...
... humidity will POR. Touch Print Quality Pages to print out the quality pages. Four pages print to these problems. 3. Scroll down to expose the photoconductor, resulting in that order. d. Also, see "Solving print quality problems" on the printer while pressing and holding 2 and 6. Enter Configuration Menu. Try a different toner cartridge...
Service Manual
Page 86
... the LVPS/HVPS cable from a different print cartridge assembly and developer before proceeding. This is more noticeable as the toner cartridge nears end-of the photoconductor causes an all black page. Heavy background Poor development or poorly charged toner particles cause excessive background. Make sure the toner cartridge and PC Kit...
... the LVPS/HVPS cable from a different print cartridge assembly and developer before proceeding. This is more noticeable as the toner cartridge nears end-of the photoconductor causes an all black page. Heavy background Poor development or poorly charged toner particles cause excessive background. Make sure the toner cartridge and PC Kit...
Service Manual
Page 87
... necessary. Make sure recommended media is low, then try a new one. Try a new PC Kit. A heavier media may have an unbalanced force against the PC (photoconductor) drum. Note: Do not touch the transfer roll except at the proper temperature to fuse the toner to prevent damage from finger oils or hand...
... necessary. Make sure recommended media is low, then try a new one. Try a new PC Kit. A heavier media may have an unbalanced force against the PC (photoconductor) drum. Note: Do not touch the transfer roll except at the proper temperature to fuse the toner to prevent damage from finger oils or hand...

Service Manual
Page 88
... measured, but the contacts and continuities can cause excessive toner to make sure that the toner cartridge is not low on back of page FRU Photoconductor kit (not a FRU) Fuser Transfer roll HVPS or engine board Action Print a menu page from the Menu Settings Page in the Reports menu. With the...
... measured, but the contacts and continuities can cause excessive toner to make sure that the toner cartridge is not low on back of page FRU Photoconductor kit (not a FRU) Fuser Transfer roll HVPS or engine board Action Print a menu page from the Menu Settings Page in the Reports menu. With the...
Service Manual
Page 108
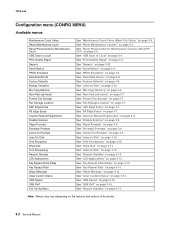
7014-xxx Configuration menu (CONFIG MENU) Available menus Maintenance Count Value Reset Maintenance Count Reset Photoconductor Maintenance Count USB Scan to Local" on page 3-4. See "Min Copy Memory" on page 3-7. See "Fax Storage Location" on page 3-6. See "...3-5. See "Key Repeat Initial Delay" on the features and options of the printer. 3-2 Service Manual Note: Menus may vary depending on page 3-15. See "Reset Photoconductor Maintenance Counter (Reset PC Cnt)" on page 3-4. See "Panel Menus" on page 3-4. See "Factory Defaults" on page 3-7. See "Format Fax Storage" on page...
7014-xxx Configuration menu (CONFIG MENU) Available menus Maintenance Count Value Reset Maintenance Count Reset Photoconductor Maintenance Count USB Scan to Local" on page 3-4. See "Min Copy Memory" on page 3-7. See "Fax Storage Location" on page 3-6. See "...3-5. See "Key Repeat Initial Delay" on the features and options of the printer. 3-2 Service Manual Note: Menus may vary depending on page 3-15. See "Reset Photoconductor Maintenance Counter (Reset PC Cnt)" on page 3-4. See "Panel Menus" on page 3-4. See "Factory Defaults" on page 3-7. See "Format Fax Storage" on page...

Service Manual
Page 110
...2. Menu Settings Page To print the Menu Settings page, press . The event log can only be performed only after a new photoconductor unit has been installed. Press to return to generate acceptable printed output. Touch Back to cancel and return to Local enumerates a ...disable the operator panel menus. Printing Quality Test Pages... 7014-xxx Reset Photoconductor Maintenance Counter (Reset PC Cnt) This setting resets the photoconductor kit page counter and clears any warnings or photoconductor exhausted messages. Select Print Event Log from the Configuration Menu. However, ...
...2. Menu Settings Page To print the Menu Settings page, press . The event log can only be performed only after a new photoconductor unit has been installed. Press to return to generate acceptable printed output. Touch Back to cancel and return to Local enumerates a ...disable the operator panel menus. Printing Quality Test Pages... 7014-xxx Reset Photoconductor Maintenance Counter (Reset PC Cnt) This setting resets the photoconductor kit page counter and clears any warnings or photoconductor exhausted messages. Select Print Event Log from the Configuration Menu. However, ...


