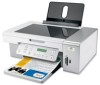
Getting Started
Page 34
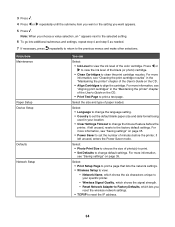
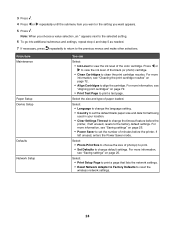
... to reset the IP address. 34 From here Maintenance Paper Setup Device Setup Defaults Network Setup You can Select: • Ink Level to view: - Select the size and type of the color cartridge. Select: • Language to change the timeout feature before the printer, if left unused, resets to the factory default...
... to reset the IP address. 34 From here Maintenance Paper Setup Device Setup Defaults Network Setup You can Select: • Ink Level to view: - Select the size and type of the color cartridge. Select: • Language to change the timeout feature before the printer, if left unused, resets to the factory default...
Getting Started
Page 38
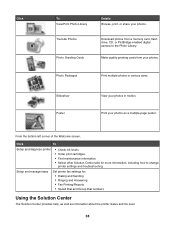
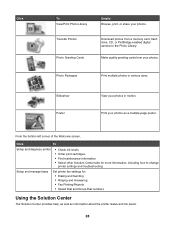
.... 38 From the bottom left corner of the Welcome screen, Click To Setup and diagnose printer • Check ink levels. • Order print cartridges. • Find maintenance information. • Select other Solution Center tabs for : • Dialing and Sending • Ringing and Answering • Fax Printing/Reports • Speed ...
.... 38 From the bottom left corner of the Welcome screen, Click To Setup and diagnose printer • Check ink levels. • Order print cartridges. • Find maintenance information. • Select other Solution Center tabs for : • Dialing and Sending • Ringing and Answering • Fax Printing/Reports • Speed ...

Getting Started
Page 39
... page. • Clean to fix horizontal streaks. • Align to fix blurry edges. • Troubleshoot other ink problems. • View ink levels and order new print cartridges. • Learn how to : - Method 2 1 Click Start Œ Programs or All Programs Œ Lexmark 3500-4500 Series. 2 Select Solution Center. Maintenance Contact Information • Install a new print...
... page. • Clean to fix horizontal streaks. • Align to fix blurry edges. • Troubleshoot other ink problems. • View ink levels and order new print cartridges. • Learn how to : - Method 2 1 Click Start Œ Programs or All Programs Œ Lexmark 3500-4500 Series. 2 Select Solution Center. Maintenance Contact Information • Install a new print...
Getting Started
Page 40
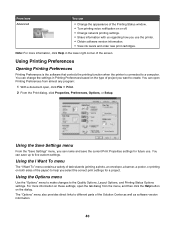
... information with us regarding how you select the correct print settings for future use the printer. • Obtain software version information. • View ink levels and order new print cartridges. You can name and save up to create. The "Options" menu also provides direct links to help you use . Using the Save...
... information with us regarding how you select the correct print settings for future use the printer. • Obtain software version information. • View ink levels and order new print cartridges. You can name and save up to create. The "Options" menu also provides direct links to help you use . Using the Save...
Getting Started
Page 49
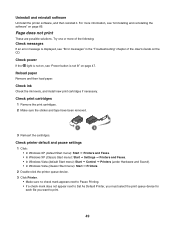
Check ink Check the ink levels, and install new print cartridges if necessary. Uninstall and reinstall software Uninstall the printer software, and then reinstall it. Check printer default and pause settings 1 Click: • In Windows XP (... not on, see "Power button is displayed, see "Uninstalling and reinstalling the software" on page 47. Check print cartridges 1 Remove the print cartridges. 2 Make sure the sticker and tape have been removed. 1 2 3 Reinsert the cartridges. For more of the following: Check messages If an error message is not lit" on page 66. Reload...
Check ink Check the ink levels, and install new print cartridges if necessary. Uninstall and reinstall software Uninstall the printer software, and then reinstall it. Check printer default and pause settings 1 Click: • In Windows XP (... not on, see "Power button is displayed, see "Uninstalling and reinstalling the software" on page 47. Check print cartridges 1 Remove the print cartridges. 2 Make sure the sticker and tape have been removed. 1 2 3 Reinsert the cartridges. For more of the following: Check messages If an error message is not lit" on page 66. Reload...
Getting Started
Page 72
... References in this single use, the license to use only and is/are designed to stop working after delivering a fixed amount of ink. If you don't have access to a product, program, or service is required. Bldg 004-2/CSC 740 New Circle Road NW Lexington... statement may be used cartridge must be made to Models X1380, X1480, X1580, X2580, X3580, and X4580) are trademarks of Lexmark International, Inc. For information on supplies and downloads, visit www.lexmark.com. Trademarks Lexmark and Lexmark with diamond design are not subject to Lexmark for remanufacturing, refilling or...
... References in this single use, the license to use only and is/are designed to stop working after delivering a fixed amount of ink. If you don't have access to a product, program, or service is required. Bldg 004-2/CSC 740 New Circle Road NW Lexington... statement may be used cartridge must be made to Models X1380, X1480, X1580, X2580, X3580, and X4580) are trademarks of Lexmark International, Inc. For information on supplies and downloads, visit www.lexmark.com. Trademarks Lexmark and Lexmark with diamond design are not subject to Lexmark for remanufacturing, refilling or...
User's Guide
Page 6
Recycling Lexmark products...76 Troubleshooting...77 Setup troubleshooting...77 Incorrect language appears on the display 77 Power button ... of the page...84 Print speed is slow...85 Partial document or photo prints...85 Photo smudges...85 Ink levels seem incorrect ...85 Ink levels seem to go down too quickly ...86 Copy troubleshooting...86 Copier does not respond ...86 Scanner unit...93 Nothing happens when memory card is inserted 93 Error messages...94 Alignment Error...94 Black Ink Low / Color Ink Low / Photo Ink Low 94 Cartridge Error (1102, 1203, 1204, or 120F 94 Clear Carrier Jam ...95 6
Recycling Lexmark products...76 Troubleshooting...77 Setup troubleshooting...77 Incorrect language appears on the display 77 Power button ... of the page...84 Print speed is slow...85 Partial document or photo prints...85 Photo smudges...85 Ink levels seem incorrect ...85 Ink levels seem to go down too quickly ...86 Copy troubleshooting...86 Copier does not respond ...86 Scanner unit...93 Nothing happens when memory card is inserted 93 Error messages...94 Alignment Error...94 Black Ink Low / Color Ink Low / Photo Ink Low 94 Cartridge Error (1102, 1203, 1204, or 120F 94 Clear Carrier Jam ...95 6
User's Guide
Page 24
... more information, see "Saving settings" on page 72. • Align Cartridges to the factory default settings. From here Maintenance Paper Setup Device Setup Defaults Network Setup You can Select: • Ink Level to view the ink level of photo(s) to print. • Set Defaults to change the timeout... feature before the printer, if left unused, resets to align the cartridge. For more information, see "Cleaning the print cartridge nozzles" on page 25. •...
... more information, see "Saving settings" on page 72. • Align Cartridges to the factory default settings. From here Maintenance Paper Setup Device Setup Defaults Network Setup You can Select: • Ink Level to view the ink level of photo(s) to print. • Set Defaults to change the timeout... feature before the printer, if left unused, resets to align the cartridge. For more information, see "Cleaning the print cartridge nozzles" on page 25. •...
User's Guide
Page 28
.... 28 From the bottom left corner of the Welcome screen, Click To Setup and diagnose printer • Check ink levels. • Order print cartridges. • Find maintenance information. • Select other Solution Center tabs for : • Dialing and Sending • Ringing and Answering • Fax Printing/Reports • Speed ...
.... 28 From the bottom left corner of the Welcome screen, Click To Setup and diagnose printer • Check ink levels. • Order print cartridges. • Find maintenance information. • Select other Solution Center tabs for : • Dialing and Sending • Ringing and Answering • Fax Printing/Reports • Speed ...

User's Guide
Page 29
... a test page. • Clean to fix horizontal streaks. • Align to fix blurry edges. • Troubleshoot other ink problems. • View ink levels and order new print cartridges. • Learn how to : - The Solution Center appears with the Maintenance tab open the Solution Center, use one of... these methods: Method 1 1 From the desktop, double-click the Lexmark Imaging Studio icon. 2 Click Setup and diagnose ...
... a test page. • Clean to fix horizontal streaks. • Align to fix blurry edges. • Troubleshoot other ink problems. • View ink levels and order new print cartridges. • Learn how to : - The Solution Center appears with the Maintenance tab open the Solution Center, use one of... these methods: Method 1 1 From the desktop, double-click the Lexmark Imaging Studio icon. 2 Click Setup and diagnose ...
User's Guide
Page 30
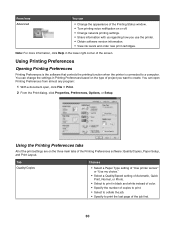
... black and white instead of color. • Specify the number of project you use the printer. • Obtain software version information. • View ink levels and order new print cartridges. From here Advanced You can open Printing Preferences from almost any program: 1 With a document open, click File Œ Print. 2 From the Print...
... black and white instead of color. • Specify the number of project you use the printer. • Obtain software version information. • View ink levels and order new print cartridges. From here Advanced You can open Printing Preferences from almost any program: 1 With a document open, click File Œ Print. 2 From the Print...
User's Guide
Page 73
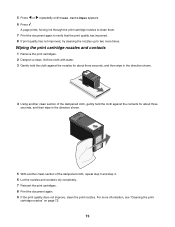
...another clean section of the dampened cloth, repeat step 3 and step 4. 6 Let the nozzles and contacts dry completely. 7 Reinsert the print cartridges. 8 Print the document again. 9 If the print quality does not improve, clean the print nozzles. For more times. 5 Press or repeatedly until ...Clean Cartridges appears. 6 Press . A page prints, forcing ink through the print cartridge nozzles to clean them. 7 Print the document again to verify that the print quality has improved. 8 If print ...
...another clean section of the dampened cloth, repeat step 3 and step 4. 6 Let the nozzles and contacts dry completely. 7 Reinsert the print cartridges. 8 Print the document again. 9 If the print quality does not improve, clean the print nozzles. For more times. 5 Press or repeatedly until ...Clean Cartridges appears. 6 Press . A page prints, forcing ink through the print cartridge nozzles to clean them. 7 Print the document again to verify that the print quality has improved. 8 If print ...
User's Guide
Page 74
...lint-free cloth with ISO/IEC 24711 (FDIS). 2 Licensed Return Program Cartridge Lexmark 3580 and Lexmark 4580 models 74 Declared yield value in use. Note: Make sure all ink or corrective fluid on the scanner glass. The cartridges do not print correctly if left exposed for an extended period of time.... • Keep the photo cartridge in its packaging until you are...
...lint-free cloth with ISO/IEC 24711 (FDIS). 2 Licensed Return Program Cartridge Lexmark 3580 and Lexmark 4580 models 74 Declared yield value in use. Note: Make sure all ink or corrective fluid on the scanner glass. The cartridges do not print correctly if left exposed for an extended period of time.... • Keep the photo cartridge in its packaging until you are...
User's Guide
Page 76
... cartridge. Lexmark does not recommend use Lexmark supplies. Refilling a cartridge can affect print quality and may cause damage to Lexmark for the indicated cartridge(s): • Replace your cartridge(s) with new Lexmark print cartridge(s). • If you purchased a new, genuine Lexmark print cartridge, but the Out of failures or damage caused by non-Lexmark ink or print cartridges. For best results, use of Original Lexmark Ink message...
... cartridge. Lexmark does not recommend use Lexmark supplies. Refilling a cartridge can affect print quality and may cause damage to Lexmark for the indicated cartridge(s): • Replace your cartridge(s) with new Lexmark print cartridge(s). • If you purchased a new, genuine Lexmark print cartridge, but the Out of failures or damage caused by non-Lexmark ink or print cartridges. For best results, use of Original Lexmark Ink message...
User's Guide
Page 79
.... Try one or more information, see "Power button is not on, see "Removing and reinstalling the software" on page 100. Check ink Check the ink levels, and install new print cartridges if necessary. 79 Check power If the light is not lit" on the computer screen to install the software. Page does not...
.... Try one or more information, see "Power button is not on, see "Removing and reinstalling the software" on page 100. Check ink Check the ink levels, and install new print cartridges if necessary. 79 Check power If the light is not lit" on the computer screen to install the software. Page does not...
User's Guide
Page 83
... • Streaks • White lines in print These are printing photos or other high-quality images, for best results use Lexmark Premium Photo Paper or Lexmark Photo Paper. Remove sheets as it exits, and allow it to dry: • Documents with graphics or images • ... the print nozzles and contacts. 3 Remove and reinsert the print cartridges. For more of paper Each paper brand accepts ink differently and prints with the following : Check ink Check the ink levels, and install new print cartridges if necessary. Removing and reinstalling the software Software may take up to...
... • Streaks • White lines in print These are printing photos or other high-quality images, for best results use Lexmark Premium Photo Paper or Lexmark Photo Paper. Remove sheets as it exits, and allow it to dry: • Documents with graphics or images • ... the print nozzles and contacts. 3 Remove and reinsert the print cartridges. For more of paper Each paper brand accepts ink differently and prints with the following : Check ink Check the ink levels, and install new print cartridges if necessary. Removing and reinstalling the software Software may take up to...

User's Guide
Page 87
..., press Copy Mode. 3 Press Lighter/Darker. 4 Press or repeatedly to improve print quality See "Improving print quality" on page 72. Check ink Check the ink levels, and install a new print cartridge if necessary. Clean the scanner glass If the scanner glass is loaded facedown on the scanner glass in print These are copying...
..., press Copy Mode. 3 Press Lighter/Darker. 4 Press or repeatedly to improve print quality See "Improving print quality" on page 72. Check ink Check the ink levels, and install a new print cartridge if necessary. Clean the scanner glass If the scanner glass is loaded facedown on the scanner glass in print These are copying...
User's Guide
Page 94
.... Continue with the following : Remove tape from print cartridge 1 Remove the print cartridge. 2 Make sure the sticker and tape have been removed. 1 2 3 Reinsert the cartridge. 4 Press to appear. Black Ink Low / Color Ink Low / Photo Ink Low 1 Check the indicated ink level or levels, and install a new print cartridge or cartridges if necessary. Try one of the following procedure...
.... Continue with the following : Remove tape from print cartridge 1 Remove the print cartridge. 2 Make sure the sticker and tape have been removed. 1 2 3 Reinsert the cartridge. 4 Press to appear. Black Ink Low / Color Ink Low / Photo Ink Low 1 Check the indicated ink level or levels, and install a new print cartridge or cartridges if necessary. Try one of the following procedure...

User's Guide
Page 104
... software, or using the print cartridges inside, confirms your point of ink will remain in its original packaging to your acceptance of the following license/agreement: The patented print cartridges contained inside are licensed for a single use the print cartridge terminates, and the used cartridge must be returned only to Lexmark for remanufacturing, refilling or recycling...
... software, or using the print cartridges inside, confirms your point of ink will remain in its original packaging to your acceptance of the following license/agreement: The patented print cartridges contained inside are licensed for a single use the print cartridge terminates, and the used cartridge must be returned only to Lexmark for remanufacturing, refilling or recycling...
User's Guide
Page 105
... 18 Menu 18 Photo Card 18 Power 17 Right arrow 18 Scan Mode 18 Select 18 Settings 18 Start Black 19 Start Color 19 buttons, Lexmark Imaging Studio Copy 27 E-mail 27 Fax 27 Photo Greeting Cards 27 Photo Packages 27 Poster 27 Scan 27 Slideshow 27 Transfer Photos 27 using... 73 CD printing photos from 54 transferring all photos using the computer 47 transferring selected photos using the computer 48 cleaning print cartridge nozzles 72 collating copies 41, 59 color ink low 94 computer not connected error 96 Contact Information tab 29 contents, box 12 control panel 16 Copy menu 19 installing...
... 18 Menu 18 Photo Card 18 Power 17 Right arrow 18 Scan Mode 18 Select 18 Settings 18 Start Black 19 Start Color 19 buttons, Lexmark Imaging Studio Copy 27 E-mail 27 Fax 27 Photo Greeting Cards 27 Photo Packages 27 Poster 27 Scan 27 Slideshow 27 Transfer Photos 27 using... 73 CD printing photos from 54 transferring all photos using the computer 47 transferring selected photos using the computer 48 cleaning print cartridge nozzles 72 collating copies 41, 59 color ink low 94 computer not connected error 96 Contact Information tab 29 contents, box 12 control panel 16 Copy menu 19 installing...


