
Getting Started
Page 3
... printer for wireless printing 15 Setting up the printer using a USB cable...17 Installing an optional internal wireless print server 17 Configuring the optional internal wireless print server 19 Installing the printer on additional network computers 19 Wireless networking...20 Networking overview...20 Learning about the printer ...the Scan menu ...30 Using the Photo Card menu ...31 Using the PictBridge menu ...32 Using the Settings menu ...33 Saving settings ...35 Learning about the software 37 Using the printer software...37 Using the Lexmark Imaging Studio...37 Using the Solution Center...
... printer for wireless printing 15 Setting up the printer using a USB cable...17 Installing an optional internal wireless print server 17 Configuring the optional internal wireless print server 19 Installing the printer on additional network computers 19 Wireless networking...20 Networking overview...20 Learning about the printer ...the Scan menu ...30 Using the Photo Card menu ...31 Using the PictBridge menu ...32 Using the Settings menu ...33 Saving settings ...35 Learning about the software 37 Using the printer software...37 Using the Lexmark Imaging Studio...37 Using the Solution Center...
Getting Started
Page 4
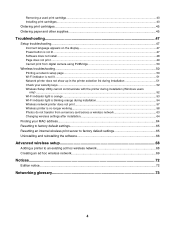
... indicator light is orange ...53 Wi-Fi indicator light is blinking orange during installation 54 Wireless network printer does not print ...57 Wireless printer is no longer working...58 Photos do not transfer from a memory card across a wireless network 63 Changing wireless settings after installation 64 Finding your MAC address...64 Resetting to factory default settings 65...
... indicator light is orange ...53 Wi-Fi indicator light is blinking orange during installation 54 Wireless network printer does not print ...57 Wireless printer is no longer working...58 Photos do not transfer from a memory card across a wireless network 63 Changing wireless settings after installation 64 Finding your MAC address...64 Resetting to factory default settings 65...
Getting Started
Page 5
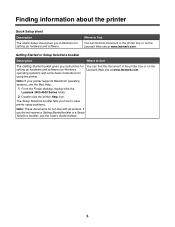
...the Mac Help: 1 From the Finder desktop, double-click the Lexmark 3500-4500 Series folder. 2 Double-click the printer Help icon. You can find The Getting Started booklet gives you instructions for using the printer. Note: If your printer supports Macintosh operating systems, see the User's Guide instead. 5... Solutions booklet Description Where to solve printer setup problems. Note: These documents do not ship with all printers. The Setup Solutions booklet tells you how to find this document in the printer box or on the Lexmark Web site at www.lexmark.com. Where to find You can...
...the Mac Help: 1 From the Finder desktop, double-click the Lexmark 3500-4500 Series folder. 2 Double-click the printer Help icon. You can find The Getting Started booklet gives you instructions for using the printer. Note: If your printer supports Macintosh operating systems, see the User's Guide instead. 5... Solutions booklet Description Where to solve printer setup problems. Note: These documents do not ship with all printers. The Setup Solutions booklet tells you how to find this document in the printer box or on the Lexmark Web site at www.lexmark.com. Where to find You can...
Getting Started
Page 6
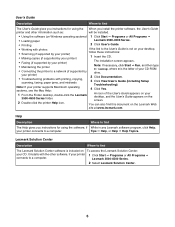
...'s Guide. • Working with photos If the link to the User's Guide is the letter of the User's Guide appears on your desktop, and the User's Guide appears on the Lexmark Web site at www.lexmark.com. Help Description Where to find The User's Guide gives you install the printer software, the User's Guide...
...'s Guide. • Working with photos If the link to the User's Guide is the letter of the User's Guide appears on your desktop, and the User's Guide appears on the Lexmark Web site at www.lexmark.com. Help Description Where to find The User's Guide gives you install the printer software, the User's Guide...
Getting Started
Page 7
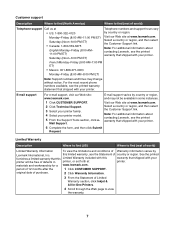
... Warranty Information. 3 From the Statement of Limited Warranty section, click Inkjet & All-In-One Printers. 4 Scroll through the Web page to find (rest of world) Limited Warranty Information To view the limitations and conditions of Warranty information varies by Lexmark International, Inc. For the most recent phone numbers available, see the printed warranty...
... Warranty Information. 3 From the Statement of Limited Warranty section, click Inkjet & All-In-One Printers. 4 Scroll through the Web page to find (rest of world) Limited Warranty Information To view the limitations and conditions of Warranty information varies by Lexmark International, Inc. For the most recent phone numbers available, see the printed warranty...

Getting Started
Page 8
Record the following information (located on the store receipt and the back of the printer), and have it ready when you contact us so that we may serve you faster: • Machine Type number • Serial number • Date purchased • Store where purchased 8
Record the following information (located on the store receipt and the back of the printer), and have it ready when you contact us so that we may serve you faster: • Machine Type number • Serial number • Date purchased • Store where purchased 8
Getting Started
Page 9
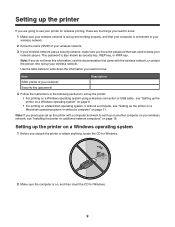
...Security key (password) Description 4 Follow the instructions in the following sections to set up the printer: • For printing on a Windows operating system using a wireless connection or USB cable , see "Setting up the printer on a Windows operating system" on page 9. • For printing on a Macintosh operating ... key. This password is set up your network secure. Setting up the printer If you are going to use your printer for Windows. 9 Note: If you previously set up the printer with the wireless network, or contact the person who set up and working properly, and ...
...Security key (password) Description 4 Follow the instructions in the following sections to set up the printer: • For printing on a Windows operating system using a wireless connection or USB cable , see "Setting up the printer on a Windows operating system" on page 9. • For printing on a Macintosh operating ... key. This password is set up your network secure. Setting up the printer If you are going to use your printer for Windows. 9 Note: If you previously set up the printer with the wireless network, or contact the person who set up and working properly, and ...
Getting Started
Page 10
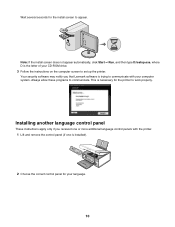
... panels with your computer system. Installing another language control panel These instructions apply only if you that Lexmark software is necessary for the printer to communicate with the printer. 1 Lift and remove the control panel (if one is the letter of your CD-ROM drive. 3 Follow the instructions on the computer screen to communicate... type D:\setup.exe, where D is installed). 2 Choose the correct control panel for the install screen to appear. Always allow these programs to set up the printer. Wait several seconds for your language. 10
... panels with your computer system. Installing another language control panel These instructions apply only if you that Lexmark software is necessary for the printer to communicate with the printer. 1 Lift and remove the control panel (if one is the letter of your CD-ROM drive. 3 Follow the instructions on the computer screen to communicate... type D:\setup.exe, where D is installed). 2 Choose the correct control panel for the install screen to appear. Always allow these programs to set up the printer. Wait several seconds for your language. 10
Getting Started
Page 11
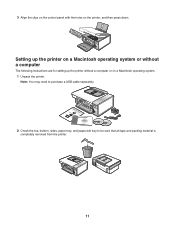
Setting up the printer on a Macintosh operating system or without a computer The following instructions are for setting up the printer without a computer or on the printer, and then press down. Note: You may need to purchase a USB cable separately. 1 2 3 2 Check the top, bottom, sides, paper tray, and paper exit tray to be sure that all tape and packing material is completely removed from the printer. 11 3 Align the clips on the control panel with the holes on a Macintosh operating system. 1 Unpack the printer.
Setting up the printer on a Macintosh operating system or without a computer The following instructions are for setting up the printer without a computer or on the printer, and then press down. Note: You may need to purchase a USB cable separately. 1 2 3 2 Check the top, bottom, sides, paper tray, and paper exit tray to be sure that all tape and packing material is completely removed from the printer. 11 3 Align the clips on the control panel with the holes on a Macintosh operating system. 1 Unpack the printer.
Getting Started
Page 13
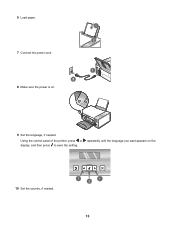
repeatedly until the language you want appears on . 9 Set the language, if needed . 1 1 2 13 6 Load paper. 1 2 7 Connect the power cord. 8 Make sure the power is on the 10 Set the country, if needed . Using the control panel of the printer, press or display, and then press to save the setting.
repeatedly until the language you want appears on . 9 Set the language, if needed . 1 1 2 13 6 Load paper. 1 2 7 Connect the power cord. 8 Make sure the power is on the 10 Set the country, if needed . Using the control panel of the printer, press or display, and then press to save the setting.
Getting Started
Page 14
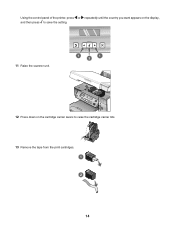
Using the control panel of the printer, press or repeatedly until the country you want appears on the display, and then press to save the setting. 11 Raise the scanner unit. 1 1 2 12 Press down on the cartridge carrier levers to raise the cartridge carrier lids. 13 Remove the tape from the print cartridges. 1 2 14
Using the control panel of the printer, press or repeatedly until the country you want appears on the display, and then press to save the setting. 11 Raise the scanner unit. 1 1 2 12 Press down on the cartridge carrier levers to raise the cartridge carrier lids. 13 Remove the tape from the print cartridges. 1 2 14
Getting Started
Page 15
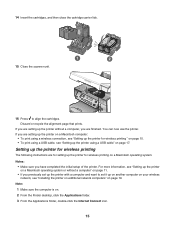
... the Internet Connect icon. 15 Notes: • Make sure you previously set up the printer with a computer and want to align the cartridges. Setting up the printer for wireless printing The following instructions are setting up the printer on a Macintosh computer: • To print using a USB cable" on page 17.... then close the cartridge carrier lids. 15 Close the scanner unit. 16 Press to set it up on another computer on your wireless network, see "Installing the printer on additional network computers" on page 19. Discard or recycle the alignment page that prints. You can now use the...
... the Internet Connect icon. 15 Notes: • Make sure you previously set up the printer with a computer and want to align the cartridges. Setting up the printer for wireless printing The following instructions are setting up the printer on a Macintosh computer: • To print using a USB cable" on page 17.... then close the cartridge carrier lids. 15 Close the scanner unit. 16 Press to set it up on another computer on your wireless network, see "Installing the printer on additional network computers" on page 19. Discard or recycle the alignment page that prints. You can now use the...
Getting Started
Page 16
...For BSS (Basic Service Set) Type, select • Infrastructure if your wireless network uses a wireless access point (wireless router) to communicate with other wireless devices c Select the type of security you are using the WEP type of the printer. • You will be restored when you reconnect to your original ... OS X version 10.3, but is the last six digits of your wireless network. Note: The application is referred to enter the password for Macintosh. 18 From the Finder desktop, double-click the Lexmark 3500-4500 Series Installer icon. 19 Double-click the Install icon. 16...
...For BSS (Basic Service Set) Type, select • Infrastructure if your wireless network uses a wireless access point (wireless router) to communicate with other wireless devices c Select the type of security you are using the WEP type of the printer. • You will be restored when you reconnect to your original ... OS X version 10.3, but is the last six digits of your wireless network. Note: The application is referred to enter the password for Macintosh. 18 From the Finder desktop, double-click the Lexmark 3500-4500 Series Installer icon. 19 Double-click the Install icon. 16...
Getting Started
Page 17
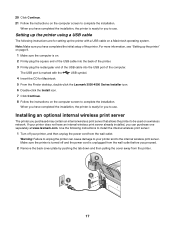
...you have an internal wireless print server already installed, you proceed. 2 Remove the back cover plate by pushing the tab down and then pulling the cover away from the wall outlet. Warning: Failure to unplug the printer can purchase one separately at www.lexmark.com. For more ...information, see "Setting up the printer using a USB cable The following instructions to the internal wireless print server. Use the following instructions are for setting up ...
...you have an internal wireless print server already installed, you proceed. 2 Remove the back cover plate by pushing the tab down and then pulling the cover away from the wall outlet. Warning: Failure to unplug the printer can purchase one separately at www.lexmark.com. For more ...information, see "Setting up the printer using a USB cable The following instructions to the internal wireless print server. Use the following instructions are for setting up ...

Getting Started
Page 18
... server. 4 Align the edges of the printer. c Follow the prompts on your wireless network. • If you purchased the optional internal wireless print server separately and have already installed the printer: a Click Start Œ Programs or All Programs Œ Lexmark 3500-4500 Series. b Click Wireless Setup. 3 Unpack the internal wireless print server. Save the packaging materials. Warning...
... server. 4 Align the edges of the printer. c Follow the prompts on your wireless network. • If you purchased the optional internal wireless print server separately and have already installed the printer: a Click Start Œ Programs or All Programs Œ Lexmark 3500-4500 Series. b Click Wireless Setup. 3 Unpack the internal wireless print server. Save the packaging materials. Warning...
Getting Started
Page 19
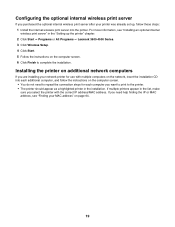
... the instructions on page 64. 19 Configuring the optional internal wireless print server If you purchased the optional internal wireless print server after your printer was already set up the printer" chapter. 2 Click Start ΠPrograms or All Programs ΠLexmark 3500-4500 Series. 3 Click Wireless Setup. 4 Click Start. 5 Follow the instructions on the computer screen...
... the instructions on page 64. 19 Configuring the optional internal wireless print server If you purchased the optional internal wireless print server after your printer was already set up the printer" chapter. 2 Click Start ΠPrograms or All Programs ΠLexmark 3500-4500 Series. 3 Click Wireless Setup. 4 Click Start. 5 Follow the instructions on the computer screen...
Getting Started
Page 20
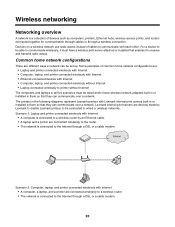
... connected to wired or wireless networks. Scenario 1: Laptop and printer connected wirelessly with Internet • A computer is connected to a wireless router by Lexmark to enable Lexmark printers to be set up. Scenario 2: Computer, laptop, and printer connected wirelessly with Internet • A computer, a laptop, and a printer are : • Laptop and printer connected wirelessly with Internet • Computer, laptop, and printer connected wirelessly with Internet •...
... connected to wired or wireless networks. Scenario 1: Laptop and printer connected wirelessly with Internet • A computer is connected to a wireless router by Lexmark to enable Lexmark printers to be set up. Scenario 2: Computer, laptop, and printer connected wirelessly with Internet • A computer, a laptop, and a printer are : • Laptop and printer connected wirelessly with Internet • Computer, laptop, and printer connected wirelessly with Internet •...
Getting Started
Page 21
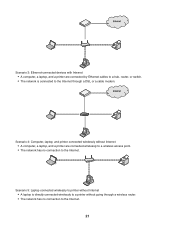
Scenario 3: Ethernet-connected devices with Internet • A computer, a laptop, and a printer are connected wirelessly to a wireless access point. • The network has no connection to the Internet. 21 Scenario 5: Laptop connected wirelessly to the Internet. Scenario 4: Computer, laptop, and printer connected wirelessly without Internet • A computer, a laptop, and a printer are connected by Ethernet cables to a hub, router, or...
Scenario 3: Ethernet-connected devices with Internet • A computer, a laptop, and a printer are connected wirelessly to a wireless access point. • The network has no connection to the Internet. 21 Scenario 5: Laptop connected wirelessly to the Internet. Scenario 4: Computer, laptop, and printer connected wirelessly without Internet • A computer, a laptop, and a printer are connected by Ethernet cables to a hub, router, or...
Getting Started
Page 22
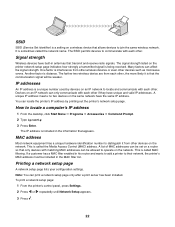
...network have the same IP address. A unique IP address means no two devices on the printer network setup page indicates how strongly a transmitted signal is being received. You can locate the printer's IP address by devices on an IP network to distinguish it is that the communication ...communicate with each other devices such as microwave ovens. If a customer has a MAC filter enabled in the MAC filter list. One factor is interference from other wireless devices or even other . This is called the Media Access Control (MAC) address. Devices on an IP network can be included...
...network have the same IP address. A unique IP address means no two devices on the printer network setup page indicates how strongly a transmitted signal is being received. You can locate the printer's IP address by devices on an IP network to distinguish it is that the communication ...communicate with each other devices such as microwave ovens. If a customer has a MAC filter enabled in the MAC filter list. One factor is interference from other wireless devices or even other . This is called the Media Access Control (MAC) address. Devices on an IP network can be included...
Getting Started
Page 23
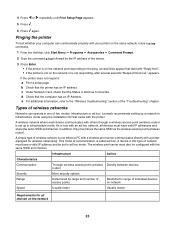
... installation CD that start with "Reply from". • If the printer is not on the network 23 appears. In addition, they must have valid IP addresses and share the same SSID and channel. Lexmark recommends setting up in one where a PC with a wireless print server communicates directly with an ad hoc network, all devices...
... installation CD that start with "Reply from". • If the printer is not on the network 23 appears. In addition, they must have valid IP addresses and share the same SSID and channel. Lexmark recommends setting up in one where a PC with a wireless print server communicates directly with an ad hoc network, all devices...


