User's Guide
Page 4
......50 How do I find out what type of security my network is using 50 Can I use my printer on a USB and a wireless connection at the same time 50 What is a MAC address?...51 How...Loading paper 54 Loading paper...54 Loading various paper types...54 Loading original documents on the scanner glass 58 Using the automatic paper type sensor...59 Printing 60 Printing basic documents...60 ... printed copies...61 Printing the last page first (reverse page order)...62 Printing multiple pages on one sheet (N-Up)...62 Printing documents from a memory card or flash drive 63 Printing specialty documents...
......50 How do I find out what type of security my network is using 50 Can I use my printer on a USB and a wireless connection at the same time 50 What is a MAC address?...51 How...Loading paper 54 Loading paper...54 Loading various paper types...54 Loading original documents on the scanner glass 58 Using the automatic paper type sensor...59 Printing 60 Printing basic documents...60 ... printed copies...61 Printing the last page first (reverse page order)...62 Printing multiple pages on one sheet (N-Up)...62 Printing documents from a memory card or flash drive 63 Printing specialty documents...
User's Guide
Page 6
...fax using the computer...90 Receiving a fax...91 Maintaining the printer 93 Maintaining print cartridges...93 Installing print cartridges...93 Removing a used print cartridge ...94 Refilling print cartridges...95 Using genuine Lexmark print cartridges...95 Aligning print cartridges ...96 Cleaning the print ...cartridge nozzles...96 Checking ink levels...97 Wiping the print cartridge nozzles and contacts ...98 Preserving the print cartridges ...99 Cleaning the scanner glass...99 Cleaning the exterior of the printer...
...fax using the computer...90 Receiving a fax...91 Maintaining the printer 93 Maintaining print cartridges...93 Installing print cartridges...93 Removing a used print cartridge ...94 Refilling print cartridges...95 Using genuine Lexmark print cartridges...95 Aligning print cartridges ...96 Cleaning the print ...cartridge nozzles...96 Checking ink levels...97 Wiping the print cartridge nozzles and contacts ...98 Preserving the print cartridges ...99 Cleaning the scanner glass...99 Cleaning the exterior of the printer...
User's Guide
Page 19
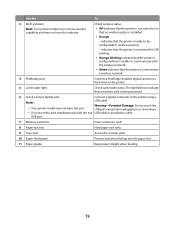
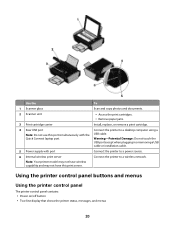
... being accessed. 6 Quick Connect laptop port Connect a laptop computer to the printer. 5 Card reader light Check card reader status. USB port. 7 Memory card slots Insert a memory card. 8 Paper exit tray Hold paper as it exits. 9 Top cover Access the scanner glass. 10 Paper feed guard Prevent items from falling into the paper...
... being accessed. 6 Quick Connect laptop port Connect a laptop computer to the printer. 5 Card reader light Check card reader status. USB port. 7 Memory card slots Insert a memory card. 8 Paper exit tray Hold paper as it exits. 9 Top cover Access the scanner glass. 10 Paper feed guard Prevent items from falling into the paper...
User's Guide
Page 20
... have this port simultaneously with port Connect the printer to a power source. 6 Internal wireless print server Connect the printer to a desktop computer using a Note: Do not use this print server. Quick Connect laptop port. Use the To 1 Scanner glass Scan and copy photos and documents. 2 Scanner unit • Access the print cartridges. • Remove...
... have this port simultaneously with port Connect the printer to a power source. 6 Internal wireless print server Connect the printer to a desktop computer using a Note: Do not use this print server. Quick Connect laptop port. Use the To 1 Scanner glass Scan and copy photos and documents. 2 Scanner unit • Access the print cartridges. • Remove...

User's Guide
Page 58
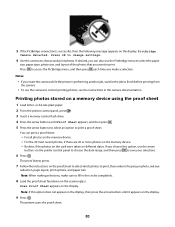
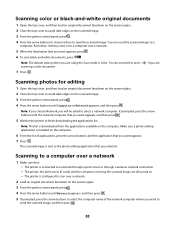
Note: Photos should be loaded as shown. 58 Loading original documents on the scanner glass in the lower right corner. You can scan and then print photos, text documents, magazine articles, newspapers, and other publications. Note: The maximum scan area for the scanner glass is 216 x 297 mm (8.5 x 11.7 in.). 1 Open the top cover. 2 Place the original document or item facedown on the scanner glass You can scan a document for faxing.
Note: Photos should be loaded as shown. 58 Loading original documents on the scanner glass in the lower right corner. You can scan and then print photos, text documents, magazine articles, newspapers, and other publications. Note: The maximum scan area for the scanner glass is 216 x 297 mm (8.5 x 11.7 in.). 1 Open the top cover. 2 Place the original document or item facedown on the scanner glass You can scan a document for faxing.
User's Guide
Page 80
... number of the photos that you make sure to fill in the camera documentation. The printer scans the proof sheet. 80 or A4-size plain paper. 2 From the printer control panel, press . 3 Insert a memory card or flash drive. 4 Press the...on the display. 9 Press . The proof sheets prints. 7 Follow the instructions on the display. Printing photos stored on the printer control panel to choose the date range, and then press to save your selections. 6 Press . If desired, you choose ...photos, see the instructions in the circles completely. 8 Load the proof sheet facedown on the scanner glass.
... number of the photos that you make sure to fill in the camera documentation. The printer scans the proof sheet. 80 or A4-size plain paper. 2 From the printer control panel, press . 3 Insert a memory card or flash drive. 4 Press the...on the display. 9 Press . The proof sheets prints. 7 Follow the instructions on the display. Printing photos stored on the printer control panel to choose the date range, and then press to save your selections. 6 Press . If desired, you choose ...photos, see the instructions in the circles completely. 8 Load the proof sheet facedown on the scanner glass.

User's Guide
Page 82
... the printed surface with the paper.) 2 Place a photo facedown on the list, select Other. Note: The light is not on the scanner glass. 3 From the printer control panel, press . 4 Press until Photo Reprint appears. 5 Press the arrow buttons until Yes appears, and then press . 6 Press... arrow buttons until the desired paper size appears. Enlarging or reducing images 1 Load paper. 2 Load an original document facedown on the scanner glass. 3 From the printer control panel, press . 4 Press until Resize appears. 5 Press the arrow buttons until the setting that came with your desired paper ...
... the printed surface with the paper.) 2 Place a photo facedown on the list, select Other. Note: The light is not on the scanner glass. 3 From the printer control panel, press . 4 Press until Photo Reprint appears. 5 Press the arrow buttons until Yes appears, and then press . 6 Press... arrow buttons until the desired paper size appears. Enlarging or reducing images 1 Load paper. 2 Load an original document facedown on the scanner glass. 3 From the printer control panel, press . 4 Press until Resize appears. 5 Press the arrow buttons until the setting that came with your desired paper ...

User's Guide
Page 83
...Draft, Normal, or Photo, and then press your setting. Adjusting copy quality 1 Load paper. 2 Load an original document facedown on the scanner glass. 3 From the printer control panel, press . 4 Press until Quality appears. 5 Press the arrow buttons to set the copy quality to print a borderless copy ...on the scanner glass. 3 From the printer control panel, press . 4 Press until the setting that you selected. Collating copies using the printer control panel If you print multiple copies of a document, then you can choose to...
...Draft, Normal, or Photo, and then press your setting. Adjusting copy quality 1 Load paper. 2 Load an original document facedown on the scanner glass. 3 From the printer control panel, press . 4 Press until Quality appears. 5 Press the arrow buttons to set the copy quality to print a borderless copy ...on the scanner glass. 3 From the printer control panel, press . 4 Press until the setting that you selected. Collating copies using the printer control panel If you print multiple copies of a document, then you can choose to...

User's Guide
Page 84
.... 11 When prompted if you want to scan another page, press to choose Yes. 84 1 Load paper. 2 Load an original document facedown on the scanner glass. 3 From the printer control panel, press . 4 Press the arrow buttons to select the number of copies, and then press . 5 Press until Collate appears. 6 Press the ... you want to scan another page, press the arrow buttons until No appears, and then press to start printing the copies. Repeating an image on one page You can condense a 20-page document into 5 pages if you want to scan another page, press . 9 Load the next page of the original ...
.... 11 When prompted if you want to scan another page, press to choose Yes. 84 1 Load paper. 2 Load an original document facedown on the scanner glass. 3 From the printer control panel, press . 4 Press the arrow buttons to select the number of copies, and then press . 5 Press until Collate appears. 6 Press the ... you want to scan another page, press the arrow buttons until No appears, and then press to start printing the copies. Repeating an image on one page You can condense a 20-page document into 5 pages if you want to scan another page, press . 9 Load the next page of the original ...

User's Guide
Page 85
8 Load the next page of the original document facedown on the scanner glass, and then press . 9 Repeat steps 7 and 8 until all the pages that you want to copy have been saved to the printer memory. 10 When asked if you want to scan another page, press the arrow buttons until No appears, and then press to turn off the printer. 85 Canceling a copy job 1 Press . Scanning stops and the scanner bar returns to its home position. 2 Press to start printing.
8 Load the next page of the original document facedown on the scanner glass, and then press . 9 Repeat steps 7 and 8 until all the pages that you want to copy have been saved to the printer memory. 10 When asked if you want to scan another page, press the arrow buttons until No appears, and then press to turn off the printer. 85 Canceling a copy job 1 Press . Scanning stops and the scanner bar returns to its home position. 2 Press to start printing.
User's Guide
Page 86
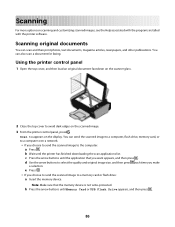
... display. b Wait until Memory Card or USB Flash Drive appears, and then press . 86 Using the printer control panel 1 Open the top cover, and then load an original document facedown on the scanner glass. 2 Close the top cover to a memory card or flash drive: a Insert the memory device....and other publications. Scanning For more options on scanning and customizing scanned images, see the Help associated with the programs installed with the printer software. c Press the arrow buttons until the application that the memory device is not write-protected. Note: Make sure that you choose...
... display. b Wait until Memory Card or USB Flash Drive appears, and then press . 86 Using the printer control panel 1 Open the top cover, and then load an original document facedown on the scanner glass. 2 Close the top cover to a memory card or flash drive: a Insert the memory device....and other publications. Scanning For more options on scanning and customizing scanned images, see the Help associated with the programs installed with the printer software. c Press the arrow buttons until the application that the memory device is not write-protected. Note: Make sure that you choose...
User's Guide
Page 87
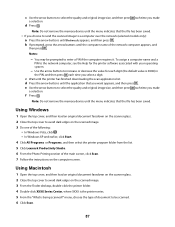
... of the network computer appears, and then press . Using Windows 1 Open the top cover, and then load an original document facedown on the scanner glass. 2 Close the top cover to select the quality and original image size, and then press a selection. each digit (the default value ... dark edges on the scanned image. 3 Do one of the following: • In Windows Vista, click . • In Windows XP and earlier, click Start. 4 Click All Programs or Programs, and then select the printer program folder from the list. 5 Click Lexmark Productivity Studio. 6 From the Photo Printing section ...
... of the network computer appears, and then press . Using Windows 1 Open the top cover, and then load an original document facedown on the scanner glass. 2 Close the top cover to select the quality and original image size, and then press a selection. each digit (the default value ... dark edges on the scanned image. 3 Do one of the following: • In Windows Vista, click . • In Windows XP and earlier, click Start. 4 Click All Programs or Programs, and then select the printer program folder from the list. 5 Click Lexmark Productivity Studio. 6 From the Photo Printing section ...
User's Guide
Page 88
... server (if used), and the computer receiving the scanned image are all turned on. • The printer is configured to scan over a network. 2 Load an original document facedown on the scanner glass. 3 From the printer control panel, press . 4 Press the arrow buttons until Network appears, and then press . 5 If...white original documents 1 Open the top cover, and then load an original document facedown on the scanner glass. 2 Close the top cover to avoid dark edges on the scanned image. 3 From the printer control panel, press . 4 Press the arrow buttons to choose where to avoid dark edges on...
... server (if used), and the computer receiving the scanned image are all turned on. • The printer is configured to scan over a network. 2 Load an original document facedown on the scanner glass. 3 From the printer control panel, press . 4 Press the arrow buttons until Network appears, and then press . 5 If...white original documents 1 Open the top cover, and then load an original document facedown on the scanner glass. 2 Close the top cover to avoid dark edges on the scanned image. 3 From the printer control panel, press . 4 Press the arrow buttons to choose where to avoid dark edges on...
User's Guide
Page 90
... a fax using the computer You can include up to someone using the software. Using Macintosh 1 Load an original document facedown on the scanner glass. 2 Do one of your fax. 13 Click Send. Note: A fax number can scan a document to the computer and then fax it to 64 ...information, and then click Next. 10 If there are installed on . • The Lexmark Fax Solutions and Lexmark Productivity Studio software are any additional documents that you send a fax, make sure: • The printer is connected to a computer with your fax, add these additional programs during initial installation...
... a fax using the computer You can include up to someone using the software. Using Macintosh 1 Load an original document facedown on the scanner glass. 2 Do one of your fax. 13 Click Send. Note: A fax number can scan a document to the computer and then fax it to 64 ...information, and then click Next. 10 If there are installed on . • The Lexmark Fax Solutions and Lexmark Productivity Studio software are any additional documents that you send a fax, make sure: • The printer is connected to a computer with your fax, add these additional programs during initial installation...
User's Guide
Page 94
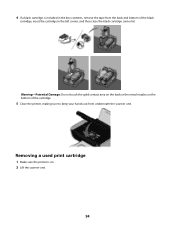
Removing a used print cartridge 1 Make sure the printer is included in the left carrier, and then close the black cartridge carrier lid. 4 If a black cartridge is on the bottom of the cartridge. 5 Close the printer, making sure to keep your hands out from the back and bottom of the black cartridge, insert the cartridge in the box contents, remove the tape from underneath the scanner unit. Warning-Potential Damage: Do not touch the gold contact area on the back or the metal nozzles on . 2 Lift the scanner unit. 94
Removing a used print cartridge 1 Make sure the printer is included in the left carrier, and then close the black cartridge carrier lid. 4 If a black cartridge is on the bottom of the cartridge. 5 Close the printer, making sure to keep your hands out from the back and bottom of the black cartridge, insert the cartridge in the box contents, remove the tape from underneath the scanner unit. Warning-Potential Damage: Do not touch the gold contact area on the back or the metal nozzles on . 2 Lift the scanner unit. 94
User's Guide
Page 99
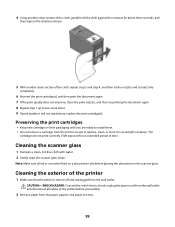
... print quality is turned off and unplugged from the wall outlet and disconnect all ink or corrective fluid on the scanner glass. Cleaning the exterior of the printer 1 Make sure that the printer is still not satisfactory, replace the print cartridge(s). CAUTION-SHOCK HAZARD: To avoid the risk of electric shock, unplug the...
... print quality is turned off and unplugged from the wall outlet and disconnect all ink or corrective fluid on the scanner glass. Cleaning the exterior of the printer 1 Make sure that the printer is still not satisfactory, replace the print cartridge(s). CAUTION-SHOCK HAZARD: To avoid the risk of electric shock, unplug the...

User's Guide
Page 138
..., print aligning 96 cleaning 96 installing 93 ordering 100 preserving 99 removing 94 using genuine Lexmark 95 wiping 98 changing default settings 27 Power Saver timeout 27 temporary settings 27 changing wireless... 83 enlarging an image 82 making a copy lighter or darker 83 multiple page images on one sheet 84 N-up 84 photos 82 reducing an image 82 repeating an image 84 customizing settings...faxing using the software 90 loading on scanner glass 86 loading on the scanner glass 58 making color or black-and-white scan 88 printing 60 scanning using the printer control panel 86 E emission notices 126,...
..., print aligning 96 cleaning 96 installing 93 ordering 100 preserving 99 removing 94 using genuine Lexmark 95 wiping 98 changing default settings 27 Power Saver timeout 27 temporary settings 27 changing wireless... 83 enlarging an image 82 making a copy lighter or darker 83 multiple page images on one sheet 84 N-up 84 photos 82 reducing an image 82 repeating an image 84 customizing settings...faxing using the software 90 loading on scanner glass 86 loading on the scanner glass 58 making color or black-and-white scan 88 printing 60 scanning using the printer control panel 86 E emission notices 126,...

User's Guide
Page 139
...54 transparencies 54 M MAC address 51 MAC address filtering 51 MAC address, finding 51 Mac printer software using 32 Macintosh installing printer on wireless network 36 magazine articles, loading on the scanner glass 58 maintenance menus Settings menu 26 memory card inserting 72 printing documents from 63 printing ...page printing 110 networking finding IP address of computer 52 finding IP address of computer (Mac) 52 finding IP address of printer 52 IP addresses 52 newspapers, loading on the scanner glass 58 noise emission levels 130 notices 126, 127, 128, 129, 130, 131, 132 N-up copies 84 N-up...
...54 transparencies 54 M MAC address 51 MAC address filtering 51 MAC address, finding 51 Mac printer software using 32 Macintosh installing printer on wireless network 36 magazine articles, loading on the scanner glass 58 maintenance menus Settings menu 26 memory card inserting 72 printing documents from 63 printing ...page printing 110 networking finding IP address of computer 52 finding IP address of computer (Mac) 52 finding IP address of printer 52 IP addresses 52 newspapers, loading on the scanner glass 58 noise emission levels 130 notices 126, 127, 128, 129, 130, 131, 132 N-up copies 84 N-up...
User's Guide
Page 140
...support 18 PictBridge port 19 power supply port 20 print cartridge carrier 20 printer control panel 18 scanner glass 20 scanner unit 20 top cover 19 USB port 20 Wi-Fi indicator 18 password...genuine Lexmark 95 wiping 98 print jobs, canceling 70 print jobs, resuming 69 print settings saving and deleting 67 printer setting up without a computer 13 printer cannot connect to wireless network 111 printer control...copies 61 multiple pages on one sheet 62 network setup page 110 photos from digital camera using DPOF 81 photos using printer control panel 76 photos using printer software 77 photos using the...
...support 18 PictBridge port 19 power supply port 20 print cartridge carrier 20 printer control panel 18 scanner glass 20 scanner unit 20 top cover 19 USB port 20 Wi-Fi indicator 18 password...genuine Lexmark 95 wiping 98 print jobs, canceling 70 print jobs, resuming 69 print settings saving and deleting 67 printer setting up without a computer 13 printer cannot connect to wireless network 111 printer control...copies 61 multiple pages on one sheet 62 network setup page 110 photos from digital camera using DPOF 81 photos using printer control panel 76 photos using printer software 77 photos using the...


