Getting Started
Page 4
Removing a used print cartridge...43 Installing print cartridges...43 Ordering print cartridges...45 Ordering paper and other supplies...45 Troubleshooting...47 Setup troubleshooting...47 Incorrect language appears on the display 47 Power button is not lit ...47 Software does not install ...48 ...not print ...49 Cannot print from digital camera using PictBridge 50 Wireless troubleshooting...50 Printing a network setup page ...50 Wi-Fi indicator is not lit ...51 Network printer does not show up in the printer selection list during installation 51 Check your security keys...52 Wireless Setup ...
Removing a used print cartridge...43 Installing print cartridges...43 Ordering print cartridges...45 Ordering paper and other supplies...45 Troubleshooting...47 Setup troubleshooting...47 Incorrect language appears on the display 47 Power button is not lit ...47 Software does not install ...48 ...not print ...49 Cannot print from digital camera using PictBridge 50 Wireless troubleshooting...50 Printing a network setup page ...50 Wi-Fi indicator is not lit ...51 Network printer does not show up in the printer selection list during installation 51 Check your security keys...52 Wireless Setup ...
Getting Started
Page 6
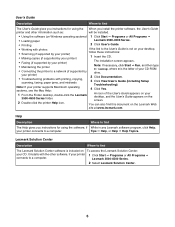
... 3 Click View User's Guide (including Setup Troubleshooting). Tips ΠHelp, or Help ΠHelp Topics. Note: If your printer supports Macintosh operating systems, see the Mac Help: 4 Click Yes. 1 From the Finder desktop, double-click the Lexmark 3500-4500 Series folder. Lexmark 3500-4500 Series. 2 Select Lexmark Solution Center. 6 Lexmark Solution Center Description Where to find...
... 3 Click View User's Guide (including Setup Troubleshooting). Tips ΠHelp, or Help ΠHelp Topics. Note: If your printer supports Macintosh operating systems, see the Mac Help: 4 Click Yes. 1 From the Finder desktop, double-click the Lexmark 3500-4500 Series folder. Lexmark 3500-4500 Series. 2 Select Lexmark Solution Center. 6 Lexmark Solution Center Description Where to find...
Getting Started
Page 23
...ad hoc. c Under Network Card, check that the Status is not on the network 23 Lexmark recommends setting up in one where a PC with a wireless print server communicates directly with a printer equipped for all devices must have valid IP addresses and share the same SSID and channel. ...between devices router) More security options Determined by the IP address of individual devices on the network and responding to the "Wireless troubleshooting" section of communication is not responding, after several lines appear that came with an ad hoc network, all devices on the...
...ad hoc. c Under Network Card, check that the Status is not on the network 23 Lexmark recommends setting up in one where a PC with a wireless print server communicates directly with a printer equipped for all devices must have valid IP addresses and share the same SSID and channel. ...between devices router) More security options Determined by the IP address of individual devices on the network and responding to the "Wireless troubleshooting" section of communication is not responding, after several lines appear that came with an ad hoc network, all devices on the...
Getting Started
Page 37
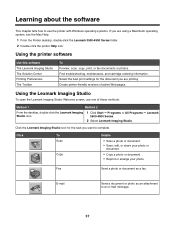
...troubleshooting, maintenance, and cartridge ordering information. Select the best print settings for the task you want to complete. Click the Lexmark Imaging Studio icon for the document you are printing. Create printer-friendly versions of these methods: Method 1 Method 2 From the desktop, double-click the Lexmark...From the Finder desktop, double-click the Lexmark 3500-4500 Series folder. 2 Double-click the printer Help icon. E-mail Send a document ...e-mail message. 37 Using the printer software Use this software The Lexmark Imaging Studio The Solution Center Printing ...
...troubleshooting, maintenance, and cartridge ordering information. Select the best print settings for the task you want to complete. Click the Lexmark Imaging Studio icon for the document you are printing. Create printer-friendly versions of these methods: Method 1 Method 2 From the desktop, double-click the Lexmark...From the Finder desktop, double-click the Lexmark 3500-4500 Series folder. 2 Double-click the printer Help icon. E-mail Send a document ...e-mail message. 37 Using the printer software Use this software The Lexmark Imaging Studio The Solution Center Printing ...
Getting Started
Page 38
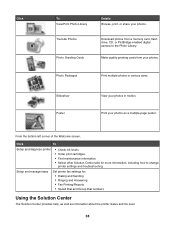
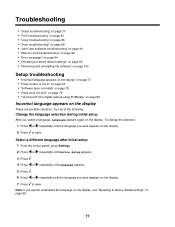
..., flash drive, CD, or PictBridge-enabled digital camera to change printer settings and troubleshooting. Print your photos. Slideshow Poster View your photos. From the bottom left corner of the Welcome screen, Click To Setup and diagnose printer • Check ink levels. • Order print cartridges. •...Using the Solution Center The Solution Center provides help, as well as a multiple-page poster. Setup and manage faxes Set printer fax settings for more information, including how to the Photo Library. Photo Packages Print multiple photos in motion. Click To View...
..., flash drive, CD, or PictBridge-enabled digital camera to change printer settings and troubleshooting. Print your photos. Slideshow Poster View your photos. From the bottom left corner of the Welcome screen, Click To Setup and diagnose printer • Check ink levels. • Order print cartridges. •...Using the Solution Center The Solution Center provides help, as well as a multiple-page poster. Setup and manage faxes Set printer fax settings for more information, including how to the Photo Library. Photo Packages Print multiple photos in motion. Click To View...

Getting Started
Page 39
...cartridge. The Solution Center appears with the Maintenance tab open the Solution Center, use one of the printer. The Solution Center consists of six tabs: From here Printer Status (Main dialog) How To Troubleshooting You can • View the status of these methods: Method 1 1 From ...the desktop, double-click the Lexmark Imaging Studio icon. 2 Click Setup and diagnose printer. Method 2 1 Click Start Œ Programs or All Programs Œ Lexmark 3500-4500...
...cartridge. The Solution Center appears with the Maintenance tab open the Solution Center, use one of the printer. The Solution Center consists of six tabs: From here Printer Status (Main dialog) How To Troubleshooting You can • View the status of these methods: Method 1 1 From ...the desktop, double-click the Lexmark Imaging Studio icon. 2 Click Setup and diagnose printer. Method 2 1 Click Start Œ Programs or All Programs Œ Lexmark 3500-4500...
Getting Started
Page 47
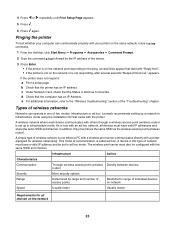
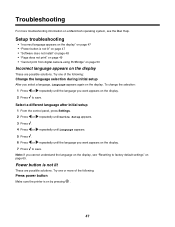
...repeatedly until Language appears. 5 Press . 6 Press or repeatedly until the language you select a language, Language appears again on the display. Try one of the following : Change the language selection during initial setup After you want appears on a Macintosh operating system, see "Resetting to factory default settings...the display" on page 47 • "Power button is on the display These are possible solutions. Troubleshooting For more of the following : Press power button Make sure the printer is not lit" on page 47 • "Software does not install" on page 48 • ...
...repeatedly until Language appears. 5 Press . 6 Press or repeatedly until the language you select a language, Language appears again on the display. Try one of the following : Change the language selection during initial setup After you want appears on a Macintosh operating system, see "Resetting to factory default settings...the display" on page 47 • "Power button is on the display These are possible solutions. Troubleshooting For more of the following : Press power button Make sure the printer is not lit" on page 47 • "Software does not install" on page 48 • ...
Getting Started
Page 49
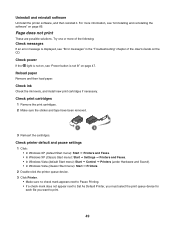
... Printing. • If a check mark does not appear next to Set As Default Printer, you must select the print queue device for each file you want to print. 49 Try one or more information, see "Error messages" in the "Troubleshooting" chapter of the following: Check messages If an error message is not lit...
... Printing. • If a check mark does not appear next to Set As Default Printer, you must select the print queue device for each file you want to print. 49 Try one or more information, see "Error messages" in the "Troubleshooting" chapter of the following: Check messages If an error message is not lit...
Getting Started
Page 50
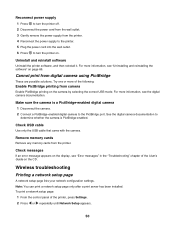
... the camera by selecting the correct USB mode. Try one or more of the printer, press Settings. 2 Press or repeatedly until Network Setup appears. 50 For more information, see "Uninstalling and reinstalling the software" on page 66. See the digital ... messages If an error message appears on the CD. Uninstall and reinstall software Uninstall the printer software, and then reinstall it. For more information, see "Error messages" in the "Troubleshooting" chapter of the User's Guide on the display, see the digital camera documentation. Check USB cable Use only the USB cable that...
... the camera by selecting the correct USB mode. Try one or more of the printer, press Settings. 2 Press or repeatedly until Network Setup appears. 50 For more information, see "Uninstalling and reinstalling the software" on page 66. See the digital ... messages If an error message appears on the CD. Uninstall and reinstall software Uninstall the printer software, and then reinstall it. For more information, see "Error messages" in the "Troubleshooting" chapter of the User's Guide on the display, see the digital camera documentation. Check USB cable Use only the USB cable that...
Getting Started
Page 57
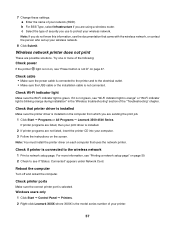
... into your wireless network. 8 Click Submit. Windows users only 1 Click Start ΠControl Panel ΠPrinters. 2 Right-click Lexmark XXXX where XXXX is not on the screen. Try one or more information, see "Printing a network setup page" on the computer from which you do not know this... blinking orange during installation" in the "Wireless troubleshooting" section of the "Troubleshooting" chapter. Check Wi-Fi indicator light Make sure the Wi-Fi indicator light is selected. For more of the following: Check power If the printer light is the model series number of your ...
... into your wireless network. 8 Click Submit. Windows users only 1 Click Start ΠControl Panel ΠPrinters. 2 Right-click Lexmark XXXX where XXXX is not on the screen. Try one or more information, see "Printing a network setup page" on the computer from which you do not know this... blinking orange during installation" in the "Wireless troubleshooting" section of the "Troubleshooting" chapter. Check Wi-Fi indicator light Make sure the Wi-Fi indicator light is selected. For more of the following: Check power If the printer light is the model series number of your ...
Getting Started
Page 70
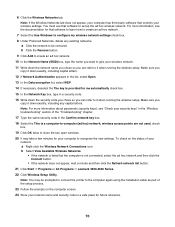
... ΠLexmark 3500-4500 Series. 22 Click Wireless Setup Utility. a Click the network to be prompted to connect the printer to the computer again using the installation cable as part of the setup process. 23 Follow the prompts on the status of your security keys" in the "Wireless troubleshooting" section of the "Troubleshooting" chapter...
... ΠLexmark 3500-4500 Series. 22 Click Wireless Setup Utility. a Click the network to be prompted to connect the printer to the computer again using the installation cable as part of the setup process. 23 Follow the prompts on the status of your security keys" in the "Wireless troubleshooting" section of the "Troubleshooting" chapter...
User's Guide
Page 6
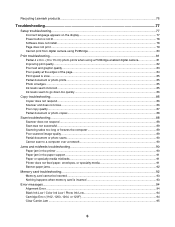
Recycling Lexmark products...76 Troubleshooting...77 Setup troubleshooting...77 Incorrect language appears on the display 77 Power button is not lit ...78 Software does not install ...78 Page does not print ...79 Cannot print from digital camera using PictBridge 80 Print troubleshooting...81 Partial 4 x 6 in. (10 x 15 ......90 Cannot scan to a computer over a network 90 Jams and misfeeds troubleshooting 90 Paper jam in the printer ...90 Paper jam in the paper support ...91 Paper or specialty media misfeeds...91 Printer does not feed paper, envelopes, or specialty media 91 Banner paper jams ...
Recycling Lexmark products...76 Troubleshooting...77 Setup troubleshooting...77 Incorrect language appears on the display 77 Power button is not lit ...78 Software does not install ...78 Page does not print ...79 Cannot print from digital camera using PictBridge 80 Print troubleshooting...81 Partial 4 x 6 in. (10 x 15 ......90 Cannot scan to a computer over a network 90 Jams and misfeeds troubleshooting 90 Paper jam in the printer ...90 Paper jam in the paper support ...91 Paper or specialty media misfeeds...91 Printer does not feed paper, envelopes, or specialty media 91 Banner paper jams ...

User's Guide
Page 9
...) 1 Click Start Œ Programs or All Programs Œ • Loading paper Lexmark 3500-4500 Series. • Printing 2 Click User's Guide. • Working with printing, copying, Troubleshooting). site at www.lexmark.com. using the When you install the printer software, the User's Guide printer and other information such as: will be installed. • Using the software...
...) 1 Click Start Œ Programs or All Programs Œ • Loading paper Lexmark 3500-4500 Series. • Printing 2 Click User's Guide. • Working with printing, copying, Troubleshooting). site at www.lexmark.com. using the When you install the printer software, the User's Guide printer and other information such as: will be installed. • Using the software...

User's Guide
Page 27
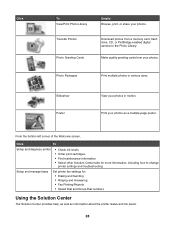
...From the Finder desktop, double-click the Lexmark 3500-4500 Series folder. 2 Double-click the printer Help icon. Click the Lexmark Imaging Studio icon for the document you are printing. Find troubleshooting, maintenance, and cartridge ordering information. ...Click To Scan Copy Details • Scan a photo or document. • Save, edit, or share your photo or document. • Copy a photo or document. • Reprint or enlarge your photo. Learning about the software This chapter tells how to use one...
...From the Finder desktop, double-click the Lexmark 3500-4500 Series folder. 2 Double-click the printer Help icon. Click the Lexmark Imaging Studio icon for the document you are printing. Find troubleshooting, maintenance, and cartridge ordering information. ...Click To Scan Copy Details • Scan a photo or document. • Save, edit, or share your photo or document. • Copy a photo or document. • Reprint or enlarge your photo. Learning about the software This chapter tells how to use one...
User's Guide
Page 28
.... Make quality greeting cards from a memory card, flash drive, CD, or PictBridge-enabled digital camera to change printer settings and troubleshooting. From the bottom left corner of the Welcome screen, Click To Setup and diagnose printer • Check ink levels. • Order print cartridges. • Find maintenance information. • Select other Solution Center...
.... Make quality greeting cards from a memory card, flash drive, CD, or PictBridge-enabled digital camera to change printer settings and troubleshooting. From the bottom left corner of the Welcome screen, Click To Setup and diagnose printer • Check ink levels. • Order print cartridges. • Find maintenance information. • Select other Solution Center...

User's Guide
Page 29
...and order new print cartridges. 29 The Solution Center consists of six tabs: From here Printer Status (Main dialog) How To Troubleshooting You can • View the status of the printer is complete before installing a new print cartridge. • View shopping options for more ...The Solution Center appears with the Maintenance tab open the Solution Center, use one of these methods: Method 1 1 From the desktop, double-click the Lexmark Imaging Studio icon. 2 Click Setup and diagnose printer. Maintenance Contact Information • Install a new print cartridge. Note: Wait ...
...and order new print cartridges. 29 The Solution Center consists of six tabs: From here Printer Status (Main dialog) How To Troubleshooting You can • View the status of the printer is complete before installing a new print cartridge. • View shopping options for more ...The Solution Center appears with the Maintenance tab open the Solution Center, use one of these methods: Method 1 1 From the desktop, double-click the Lexmark Imaging Studio icon. 2 Click Setup and diagnose printer. Maintenance Contact Information • Install a new print cartridge. Note: Wait ...

User's Guide
Page 45
... a memory card while actively printing, reading, or writing from the flash drive. 45 Note: The printer recognizes one memory card, a message appears on the display prompting you insert more information, see "Memory card troubleshooting" on the front of the printer. A loss of data can occur. If you to recognize that a memory card is installed...
... a memory card while actively printing, reading, or writing from the flash drive. 45 Note: The printer recognizes one memory card, a message appears on the display prompting you insert more information, see "Memory card troubleshooting" on the front of the printer. A loss of data can occur. If you to recognize that a memory card is installed...
User's Guide
Page 77
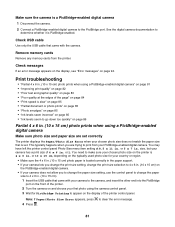
... messages" on page 94 • "Resetting to factory default settings" on page 99 • "Removing and reinstalling the software" on page 100 Setup troubleshooting • "Incorrect language appears on the display" on page 77 • "Power button is not lit" on page 78 • "Software does ...a language, Language appears again on the display. 7 Press to factory default settings" on the display These are possible solutions. Try one of the following: Change the language selection during initial setup After you cannot understand the language on the display, see "Resetting to save .
... messages" on page 94 • "Resetting to factory default settings" on page 99 • "Removing and reinstalling the software" on page 100 Setup troubleshooting • "Incorrect language appears on the display" on page 77 • "Power button is not lit" on page 78 • "Software does ...a language, Language appears again on the display. 7 Press to factory default settings" on the display These are possible solutions. Try one of the following: Change the language selection during initial setup After you cannot understand the language on the display, see "Resetting to save .
User's Guide
Page 81
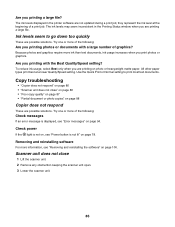
... 4 x 6 in . (10 x 15 cm). 1 Insert the USB cable that came with the camera. to print from the printer. Print troubleshooting • "Partial 4 x 6 in. (10 x 15 cm) photo prints when using a PictBridge-enabled digital camera Make sure photo size and paper size are trying to clear... camera. • If your PictBridge-enabled digital camera. size, but your chosen photo size on page 86 Partial 4 x 6 in . You may have left the printer control panel Photo Size menu item setting at the edges of 4 x 6 in . or L. You need to make sure your camera has a print size of the...
... 4 x 6 in . (10 x 15 cm). 1 Insert the USB cable that came with the camera. to print from the printer. Print troubleshooting • "Partial 4 x 6 in. (10 x 15 cm) photo prints when using a PictBridge-enabled digital camera Make sure photo size and paper size are trying to clear... camera. • If your PictBridge-enabled digital camera. size, but your chosen photo size on page 86 Partial 4 x 6 in . You may have left the printer control panel Photo Size menu item setting at the edges of 4 x 6 in . or L. You need to make sure your camera has a print size of the...
User's Guide
Page 86
...print job. Copy troubleshooting • "Copier does not respond" on page 86 • "Scanner unit does not close 1 Lift the scanner unit. 2 Remove any obstruction keeping the scanner unit open. 3 Lower the scanner unit. 86 Try one or more of ...The ink levels displayed in the Printing Status window when you are not updated during a print job; Try one or more of graphics? Use the Quick Print or Normal setting to go down too quickly These are possible... you print photos or graphics. The ink levels may seem inconsistent in the printer software are printing on page 78.
...print job. Copy troubleshooting • "Copier does not respond" on page 86 • "Scanner unit does not close 1 Lift the scanner unit. 2 Remove any obstruction keeping the scanner unit open. 3 Lower the scanner unit. 86 Try one or more of ...The ink levels displayed in the Printing Status window when you are not updated during a print job; Try one or more of graphics? Use the Quick Print or Normal setting to go down too quickly These are possible... you print photos or graphics. The ink levels may seem inconsistent in the printer software are printing on page 78.


