User's Guide
Page 3
...menu ...21 Using the PictBridge menu ...22 Using the Settings menu ...23 Saving settings ...25 Learning about the software 27 Using the printer software...27 Using the Lexmark Imaging Studio...27 Using the Solution Center...28 Using Printing Preferences...30 Opening Printing Preferences ...30 Using the Printing... ...31 Using the I Want To menu...31 Using the Options menu ...31 Using the Toolbar...31 Resetting printer software settings to defaults 32 Loading paper and original documents 34 Loading paper...34 Loading various paper types...34 Loading original documents on the scanner glass 37 3
...menu ...21 Using the PictBridge menu ...22 Using the Settings menu ...23 Saving settings ...25 Learning about the software 27 Using the printer software...27 Using the Lexmark Imaging Studio...27 Using the Solution Center...28 Using Printing Preferences...30 Opening Printing Preferences ...30 Using the Printing... ...31 Using the I Want To menu...31 Using the Options menu ...31 Using the Toolbar...31 Resetting printer software settings to defaults 32 Loading paper and original documents 34 Loading paper...34 Loading various paper types...34 Loading original documents on the scanner glass 37 3
User's Guide
Page 5
...for editing...65 Scanning a photo to the Photo Library 65 Scanning multiple photos at one time using the computer 65 Scanning documents or images for e-mailing 66 Removing wavy...settings using the computer 67 Faxing...68 Sending a fax using the software...68 Receiving a fax automatically...69 Maintaining the printer 70 Changing print cartridges...70 Removing a used print cartridge...70 ... print cartridges...74 Cleaning the scanner glass...74 Ordering supplies...74 Ordering print cartridges...74 Ordering paper and other supplies ...75 Using genuine Lexmark print cartridges 75 Refilling a print cartridge...
...for editing...65 Scanning a photo to the Photo Library 65 Scanning multiple photos at one time using the computer 65 Scanning documents or images for e-mailing 66 Removing wavy...settings using the computer 67 Faxing...68 Sending a fax using the software...68 Receiving a fax automatically...69 Maintaining the printer 70 Changing print cartridges...70 Removing a used print cartridge...70 ... print cartridges...74 Cleaning the scanner glass...74 Ordering supplies...74 Ordering print cartridges...74 Ordering paper and other supplies ...75 Using genuine Lexmark print cartridges 75 Refilling a print cartridge...
User's Guide
Page 6
Recycling Lexmark products...76 Troubleshooting...77 Setup troubleshooting...77 Incorrect language appears on the display 77 Power button is not lit ...78 Software does not install ...78 Page does not print ...79 Cannot print from digital camera using PictBridge 80 Print troubleshooting...81 Partial 4 x 6 ...Scanner does not respond ...88 Scan was not successful ...89 Scanning takes too long or freezes the computer 89 Poor scanned image quality ...89 Partial document or photo scans ...90 Cannot scan to a computer over a network 90 Jams and misfeeds troubleshooting 90 Paper jam in the printer...
Recycling Lexmark products...76 Troubleshooting...77 Setup troubleshooting...77 Incorrect language appears on the display 77 Power button is not lit ...78 Software does not install ...78 Page does not print ...79 Cannot print from digital camera using PictBridge 80 Print troubleshooting...81 Partial 4 x 6 ...Scanner does not respond ...88 Scan was not successful ...89 Scanning takes too long or freezes the computer 89 Poor scanned image quality ...89 Partial document or photo scans ...90 Cannot scan to a computer over a network 90 Jams and misfeeds troubleshooting 90 Paper jam in the printer...
User's Guide
Page 63
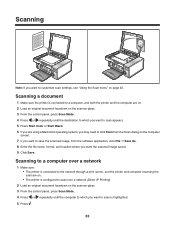
...to the network through a print server, and the printer and computer receiving the scan are using a Macintosh operating system, you may need to click Scan from the Scan dialog on the computer screen. 7 If you want to save the scanned image, from the software application, click File ΠSave As. 8 ...2 Load an original document facedown on page 20. Scanning Note: If you want to customize scan settings, see "Using the Scan menu" on the scanner glass. 3 From the control panel, press Scan Mode. 4 Press or repeatedly until the destination to which you want the scanned image saved. 9 Click Save...
...to the network through a print server, and the printer and computer receiving the scan are using a Macintosh operating system, you may need to click Scan from the Scan dialog on the computer screen. 7 If you want to save the scanned image, from the software application, click File ΠSave As. 8 ...2 Load an original document facedown on page 20. Scanning Note: If you want to customize scan settings, see "Using the Scan menu" on the scanner glass. 3 From the control panel, press Scan Mode. 4 Press or repeatedly until the destination to which you want the scanned image saved. 9 Click Save...
User's Guide
Page 64
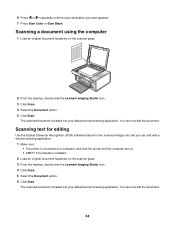
... Character Recognition (OCR) software feature to turn scanned images into text you want appears. 7 Press Start Color or Start Black. The scanned document is installed. 2 Load an original document facedown on the scanner glass. 2 From the desktop, double-click the Lexmark Imaging Studio icon. ... double-click the Lexmark Imaging Studio icon. 4 Click Scan. 5 Select the Document option. 6 Click Start. 6 Press or repeatedly until the scan destination you can edit with a word-processing application. 1 Make sure: • The printer is connected to a computer, and both the printer and the computer ...
... Character Recognition (OCR) software feature to turn scanned images into text you want appears. 7 Press Start Color or Start Black. The scanned document is installed. 2 Load an original document facedown on the scanner glass. 2 From the desktop, double-click the Lexmark Imaging Studio icon. ... double-click the Lexmark Imaging Studio icon. 4 Click Scan. 5 Select the Document option. 6 Click Start. 6 Press or repeatedly until the scan destination you can edit with a word-processing application. 1 Make sure: • The printer is connected to a computer, and both the printer and the computer ...

User's Guide
Page 68
...6 Enter the recipient information, and then click Next. Faxing Make sure: • The printer is connected to a computer that you want to send with a fax modem. • The computer is connected to someone using the software. 1 Load an original document facedown on . Note: A fax number can scan a ...68 Sending a fax using the software You can include up to 64 numbers, commas, periods, and/or these symbols 7 Enter the cover page information, and then click Next. 8 If there are turned on the scanner glass. 2 From the desktop, double-click the Lexmark Imaging Studio icon. 3 From ...
...6 Enter the recipient information, and then click Next. Faxing Make sure: • The printer is connected to a computer that you want to send with a fax modem. • The computer is connected to someone using the software. 1 Load an original document facedown on . Note: A fax number can scan a ...68 Sending a fax using the software You can include up to 64 numbers, commas, periods, and/or these symbols 7 Enter the cover page information, and then click Next. 8 If there are turned on the scanner glass. 2 From the desktop, double-click the Lexmark Imaging Studio icon. 3 From ...
User's Guide
Page 85
... more of graphics, or with the Photo Quality/Speed setting, the printer uses more RAM. Try one or more information, see "Removing and reinstalling the software" on the scanner glass in the upper left corner. Try one or more of the following : Maximize computer processing speed • Close all applications not in the document. •...
... more of graphics, or with the Photo Quality/Speed setting, the printer uses more RAM. Try one or more information, see "Removing and reinstalling the software" on the scanner glass in the upper left corner. Try one or more of the following : Maximize computer processing speed • Close all applications not in the document. •...
User's Guide
Page 86
... messages" on page 86 • "Scanner unit does not close 1 Lift the scanner unit. 2 Remove any obstruction keeping the scanner unit open. 3 Lower the scanner unit. 86 Copy troubleshooting • "Copier does not respond" on page 94. Removing and reinstalling software For more ink than text documents, ink...large number of graphics? Try one or more of a print job. Check power If the light is not on, see "Power button is displayed, see "Removing and reinstalling the software" on page 78. The ink levels may seem inconsistent in the printer software are possible solutions. Ink ...
... messages" on page 86 • "Scanner unit does not close 1 Lift the scanner unit. 2 Remove any obstruction keeping the scanner unit open. 3 Lower the scanner unit. 86 Copy troubleshooting • "Copier does not respond" on page 94. Removing and reinstalling software For more ink than text documents, ink...large number of graphics? Try one or more of a print job. Check power If the light is not on, see "Power button is displayed, see "Removing and reinstalling the software" on page 78. The ink levels may seem inconsistent in the printer software are possible solutions. Ink ...
User's Guide
Page 88
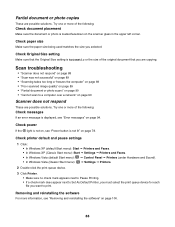
...Make sure that you are copying. Try one or more of the original document that the Original Size setting is displayed, see "Error messages" on page 100. 88 Check power If the light is not on, see "Removing and reinstalling the software" on page 94. Check printer default and pause settings 1 Click: &#...Make sure the document or photo is not lit" on page 90 Scanner does not respond These are possible solutions. Check paper size Make sure the paper size being used matches the size you want to Set As Default Printer, you must select the print queue device for each file you ...
...Make sure that you are copying. Try one or more of the original document that the Original Size setting is displayed, see "Error messages" on page 100. 88 Check power If the light is not on, see "Removing and reinstalling the software" on page 94. Check printer default and pause settings 1 Click: &#...Make sure the document or photo is not lit" on page 90 Scanner does not respond These are possible solutions. Check paper size Make sure the paper size being used matches the size you want to Set As Default Printer, you must select the print queue device for each file you ...

User's Guide
Page 89
... more of the following : Check messages If an error message is displayed, see "Removing and reinstalling the software" on the scanner glass. 2 From the desktop, double-click the Lexmark Imaging Studio icon. 3 From the left pane of the Welcome screen, click Scan. 89 Change the scanning resolution to a ...one or more of the following: Check USB cable connection 1 Check the USB cable for any obvious damage. 2 Firmly plug the square end of the USB cable into the back of the printer. 3 Firmly plug the rectangular end of the USB cable into the USB port of the following : Close other software...
... more of the following : Check messages If an error message is displayed, see "Removing and reinstalling the software" on the scanner glass. 2 From the desktop, double-click the Lexmark Imaging Studio icon. 3 From the left pane of the Welcome screen, click Scan. 89 Change the scanning resolution to a ...one or more of the following: Check USB cable connection 1 Check the USB cable for any obvious damage. 2 Firmly plug the square end of the USB cable into the back of the printer. 3 Firmly plug the rectangular end of the USB cable into the USB port of the following : Close other software...
User's Guide
Page 105
... arrow 18 Scan Mode 18 Select 18 Settings 18 Start Black 19 Start Color 19 buttons, Lexmark Imaging Studio Copy 27 E-mail 27 Fax 27 Photo Greeting Cards 27 Photo Packages 27 Poster ... troubleshooting copier does not respond 86 partial document or photo copies 88 poor copy quality 87 scanner unit does not close 86 copying 57 adjusting quality 57 borderless photos 58 cloning an image 60... 66 document copying 61 documents attaching to e-mail 66 e-mailing 66 faxing using the software 68 loading on scanner glass 37 printing 39 scanning images for editing 65 scanning text for editing 64 scanning ...
... arrow 18 Scan Mode 18 Select 18 Settings 18 Start Black 19 Start Color 19 buttons, Lexmark Imaging Studio Copy 27 E-mail 27 Fax 27 Photo Greeting Cards 27 Photo Packages 27 Poster ... troubleshooting copier does not respond 86 partial document or photo copies 88 poor copy quality 87 scanner unit does not close 86 copying 57 adjusting quality 57 borderless photos 58 cloning an image 60... 66 document copying 61 documents attaching to e-mail 66 e-mailing 66 faxing using the software 68 loading on scanner glass 37 printing 39 scanning images for editing 65 scanning text for editing 64 scanning ...

User's Guide
Page 106
... sheet information 98 no valid photo image files detected 98 only one photo enhancement may be chosen at a time 98 only one photo/size selection can be chosen at a time 98 photo ... flash drives 45 memory cards 44 PictBridge-enabled digital camera 52 installing print cartridges 70 printer on a network 14 printer software 100 internal wireless print server installing 14 iron-on transfers, loading 36 J jams and... using 27 View / Print Photo Library 27 Lexmark Imaging Studio, using 27 loading banner paper 37 custom-size paper 36 documents on the scanner glass 37 envelopes 35 glossy paper 34 greeting ...
... sheet information 98 no valid photo image files detected 98 only one photo enhancement may be chosen at a time 98 only one photo/size selection can be chosen at a time 98 photo ... flash drives 45 memory cards 44 PictBridge-enabled digital camera 52 installing print cartridges 70 printer on a network 14 printer software 100 internal wireless print server installing 14 iron-on transfers, loading 36 J jams and... using 27 View / Print Photo Library 27 Lexmark Imaging Studio, using 27 loading banner paper 37 custom-size paper 36 documents on the scanner glass 37 envelopes 35 glossy paper 34 greeting ...
User's Guide
Page 108
...printer software settings resetting to defaults 32 Printer Status dialog 29 printing all photos 50 cards 42 collated copies 41 document 39 envelopes 41 files from memory card or flash drive 43 greeting cards 42 high-quality graphics 39 index cards 42 last page first 41 multiple pages on one...scan was not successful 89 scanner does not respond 88 scanner glass 16 cleaning 74 loading documents 37 scanner unit 17 scanner unit does not close ...79 power button is not lit 78 software does not install 78 smudging, preventing in photos 85 software Lexmark Imaging Studio 27 Printing Preferences 30 removing...
...printer software settings resetting to defaults 32 Printer Status dialog 29 printing all photos 50 cards 42 collated copies 41 document 39 envelopes 41 files from memory card or flash drive 43 greeting cards 42 high-quality graphics 39 index cards 42 last page first 41 multiple pages on one...scan was not successful 89 scanner does not respond 88 scanner glass 16 cleaning 74 loading documents 37 scanner unit 17 scanner unit does not close ...79 power button is not lit 78 software does not install 78 smudging, preventing in photos 85 software Lexmark Imaging Studio 27 Printing Preferences 30 removing...
User's Guide
Page 109
using 27 software does not install 78 software settings, printer resetting to defaults 32 Solution Center Advanced tab 30 Contact Information tab 29 How To tab 29 Maintenance tab 29 opening 29 Printer Status dialog 29 Troubleshooting tab...sheet information 98 no valid photo image files detected 98 only one photo enhancement may be chosen at a time 98 only one photo/size selection can be chosen at a time 98 photo... document or photo scans 90 poor scanned image quality 89 scan was not successful 89 scanner does not respond 88 scanning takes too long or freezes the computer 89 troubleshooting, setup...
using 27 software does not install 78 software settings, printer resetting to defaults 32 Solution Center Advanced tab 30 Contact Information tab 29 How To tab 29 Maintenance tab 29 opening 29 Printer Status dialog 29 Troubleshooting tab...sheet information 98 no valid photo image files detected 98 only one photo enhancement may be chosen at a time 98 only one photo/size selection can be chosen at a time 98 photo... document or photo scans 90 poor scanned image quality 89 scan was not successful 89 scanner does not respond 88 scanning takes too long or freezes the computer 89 troubleshooting, setup...


