Getting Started
Page 34
... settings" on the CD. • Align Cartridges to align the cartridge. For more information, see "Cleaning the print cartridge nozzles" in your specific printer. - Select: • Language to change the language setting. • Country to set the number of the User's Guide on page 35. &#... the six characters unique to your location. • Clear Settings Timeout to clean the print cartridge nozzles. Reset Network Adapter to view the ink level of paper loaded. Press or to Factory Defaults, which shows the signal strength. - For more information, see "Saving settings" on ...
... settings" on the CD. • Align Cartridges to align the cartridge. For more information, see "Cleaning the print cartridge nozzles" in your specific printer. - Select: • Language to change the language setting. • Country to set the number of the User's Guide on page 35. &#... the six characters unique to your location. • Clear Settings Timeout to clean the print cartridge nozzles. Reset Network Adapter to view the ink level of paper loaded. Press or to Factory Defaults, which shows the signal strength. - For more information, see "Saving settings" on ...
Getting Started
Page 38
...to the Photo Library. Slideshow Poster View your photos. From the bottom left corner of the Welcome screen, Click To Setup and diagnose printer • Check ink levels. • Order print cartridges. • Find maintenance information. • Select other Solution Center tabs for : • .... Make quality greeting cards from a memory card, flash drive, CD, or PictBridge-enabled digital camera to change printer settings and troubleshooting. Print your photos. Photo Packages Print multiple photos in motion. Download photos from your photos as information about the...
...to the Photo Library. Slideshow Poster View your photos. From the bottom left corner of the Welcome screen, Click To Setup and diagnose printer • Check ink levels. • Order print cartridges. • Find maintenance information. • Select other Solution Center tabs for : • .... Make quality greeting cards from a memory card, flash drive, CD, or PictBridge-enabled digital camera to change printer settings and troubleshooting. Print your photos. Photo Packages Print multiple photos in motion. Download photos from your photos as information about the...

Getting Started
Page 39
... Method 1 1 From the desktop, double-click the Lexmark Imaging Studio icon. 2 Click Setup and diagnose printer. Note: Wait until scanning is Busy Printing. • View paper type detected. • View ink levels and order new print cartridges. • Learn how...ink levels and order new print cartridges. • Learn how to : - Print projects such as photos, envelopes, cards, banners, iron-on the World Wide Web. • View ink levels and order new print cartridges. 39 To open . The Solution Center appears with the Maintenance tab open the Solution Center, use one of the printer...
... Method 1 1 From the desktop, double-click the Lexmark Imaging Studio icon. 2 Click Setup and diagnose printer. Note: Wait until scanning is Busy Printing. • View paper type detected. • View ink levels and order new print cartridges. • Learn how...ink levels and order new print cartridges. • Learn how to : - Print projects such as photos, envelopes, cards, banners, iron-on the World Wide Web. • View ink levels and order new print cartridges. 39 To open . The Solution Center appears with the Maintenance tab open the Solution Center, use one of the printer...
Getting Started
Page 40
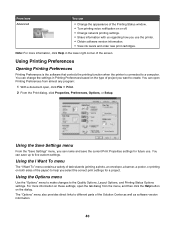
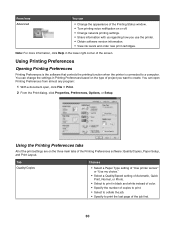
... Options, or Setup. Using Printing Preferences Opening Printing Preferences Printing Preferences is the software that controls the printing function when the printer is connected to the Quality Options, Layout Options, and Printing Status Options settings. Using the Options menu Use the "Options... settings. • Share information with us regarding how you select the correct print settings for future use the printer. • Obtain software version information. • View ink levels and order new print cartridges. Using the I Want To menu The "I Want To" menu contains a...
... Options, or Setup. Using Printing Preferences Opening Printing Preferences Printing Preferences is the software that controls the printing function when the printer is connected to the Quality Options, Layout Options, and Printing Status Options settings. Using the Options menu Use the "Options... settings. • Share information with us regarding how you select the correct print settings for future use the printer. • Obtain software version information. • View ink levels and order new print cartridges. Using the I Want To menu The "I Want To" menu contains a...
Getting Started
Page 49
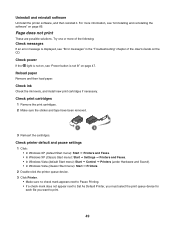
...ink Check the ink levels, and install new print cartridges if necessary. Check printer default and pause settings 1 Click: • In Windows XP (default Start menu): Start Œ Printers...140; Printers (under Hardware and Sound). • In Windows Vista (Classic Start menu): Start Œ Printers. 2 Double-click the printer queue device. 3 Click Printer. •...does not appear next to Set As Default Printer, you must select the print queue device ...are possible solutions. Uninstall and reinstall software Uninstall the printer software, and then reinstall it. Reload paper Remove and...
...ink Check the ink levels, and install new print cartridges if necessary. Check printer default and pause settings 1 Click: • In Windows XP (default Start menu): Start Œ Printers...140; Printers (under Hardware and Sound). • In Windows Vista (Classic Start menu): Start Œ Printers. 2 Double-click the printer queue device. 3 Click Printer. •...does not appear next to Set As Default Printer, you must select the print queue device ...are possible solutions. Uninstall and reinstall software Uninstall the printer software, and then reinstall it. Reload paper Remove and...
Getting Started
Page 72
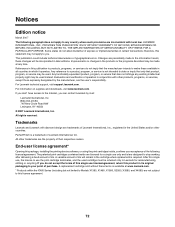
...A PARTICULAR PURPOSE. A variable amount of ink will be made to make these available in all countries in certain transactions; therefore, this license agreement. 72 these terms is available at any time. Changes are periodically made at www.lexmark.com. * Products within the XX80 Series...statement may be incorporated in the cartridge when replacement is required. For Lexmark technical support, visit support.lexmark.com. If you don't have access to stop working after delivering a fixed amount of ink. PerfectFinish is not intended to state or imply that only that ...
...A PARTICULAR PURPOSE. A variable amount of ink will be made to make these available in all countries in certain transactions; therefore, this license agreement. 72 these terms is available at any time. Changes are periodically made at www.lexmark.com. * Products within the XX80 Series...statement may be incorporated in the cartridge when replacement is required. For Lexmark technical support, visit support.lexmark.com. If you don't have access to stop working after delivering a fixed amount of ink. PerfectFinish is not intended to state or imply that only that ...
User's Guide
Page 6
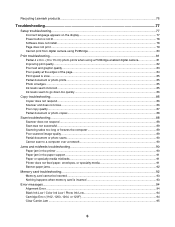
Recycling Lexmark products...76 Troubleshooting...77 Setup troubleshooting...77 Incorrect language ...84 Print speed is slow...85 Partial document or photo prints...85 Photo smudges...85 Ink levels seem incorrect ...85 Ink levels seem to go down too quickly ...86 Copy troubleshooting...86 Copier does not respond...Printer does not feed paper, envelopes, or specialty media 91 Banner paper jams ...92 Memory card troubleshooting...92 Memory card cannot be inserted ...93 Nothing happens when memory card is inserted 93 Error messages...94 Alignment Error...94 Black Ink Low / Color Ink Low / Photo Ink...
Recycling Lexmark products...76 Troubleshooting...77 Setup troubleshooting...77 Incorrect language ...84 Print speed is slow...85 Partial document or photo prints...85 Photo smudges...85 Ink levels seem incorrect ...85 Ink levels seem to go down too quickly ...86 Copy troubleshooting...86 Copier does not respond...Printer does not feed paper, envelopes, or specialty media 91 Banner paper jams ...92 Memory card troubleshooting...92 Memory card cannot be inserted ...93 Nothing happens when memory card is inserted 93 Error messages...94 Alignment Error...94 Black Ink Low / Color Ink Low / Photo Ink...
User's Guide
Page 24
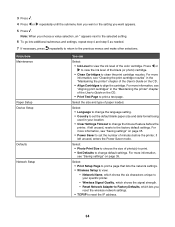
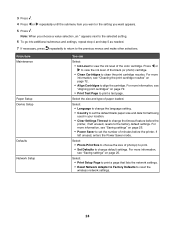
...ink level of the color cartridge. Select the size and type of photo(s) to print. • Set Defaults to align the cartridge. For more information, see "Saving settings" on page 72. • Align Cartridges to change default settings. Select: • Language to change the timeout feature before the printer... selections. For more information, see "Saving settings" on page 72. • Print Test Page to set the number of minutes before the printer, if left unused, enters the Power Saver mode. Note: When you want or the setting you choose a value selection, an * appears ...
...ink level of the color cartridge. Select the size and type of photo(s) to print. • Set Defaults to align the cartridge. For more information, see "Saving settings" on page 72. • Align Cartridges to change default settings. Select: • Language to change the timeout feature before the printer... selections. For more information, see "Saving settings" on page 72. • Print Test Page to set the number of minutes before the printer, if left unused, enters the Power Saver mode. Note: When you want or the setting you choose a value selection, an * appears ...
User's Guide
Page 28
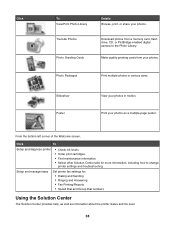
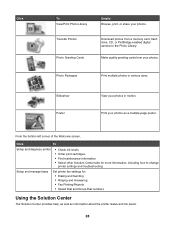
Slideshow Poster View your photos. Print your photos. From the bottom left corner of the Welcome screen, Click To Setup and diagnose printer • Check ink levels. • Order print cartridges. • Find maintenance information. • Select other Solution Center tabs for : • ... Solution Center provides help, as well as a multiple-page poster. Download photos from your photos as information about the printer status and ink levels. 28 Click To View/Print Photo Library Transfer Photos Photo Greeting Cards Details Browse, print, or share your photos...
Slideshow Poster View your photos. Print your photos. From the bottom left corner of the Welcome screen, Click To Setup and diagnose printer • Check ink levels. • Order print cartridges. • Find maintenance information. • Select other Solution Center tabs for : • ... Solution Center provides help, as well as a multiple-page poster. Download photos from your photos as information about the printer status and ink levels. 28 Click To View/Print Photo Library Transfer Photos Photo Greeting Cards Details Browse, print, or share your photos...

User's Guide
Page 29
...methods: Method 1 1 From the desktop, double-click the Lexmark Imaging Studio icon. 2 Click Setup and diagnose printer. To open . Note: Wait until scanning is Busy Printing. • View paper type detected. • View ink levels and order new print cartridges. • Learn how to...status. • Solve printer problems. • View ink levels and order new print cartridges. The Solution Center appears with the Maintenance tab open the Solution Center, use one of the printer. Use basic features. - Method 2 1 Click Start Œ Programs or All Programs Œ Lexmark 3500-4500 Series. 2...
...methods: Method 1 1 From the desktop, double-click the Lexmark Imaging Studio icon. 2 Click Setup and diagnose printer. To open . Note: Wait until scanning is Busy Printing. • View paper type detected. • View ink levels and order new print cartridges. • Learn how to...status. • Solve printer problems. • View ink levels and order new print cartridges. The Solution Center appears with the Maintenance tab open the Solution Center, use one of the printer. Use basic features. - Method 2 1 Click Start Œ Programs or All Programs Œ Lexmark 3500-4500 Series. 2...
User's Guide
Page 30
.... Using the Printing Preferences tabs All of the print settings are on the type of project you use the printer. • Obtain software version information. • View ink levels and order new print cartridges. Tab Quality/Copies Choices • Select a Paper Type setting of "Use...• Select to collate the job. • Specify to a computer. Note: For more information, click Help in Printing Preferences based on the three main tabs of the Printing Status window. • Turn printing voice notification on or off. • Change network printing settings. • Share ...
.... Using the Printing Preferences tabs All of the print settings are on the type of project you use the printer. • Obtain software version information. • View ink levels and order new print cartridges. Tab Quality/Copies Choices • Select a Paper Type setting of "Use...• Select to collate the job. • Specify to a computer. Note: For more information, click Help in Printing Preferences based on the three main tabs of the Printing Status window. • Turn printing voice notification on or off. • Change network printing settings. • Share ...
User's Guide
Page 34
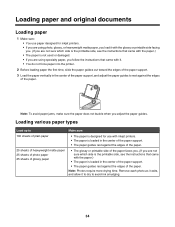
... each photo as it exits, and allow it to dry to avoid ink smudging. 34 Loading various paper types Load up to 100 sheets of ...is the printable side, see the instructions that came with it. • You do not force paper into the printer. 2 Before loading paper the first time, slide the paper guides out toward the edges of the paper support. 3... against the edges of the paper. Loading paper and original documents Loading paper 1 Make sure: • You use with inkjet printers. • The paper is loaded in the center of the paper support. • The paper guides rest against the edges...
... each photo as it exits, and allow it to dry to avoid ink smudging. 34 Loading various paper types Load up to 100 sheets of ...is the printable side, see the instructions that came with it. • You do not force paper into the printer. 2 Before loading paper the first time, slide the paper guides out toward the edges of the paper support. 3... against the edges of the paper. Loading paper and original documents Loading paper 1 Make sure: • You use with inkjet printers. • The paper is loaded in the center of the paper support. • The paper guides rest against the edges...
User's Guide
Page 35
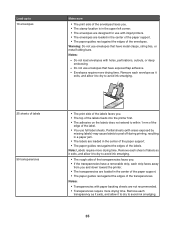
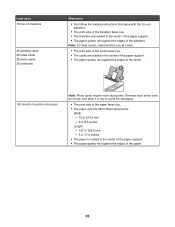
...side of the envelopes faces you. • The stamp location is in the upper left corner. • The envelopes are designed for use with inkjet printers. • The envelopes are loaded in the center of the paper support. • The paper guides rest against the edges of the transparencies. Note...from you . • The top of the labels feeds into the printer first. • The adhesive on the labels does not extend to avoid ink smudging. 1 2 • The print side of the labels faces you and down toward the printer. • The transparencies are loaded in the center of the paper support...
...side of the envelopes faces you. • The stamp location is in the upper left corner. • The envelopes are designed for use with inkjet printers. • The envelopes are loaded in the center of the paper support. • The paper guides rest against the edges of the transparencies. Note...from you . • The top of the labels feeds into the printer first. • The adhesive on the labels does not extend to avoid ink smudging. 1 2 • The print side of the labels faces you and down toward the printer. • The transparencies are loaded in the center of the paper support...
User's Guide
Page 36
... guides rest against the edges of the cards. 100 sheets of custom-size paper Note: Photo cards require more drying time. Load up to avoid ink smudging. • The print side of the paper faces you. • The paper size fits within these dimensions: Width: - 76.2-215.9 mm - 3.0-8.5 inches Length: - 127... loaded in the center of the paper support. • The paper guides rest against the edges of the transfers. Note: For best results, load transfers one at a time. • The print side of the cards faces you. • The cards are loaded in the center of the paper support. • The...
... guides rest against the edges of the cards. 100 sheets of custom-size paper Note: Photo cards require more drying time. Load up to avoid ink smudging. • The print side of the paper faces you. • The paper size fits within these dimensions: Width: - 76.2-215.9 mm - 3.0-8.5 inches Length: - 127... loaded in the center of the paper support. • The paper guides rest against the edges of the transfers. Note: For best results, load transfers one at a time. • The print side of the cards faces you. • The cards are loaded in the center of the paper support. • The...
User's Guide
Page 73
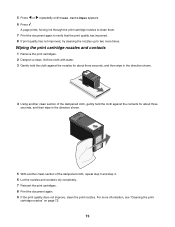
... contacts 1 Remove the print cartridges. 2 Dampen a clean, lint-free cloth with water. 3 Gently hold the cloth against the nozzles for about three seconds, and then wipe in the direction shown. 4 Using another clean section of the dampened cloth, gently hold the cloth against the contacts for... does not improve, clean the print nozzles. For more times. 5 Press or repeatedly until Clean Cartridges appears. 6 Press . A page prints, forcing ink through the print cartridge nozzles to clean them. 7 Print the document again to verify that the print quality has improved. 8 If print quality has not...
... contacts 1 Remove the print cartridges. 2 Dampen a clean, lint-free cloth with water. 3 Gently hold the cloth against the nozzles for about three seconds, and then wipe in the direction shown. 4 Using another clean section of the dampened cloth, gently hold the cloth against the contacts for... does not improve, clean the print nozzles. For more times. 5 Press or repeatedly until Clean Cartridges appears. 6 Press . A page prints, forcing ink through the print cartridge nozzles to clean them. 7 Print the document again to verify that the print quality has improved. 8 If print quality has not...
User's Guide
Page 74
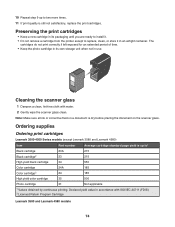
...the scanner glass 1 Dampen a clean, lint-free cloth with ISO/IEC 24711 (FDIS). 2 Licensed Return Program Cartridge Lexmark 3580 and Lexmark 4580 models 74 Note: Make sure all ink or corrective fluid on the scanner glass. Declared yield value in accordance with water. 2 Gently wipe the scanner glass ...-4500 Series models (except Lexmark 3580 and Lexmark 4580) Item Part number Average cartridge standard page yield is dry before placing the document on a document is up to replace, clean, or store it . • Do not remove a cartridge from the printer except to two more times. ...
...the scanner glass 1 Dampen a clean, lint-free cloth with ISO/IEC 24711 (FDIS). 2 Licensed Return Program Cartridge Lexmark 3580 and Lexmark 4580 models 74 Note: Make sure all ink or corrective fluid on the scanner glass. Declared yield value in accordance with water. 2 Gently wipe the scanner glass ...-4500 Series models (except Lexmark 3580 and Lexmark 4580) Item Part number Average cartridge standard page yield is dry before placing the document on a document is up to replace, clean, or store it . • Do not remove a cartridge from the printer except to two more times. ...
User's Guide
Page 76
..., use of a refilled cartridge. Recycling Lexmark products To return Lexmark products to the printer. Refilling a print cartridge The warranty does not cover repair of failures or damage caused by non-Lexmark ink or print cartridges. To prevent the message from appearing again for recycling: 1 Visit our Web site at www.lexmark.com/recycle. 2 Follow the instructions...
..., use of a refilled cartridge. Recycling Lexmark products To return Lexmark products to the printer. Refilling a print cartridge The warranty does not cover repair of failures or damage caused by non-Lexmark ink or print cartridges. To prevent the message from appearing again for recycling: 1 Visit our Web site at www.lexmark.com/recycle. 2 Follow the instructions...
User's Guide
Page 79
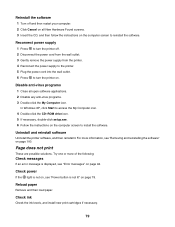
...your computer. 2 Click Cancel on all open software applications. 2 Disable any anti-virus programs. 3 Double-click the My Computer icon. Try one or more information, see "Error messages" on page 94. Disable anti-virus programs 1 Close all New Hardware Found screens. 3 Insert the CD... button is displayed, see "Removing and reinstalling the software" on page 100. Check ink Check the ink levels, and install new print cartridges if necessary. 79 Uninstall and reinstall software Uninstall the printer software, and then reinstall it. Reload paper Remove and then load paper. Page does...
...your computer. 2 Click Cancel on all open software applications. 2 Disable any anti-virus programs. 3 Double-click the My Computer icon. Try one or more information, see "Error messages" on page 94. Disable anti-virus programs 1 Close all New Hardware Found screens. 3 Insert the CD... button is displayed, see "Removing and reinstalling the software" on page 100. Check ink Check the ink levels, and install new print cartridges if necessary. 79 Uninstall and reinstall software Uninstall the printer software, and then reinstall it. Reload paper Remove and then load paper. Page does...
User's Guide
Page 81
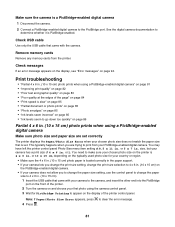
...15 cm). 1 Insert the USB cable that came with the camera. Note: If Paper/Photo Size Error appears, press 4 Press . to print from the printer. Remove memory cards Remove any memory cards from your first photo using a PictBridge-enabled digital camera" on page 81 • "Improving print quality" on page... 82 • "Poor text and graphic quality" on page 85 • "Ink levels seem to the PictBridge port. This typically happens when you to change the paper size setting, use the control panel to change the print...
...15 cm). 1 Insert the USB cable that came with the camera. Note: If Paper/Photo Size Error appears, press 4 Press . to print from the printer. Remove memory cards Remove any memory cards from your first photo using a PictBridge-enabled digital camera" on page 81 • "Improving print quality" on page... 82 • "Poor text and graphic quality" on page 85 • "Ink levels seem to the PictBridge port. This typically happens when you to change the paper size setting, use the control panel to change the print...
User's Guide
Page 83
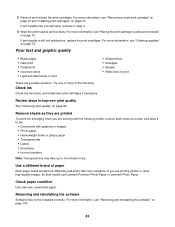
...; Streaks • White lines in print These are printing photos or other high-quality images, for best results use Lexmark Premium Photo Paper or Lexmark Photo Paper. Try one or more information, see "Wiping the print cartridge nozzles and contacts" on page 70. If you are working with ...the following : Check ink Check the ink levels, and install new print cartridges if necessary. Removing and reinstalling the software Software...
...; Streaks • White lines in print These are printing photos or other high-quality images, for best results use Lexmark Premium Photo Paper or Lexmark Photo Paper. Try one or more information, see "Wiping the print cartridge nozzles and contacts" on page 70. If you are working with ...the following : Check ink Check the ink levels, and install new print cartridges if necessary. Removing and reinstalling the software Software...


