Getting Started
Page 27
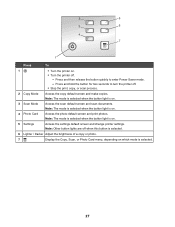
... the button quickly to turn the printer off. • Stop the print, copy, or scan process. 2 Copy Mode Access the copy default screen and make copies. Note: The mode is selected when the button light is on which mode is selected. 6 Lighter / Darker...mode is selected when the button light is on . 5 Settings Access the settings default screen and change printer settings. Note: The mode is selected when the button light is on . 3 Scan Mode Access the scan default screen and scan documents. 2 5 3 6 4 7 1 Press To 1 • Turn the printer on. • Turn the printer...
... the button quickly to turn the printer off. • Stop the print, copy, or scan process. 2 Copy Mode Access the copy default screen and make copies. Note: The mode is selected when the button light is on which mode is selected. 6 Lighter / Darker...mode is selected when the button light is on . 5 Settings Access the settings default screen and change printer settings. Note: The mode is selected when the button light is on . 3 Scan Mode Access the scan default screen and scan documents. 2 5 3 6 4 7 1 Press To 1 • Turn the printer on. • Turn the printer...
Getting Started
Page 29
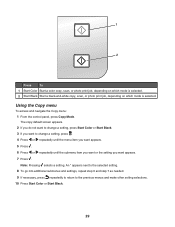
... navigate the Copy menu: 1 From the control panel, press Copy Mode. Press To 1 Start Color Start a color copy, scan, or photo print job, depending on which mode is selected. 2 Start Black Start a black-and-white copy, scan, or photo print job, depending on which mode is selected. Note: Pressing selects a setting. An * appears next to...
... navigate the Copy menu: 1 From the control panel, press Copy Mode. Press To 1 Start Color Start a color copy, scan, or photo print job, depending on which mode is selected. 2 Start Black Start a black-and-white copy, scan, or photo print job, depending on which mode is selected. Note: Pressing selects a setting. An * appears next to...

Getting Started
Page 30
... the percentage for enlarging or reducing the original copy. • Specify a specific copy size. • Create a multiple-page poster. Collate Print one or more copies in the correct order. Original Type* Specify the type of the original document. Original Size* Specify the size of the original document... a page. N-Up* Choose how many copies of a copy. Paper Setup Specify the size and type of a copy. Using the Scan menu To access and navigate the Scan menu: 1 From the control panel, press Scan Mode. Quality* Adjust the quality of an image to print on page 35. The...
... the percentage for enlarging or reducing the original copy. • Specify a specific copy size. • Create a multiple-page poster. Collate Print one or more copies in the correct order. Original Type* Specify the type of the original document. Original Size* Specify the size of the original document... a page. N-Up* Choose how many copies of a copy. Paper Setup Specify the size and type of a copy. Using the Scan menu To access and navigate the Scan menu: 1 From the control panel, press Scan Mode. Quality* Adjust the quality of an image to print on page 35. The...
Getting Started
Page 35
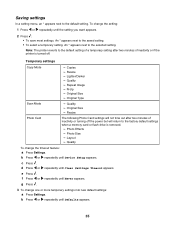
... minutes of inactivity or if the printer is turned off the power but will return to the factory default settings when a memory card or flash drive is removed. - Quality - Original Type Scan Mode - Layout - e Press . ...Lighter/Darker - N-Up - Resize Photo Card The following Photo Card settings will not time out after two minutes of inactivity or turning off . b Press or repeatedly until Device Setup appears. Copies - Resize - f Press or g Press . Note: The printer reverts to the selected setting. Quality - To change one...
... minutes of inactivity or if the printer is turned off the power but will return to the factory default settings when a memory card or flash drive is removed. - Quality - Original Type Scan Mode - Layout - e Press . ...Lighter/Darker - N-Up - Resize Photo Card The following Photo Card settings will not time out after two minutes of inactivity or turning off . b Press or repeatedly until Device Setup appears. Copies - Resize - f Press or g Press . Note: The printer reverts to the selected setting. Quality - To change one...
User's Guide
Page 18
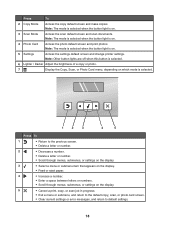
... Lighter / Darker Adjust the brightness of a copy or photo. 7 Display the Copy, Scan, or Photo Card menu, depending on which mode is on the display. 5 • Cancel a print, copy, or scan job in progress. • Exit a menu or submenu, and return to the default copy... Access the settings default screen and change printer settings. Note: The mode is selected when the button light is on . 3 Scan Mode Access the scan default screen and scan documents. Press To 2 Copy Mode Access the copy default screen and make copies. Note: The mode is selected when the button light is ...
... Lighter / Darker Adjust the brightness of a copy or photo. 7 Display the Copy, Scan, or Photo Card menu, depending on which mode is on the display. 5 • Cancel a print, copy, or scan job in progress. • Exit a menu or submenu, and return to the default copy... Access the settings default screen and change printer settings. Note: The mode is selected when the button light is on . 3 Scan Mode Access the scan default screen and scan documents. Press To 2 Copy Mode Access the copy default screen and make copies. Note: The mode is selected when the button light is ...

User's Guide
Page 19
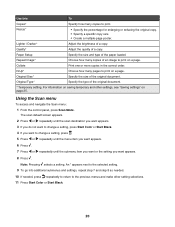
...or Start Black. 19 Press To 1 Start Color Start a color copy, scan, or photo print job, depending on which mode is selected. 2 Start Black Start a black-and-white copy, scan or photo print job, depending on which mode is selected. Using the Copy menu To access and navigate the Copy menu:... 1 From the control panel, press Copy Mode. Note: Pressing selects a setting....
...or Start Black. 19 Press To 1 Start Color Start a color copy, scan, or photo print job, depending on which mode is selected. 2 Start Black Start a black-and-white copy, scan or photo print job, depending on which mode is selected. Using the Copy menu To access and navigate the Copy menu:... 1 From the control panel, press Copy Mode. Note: Pressing selects a setting....
User's Guide
Page 20
Collate Print one or more copies in the correct order. Original Size* Specify the size of the original document. * Temporary setting. Using the Scan menu To access and navigate the Scan menu: 1 From the control panel, press Scan Mode. An * appears next to the selected setting. 9 To go ...Original Type* Specify the type of the original document. Repeat Image* Choose how many copies of a copy. The scan default screen appears. 2 Press or repeatedly until the scan destination you want appears. 3 If you do not want to change a setting, press Start Color or Start Black...
Collate Print one or more copies in the correct order. Original Size* Specify the size of the original document. * Temporary setting. Using the Scan menu To access and navigate the Scan menu: 1 From the control panel, press Scan Mode. An * appears next to the selected setting. 9 To go ...Original Type* Specify the type of the original document. Repeat Image* Choose how many copies of a copy. The scan default screen appears. 2 Press or repeatedly until the scan destination you want appears. 3 If you do not want to change a setting, press Start Color or Start Black...

User's Guide
Page 25
... In a setting menu, an * appears next to the selected setting. Note: The printer reverts to the default setting of a temporary setting after two minutes of inactivity or if the printer is removed. - Temporary settings Copy Mode - Original Type Scan Mode - f Press or g Press . b Press or repeatedly until Clear Settings Timeout appears...8226; To select a temporary setting. repeatedly until Device Setup appears. Original Size - b Press or repeatedly until Never appears. 3 To change one or more temporary settings into new default settings: a Press Settings. Copies -
... In a setting menu, an * appears next to the selected setting. Note: The printer reverts to the default setting of a temporary setting after two minutes of inactivity or if the printer is removed. - Temporary settings Copy Mode - Original Type Scan Mode - f Press or g Press . b Press or repeatedly until Clear Settings Timeout appears...8226; To select a temporary setting. repeatedly until Device Setup appears. Original Size - b Press or repeatedly until Never appears. 3 To change one or more temporary settings into new default settings: a Press Settings. Copies -
User's Guide
Page 63
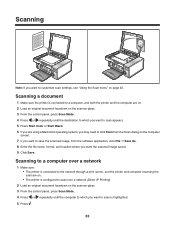
...Scan Mode. 4 Press or repeatedly until the destination to which you want to scan appears. 5 Press Start Color or Start Black. 6 If you are on. • The printer is configured to scan over a network 1 Make sure: • The printer is highlighted. 5 Press . 63 Scanning Note: If you want the scanned image saved. 9 Click Save. Scanning to customize scan... the control panel, press Scan Mode. 4 Press or repeatedly until the computer to which you want to scan is connected to the network through a print server, and the printer and computer receiving the scan are using a Macintosh operating...
...Scan Mode. 4 Press or repeatedly until the destination to which you want to scan appears. 5 Press Start Color or Start Black. 6 If you are on. • The printer is configured to scan over a network 1 Make sure: • The printer is highlighted. 5 Press . 63 Scanning Note: If you want the scanned image saved. 9 Click Save. Scanning to customize scan... the control panel, press Scan Mode. 4 Press or repeatedly until the computer to which you want to scan is connected to the network through a print server, and the printer and computer receiving the scan are using a Macintosh operating...
User's Guide
Page 82
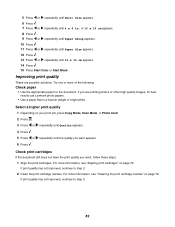
Try one or more information, see "Aligning print cartridges" on page 72. For more information, see "Cleaning the print cartridge nozzles" on your print job, press Copy Mode, Scan Mode, or Photo Card. 2 Press . 3 Press or repeatedly until Quality appears. 4 Press . 5 Press or repeatedly until the quality ... print quality 1 Depending on page 72. For more of the following: Check paper • Use the appropriate paper for best results use Lexmark photo papers. • Use a paper that is a heavier weight or bright white. Check print cartridges If the document still does not ...
Try one or more information, see "Aligning print cartridges" on page 72. For more information, see "Cleaning the print cartridge nozzles" on your print job, press Copy Mode, Scan Mode, or Photo Card. 2 Press . 3 Press or repeatedly until Quality appears. 4 Press . 5 Press or repeatedly until the quality ... print quality 1 Depending on page 72. For more of the following: Check paper • Use the appropriate paper for best results use Lexmark photo papers. • Use a paper that is a heavier weight or bright white. Check print cartridges If the document still does not ...

User's Guide
Page 87
Try one or more of the document or image. Review steps to improve print quality See "Improving print quality" on the scanner glass. 2 From the control panel, press Copy Mode. 3 Press Lighter/Darker. 4 Press or repeatedly to lighten or darken the copy. 5 Press Start Color or Start Black.... error message is loaded facedown on the scanner glass in print These are copying or scanning from photo or glossy paper, a magazine, or a newspaper, see "Error messages" on page 66. If you scanning from scanned photos, magazines, or newspapers" on page 94. Check document placement Make sure the...
Try one or more of the document or image. Review steps to improve print quality See "Improving print quality" on the scanner glass. 2 From the control panel, press Copy Mode. 3 Press Lighter/Darker. 4 Press or repeatedly to lighten or darken the copy. 5 Press Start Color or Start Black.... error message is loaded facedown on the scanner glass in print These are copying or scanning from photo or glossy paper, a magazine, or a newspaper, see "Error messages" on page 66. If you scanning from scanned photos, magazines, or newspapers" on page 94. Check document placement Make sure the...
User's Guide
Page 102
.... CAUTION: A CAUTION identifies something that could cause you have further questions about recycling options, visit the Lexmark Web site at www.lexmark.com for your printer has a wireless network card installed Noise emission levels The following notices are subject to change. CAUTION: This... type of the European Union. Note: Some modes may not apply to your product. 1-meter average sound pressure, dBA Printing 50 Scanning...
.... CAUTION: A CAUTION identifies something that could cause you have further questions about recycling options, visit the Lexmark Web site at www.lexmark.com for your printer has a wireless network card installed Noise emission levels The following notices are subject to change. CAUTION: This... type of the European Union. Note: Some modes may not apply to your product. 1-meter average sound pressure, dBA Printing 50 Scanning...
User's Guide
Page 103
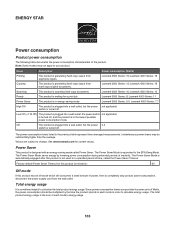
... The product is generating hard-copy output from electronic inputs. Lexmark 3500 Series: 8; Lexmark 4500 Series: 16 Scanning The product is waiting for a print job. Note: Some modes may not apply to your product. Lexmark 4500 Series: 11 Power Saver The product is turned off. Lexmark 4500 Series: 7.7 High Off The product is plugged into a wall...
... The product is generating hard-copy output from electronic inputs. Lexmark 3500 Series: 8; Lexmark 4500 Series: 16 Scanning The product is waiting for a print job. Note: Some modes may not apply to your product. Lexmark 4500 Series: 11 Power Saver The product is turned off. Lexmark 4500 Series: 7.7 High Off The product is plugged into a wall...
User's Guide
Page 105
... box contents 12 buttons, control panel Back 18 Cancel 18 Copy Mode 18 Left arrow 18 Lighter / Darker 18 Menu 18 Photo Card 18 Power 17 Right arrow 18 Scan Mode 18 Select 18 Settings 18 Start Black 19 Start Color 19 buttons, Lexmark Imaging Studio Copy 27 E-mail 27 Fax 27 Photo Greeting... Cards 27 Photo Packages 27 Poster 27 Scan 27 Slideshow 27 Transfer Photos 27 using 27 View / Print...
... box contents 12 buttons, control panel Back 18 Cancel 18 Copy Mode 18 Left arrow 18 Lighter / Darker 18 Menu 18 Photo Card 18 Power 17 Right arrow 18 Scan Mode 18 Select 18 Settings 18 Start Black 19 Start Color 19 buttons, Lexmark Imaging Studio Copy 27 E-mail 27 Fax 27 Photo Greeting... Cards 27 Photo Packages 27 Poster 27 Scan 27 Slideshow 27 Transfer Photos 27 using 27 View / Print...


