Sending a fax using the computer
Page 1
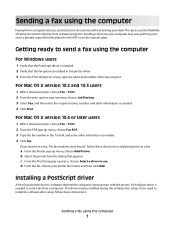
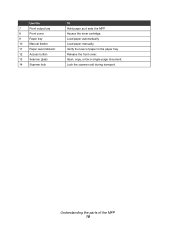
... send a fax from your desk. c From the Print Using pop-up menu, choose Fax PDF. 3 Type the fax number in the ADF or on the scanner glass. Installing a PostScript driver A PostScript printer driver is needed . 4 Click Fax.
... send a fax from your desk. c From the Print Using pop-up menu, choose Fax PDF. 3 Type the fax number in the ADF or on the scanner glass. Installing a PostScript driver A PostScript printer driver is needed . 4 Click Fax.
Clearing Jams Guide
Page 2
Note: To prevent document jams, use the scanner glass rather than the ADF for thick, thin, or a mixed set of the MFP. 2 Remove the jammed paper by gently pulling it straight out. 2 Remove ... then load the documents back into the ADF. 2 Remove the jammed paper by gently pulling it straight out. 3 Insert the paper tray. 290/291/292 Scanner Jam 1 Open the ADF top cover. 3 Close the rear cover. 4 Press Start to resume printing. 241/242 Paper Jam 1 Open the appropriate paper tray. 4 Press...
Note: To prevent document jams, use the scanner glass rather than the ADF for thick, thin, or a mixed set of the MFP. 2 Remove the jammed paper by gently pulling it straight out. 2 Remove ... then load the documents back into the ADF. 2 Remove the jammed paper by gently pulling it straight out. 3 Insert the paper tray. 290/291/292 Scanner Jam 1 Open the ADF top cover. 3 Close the rear cover. 4 Press Start to resume printing. 241/242 Paper Jam 1 Open the appropriate paper tray. 4 Press...

Troubleshooting Guide
Page 4
...Scanner does not respond • Check the display. Call your telephone company to Set As Default. Can receive but not receive faxes • Load paper to be serviced. or Click Start Control Panel Printers and Other Hardware Printers and Faxes. 2 Double-click the Lexmark X340... unsuccessful • Restart the computer. • Remove and reinstall the software. For more information, see whether Fax Forwarding is not on the scanner glass. • Check the Prefix setting. 1 From the control panel, press Fax. 2 Press Menu. 3 Press or repeatedly until Off ...
...Scanner does not respond • Check the display. Call your telephone company to Set As Default. Can receive but not receive faxes • Load paper to be serviced. or Click Start Control Panel Printers and Other Hardware Printers and Faxes. 2 Double-click the Lexmark X340... unsuccessful • Restart the computer. • Remove and reinstall the software. For more information, see whether Fax Forwarding is not on the scanner glass. • Check the Prefix setting. 1 From the control panel, press Fax. 2 Press Menu. 3 Press or repeatedly until Off ...
User's Guide
Page 4
... type and size 35 Using the control panel 35 Using the computer 35 Loading original documents into the ADF 36 Loading original documents on the scanner glass 37 Selecting an output location 38 Chapter 5: Printing 39 Printing a document ...39 Printing an envelope ...39 Printing transparencies 40 Printing collated copies 40 Printing...
... type and size 35 Using the control panel 35 Using the computer 35 Loading original documents into the ADF 36 Loading original documents on the scanner glass 37 Selecting an output location 38 Chapter 5: Printing 39 Printing a document ...39 Printing an envelope ...39 Printing transparencies 40 Printing collated copies 40 Printing...

User's Guide
Page 5
... cartridge 62 Redistributing toner ...63 Replacing the photoconductor 65 Cleaning the MFP ...67 Cleaning the scanner glass 67 Cleaning the outside of the MFP 67 Cleaning the inside of the MFP 68 Ordering supplies ...70 Recycling Lexmark products 70 Chapter 10: Troubleshooting 71 Setup troubleshooting ...72 Removing and reinstalling the drivers software...
... cartridge 62 Redistributing toner ...63 Replacing the photoconductor 65 Cleaning the MFP ...67 Cleaning the scanner glass 67 Cleaning the outside of the MFP 67 Cleaning the inside of the MFP 68 Ordering supplies ...70 Recycling Lexmark products 70 Chapter 10: Troubleshooting 71 Setup troubleshooting ...72 Removing and reinstalling the drivers software...
User's Guide
Page 17
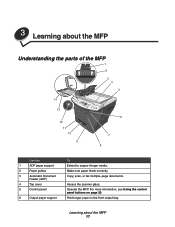
Access the scanner glass. For more information, see Using the control panel buttons on page 20. Learning about the MFP Understanding the parts of the MFP 1 2 3 4 5 14 13 12 11 10 9 6 7 8 Use the 1 ADF paper support 2 Paper guides 3 Automatic Document Feeder (ADF) 4 Top cover 5 Control panel 6 Output paper support To Extend to support longer media. 3 Learning about the MFP 17 Make sure paper feeds correctly. Hold longer paper in the front output tray. Copy, scan, or fax multiple-page documents. Operate the MFP.
Access the scanner glass. For more information, see Using the control panel buttons on page 20. Learning about the MFP Understanding the parts of the MFP 1 2 3 4 5 14 13 12 11 10 9 6 7 8 Use the 1 ADF paper support 2 Paper guides 3 Automatic Document Feeder (ADF) 4 Top cover 5 Control panel 6 Output paper support To Extend to support longer media. 3 Learning about the MFP 17 Make sure paper feeds correctly. Hold longer paper in the front output tray. Copy, scan, or fax multiple-page documents. Operate the MFP.
User's Guide
Page 18
Load paper manually. Lock the scanner unit during transport. Load paper automatically. Verify the level of the MFP 18 Understanding the parts of paper in the paper tray. Release the front cover. Use the 7 Front output tray 8 Front cover 9 Paper tray 10 Manual feeder 11 Paper level indicator 12 Access button 13 Scanner glass 14 Scanner lock To Hold paper as it exits the MFP. Scan, copy, or fax a single-page document. Access the toner cartridge.
Load paper manually. Lock the scanner unit during transport. Load paper automatically. Verify the level of the MFP 18 Understanding the parts of paper in the paper tray. Release the front cover. Use the 7 Front output tray 8 Front cover 9 Paper tray 10 Manual feeder 11 Paper level indicator 12 Access button 13 Scanner glass 14 Scanner lock To Hold paper as it exits the MFP. Scan, copy, or fax a single-page document. Access the toner cartridge.

User's Guide
Page 36
Loading original documents into the ADF You can load up into the ADF. For more information, see Loading original documents on the scanner glass on the ADF against the edges of an original document into the ADF for scanning, copying, and faxing. • Remove staples and paper clips ... documents that are damaged or folded. Loading original documents into the ADF. If this occurs, use the scanner glass. Note: If longer paper is used, extend the ADF paper support. Place these items on the scanner glass. 2 Adjust the paper guides on page 37. 1 Load an original document face-up to 50...
Loading original documents into the ADF You can load up into the ADF. For more information, see Loading original documents on the scanner glass on the ADF against the edges of an original document into the ADF for scanning, copying, and faxing. • Remove staples and paper clips ... documents that are damaged or folded. Loading original documents into the ADF. If this occurs, use the scanner glass. Note: If longer paper is used, extend the ADF paper support. Place these items on the scanner glass. 2 Adjust the paper guides on page 37. 1 Load an original document face-up to 50...

User's Guide
Page 37
Loading original documents on the scanner glass 37 Loading original documents on the scanner glass You can scan, copy, and fax photos, text documents, magazine articles, newspapers, and other publications. Note: Place postcards, 4 x 6 cards, small items, or thin media (such as magazine clippings or carbonless paper) on the scanner glass. 1 Open the top cover. 2 Place the document face-down on the scanner glass in the upper left corner.
Loading original documents on the scanner glass 37 Loading original documents on the scanner glass You can scan, copy, and fax photos, text documents, magazine articles, newspapers, and other publications. Note: Place postcards, 4 x 6 cards, small items, or thin media (such as magazine clippings or carbonless paper) on the scanner glass. 1 Open the top cover. 2 Place the document face-down on the scanner glass in the upper left corner.

User's Guide
Page 42
Note: Do not load postcards, 4 x 6 cards, small items, or thin media (such as magazine clippings or carbonless paper). Place these items on the scanner glass. Faxing 42 6 Faxing You can load an original document into the ADF. Use the scanner glass for multiple-page documents. ADF Scanner glass Use the ADF for single-page documents, postcards, 4 x 6 cards, small items, or thin media (such as magazine clippings or carbonless paper) into the ADF or on the scanner glass.
Note: Do not load postcards, 4 x 6 cards, small items, or thin media (such as magazine clippings or carbonless paper). Place these items on the scanner glass. Faxing 42 6 Faxing You can load an original document into the ADF. Use the scanner glass for multiple-page documents. ADF Scanner glass Use the ADF for single-page documents, postcards, 4 x 6 cards, small items, or thin media (such as magazine clippings or carbonless paper) into the ADF or on the scanner glass.

User's Guide
Page 43
... Make sure the MFP is connected to an active, analog telephone line. Sending a fax 43 Place these items on the scanner glass. 3 From the control panel, press Fax. 4 Enter a fax number, press Speed Dial 1, 2, 3, 4, ...sure the MFP is on. 2 Load an original document face-up into the ADF or face-down on the scanner glass. Sending a fax automatically 1 Make sure the MFP is on. 2 Load an original document face-up... If you have a Speed Dial list but want to create one, see Using the Phone Book on the scanner glass. 3 From the control panel, press Fax. 4 Press to select a number. Note: • ...
... Make sure the MFP is connected to an active, analog telephone line. Sending a fax 43 Place these items on the scanner glass. 3 From the control panel, press Fax. 4 Enter a fax number, press Speed Dial 1, 2, 3, 4, ...sure the MFP is on. 2 Load an original document face-up into the ADF or face-down on the scanner glass. Sending a fax automatically 1 Make sure the MFP is on. 2 Load an original document face-up... If you have a Speed Dial list but want to create one, see Using the Phone Book on the scanner glass. 3 From the control panel, press Fax. 4 Press to select a number. Note: • ...

User's Guide
Page 44
...Speed Dial 1, 2, 3, 4, or 5, or press Phone Book to as many as 8 people at a later time. 1 Load an original document into the ADF or on the scanner glass. 2 From the control panel, press Fax. 3 Under Fax, press Options. 4 Press or repeatedly until Delay send appears, and then press . 5 Press . Note: &#... shortcuts on page 47. • If you do not have a Phone Book list but want to create one, see Using the Phone Book on the scanner glass. 2 From the control panel, press Fax. 3 Under Fax, press Options. 4 Press or repeatedly until Broadcast appears, and then press . 5 Press . 6 Enter a fax...
...Speed Dial 1, 2, 3, 4, or 5, or press Phone Book to as many as 8 people at a later time. 1 Load an original document into the ADF or on the scanner glass. 2 From the control panel, press Fax. 3 Under Fax, press Options. 4 Press or repeatedly until Delay send appears, and then press . 5 Press . Note: &#... shortcuts on page 47. • If you do not have a Phone Book list but want to create one, see Using the Phone Book on the scanner glass. 2 From the control panel, press Fax. 3 Under Fax, press Options. 4 Press or repeatedly until Broadcast appears, and then press . 5 Press . 6 Enter a fax...
User's Guide
Page 48
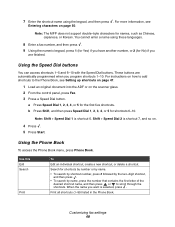
... Phone Book, see Entering characters on . 4 Press . 5 Press Start. Note: The MFP does not support double-byte characters for shortcuts 6-10. For instructions on the scanner glass. 2 From the control panel, press Fax. 3 Press a Speed Dial button. Using the Phone Book To access the Phone Book menu, press Phone Book. When...
... Phone Book, see Entering characters on . 4 Press . 5 Press Start. Note: The MFP does not support double-byte characters for shortcuts 6-10. For instructions on the scanner glass. 2 From the control panel, press Fax. 3 Press a Speed Dial button. Using the Phone Book To access the Phone Book menu, press Phone Book. When...

User's Guide
Page 51
...-page documents, postcards, 4 x 6 cards, small items, or thin media (such as magazine clippings or carbonless paper) into the ADF or on the scanner glass. For more information, see Setting the paper type and size on the scanner glass. Copying 51 7 Copying You can load an original document into the ADF. Use the... scanner glass for multiple-page documents. Note: Do not load postcards, 4 x 6 cards, small items, or thin media (such as magazine clippings or carbonless paper). Place these ...
...-page documents, postcards, 4 x 6 cards, small items, or thin media (such as magazine clippings or carbonless paper) into the ADF or on the scanner glass. For more information, see Setting the paper type and size on the scanner glass. Copying 51 7 Copying You can load an original document into the ADF. Use the... scanner glass for multiple-page documents. Note: Do not load postcards, 4 x 6 cards, small items, or thin media (such as magazine clippings or carbonless paper). Place these ...

User's Guide
Page 52
...8226; 2-Up-Prints two copied documents on a page. • 4-Up-Prints four copied documents on a page. • Off-Prints one copied document on the scanner glass. 3 From the control panel, make sure Copy mode is selected. 4 Under Copy, press Options. 5 Press or repeatedly until Paper Saver is selected, and ...the number of copies you want to print. 5 Press Start. 2 Load the original document face-up into the ADF or face-down on the scanner glass. 2 From the control panel, make sure Copy mode is selected. Collating copies 52 Collating copies If you make multiple copies of a document...
...8226; 2-Up-Prints two copied documents on a page. • 4-Up-Prints four copied documents on a page. • Off-Prints one copied document on the scanner glass. 3 From the control panel, make sure Copy mode is selected. 4 Under Copy, press Options. 5 Press or repeatedly until Paper Saver is selected, and ...the number of copies you want to print. 5 Press Start. 2 Load the original document face-up into the ADF or face-down on the scanner glass. 2 From the control panel, make sure Copy mode is selected. Collating copies 52 Collating copies If you make multiple copies of a document...

User's Guide
Page 53
... reducing an image 1 Load paper. 2 Load an original document face-up into the ADF. Enlarging or reducing an image 53 Place these items on the scanner glass. 8 Press Start. 9 If prompted, press 1 (for yes) if you have more pages, or 2 (for no) if you have finished copying the number of pages... Start. Note: Do not load postcards, index cards, small items, or thin media (such as magazine clippings) into the ADF or face-down on the scanner glass. 3 From the control panel, make sure Copy mode is selected. 4 Press Scale repeatedly until the option you want appears.
... reducing an image 1 Load paper. 2 Load an original document face-up into the ADF. Enlarging or reducing an image 53 Place these items on the scanner glass. 8 Press Start. 9 If prompted, press 1 (for yes) if you have more pages, or 2 (for no) if you have finished copying the number of pages... Start. Note: Do not load postcards, index cards, small items, or thin media (such as magazine clippings) into the ADF or face-down on the scanner glass. 3 From the control panel, make sure Copy mode is selected. 4 Press Scale repeatedly until the option you want appears.
User's Guide
Page 54
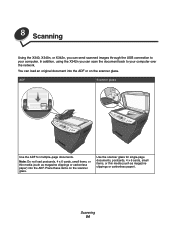
... (such as magazine clippings or carbonless paper) into the ADF or on the scanner glass. Scanning 54 You can load an original document into the ADF. Place these items on the scanner glass. Use the scanner glass for multiple-page documents. In addition, using the X342n you can send... scanned images through the USB connection to your computer. 8 Scanning Using the X340, X340n, or X342n, you can scan the document ...
... (such as magazine clippings or carbonless paper) into the ADF or on the scanner glass. Scanning 54 You can load an original document into the ADF. Place these items on the scanner glass. Use the scanner glass for multiple-page documents. In addition, using the X342n you can send... scanned images through the USB connection to your computer. 8 Scanning Using the X340, X340n, or X342n, you can scan the document ...
User's Guide
Page 55
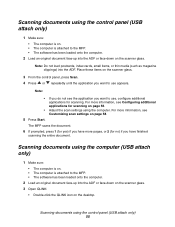
...been loaded onto the computer. 2 Load an original document face-up into the ADF or face-down on the scanner glass. Scanning documents using the control panel (USB attach only) 1 Make sure: • The computer is .... 2 Load an original document face-up into the ADF or face-down on the scanner glass. 3 Open QLINK: • Double-click the QLINK icon on the desktop. For more information, ...see Customizing scan settings on the scanner glass. 3 From the control panel, press Scan. 4 Press or repeatedly until the application you ...
...been loaded onto the computer. 2 Load an original document face-up into the ADF or face-down on the scanner glass. Scanning documents using the control panel (USB attach only) 1 Make sure: • The computer is .... 2 Load an original document face-up into the ADF or face-down on the scanner glass. 3 Open QLINK: • Double-click the QLINK icon on the desktop. For more information, ...see Customizing scan settings on the scanner glass. 3 From the control panel, press Scan. 4 Press or repeatedly until the application you ...
User's Guide
Page 57
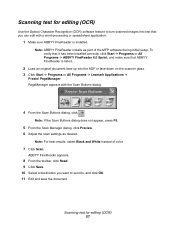
... 6.0 Sprint, and make sure that you want to send to turn scanned images into the ADF or face-down on the scanner glass. 3 Click Start Æ Programs or All Programs Æ Lexmark Applications Æ Presto! ABBYY FineReader appears. 8 From the toolbar, click Read. 9 Click Save. 10 Select a destination you can edit with...
... 6.0 Sprint, and make sure that you want to send to turn scanned images into the ADF or face-down on the scanner glass. 3 Click Start Æ Programs or All Programs Æ Lexmark Applications Æ Presto! ABBYY FineReader appears. 8 From the toolbar, click Read. 9 Click Save. 10 Select a destination you can edit with...
User's Guide
Page 59
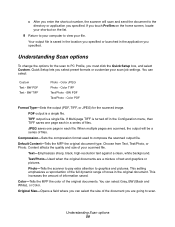
c After you enter the shortcut number, the scanner will be a series of information saved. Your output file is turned off in the Configuration menu, then TIFF saves one page in each in the ... in the application you specified. JPEG saves one page each file. Text-Emphasizes sharp, black, high-resolution text against a clean, white background. Photo-Tells the scanner to pay extra attention to compress the scanned output file. If you touch Profiles on the home screen, locate your shortcut on the list. 9 Return...
c After you enter the shortcut number, the scanner will be a series of information saved. Your output file is turned off in the Configuration menu, then TIFF saves one page in each in the ... in the application you specified. JPEG saves one page each file. Text-Emphasizes sharp, black, high-resolution text against a clean, white background. Photo-Tells the scanner to pay extra attention to compress the scanned output file. If you touch Profiles on the home screen, locate your shortcut on the list. 9 Return...


