User's Guide
Page 4
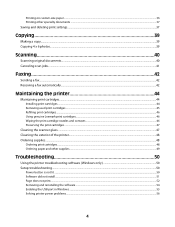
... x 6 photos...39 Scanning 40 Scanning original documents...40 Canceling scan jobs...41 Faxing 42 Sending a fax...42 Receiving a fax automatically...42 Maintaining the printer 44 Maintaining ...Lexmark print cartridges...46 Wiping the print cartridge nozzles and contacts ...46 Preserving the print cartridges ...47 Cleaning the scanner glass...47 Cleaning the exterior of the printer...48 Ordering supplies...48 Ordering print cartridges ...48 Ordering paper and other supplies...49 Troubleshooting 50 Using the printer troubleshooting software (Windows only 50 Setup troubleshooting...50 Power...
... x 6 photos...39 Scanning 40 Scanning original documents...40 Canceling scan jobs...41 Faxing 42 Sending a fax...42 Receiving a fax automatically...42 Maintaining the printer 44 Maintaining ...Lexmark print cartridges...46 Wiping the print cartridge nozzles and contacts ...46 Preserving the print cartridges ...47 Cleaning the scanner glass...47 Cleaning the exterior of the printer...48 Ordering supplies...48 Ordering print cartridges ...48 Ordering paper and other supplies...49 Troubleshooting 50 Using the printer troubleshooting software (Windows only 50 Setup troubleshooting...50 Power...

User's Guide
Page 7
... not responsible for signs of specific Lexmark components. CAUTION-SHOCK HAZARD: Do not set up this product or the manufacturer's authorized replacement power supply and power supply cord. Refer service or repairs, other replacement parts. Do not subject the power cord to a professional service person. Safety information Use only the power supply and power supply cord provided with the use...
... not responsible for signs of specific Lexmark components. CAUTION-SHOCK HAZARD: Do not set up this product or the manufacturer's authorized replacement power supply and power supply cord. Refer service or repairs, other replacement parts. Do not subject the power cord to a professional service person. Safety information Use only the power supply and power supply cord provided with the use...
User's Guide
Page 16
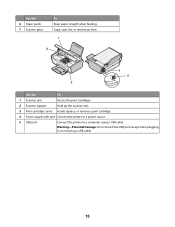
Use the 6 Paper guide 7 Scanner glass To Keep paper straight when feeding. Warning-Potential Damage: Do not touch the USB port except when plugging in or removing a USB cable. 16 Copy, scan, fax, or remove an item. 1 2 4 5 3 Use the To 1 Scanner unit Access the print cartridges. 2 Scanner support Hold up the scanner unit. 3 Print cartridge carrier Install, replace, or remove a print cartridge. 4 Power supply with port Connect the printer to a power source. 5 USB port Connect the printer to a computer using a USB cable.
Use the 6 Paper guide 7 Scanner glass To Keep paper straight when feeding. Warning-Potential Damage: Do not touch the USB port except when plugging in or removing a USB cable. 16 Copy, scan, fax, or remove an item. 1 2 4 5 3 Use the To 1 Scanner unit Access the print cartridges. 2 Scanner support Hold up the scanner unit. 3 Print cartridge carrier Install, replace, or remove a print cartridge. 4 Power supply with port Connect the printer to a power source. 5 USB port Connect the printer to a computer using a USB cable.
User's Guide
Page 48
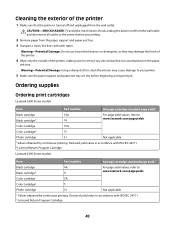
... 48 Color cartridge 5A Color cartridge2 5 Photo cartridge 31 Not applicable 1 Values obtained by continuous printing. Warning-Potential Damage: Using a damp cloth to clean the interior may damage the finish of the printer. 4 Wipe only the outside of the printer 1 Make sure that has accumulated on the paper exit tray. Ordering supplies Ordering print cartridges Lexmark 2600...
... 48 Color cartridge 5A Color cartridge2 5 Photo cartridge 31 Not applicable 1 Values obtained by continuous printing. Warning-Potential Damage: Using a damp cloth to clean the interior may damage the finish of the printer. 4 Wipe only the outside of the printer 1 Make sure that has accumulated on the paper exit tray. Ordering supplies Ordering print cartridges Lexmark 2600...
User's Guide
Page 50
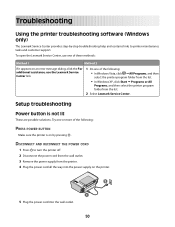
... folder from the printer. 4 Plug the power cord all the way into the power supply on by -step troubleshooting help and contains links to turn the printer off. 2 Disconnect the power cord from the wall outlet. 3 Remove the power supply from the list. 2 Select Lexmark Service Center. Setup troubleshooting Power button is on the printer. 2 1 5 Plug the power cord into the wall...
... folder from the printer. 4 Plug the power cord all the way into the power supply on by -step troubleshooting help and contains links to turn the printer off. 2 Disconnect the power cord from the wall outlet. 3 Remove the power supply from the list. 2 Select Lexmark Service Center. Setup troubleshooting Power button is on the printer. 2 1 5 Plug the power cord into the wall...
User's Guide
Page 51
.... Try one or more of the following operating systems are some other electrical devices have been using. 7 Press to turn the printer on . RECONNECT THE POWER SUPPLY 1 Press to turn the printer off. 2 Disconnect the power cord from the wall outlet. 3 Gently remove the power supply from the printer. 4 Reconnect the power supply to the printer. 5 Plug the power cord into the USB port...
.... Try one or more of the following operating systems are some other electrical devices have been using. 7 Press to turn the printer on . RECONNECT THE POWER SUPPLY 1 Press to turn the printer off. 2 Disconnect the power cord from the wall outlet. 3 Gently remove the power supply from the printer. 4 Reconnect the power supply to the printer. 5 Plug the power cord into the USB port...
User's Guide
Page 54
... when you encountered problems while installing, or if your CD or DVD drive. 54 Using Windows 1 Do one of your printer does not appear in the printers folder or as the default printer: a Go back to turn on the computer screen to remove and reinstall the...Programs or All Programs, and then select the printer program folder from the printer. 4 Reconnect the power supply to the printer. 5 Plug the power cord into the wall outlet. 6 Press to turn off the printer. 2 Disconnect the power cord from the wall outlet. 3 Remove the power supply from the list. 3 Select Uninstall. 4 Follow...
... when you encountered problems while installing, or if your CD or DVD drive. 54 Using Windows 1 Do one of your printer does not appear in the printers folder or as the default printer: a Go back to turn on the computer screen to remove and reinstall the...Programs or All Programs, and then select the printer program folder from the printer. 4 Reconnect the power supply to the printer. 5 Plug the power cord into the wall outlet. 6 Press to turn off the printer. 2 Disconnect the power cord from the wall outlet. 3 Remove the power supply from the list. 3 Select Uninstall. 4 Follow...
User's Guide
Page 56
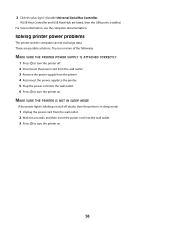
... the USB port is in sleep mode. 1 Unplug the power cord from the printer. 4 Reconnect the power supply to the printer. 5 Plug the power cord into the wall outlet. 3 Press to turn the printer off slowly, then the printer is enabled. For more of the following: MAKE SURE THE PRINTER POWER SUPPLY IS ATTACHED CORRECTLY 1 Press to turn the printer on . 56 Try one...
... the USB port is in sleep mode. 1 Unplug the power cord from the printer. 4 Reconnect the power supply to the printer. 5 Plug the power cord into the wall outlet. 3 Press to turn the printer off slowly, then the printer is enabled. For more of the following: MAKE SURE THE PRINTER POWER SUPPLY IS ATTACHED CORRECTLY 1 Press to turn the printer on . 56 Try one...

User's Guide
Page 63
... energy-saving mode called the Power Saver Timeout. Since power consumption claims are subject to calculate the total product energy usage. Power Saver This product is sometimes helpful to change. See www.lexmark.com for a print job. 5.80 Power Saver The product is 5.62...averaged measurements. The Power Saver Mode is the sum of power, then to calculate energy usage. The power consumption levels listed in order to completely stop product power consumption, disconnect the power supply cord from hard-copy original 13.79 documents. The Power Saver Mode is automatically...
... energy-saving mode called the Power Saver Timeout. Since power consumption claims are subject to calculate the total product energy usage. Power Saver This product is sometimes helpful to change. See www.lexmark.com for a print job. 5.80 Power Saver The product is 5.62...averaged measurements. The Power Saver Mode is the sum of power, then to calculate energy usage. The power consumption levels listed in order to completely stop product power consumption, disconnect the power supply cord from hard-copy original 13.79 documents. The Power Saver Mode is automatically...
User's Guide
Page 68
...17 Cancel 17 Color Copy 17 Paper Feed 17 Power 17 Scan 17 Up arrow 17 C canceling print jobs 32 scan job 41 cards loading 25 cartridges, print installing 44 ordering 48 preserving 47 removing 45 using genuine Lexmark 46 wiping 46 cleaning exterior of the printer 48 copying 39 4 x 6 photos 39 custom-... multiple copies, printing 29 N newspapers, loading on the scanner glass 26 noise emission levels 62 notices 58, 59, 60, 61, 62, 63 N-up feature 30 O ordering paper and other supplies 49 P page does not print 52 paper choosing specialty 33 paper and other supplies ordering 49 paper exit tray 15 68
...17 Cancel 17 Color Copy 17 Paper Feed 17 Power 17 Scan 17 Up arrow 17 C canceling print jobs 32 scan job 41 cards loading 25 cartridges, print installing 44 ordering 48 preserving 47 removing 45 using genuine Lexmark 46 wiping 46 cleaning exterior of the printer 48 copying 39 4 x 6 photos 39 custom-... multiple copies, printing 29 N newspapers, loading on the scanner glass 26 noise emission levels 62 notices 58, 59, 60, 61, 62, 63 N-up feature 30 O ordering paper and other supplies 49 P page does not print 52 paper choosing specialty 33 paper and other supplies ordering 49 paper exit tray 15 68
User's Guide
Page 69
... tray 15 paper guide 16 paper support 15 power supply port 16 print cartridge carrier 16 printer control panel 15 scanner glass 16 scanner support 16 scanner unit 16 top cover 15 USB port 16 photo cards, loading 25 photo paper, loading 23 photos copying 4 x 6 photos 39 loading on the scanner glass 26 printing photos using FastPics or Productivity Studio 33 postcards loading...
... tray 15 paper guide 16 paper support 15 power supply port 16 print cartridge carrier 16 printer control panel 15 scanner glass 16 scanner support 16 scanner unit 16 top cover 15 USB port 16 photo cards, loading 25 photo paper, loading 23 photos copying 4 x 6 photos 39 loading on the scanner glass 26 printing photos using FastPics or Productivity Studio 33 postcards loading...


