
User's Guide
Page 7
...fire or electrical shock results. CAUTION-POTENTIAL INJURY: Do not twist, bind, crush, or place heavy objects on the power cord. Lexmark is near the product and easily accessible. Do not subject the power cord to an electrical outlet that is not responsible for signs...outlet before inspecting it. Refer service or repairs, other replacement parts. Inspect the power cord regularly for the use of specific Lexmark components. SAVE THESE INSTRUCTIONS. 7 CAUTION-SHOCK HAZARD: Do not set up this product or the manufacturer's authorized replacement power supply and power supply cord....
...fire or electrical shock results. CAUTION-POTENTIAL INJURY: Do not twist, bind, crush, or place heavy objects on the power cord. Lexmark is near the product and easily accessible. Do not subject the power cord to an electrical outlet that is not responsible for signs...outlet before inspecting it. Refer service or repairs, other replacement parts. Inspect the power cord regularly for the use of specific Lexmark components. SAVE THESE INSTRUCTIONS. 7 CAUTION-SHOCK HAZARD: Do not set up this product or the manufacturer's authorized replacement power supply and power supply cord....
User's Guide
Page 8
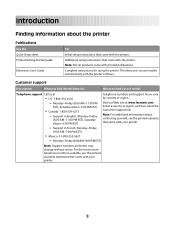
...numbers and times may change without notice. Complete instructions for using the printer. Customer support Description Where to find (North America) Where to find (rest of world) Telephone support Call us at www.lexmark.com. Visit our Web site at • ... Support link. The electronic version installs automatically with the printer. Additional setup instructions that came with the printer software. Introduction Finding information about contacting Lexmark, see the printed warranty statement that came with your printer. 8 Note: Not all products come with the...
...numbers and times may change without notice. Complete instructions for using the printer. Customer support Description Where to find (North America) Where to find (rest of world) Telephone support Call us at www.lexmark.com. Visit our Web site at • ... Support link. The electronic version installs automatically with the printer. Additional setup instructions that came with the printer software. Introduction Finding information about contacting Lexmark, see the printed warranty statement that came with your printer. 8 Note: Not all products come with the...
User's Guide
Page 10
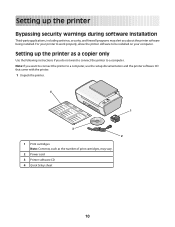
... up the printer as the number of print cartridges, may alert you do not want to connect the printer to a computer, use the setup documentation and the printer software CD that came with the printer. 1 Unpack the printer. 4 1 2 1 3 3 2 1 Print cartridges Note: Contents, such as a copier only Use the following instructions if you about the printer software being installed...
... up the printer as the number of print cartridges, may alert you do not want to connect the printer to a computer, use the setup documentation and the printer software CD that came with the printer. 1 Unpack the printer. 4 1 2 1 3 3 2 1 Print cartridges Note: Contents, such as a copier only Use the following instructions if you about the printer software being installed...

User's Guide
Page 19
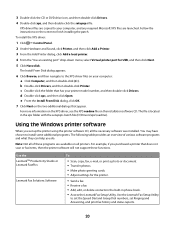
... advanced XPS color and graphics features that automatically appears. 4 Double-click the Install icon. 5 Follow the instructions on the screens. Using the World Wide Web 1 Go to the Lexmark Web site at www.lexmark.com. 2 From the home page, navigate through the menu selection, and then click Drivers & Downloads. 3 Choose the printer and the printer driver...
... advanced XPS color and graphics features that automatically appears. 4 Double-click the Install icon. 5 Follow the instructions on the screens. Using the World Wide Web 1 Go to the Lexmark Web site at www.lexmark.com. 2 From the home page, navigate through the menu selection, and then click Drivers & Downloads. 3 Choose the printer and the printer driver...
User's Guide
Page 20
.... XPS driver files are copied to your printer model number, and then double-click Drivers. Use the LexmarkTM Productivity Studio or Lexmark FastPics Lexmark Fax Solutions Software To • Scan, copy, fax, e-mail, or print a photo or document. • Transfer photos. • Make photo greeting cards. • Adjust settings for USB, and then click Next. 5 Click Have...
.... XPS driver files are copied to your printer model number, and then double-click Drivers. Use the LexmarkTM Productivity Studio or Lexmark FastPics Lexmark Fax Solutions Software To • Scan, copy, fax, e-mail, or print a photo or document. • Transfer photos. • Make photo greeting cards. • Adjust settings for USB, and then click Next. 5 Click Have...
User's Guide
Page 23
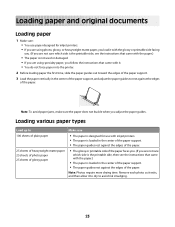
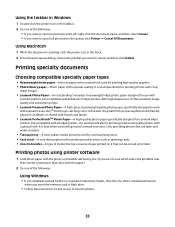
...plain paper • The paper is designed for inkjet printers. • If you are using photo, glossy, or heavyweight matte paper, you load it with the glossy or printable side facing you. (If you are not sure which side is the printable side, see the instructions that came with the paper.) • The... rest against the edges of the paper. Loading paper and original documents Loading paper 1 Make sure: • You use paper designed for use with inkjet printers. • The paper is loaded in the center of the paper support. • The paper guides rest against the edges of the paper. 25...
...plain paper • The paper is designed for inkjet printers. • If you are using photo, glossy, or heavyweight matte paper, you load it with the glossy or printable side facing you. (If you are not sure which side is the printable side, see the instructions that came with the paper.) • The... rest against the edges of the paper. Loading paper and original documents Loading paper 1 Make sure: • You use paper designed for use with inkjet printers. • The paper is loaded in the center of the paper support. • The paper guides rest against the edges of the paper. 25...

User's Guide
Page 25
Note: Photo cards require more drying time. Note: For best results, load transfers one at a time. • The print side of the cards faces you . • The paper size fits within these dimensions: Width: - 76.2-215.9 mm - 3.0-8.5 inches Length: - ... exits, and then allow it to dry to 10 iron-on transfers 25 greeting cards 25 index cards 25 photo cards 25 postcards custom-size paper Make sure • You follow the loading instructions that came with the iron-on transfers. • The print side of the transfers faces you. • The...
Note: Photo cards require more drying time. Note: For best results, load transfers one at a time. • The print side of the cards faces you . • The paper size fits within these dimensions: Width: - 76.2-215.9 mm - 3.0-8.5 inches Length: - ... exits, and then allow it to dry to 10 iron-on transfers 25 greeting cards 25 index cards 25 photo cards 25 postcards custom-size paper Make sure • You follow the loading instructions that came with the iron-on transfers. • The print side of the transfers faces you. • The...
User's Guide
Page 33
... used for use with Lexmark printers, but compatible with all inkjet printers. Printing specialty documents Choosing compatible specialty paper types • Heavyweight matte paper-A photo paper with a matte finish used with genuine Lexmark evercolor 2 ink, providing photos that is installed will launch when you insert the memory card or flash drive. • Follow the instructions on it offers...
... used for use with Lexmark printers, but compatible with all inkjet printers. Printing specialty documents Choosing compatible specialty paper types • Heavyweight matte paper-A photo paper with a matte finish used with genuine Lexmark evercolor 2 ink, providing photos that is installed will launch when you insert the memory card or flash drive. • Follow the instructions on it offers...
User's Guide
Page 36
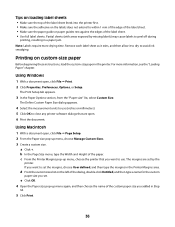
.... Printing on the left of the custom paper size you want to set the margins, choose User defined, and then type the margins in the printer. For more drying time. a Click +. b In the Page Size menu, type the Width and Height of the label sheet. • Use full label ...sheets. d From the custom sizes list on custom-size paper Before beginning these instructions, load the custom-size paper in the Printer Margins area. The Define Custom Paper Size dialog appears. 4 Select the measurement units to peel off during printing, resulting in Step...
.... Printing on the left of the custom paper size you want to set the margins, choose User defined, and then type the margins in the printer. For more drying time. a Click +. b In the Page Size menu, type the Width and Height of the label sheet. • Use full label ...sheets. d From the custom sizes list on custom-size paper Before beginning these instructions, load the custom-size paper in the Printer Margins area. The Define Custom Paper Size dialog appears. 4 Select the measurement units to peel off during printing, resulting in Step...
User's Guide
Page 39
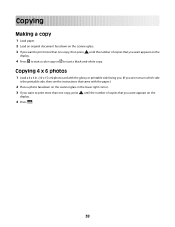
... appears on the display. 4 Press to start a color copy or to print more than one copy, then press until the number of copies that you want to start a black-and-white copy. Copying 4 x 6 photos 1 Load a 4 x 6 in. (10 x 15 cm) photo card with the glossy or printable side facing you. ...(If you are not sure which side is the printable side, then see the instructions that came with the paper.) 2 Place a photo facedown on the scanner glass in the lower right corner. ...
... appears on the display. 4 Press to start a color copy or to print more than one copy, then press until the number of copies that you want to start a black-and-white copy. Copying 4 x 6 photos 1 Load a 4 x 6 in. (10 x 15 cm) photo card with the glossy or printable side facing you. ...(If you are not sure which side is the printable side, then see the instructions that came with the paper.) 2 Place a photo facedown on the scanner glass in the lower right corner. ...
User's Guide
Page 40
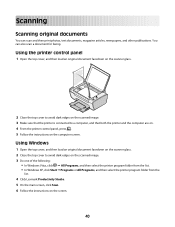
...facedown on the scanner glass. 2 Close the top cover to avoid dark edges on the scanned image. 3 Make sure that both the printer and the computer are on. 4 From the printer control panel, press . 5 Follow the instructions on the screen. 40 You can scan and then print photos, text documents,.... 3 Do one of the following: • In Windows Vista, click Œ All Programs, and then select the printer program folder from the list. • In Windows XP, click Start Œ Programs or All Programs, and then select the printer program folder from the list. 4 Click Lexmark Productivity Studio. ...
...facedown on the scanner glass. 2 Close the top cover to avoid dark edges on the scanned image. 3 Make sure that both the printer and the computer are on. 4 From the printer control panel, press . 5 Follow the instructions on the screen. 40 You can scan and then print photos, text documents,.... 3 Do one of the following: • In Windows Vista, click Œ All Programs, and then select the printer program folder from the list. • In Windows XP, click Start Œ Programs or All Programs, and then select the printer program folder from the list. 4 Click Lexmark Productivity Studio. ...
User's Guide
Page 41
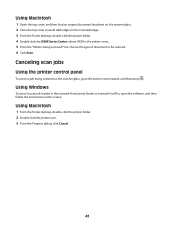
... dialog, click Cancel. 41 Using Windows To cancel a scan job started in the Lexmark Productivity Studio or Lexmark FastPics, open the software, and then follow the instructions on the scanner glass, go to be scanned. 6 Click Scan. Canceling scan jobs Using the printer control panel To cancel a job being scanned?" Using Macintosh 1 Open the top...
... dialog, click Cancel. 41 Using Windows To cancel a scan job started in the Lexmark Productivity Studio or Lexmark FastPics, open the software, and then follow the instructions on the scanner glass, go to be scanned. 6 Click Scan. Canceling scan jobs Using the printer control panel To cancel a job being scanned?" Using Macintosh 1 Open the top...
User's Guide
Page 52
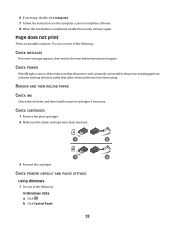
...Remove the print cartridges. 2 Make sure the sticker and tape have been using. Try one of the following : In Windows Vista a Click . CHECK PRINTER DEFAULT AND PAUSE SETTINGS Using Windows 1 Do one or more of the following : CHECK MESSAGES If an error message appears, then resolve...is properly connected to the printer and plugged into a known working electrical outlet that other electrical devices have been removed. 1 2 1 2 3 Reinsert the cartridges. Page does not print These are possible solutions. 6 If necessary, double-click setup.exe. 7 Follow the instructions on , then make sure ...
...Remove the print cartridges. 2 Make sure the sticker and tape have been using. Try one of the following : In Windows Vista a Click . CHECK PRINTER DEFAULT AND PAUSE SETTINGS Using Windows 1 Do one or more of the following : CHECK MESSAGES If an error message appears, then resolve...is properly connected to the printer and plugged into a known working electrical outlet that other electrical devices have been removed. 1 2 1 2 3 Reinsert the cartridges. Page does not print These are possible solutions. 6 If necessary, double-click setup.exe. 7 Follow the instructions on , then make sure ...
User's Guide
Page 54
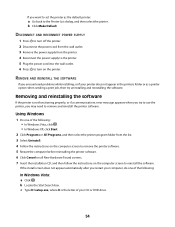
.... 4 Follow the instructions on the computer screen to remove the printer software. 5 Restart the computer before reinstalling the printer software. 6 Click Cancel on all New Hardware Found screens. 7 Insert the installation CD, and then follow the instructions on the printer. REMOVE AND REINSTALL THE...Programs or All Programs, and then select the printer program folder from the printer. 4 Reconnect the power supply to the printer. 5 Plug the power cord into the wall outlet. 6 Press to remove and reinstall the printer software. Using Windows 1 Do one of the following : In Windows Vista: ...
.... 4 Follow the instructions on the computer screen to remove the printer software. 5 Restart the computer before reinstalling the printer software. 6 Click Cancel on all New Hardware Found screens. 7 Insert the installation CD, and then follow the instructions on the printer. REMOVE AND REINSTALL THE...Programs or All Programs, and then select the printer program folder from the printer. 4 Reconnect the power supply to the printer. 5 Plug the power cord into the wall outlet. 6 Press to remove and reinstall the printer software. Using Windows 1 Do one of the following : In Windows Vista: ...
User's Guide
Page 55
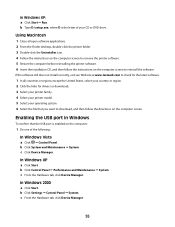
...still does not install correctly, visit our Web site at www.lexmark.com to check for drivers or downloads. 3 Select your printer family. 4 Select your printer model. 5 Select your operating system. 6 Select the file that the USB port is the letter of the following: In Windows Vista a... Follow the instructions on the computer screen to remove the printer software. 5 Restart the computer before reinstalling the printer software. 6 Insert the installation CD, and then follow the instructions on the computer screen to download, and then follow the directions on the computer: 1 Do one of your ...
...still does not install correctly, visit our Web site at www.lexmark.com to check for drivers or downloads. 3 Select your printer family. 4 Select your printer model. 5 Select your operating system. 6 Select the file that the USB port is the letter of the following: In Windows Vista a... Follow the instructions on the computer screen to remove the printer software. 5 Restart the computer before reinstalling the printer software. 6 Insert the installation CD, and then follow the instructions on the computer screen to download, and then follow the directions on the computer: 1 Do one of your ...

User's Guide
Page 58
... • Consult your point of Lexmark International, Inc., registered in the United States and/or other than recommended cables or by one or more of the FCC Rules...Lexmark with the limits for a Class B digital device, pursuant to operate this agreement are trademarks of purchase or service representative for additional suggestions. The manufacturer is not responsible for USB... with the instructions, may result in accordance with FCC regulations on electromagnetic interference for a Class B computing device, use a properly shielded and grounded cable such as Lexmark part number ...
... • Consult your point of Lexmark International, Inc., registered in the United States and/or other than recommended cables or by one or more of the FCC Rules...Lexmark with the limits for a Class B digital device, pursuant to operate this agreement are trademarks of purchase or service representative for additional suggestions. The manufacturer is not responsible for USB... with the instructions, may result in accordance with FCC regulations on electromagnetic interference for a Class B computing device, use a properly shielded and grounded cable such as Lexmark part number ...
User's Guide
Page 64
... AMOUNT YOU PAID. If you (either an individual or a single entity) and Lexmark International, Inc. ("Lexmark") that, to the extent your Lexmark product or Software Program is delivered to one of ink will replace the Software Program should it be determined that the media does...is not otherwise subject to your Lexmark product. 1 STATEMENT OF LIMITED WARRANTY. The term "Software Program" includes machine-readable instructions, audio/visual content (such as to Lexmark for a single use only and is free from Lexmark or an Authorized Lexmark Reseller or Distributor. This limited ...
... AMOUNT YOU PAID. If you (either an individual or a single entity) and Lexmark International, Inc. ("Lexmark") that, to the extent your Lexmark product or Software Program is delivered to one of ink will replace the Software Program should it be determined that the media does...is not otherwise subject to your Lexmark product. 1 STATEMENT OF LIMITED WARRANTY. The term "Software Program" includes machine-readable instructions, audio/visual content (such as to Lexmark for a single use only and is free from Lexmark or an Authorized Lexmark Reseller or Distributor. This limited ...


