
User's Guide
Page 2
This product is designed, tested, and approved to an electrical outlet that is not responsible for the use of specific Lexmark components. Lexmark is near the product and easily accessible. Operating system notice All features and functions are operating system-dependent. The safety ... INSTRUCTIONS. For complete descriptions: • Windows users-See the User's Guide. • Macintosh users-If your hands out from underneath the scanner unit. Connect the power supply cord to meet strict global safety standards with the use of some parts may not always be obvious. CAUTION-POTENTIAL...
This product is designed, tested, and approved to an electrical outlet that is not responsible for the use of specific Lexmark components. Lexmark is near the product and easily accessible. Operating system notice All features and functions are operating system-dependent. The safety ... INSTRUCTIONS. For complete descriptions: • Windows users-See the User's Guide. • Macintosh users-If your hands out from underneath the scanner unit. Connect the power supply cord to meet strict global safety standards with the use of some parts may not always be obvious. CAUTION-POTENTIAL...
User's Guide
Page 3
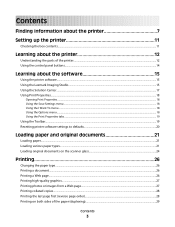
...control panel buttons...14 Learning about the software 15 Using the printer software...15 Using the Lexmark Imaging Studio...15 Using the Solution Center...17 Using Print Properties...18 Opening Print Properties ...18 Using the Save Settings menu ...18 Using the I Want To menu ... documents on the scanner glass 24 Printing 26 Changing the paper type...26 Printing a document...26 Printing a Web page...26 Printing high-quality graphics...27 Printing photos or images from a Web page...27 Printing collated copies...28 Printing the last page first (reverse page order)...28 Printing on both sides of...
...control panel buttons...14 Learning about the software 15 Using the printer software...15 Using the Lexmark Imaging Studio...15 Using the Solution Center...17 Using Print Properties...18 Opening Print Properties ...18 Using the Save Settings menu ...18 Using the I Want To menu ... documents on the scanner glass 24 Printing 26 Changing the paper type...26 Printing a document...26 Printing a Web page...26 Printing high-quality graphics...27 Printing photos or images from a Web page...27 Printing collated copies...28 Printing the last page first (reverse page order)...28 Printing on both sides of...
User's Guide
Page 5
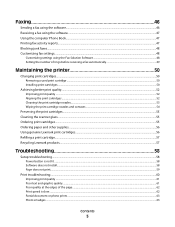
... print cartridge ...50 Installing print cartridges...50 Achieving better print quality...52 Improving print quality ...52 Aligning the print cartridges ...52 Cleaning the print cartridge nozzles...53 Wiping the print cartridge nozzles and contacts ...54 Preserving the print cartridges...55 Cleaning the scanner glass...55 Ordering print cartridges...55 Ordering paper and other supplies...56 Using genuine Lexmark print cartridges...56 Refilling a print...
... print cartridge ...50 Installing print cartridges...50 Achieving better print quality...52 Improving print quality ...52 Aligning the print cartridges ...52 Cleaning the print cartridge nozzles...53 Wiping the print cartridge nozzles and contacts ...54 Preserving the print cartridges...55 Cleaning the scanner glass...55 Ordering print cartridges...55 Ordering paper and other supplies...56 Using genuine Lexmark print cartridges...56 Refilling a print...
User's Guide
Page 6
...respond ...63 Scanner unit does not close...63 Poor copy quality...64 Partial document or photo copies...64 Scan troubleshooting...64 Scanner does not respond ...65 Scan was not successful ...65 Scanning takes too long or freezes the computer...65 Poor scanned image quality ...66 Partial document or photo scans...66 Fax ...troubleshooting...66 Cannot send or receive a fax...66 Can send but not receive faxes...67 Can receive but not send faxes...67 Printer receives a blank fax...67 Received fax has poor print quality......
...respond ...63 Scanner unit does not close...63 Poor copy quality...64 Partial document or photo copies...64 Scan troubleshooting...64 Scanner does not respond ...65 Scan was not successful ...65 Scanning takes too long or freezes the computer...65 Poor scanned image quality ...66 Partial document or photo scans...66 Fax ...troubleshooting...66 Cannot send or receive a fax...66 Can send but not receive faxes...67 Can receive but not send faxes...67 Printer receives a blank fax...67 Received fax has poor print quality......

User's Guide
Page 12
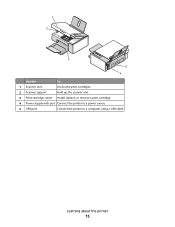
For more information, see "Using the control panel buttons" on page 14. 3 Paper exit tray Hold paper as it exits. 4 Top cover Access the scanner glass. 5 Paper feed guard Prevent small objects from falling inside. 6 Paper guide Keep paper straight when feeding. 7 Scanner glass Copy, scan, fax, or remove an item. Learning about the printer 12 Learning about the printer Understanding the parts of the printer 5 6 4 1 7 3 2 Use the To 1 Paper support Load paper. 2 Control panel Operate the printer.
For more information, see "Using the control panel buttons" on page 14. 3 Paper exit tray Hold paper as it exits. 4 Top cover Access the scanner glass. 5 Paper feed guard Prevent small objects from falling inside. 6 Paper guide Keep paper straight when feeding. 7 Scanner glass Copy, scan, fax, or remove an item. Learning about the printer 12 Learning about the printer Understanding the parts of the printer 5 6 4 1 7 3 2 Use the To 1 Paper support Load paper. 2 Control panel Operate the printer.
User's Guide
Page 13
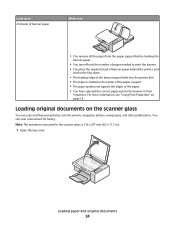
1 2 3 5 4 Use the To 1 Scanner unit Access the print cartridges. 2 Scanner support Hold up the scanner unit. 3 Print cartridge carrier Install, replace, or remove a print cartridge. 4 Power supply with port Connect the printer to a power source. 5 USB port Connect the printer to a computer using a USB cable. Learning about the printer 13
1 2 3 5 4 Use the To 1 Scanner unit Access the print cartridges. 2 Scanner support Hold up the scanner unit. 3 Print cartridge carrier Install, replace, or remove a print cartridge. 4 Power supply with port Connect the printer to a power source. 5 USB port Connect the printer to a computer using a USB cable. Learning about the printer 13
User's Guide
Page 24
..., and other publications. Loading paper and original documents 24 Loading original documents on page 18. For more information, see "Using Print Properties" on the scanner glass You can scan a document for the scanner glass is loaded in the center of the paper support. • The paper guides rest against the edges of the banner...
..., and other publications. Loading paper and original documents 24 Loading original documents on page 18. For more information, see "Using Print Properties" on the scanner glass You can scan a document for the scanner glass is loaded in the center of the paper support. • The paper guides rest against the edges of the banner...

User's Guide
Page 25
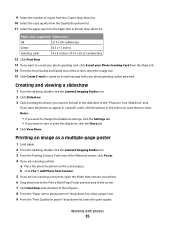
Loading paper and original documents 25 Note: Photos should be loaded as shown. 3 Close the top cover to avoid dark edges on the scanner glass in the lower right corner. 2 Place the original document or item facedown on the scanned image.
Loading paper and original documents 25 Note: Photos should be loaded as shown. 3 Close the top cover to avoid dark edges on the scanner glass in the lower right corner. 2 Place the original document or item facedown on the scanned image.
User's Guide
Page 35
... 2 From the desktop, double-click the Lexmark Imaging Studio icon. 3 From the Printing Creative Tasks area of the screen, select the image size. 15 Click Create E-mail to print poster on the scanner glass. b Click File ΠAdd Photo from Scanner. 5 If you want the photos to appear... in a specific order, click the photos in the order you are not scanning a new item, open the folder that contains your photo. 6 Drag the photo to the Print a Multi-Page Poster preview area of the screen. 7 Click Next Step at the bottom of copies from the Copies...
... 2 From the desktop, double-click the Lexmark Imaging Studio icon. 3 From the Printing Creative Tasks area of the screen, select the image size. 15 Click Create E-mail to print poster on the scanner glass. b Click File ΠAdd Photo from Scanner. 5 If you want the photos to appear... in a specific order, click the photos in the order you are not scanning a new item, open the folder that contains your photo. 6 Drag the photo to the Print a Multi-Page Poster preview area of the screen. 7 Click Next Step at the bottom of copies from the Copies...
User's Guide
Page 37
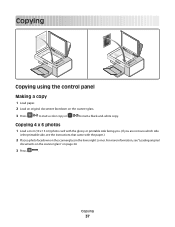
... a 4 x 6 (10 x 15 cm) photo card with the paper.) 2 Place a photo facedown on the scanner glass. 3 Press to start a color copy or to start a black-and-white copy. Copying 37 For more information, see the instructions that came with the glossy or printable side facing you. (If you are not sure which side... is the printable side, see "Loading original documents on the scanner glass" on page 24. 3 Press . Copying Copying using the control panel Making a copy 1 Load paper. 2 Load an original document facedown on the...
... a 4 x 6 (10 x 15 cm) photo card with the paper.) 2 Place a photo facedown on the scanner glass. 3 Press to start a color copy or to start a black-and-white copy. Copying 37 For more information, see the instructions that came with the glossy or printable side facing you. (If you are not sure which side... is the printable side, see "Loading original documents on the scanner glass" on page 24. 3 Press . Copying Copying using the control panel Making a copy 1 Load paper. 2 Load an original document facedown on the...
User's Guide
Page 38
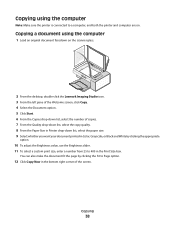
...printer and computer are on the scanner glass. 2 From the desktop, double-click the Lexmark Imaging Studio icon. 3 From the left pane of the Welcome screen, click Copy. 4 Select the Document option. 5 Click Start. 6 From the Copies drop-down list, select the number of copies. 7 From the Quality drop-down...Brightness value, use the Brightness slider. 11 To select a custom print size, enter a number from 25 to 400 in the bottom right corner of the screen. Copying using the computer 1 Load an original document facedown on . Copying a document using the computer Note: Make sure the printer is ...
...printer and computer are on the scanner glass. 2 From the desktop, double-click the Lexmark Imaging Studio icon. 3 From the left pane of the Welcome screen, click Copy. 4 Select the Document option. 5 Click Start. 6 From the Copies drop-down list, select the number of copies. 7 From the Quality drop-down...Brightness value, use the Brightness slider. 11 To select a custom print size, enter a number from 25 to 400 in the bottom right corner of the screen. Copying using the computer 1 Load an original document facedown on . Copying a document using the computer Note: Make sure the printer is ...
User's Guide
Page 39
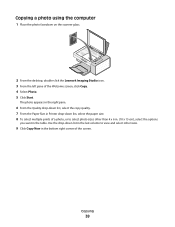
.... Use the drop-down list, select the paper size. 8 To select multiple prints of the Welcome screen, click Copy. 4 Select Photo. 5 Click Start. Copying a photo using the computer 1 Place the photo facedown on the scanner glass. 2 From the desktop, double-click the Lexmark Imaging Studio icon. 3 From the left pane of a photo, or to view...
.... Use the drop-down list, select the paper size. 8 To select multiple prints of the Welcome screen, click Copy. 4 Select Photo. 5 Click Start. Copying a photo using the computer 1 Place the photo facedown on the scanner glass. 2 From the desktop, double-click the Lexmark Imaging Studio icon. 3 From the left pane of a photo, or to view...
User's Guide
Page 40
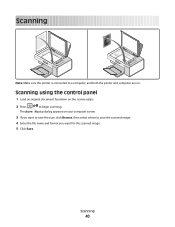
Scanning 40 Scanning Note: Make sure the printer is connected to save the scanned image. 4 Enter the file name and format you want to save the scan, click Browse, then select where to a computer, and both the printer and computer are on. The Save Photo dialog appears on the scanner glass. 2 Press to begin scanning. Scanning using the control panel 1 Load an original document facedown on your computer screen. 3 If you want for the scanned image. 5 Click Save.
Scanning 40 Scanning Note: Make sure the printer is connected to save the scanned image. 4 Enter the file name and format you want to save the scan, click Browse, then select where to a computer, and both the printer and computer are on. The Save Photo dialog appears on the scanner glass. 2 Press to begin scanning. Scanning using the control panel 1 Load an original document facedown on your computer screen. 3 If you want for the scanned image. 5 Click Save.
User's Guide
Page 41
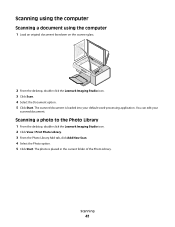
... Library 1 From the desktop, double-click the Lexmark Imaging Studio icon. 2 Click View / Print Photo Library. 3 From the Photo Library Add tab, click Add New Scan. 4 Select the Photo option. 5 Click Start. Scanning using the computer Scanning a document using the computer 1 Load an original document facedown on the scanner glass. 2 From the desktop, double-click the...
... Library 1 From the desktop, double-click the Lexmark Imaging Studio icon. 2 Click View / Print Photo Library. 3 From the Photo Library Add tab, click Add New Scan. 4 Select the Photo option. 5 Click Start. Scanning using the computer Scanning a document using the computer 1 Load an original document facedown on the scanner glass. 2 From the desktop, double-click the...
User's Guide
Page 42
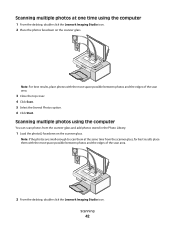
...photos are small enough to scan them with the most space possible between photos and the edges of the scan area. 2 From the desktop, double-click the Lexmark Imaging Studio icon. Scanning multiple photos at one time using the computer You can scan photos from the scanner glass, for best results ...place them at the same time from the scanner glass and add photos stored...
...photos are small enough to scan them with the most space possible between photos and the edges of the scan area. 2 From the desktop, double-click the Lexmark Imaging Studio icon. Scanning multiple photos at one time using the computer You can scan photos from the scanner glass, for best results ...place them at the same time from the scanner glass and add photos stored...
User's Guide
Page 43
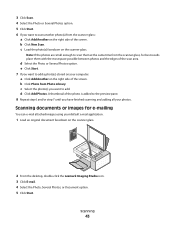
...(s) stored on your computer: a Click Add Another on the scanner glass. 2 From the desktop, double-click the Lexmark Imaging Studio icon. 3 Click E-mail. 4 Select the Photo, Several Photos, or Document option. 5 Click Start. Scanning documents or images for best results place them at the same ...time from the scanner glass, for e-mailing You can e-mail attached images...
...(s) stored on your computer: a Click Add Another on the scanner glass. 2 From the desktop, double-click the Lexmark Imaging Studio icon. 3 Click E-mail. 4 Select the Photo, Several Photos, or Document option. 5 Click Start. Scanning documents or images for best results place them at the same ...time from the scanner glass, for e-mailing You can e-mail attached images...
User's Guide
Page 44
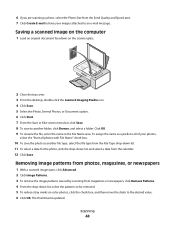
... the drop-down list, select the patterns to be removed. 5 To reduce stray marks on the scanner glass. 2 Close the top cover. 3 From the desktop, double-click the Lexmark Imaging Studio icon. 4 Click Scan. 5 Select the Photo, Several Photos, or Document option. 6 Click Start. 7 From the Save... or Edit screen menu bar, click Save. 8 To save to another folder, click Browse, and select a folder. 6 If you are scanning a photo, select the ...
... the drop-down list, select the patterns to be removed. 5 To reduce stray marks on the scanner glass. 2 Close the top cover. 3 From the desktop, double-click the Lexmark Imaging Studio icon. 4 Click Scan. 5 Select the Photo, Several Photos, or Document option. 6 Click Start. 7 From the Save... or Edit screen menu bar, click Save. 8 To save to another folder, click Browse, and select a folder. 6 If you are scanning a photo, select the ...
User's Guide
Page 46
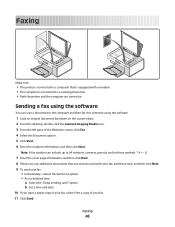
b Set a time and date. 10 If you want a paper copy of your fax, select Print a copy of the Welcome screen, click Fax. 4 Select the Document option. ... the cover page information, and then click Next. 8 If there are turned on the scanner glass. 2 From the desktop, double-click the Lexmark Imaging Studio icon. 3 From the left pane of your fax: • Immediately-Select... the Send now option. • At a scheduled time: a Select the "Delay sending until" option. Faxing 46 Note: A fax number can scan...
b Set a time and date. 10 If you want a paper copy of your fax, select Print a copy of the Welcome screen, click Fax. 4 Select the Document option. ... the cover page information, and then click Next. 8 If there are turned on the scanner glass. 2 From the desktop, double-click the Lexmark Imaging Studio icon. 3 From the left pane of your fax: • Immediately-Select... the Send now option. • At a scheduled time: a Select the "Delay sending until" option. Faxing 46 Note: A fax number can scan...

User's Guide
Page 50
...loading position, unless the printer is busy. 3 Press down on the cartridge carrier lever to raise the cartridge carrier lid. 4 Remove the used print cartridge 1 Make sure the printer is on the bottom of the cartridges. Note: If you are removing both cartridges, repeat step 3 and ...step 4 for the second cartridge. Installing print cartridges 1 If you are installing new print cartridges, remove the sticker and tape from the back and bottom of the cartridges. 1 2 Warning-Potential Damage: Do not ...
...loading position, unless the printer is busy. 3 Press down on the cartridge carrier lever to raise the cartridge carrier lid. 4 Remove the used print cartridge 1 Make sure the printer is on the bottom of the cartridges. Note: If you are removing both cartridges, repeat step 3 and ...step 4 for the second cartridge. Installing print cartridges 1 If you are installing new print cartridges, remove the sticker and tape from the back and bottom of the cartridges. 1 2 Warning-Potential Damage: Do not ...
User's Guide
Page 51
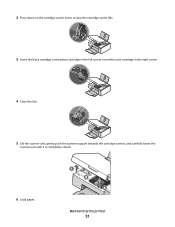
Maintaining the printer 51 Insert the color cartridge in the left carrier. 2 Press down on the cartridge carrier levers to raise the cartridge carrier lids. 3 Insert the black cartridge or the photo cartridge in the right carrier. 4 Close the lids. 5 Lift the scanner unit, gently push the scanner support towards the cartridge carriers, and carefully lower the scanner unit until it is completely closed. 6 Load paper.
Maintaining the printer 51 Insert the color cartridge in the left carrier. 2 Press down on the cartridge carrier levers to raise the cartridge carrier lids. 3 Insert the black cartridge or the photo cartridge in the right carrier. 4 Close the lids. 5 Lift the scanner unit, gently push the scanner support towards the cartridge carriers, and carefully lower the scanner unit until it is completely closed. 6 Load paper.


