User's Guide
Page 4
... a slideshow...35 Printing an image as a multiple-page poster ...35 Copying 37 Copying using the control panel...37 Making a copy...37 Copying 4 x 6 photos...37 Copying using the computer...38 Copying a document using the computer ...38 Copying a photo using the computer...39 Scanning 40 Scanning using the control panel...40 Scanning using the computer...41 Scanning a document using the computer ...41 Scanning a photo to...
... a slideshow...35 Printing an image as a multiple-page poster ...35 Copying 37 Copying using the control panel...37 Making a copy...37 Copying 4 x 6 photos...37 Copying using the computer...38 Copying a document using the computer ...38 Copying a photo using the computer...39 Scanning 40 Scanning using the control panel...40 Scanning using the computer...41 Scanning a document using the computer ...41 Scanning a photo to...
User's Guide
Page 6
...does not close...63 Poor copy quality...64 Partial document or photo copies...64 Scan troubleshooting...64 Scanner does not respond ...65 Scan was not successful ...65 Scanning takes too long or freezes the computer...65 Poor scanned image quality ...66 Partial document or photo scans...66 Fax troubleshooting...66 Cannot ...send or receive a fax...66 Can send but not receive faxes...67 Can receive but not send faxes...67 Printer receives a blank fax...67 Received fax has poor print quality......
...does not close...63 Poor copy quality...64 Partial document or photo copies...64 Scan troubleshooting...64 Scanner does not respond ...65 Scan was not successful ...65 Scanning takes too long or freezes the computer...65 Poor scanned image quality ...66 Partial document or photo scans...66 Fax troubleshooting...66 Cannot ...send or receive a fax...66 Can send but not receive faxes...67 Can receive but not send faxes...67 Printer receives a blank fax...67 Received fax has poor print quality......
User's Guide
Page 8
...) 1 Click Start Œ Programs or All Programs Œ • Loading paper Lexmark 2500 Series. • Printing 2 Click User's Guide. • Working with printing, copying, scanning, faxing, paper jams, and misfeeds 3 Click Yes. Finding information about the printer 8 Lexmark Solution Center Description Where to find The Lexmark Solution Center software is the letter of the User's Guide appears...
...) 1 Click Start Œ Programs or All Programs Œ • Loading paper Lexmark 2500 Series. • Printing 2 Click User's Guide. • Working with printing, copying, scanning, faxing, paper jams, and misfeeds 3 Click Yes. Finding information about the printer 8 Lexmark Solution Center Description Where to find The Lexmark Solution Center software is the letter of the User's Guide appears...

User's Guide
Page 12
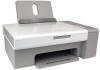
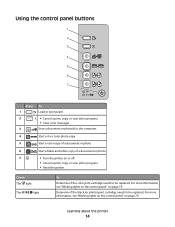
For more information, see "Using the control panel buttons" on page 14. 3 Paper exit tray Hold paper as it exits. 4 Top cover Access the scanner glass. 5 Paper feed guard Prevent small objects from falling inside. 6 Paper guide Keep paper straight when feeding. 7 Scanner glass Copy, scan, fax, or remove an item. Learning about the printer Understanding the parts of the printer 5 6 4 1 7 3 2 Use the To 1 Paper support Load paper. 2 Control panel Operate the printer. Learning about the printer 12
For more information, see "Using the control panel buttons" on page 14. 3 Paper exit tray Hold paper as it exits. 4 Top cover Access the scanner glass. 5 Paper feed guard Prevent small objects from falling inside. 6 Paper guide Keep paper straight when feeding. 7 Scanner glass Copy, scan, fax, or remove an item. Learning about the printer Understanding the parts of the printer 5 6 4 1 7 3 2 Use the To 1 Paper support Load paper. 2 Control panel Operate the printer. Learning about the printer 12
User's Guide
Page 14
... 14 Check The light The light To Determine if the color print cartridge needs to be replaced. For more information, see "Blinking lights on the control panel" on or off. • Cancel a print, copy, or scan job in progress. • Clear error messages. For more ...information, see "Blinking lights on the control panel" on page 70. Scan a document or photo(s) to the computer. 4 Start a 4 x 6 color photo copy. 5 Start a color copy of a document or photo. 6 Start...
... 14 Check The light The light To Determine if the color print cartridge needs to be replaced. For more information, see "Blinking lights on the control panel" on or off. • Cancel a print, copy, or scan job in progress. • Clear error messages. For more ...information, see "Blinking lights on the control panel" on page 70. Scan a document or photo(s) to the computer. 4 Start a 4 x 6 color photo copy. 5 Start a color copy of a document or photo. 6 Start...
User's Guide
Page 15
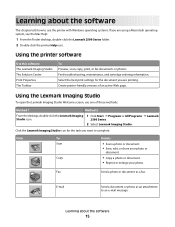
..., double-click the Lexmark 2500 Series folder. 2 Double-click the printer Help icon. Learning about the software This chapter tells how to use one of an active Web page. E-mail Send a document or photo as a fax. Select the best print settings for the task you are printing. Click To Scan Copy Details • Scan a photo or document...
..., double-click the Lexmark 2500 Series folder. 2 Double-click the printer Help icon. Learning about the software This chapter tells how to use one of an active Web page. E-mail Send a document or photo as a fax. Select the best print settings for the task you are printing. Click To Scan Copy Details • Scan a photo or document...
User's Guide
Page 24
... Note: The maximum scan area for the scanner glass is loaded in the center of the paper support. • The paper guides rest against the edges of the banner paper feeds into the printer first. • The paper is 216 x 297 mm (8.5 x 11.7 in Print Properties. Loading paper ...and original documents 24 For more information, see "Using Print Properties" on the scanner glass You can scan a document for faxing. Loading original documents on page 18. Load up to 20 sheets of ...
... Note: The maximum scan area for the scanner glass is loaded in the center of the paper support. • The paper guides rest against the edges of the banner paper feeds into the printer first. • The paper is 216 x 297 mm (8.5 x 11.7 in Print Properties. Loading paper ...and original documents 24 For more information, see "Using Print Properties" on the scanner glass You can scan a document for faxing. Loading original documents on page 18. Load up to 20 sheets of ...

User's Guide
Page 25
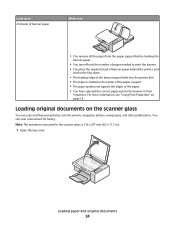
Note: Photos should be loaded as shown. 3 Close the top cover to avoid dark edges on the scanner glass in the lower right corner. Loading paper and original documents 25 2 Place the original document or item facedown on the scanned image.
Note: Photos should be loaded as shown. 3 Close the top cover to avoid dark edges on the scanner glass in the lower right corner. Loading paper and original documents 25 2 Place the original document or item facedown on the scanned image.
User's Guide
Page 35
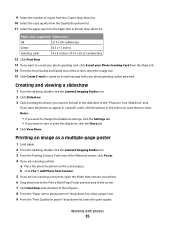
...you want to the Print a Multi-Page Poster preview area of the screen. 7 Click Next Step at the bottom of copies from the Copies drop-down list. 10 Select the copy quality from the Quality ... the Paper Size in the order you are scanning a photo: a Place the photo facedown on " drop-down list, select a paper size. 9 From the "Print Quality for poster" drop-down list. Working ... or print the slideshow, click the Share tab. 4 Click View Show. Printing an image as a multiple-page poster 1 Load paper. 2 From the desktop, double-click the Lexmark Imaging Studio icon. 3 From the Printing Creative...
...you want to the Print a Multi-Page Poster preview area of the screen. 7 Click Next Step at the bottom of copies from the Copies drop-down list. 10 Select the copy quality from the Quality ... the Paper Size in the order you are scanning a photo: a Place the photo facedown on " drop-down list, select a paper size. 9 From the "Print Quality for poster" drop-down list. Working ... or print the slideshow, click the Share tab. 4 Click View Show. Printing an image as a multiple-page poster 1 Load paper. 2 From the desktop, double-click the Lexmark Imaging Studio icon. 3 From the Printing Creative...
User's Guide
Page 40
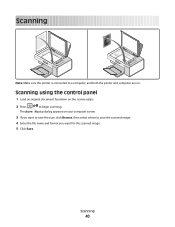
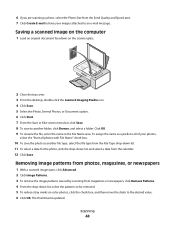
Scanning Note: Make sure the printer is connected to begin scanning. Scanning using the control panel 1 Load an original document facedown on the scanner glass. 2 Press to a computer, and both the printer and computer are on your computer screen. 3 If you want to save the scan, click Browse, then select where to save the scanned image. 4 Enter the file name and format you want for the scanned image. 5 Click Save. Scanning 40 The Save Photo dialog appears on .
Scanning Note: Make sure the printer is connected to begin scanning. Scanning using the control panel 1 Load an original document facedown on the scanner glass. 2 Press to a computer, and both the printer and computer are on your computer screen. 3 If you want to save the scan, click Browse, then select where to save the scanned image. 4 Enter the file name and format you want for the scanned image. 5 Click Save. Scanning 40 The Save Photo dialog appears on .
User's Guide
Page 41
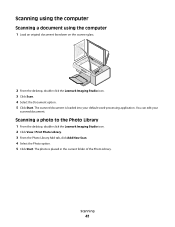
... original document facedown on the scanner glass. 2 From the desktop, double-click the Lexmark Imaging Studio icon. 3 Click Scan. 4 Select the Document option. 5 Click Start. Scanning a photo to the Photo Library 1 From the desktop, double-click the Lexmark Imaging Studio icon. 2 Click View / Print Photo Library. 3 From the Photo Library Add tab, click Add New...
... original document facedown on the scanner glass. 2 From the desktop, double-click the Lexmark Imaging Studio icon. 3 Click Scan. 4 Select the Document option. 5 Click Start. Scanning a photo to the Photo Library 1 From the desktop, double-click the Lexmark Imaging Studio icon. 2 Click View / Print Photo Library. 3 From the Photo Library Add tab, click Add New...
User's Guide
Page 42
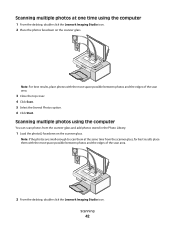
...the Photo Library. 1 Load the photo(s) facedown on the scanner glass. Note: If the photos are small enough to scan them at one time using the computer You can scan photos from the scanner glass, for best results place them with the most space possible between photos and the edges of... the scan area. 2 From the desktop, double-click the Lexmark Imaging Studio icon. Scanning 42 Note: For best results, place photos with ...
...the Photo Library. 1 Load the photo(s) facedown on the scanner glass. Note: If the photos are small enough to scan them at one time using the computer You can scan photos from the scanner glass, for best results place them with the most space possible between photos and the edges of... the scan area. 2 From the desktop, double-click the Lexmark Imaging Studio icon. Scanning 42 Note: For best results, place photos with ...
User's Guide
Page 43
...Repeat step 6 and/or step 7 until you have finished scanning and adding all your computer: a Click Add Another on the right side of the photo is added to add. c Load the photo(s) facedown on the scanner glass. 2 From the desktop, double-click the Lexmark Imaging Studio icon. 3 Click E-mail. 4 Select the ...Photo, Several Photos, or Document option. 5 Click Start. A thumbnail of the screen. Scanning 43
...Repeat step 6 and/or step 7 until you have finished scanning and adding all your computer: a Click Add Another on the right side of the photo is added to add. c Load the photo(s) facedown on the scanner glass. 2 From the desktop, double-click the Lexmark Imaging Studio icon. 3 Click E-mail. 4 Select the ...Photo, Several Photos, or Document option. 5 Click Start. A thumbnail of the screen. Scanning 43
User's Guide
Page 44
... the patterns to be removed. 5 To reduce stray marks on the scanner glass. 2 Close the top cover. 3 From the desktop, double-click the Lexmark Imaging Studio icon. 4 Click Scan. 5 Select the Photo, Several Photos, or Document option. 6 Click Start. 7 From the Save or Edit screen menu bar, click Save. 8 To ...save the photo as a prefix to an e-mail message. The thumbnail is updated. 6 If you are scanning a photo, select the Photo Size from the Send Quality and Speed area. 7 Click Create E-mail to have your images attached to all of your photos...
... the patterns to be removed. 5 To reduce stray marks on the scanner glass. 2 Close the top cover. 3 From the desktop, double-click the Lexmark Imaging Studio icon. 4 Click Scan. 5 Select the Photo, Several Photos, or Document option. 6 Click Start. 7 From the Save or Edit screen menu bar, click Save. 8 To ...save the photo as a prefix to an e-mail message. The thumbnail is updated. 6 If you are scanning a photo, select the Photo Size from the Send Quality and Speed area. 7 Click Create E-mail to have your images attached to all of your photos...

User's Guide
Page 45
... move the program higher in the list. 6 Click Close to move Scanning 45 scanning Changing the order of programs in the Scan Application list 1 From the desktop, double-click the Lexmark Imaging Studio icon. 2 Click View / Print Photo Library. 3 From the program taskbar at the bottom of the screen, click Other Software. 4 Click Modify Application...
... move the program higher in the list. 6 Click Close to move Scanning 45 scanning Changing the order of programs in the Scan Application list 1 From the desktop, double-click the Lexmark Imaging Studio icon. 2 Click View / Print Photo Library. 3 From the program taskbar at the bottom of the screen, click Other Software. 4 Click Modify Application...
User's Guide
Page 46
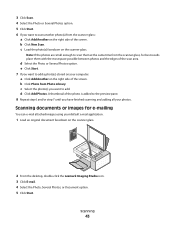
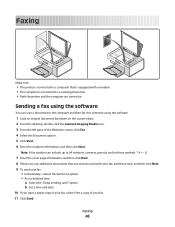
Faxing 46 Note: A fax number can scan a document to the computer and then fax it to someone ...information, and then click Next. 8 If there are turned on the scanner glass. 2 From the desktop, double-click the Lexmark Imaging Studio icon. 3 From the left pane of your fax: • Immediately-Select the Send now option. • At... working phone line. • Both the printer and the computer are any additional documents that you want a paper copy of your fax, select Print a copy of the Welcome screen, click Fax. 4 Select the Document option. 5 Click Start. 6 Enter the recipient information...
Faxing 46 Note: A fax number can scan a document to the computer and then fax it to someone ...information, and then click Next. 8 If there are turned on the scanner glass. 2 From the desktop, double-click the Lexmark Imaging Studio icon. 3 From the left pane of your fax: • Immediately-Select the Send now option. • At... working phone line. • Both the printer and the computer are any additional documents that you want a paper copy of your fax, select Print a copy of the Welcome screen, click Fax. 4 Select the Document option. 5 Click Start. 6 Enter the recipient information...

User's Guide
Page 49
.... 4 Click the Receiving Faxes tab. 5 From the "Incoming Calls" area, select Automatically. 6 From the "Rings before receiving a fax automatically 1 From the desktop, double-click the Lexmark Imaging Studio icon. 2 From the left pane of the Welcome screen, click Fax. Setting the number of rings before pickup" drop-down list, select the... Solution Software. Receiving Faxes • Select auto answer options. • Manage blocked faxes. • Choose whether to turn on the first try. • Select a default scanning device.
.... 4 Click the Receiving Faxes tab. 5 From the "Incoming Calls" area, select Automatically. 6 From the "Rings before receiving a fax automatically 1 From the desktop, double-click the Lexmark Imaging Studio icon. 2 From the left pane of the Welcome screen, click Fax. Setting the number of rings before pickup" drop-down list, select the... Solution Software. Receiving Faxes • Select auto answer options. • Manage blocked faxes. • Choose whether to turn on the first try. • Select a default scanning device.
User's Guide
Page 52
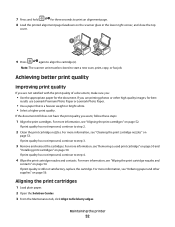
... paper and other high quality images, for three seconds to print an alignment page. 8 Load the printed alignment page facedown on page 56. 7 Press and hold for best results use Lexmark Premium Photo Paper or Lexmark Photo Paper. • Use a paper that is still ... these steps: 1 Align the print cartridges. If print quality is a heavier weight or bright white. • Select a higher print quality. Aligning the print cartridges 1 Load plain paper. 2 Open the Solution Center. 3 From the Maintenance tab, click Align to start a new scan, print, copy, or fax job. For more...
... paper and other high quality images, for three seconds to print an alignment page. 8 Load the printed alignment page facedown on page 56. 7 Press and hold for best results use Lexmark Premium Photo Paper or Lexmark Photo Paper. • Use a paper that is still ... these steps: 1 Align the print cartridges. If print quality is a heavier weight or bright white. • Select a higher print quality. Aligning the print cartridges 1 Load plain paper. 2 Open the Solution Center. 3 From the Maintenance tab, click Align to start a new scan, print, copy, or fax job. For more...
User's Guide
Page 58
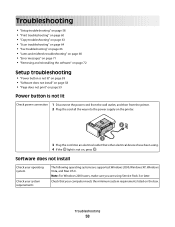
... Windows XP, Windows Vista, and Mac OS X. Troubleshooting 58 Troubleshooting • "Setup troubleshooting" on page 58 • "Print troubleshooting" on page 60 • "Copy troubleshooting" on page 63 • "Scan troubleshooting" on page 64 • "Fax troubleshooting" on page 66 • "Jams and misfeeds troubleshooting" on page 68 ...8226; "Power button is not lit" on page 58 • "Software does not install" on page 58 • "Page does not print" on page 59 Power button is not lit Check power connection 1 Disconnect the power cord from the wall outlet, and then from the printer...
... Windows XP, Windows Vista, and Mac OS X. Troubleshooting 58 Troubleshooting • "Setup troubleshooting" on page 58 • "Print troubleshooting" on page 60 • "Copy troubleshooting" on page 63 • "Scan troubleshooting" on page 64 • "Fax troubleshooting" on page 66 • "Jams and misfeeds troubleshooting" on page 68 ...8226; "Power button is not lit" on page 58 • "Software does not install" on page 58 • "Page does not print" on page 59 Power button is not lit Check power connection 1 Disconnect the power cord from the wall outlet, and then from the printer...

User's Guide
Page 64
...• Distorted graphics or pictures • Missing characters • Faded print • Dark print • Skewed lines • Smudges • Streaks • Unexpected characters • White lines in print Check the control If one of the lights is loaded facedown on the scanner glass in the lower ... original document is loaded facedown on page 44. Review steps to See "Improving print quality" on page 66 Troubleshooting 64 Make sure the paper size being used matches the size you are copying or scanning from photo or glossy paper, a magazine, or a newspaper, photo or glossy...
...• Distorted graphics or pictures • Missing characters • Faded print • Dark print • Skewed lines • Smudges • Streaks • Unexpected characters • White lines in print Check the control If one of the lights is loaded facedown on the scanner glass in the lower ... original document is loaded facedown on page 44. Review steps to See "Improving print quality" on page 66 Troubleshooting 64 Make sure the paper size being used matches the size you are copying or scanning from photo or glossy paper, a magazine, or a newspaper, photo or glossy...


