User's Guide
Page 7
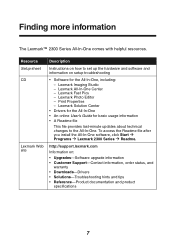
... - To access the Readme file after you install the All-In-One software, click Start Æ Programs Æ Lexmark 2300 Series Æ Readme. Lexmark Fast Pics - Lexmark Imaging Studio - Finding more information The Lexmark™ 2300 Series All-In-One comes with helpful resources. Lexmark Solution Center • Drivers for the All-In-One • An online...
... - To access the Readme file after you install the All-In-One software, click Start Æ Programs Æ Lexmark 2300 Series Æ Readme. Lexmark Fast Pics - Lexmark Imaging Studio - Finding more information The Lexmark™ 2300 Series All-In-One comes with helpful resources. Lexmark Solution Center • Drivers for the All-In-One • An online...
User's Guide
Page 12
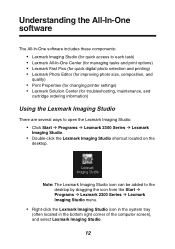
... Lexmark Imaging Studio icon can be added to open the Lexmark Imaging Studio: • Click Start Æ Programs Æ Lexmark 2300 Series Æ Lexmark Imaging Studio. • Double-click the Lexmark Imaging Studio shortcut located on the desktop. Understanding the All-In-One software The All-In-One software includes these components: • Lexmark Imaging Studio (for quick access to each task) • Lexmark...
... Lexmark Imaging Studio icon can be added to open the Lexmark Imaging Studio: • Click Start Æ Programs Æ Lexmark 2300 Series Æ Lexmark Imaging Studio. • Double-click the Lexmark Imaging Studio shortcut located on the desktop. Understanding the All-In-One software The All-In-One software includes these components: • Lexmark Imaging Studio (for quick access to each task) • Lexmark...
User's Guide
Page 18
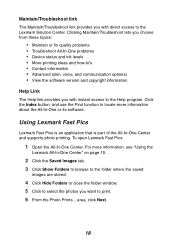
... application that is part of the All-In-One Center and supports photo printing. For more information about the All-In-One or its software. To open Lexmark Fast Pics: 1 Open the All-In-One Center. Clicking Maintain/Troubleshoot lets you choose from these topics: • Maintain or fix ...Troubleshoot link provides you with direct access to locate more information, see "Using the Lexmark All-In-One Center" on page 15. 2 Click the Saved Images tab. 3 Click Show Folders to browse to the folder where the saved images are stored. 4 Click Hide Folders to close the folder window. 5 Click ...
... application that is part of the All-In-One Center and supports photo printing. For more information about the All-In-One or its software. To open Lexmark Fast Pics: 1 Open the All-In-One Center. Clicking Maintain/Troubleshoot lets you choose from these topics: • Maintain or fix ...Troubleshoot link provides you with direct access to locate more information, see "Using the Lexmark All-In-One Center" on page 15. 2 Click the Saved Images tab. 3 Click Show Folders to browse to the folder where the saved images are stored. 4 Click Hide Folders to close the folder window. 5 Click ...
User's Guide
Page 24
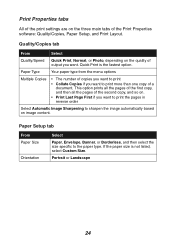
...The number of copies you want to print • Collate Copies if you want to print the pages in reverse order Select Automatic Image Sharpening to sharpen the image automatically based on . • Print Last Page First if you want . This option prints all the pages of the first ... Custom Size. Quality/Copies tab From Select Quality/Speed Quick Print, Normal, or Photo, depending on the three main tabs of the Print Properties software: Quality/Copies, Paper Setup, and Print Layout. Paper Setup tab From Paper Size Orientation Select Paper, Envelope, Banner, or Borderless, and then select...
...The number of copies you want to print • Collate Copies if you want to print the pages in reverse order Select Automatic Image Sharpening to sharpen the image automatically based on . • Print Last Page First if you want . This option prints all the pages of the first ... Custom Size. Quality/Copies tab From Select Quality/Speed Quick Print, Normal, or Photo, depending on the three main tabs of the Print Properties software: Quality/Copies, Paper Setup, and Print Layout. Paper Setup tab From Paper Size Orientation Select Paper, Envelope, Banner, or Borderless, and then select...
User's Guide
Page 48
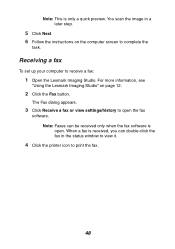
...Click the printer icon to complete the task. The Fax dialog appears. 3 Click Receive a fax or view settings/history to receive a fax: 1 Open the Lexmark Imaging Studio. Note: Faxes can double-click the fax in a later step. 5 Click Next. 6 Follow the instructions on page 12. 2 Click the Fax button...fax is received, you can be received only when the fax software is only a quick preview. Note: This is open the fax software. Receiving a fax To set up your computer to open . For more information, see "Using the Lexmark Imaging Studio" on the computer screen to print the fax. 48
...Click the printer icon to complete the task. The Fax dialog appears. 3 Click Receive a fax or view settings/history to receive a fax: 1 Open the Lexmark Imaging Studio. Note: Faxes can double-click the fax in a later step. 5 Click Next. 6 Follow the instructions on page 12. 2 Click the Fax button...fax is received, you can be received only when the fax software is only a quick preview. Note: This is open the fax software. Receiving a fax To set up your computer to open . For more information, see "Using the Lexmark Imaging Studio" on the computer screen to print the fax. 48
User's Guide
Page 67
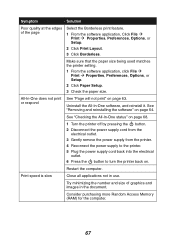
... not print or respond See "Page will not print" on page 64. Symptom Solution Poor quality at the edges of graphics and images in use. Print speed is slow Close all applications not in the document. Restart the computer. Consider purchasing more Random Access Memory ...(RAM) for the computer. 67 Make sure that the paper size being used matches the printer setting. 1 From the software application, click File Æ Print Æ Properties, Preferences, Options, or Setup. 2 Click Paper Setup. 3 Check the paper size. See "Checking...
... not print or respond See "Page will not print" on page 64. Symptom Solution Poor quality at the edges of graphics and images in use. Print speed is slow Close all applications not in the document. Restart the computer. Consider purchasing more Random Access Memory ...(RAM) for the computer. 67 Make sure that the paper size being used matches the printer setting. 1 From the software application, click File Æ Print Æ Properties, Preferences, Options, or Setup. 2 Click Paper Setup. 3 Check the paper size. See "Checking...
User's Guide
Page 75
Index A Advanced tab 26 All-In-One Center 15 All-In-One Center tabs Saved Images 17 Scanning & Copying 16 All-In-One parts 9 All-In-One software 12 B banner paper 29 borderless printing 35 C cartridge aligning 56 cleaning 57 installing 54 ordering 60 preserving 59 removing...ink low 71 installing print cartridges 54 software 64 iron-on transfers 28 J jams and misfeeds 65 L Lexmark All-In-One Center 15 Lexmark Fast Pics 18 Lexmark Imaging Studio 13 Lexmark Photo Editor 20 Lexmark products ordering 60 recycling 60 Lexmark Solution Center (LSC) 25 Lexmark Solution Center tabs Advanced 26 Contact ...
Index A Advanced tab 26 All-In-One Center 15 All-In-One Center tabs Saved Images 17 Scanning & Copying 16 All-In-One parts 9 All-In-One software 12 B banner paper 29 borderless printing 35 C cartridge aligning 56 cleaning 57 installing 54 ordering 60 preserving 59 removing...ink low 71 installing print cartridges 54 software 64 iron-on transfers 28 J jams and misfeeds 65 L Lexmark All-In-One Center 15 Lexmark Fast Pics 18 Lexmark Imaging Studio 13 Lexmark Photo Editor 20 Lexmark products ordering 60 recycling 60 Lexmark Solution Center (LSC) 25 Lexmark Solution Center tabs Advanced 26 Contact ...

User's Guide
Page 76
Printer Status 26 Troubleshooting 26 Lexmark Web site 60 loading 4 x 6 cards 29 banner paper 29 documents on scanner glass 32 envelopes 31 glossy paper 28 greeting cards 29 photo cards 29 ... R receiving a fax 48 recycling 60 reinstalling software 64 removing print cartridge 52 software 64 replacing print cartridge 52 S safety information 2 Saved Images tab 17 Scan section 16 scan troubleshooting 69 scanner glass cleaning 59 placing documents on 32 scanner unit 10 scanning 37 sending a fax 47 setup troubleshooting 61 software Lexmark All-In-One 76
Printer Status 26 Troubleshooting 26 Lexmark Web site 60 loading 4 x 6 cards 29 banner paper 29 documents on scanner glass 32 envelopes 31 glossy paper 28 greeting cards 29 photo cards 29 ... R receiving a fax 48 recycling 60 reinstalling software 64 removing print cartridge 52 software 64 replacing print cartridge 52 S safety information 2 Saved Images tab 17 Scan section 16 scan troubleshooting 69 scanner glass cleaning 59 placing documents on 32 scanner unit 10 scanning 37 sending a fax 47 setup troubleshooting 61 software Lexmark All-In-One 76
User's Guide
Page 77
Center 15 Lexmark Fast Pics 18 Lexmark Imaging Studio 13 Lexmark Photo Editor 20 Lexmark Solution Center 25 Print Properties 22 reinstalling 64 removing 64 understanding 12 uninstalling 64 specialty paper banner paper 29 envelopes 31 greeting cards .../glossy paper 28 postcards 29 transparencies 30 supplies ordering 60 recycling 60 install 62 Troubleshooting tab 26 U understanding Lexmark Solution Center 25 Print Properties 22 uninstalling software 64 USB cable 60 W Web site, Lexmark 60 wiping print cartridge nozzles 58 T top cover 9 transparencies 30 troubleshooting All-In-One does not print ...
Center 15 Lexmark Fast Pics 18 Lexmark Imaging Studio 13 Lexmark Photo Editor 20 Lexmark Solution Center 25 Print Properties 22 reinstalling 64 removing 64 understanding 12 uninstalling 64 specialty paper banner paper 29 envelopes 31 greeting cards .../glossy paper 28 postcards 29 transparencies 30 supplies ordering 60 recycling 60 install 62 Troubleshooting tab 26 U understanding Lexmark Solution Center 25 Print Properties 22 uninstalling software 64 USB cable 60 W Web site, Lexmark 60 wiping print cartridge nozzles 58 T top cover 9 transparencies 30 troubleshooting All-In-One does not print ...

