User's Guide
Page 4
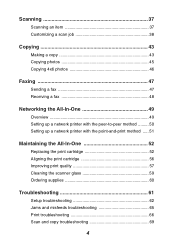
...-peer method ......... 50 Setting up a network printer with the point-and-print method ..... 51 Maintaining the All-In-One 52 Replacing the print cartridge 52 Aligning the print cartridge 56 Improving print quality 57 Cleaning the scanner glass 59 Ordering supplies 60 Troubleshooting 61 Setup troubleshooting 62 Jams and misfeeds troubleshooting 65...
...-peer method ......... 50 Setting up a network printer with the point-and-print method ..... 51 Maintaining the All-In-One 52 Replacing the print cartridge 52 Aligning the print cartridge 56 Improving print quality 57 Cleaning the scanner glass 59 Ordering supplies 60 Troubleshooting 61 Setup troubleshooting 62 Jams and misfeeds troubleshooting 65...

User's Guide
Page 8
Opening the box These items are in the box with the All-In-One: Note: A USB cable may or may not be included. 5 1 2 43 1 Power supply cord 2 USB cable 3 Print cartridge 4 Setup sheet 5 Software CD 8 If problems occur, see "Setup troubleshooting" on the Lexmark 2300 Series Setup sheet. Unpacking the All-In-One To set up the All-In-One, follow the instructions on page 62.
Opening the box These items are in the box with the All-In-One: Note: A USB cable may or may not be included. 5 1 2 43 1 Power supply cord 2 USB cable 3 Print cartridge 4 Setup sheet 5 Software CD 8 If problems occur, see "Setup troubleshooting" on the Lexmark 2300 Series Setup sheet. Unpacking the All-In-One To set up the All-In-One, follow the instructions on page 62.
User's Guide
Page 10
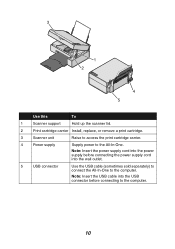
3 1 2 4 5 Use this To 1 Scanner support Hold up the scanner lid. 2 Print cartridge carrier Install, replace, or remove a print cartridge. 3 Scanner unit Raise to access the print cartridge carrier. 4 Power supply Supply power to the computer. 10 Note: Insert the USB cable into the wall outlet. 5 USB connector Use the USB cable (sometimes sold separately) to connect the All-In-One to the computer. Note: Insert the power supply cord into the power supply before connecting the power supply cord into the USB connector before connecting to the All-In-One.
3 1 2 4 5 Use this To 1 Scanner support Hold up the scanner lid. 2 Print cartridge carrier Install, replace, or remove a print cartridge. 3 Scanner unit Raise to access the print cartridge carrier. 4 Power supply Supply power to the computer. 10 Note: Insert the USB cable into the wall outlet. 5 USB connector Use the USB cable (sometimes sold separately) to connect the All-In-One to the computer. Note: Insert the power supply cord into the power supply before connecting the power supply cord into the USB connector before connecting to the All-In-One.

User's Guide
Page 12
... Pics (for quick digital photo selection and printing) • Lexmark Photo Editor (for improving photo size, composition, and quality) • Print Properties (for changing printer settings) • Lexmark Solution Center (for troubleshooting, maintenance, and cartridge ordering information) Using the Lexmark Imaging Studio There are several ways to the desktop by dragging the icon from...
... Pics (for quick digital photo selection and printing) • Lexmark Photo Editor (for improving photo size, composition, and quality) • Print Properties (for changing printer settings) • Lexmark Solution Center (for troubleshooting, maintenance, and cartridge ordering information) Using the Lexmark Imaging Studio There are several ways to the desktop by dragging the icon from...
User's Guide
Page 26
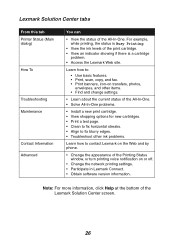
... to fix blurry edges. • Troubleshoot other ink problems. Learn how to contact Lexmark on the Web and by phone. • Change the appearance of the print cartridge. • View an indicator showing if there is a cartridge problem. • Access the Lexmark Web site. For example, while printing, the status is Busy Printing. •...
... to fix blurry edges. • Troubleshoot other ink problems. Learn how to contact Lexmark on the Web and by phone. • Change the appearance of the print cartridge. • View an indicator showing if there is a cartridge problem. • Access the Lexmark Web site. For example, while printing, the status is Busy Printing. •...
User's Guide
Page 52
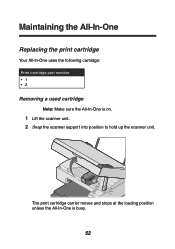
The print cartridge carrier moves and stops at the loading position unless the All-In-One is on. 1 Lift the scanner unit. 2 Snap the scanner support into position to hold up the scanner unit. Maintaining the All-In-One Replacing the print cartridge Your All-In-One uses the following cartridge: Print cartridge part number •1 •2 Removing a used cartridge Note: Make sure the All-In-One is busy. 52
The print cartridge carrier moves and stops at the loading position unless the All-In-One is on. 1 Lift the scanner unit. 2 Snap the scanner support into position to hold up the scanner unit. Maintaining the All-In-One Replacing the print cartridge Your All-In-One uses the following cartridge: Print cartridge part number •1 •2 Removing a used cartridge Note: Make sure the All-In-One is busy. 52
User's Guide
Page 53
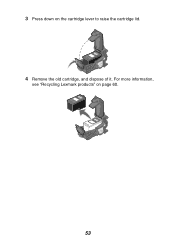
3 Press down on page 60. 1 1 53 For more information, see "Recycling Lexmark products" on the cartridge lever to raise the cartridge lid. 1 4 Remove the old cartridge, and dispose of it.
3 Press down on page 60. 1 1 53 For more information, see "Recycling Lexmark products" on the cartridge lever to raise the cartridge lid. 1 4 Remove the old cartridge, and dispose of it.
User's Guide
Page 54
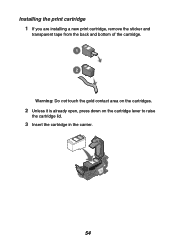
Installing the print cartridge 1 If you are installing a new print cartridge, remove the sticker and transparent tape from the back and bottom of the cartridge. 1 1 1 2 Warning: Do not touch the gold contact area on the cartridges. 2 Unless it is already open, press down on the cartridge lever to raise the cartridge lid. 3 Insert the cartridge in the carrier. 1 1 54
Installing the print cartridge 1 If you are installing a new print cartridge, remove the sticker and transparent tape from the back and bottom of the cartridge. 1 1 1 2 Warning: Do not touch the gold contact area on the cartridges. 2 Unless it is already open, press down on the cartridge lever to raise the cartridge lid. 3 Insert the cartridge in the carrier. 1 1 54
User's Guide
Page 56
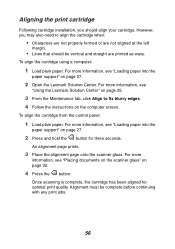
...For more information, see "Using the Lexmark Solution Center" on page 32. 4 Press the button. For more information, see "Placing documents on the scanner glass" on page 25. 3 From the Maintenance tab, click Align to align the cartridge when: • Characters are not ...Loading paper into the paper support" on the computer screen. Aligning the print cartridge Following cartridge installation, you may also need to fix blurry edges. 4 Follow the instructions on page 27. 2 Open the Lexmark Solution Center. However, you should be complete before continuing with any print jobs...
...For more information, see "Using the Lexmark Solution Center" on page 32. 4 Press the button. For more information, see "Placing documents on the scanner glass" on page 25. 3 From the Maintenance tab, click Align to align the cartridge when: • Characters are not ...Loading paper into the paper support" on the computer screen. Aligning the print cartridge Following cartridge installation, you may also need to fix blurry edges. 4 Follow the instructions on page 27. 2 Open the Lexmark Solution Center. However, you should be complete before continuing with any print jobs...

User's Guide
Page 57
... print the document again. Cleaning the print cartridge nozzles 1 Load paper. For more information, see "Loading paper into the paper support" on page 27. 2 Click Start Æ Programs Æ Lexmark 2300 Series Æ Lexmark Solution Center. 3 From the Maintenance tab, click Clean to verify that is a heavier weight, is bright white, or is...
... print the document again. Cleaning the print cartridge nozzles 1 Load paper. For more information, see "Loading paper into the paper support" on page 27. 2 Click Start Æ Programs Æ Lexmark 2300 Series Æ Lexmark Solution Center. 3 From the Maintenance tab, click Clean to verify that is a heavier weight, is bright white, or is...
User's Guide
Page 58
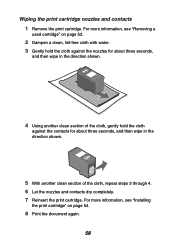
... and contacts 1 Remove the print cartridge. For more information, see "Installing the print cartridge" on page 52. 2 Dampen a clean, lint-free cloth with water. 3 Gently hold the cloth against the nozzles for about three seconds, and then wipe in ... wipe in the direction shown. 5 With another clean section of the cloth, repeat steps 3 through 4. 6 Let the nozzles and contacts dry completely. 7 Reinsert the print cartridge. For more information, see "Removing a used cartridge" on page 54. 8 Print the document again. 58 1
... and contacts 1 Remove the print cartridge. For more information, see "Installing the print cartridge" on page 52. 2 Dampen a clean, lint-free cloth with water. 3 Gently hold the cloth against the nozzles for about three seconds, and then wipe in ... wipe in the direction shown. 5 With another clean section of the cloth, repeat steps 3 through 4. 6 Let the nozzles and contacts dry completely. 7 Reinsert the print cartridge. For more information, see "Removing a used cartridge" on page 54. 8 Print the document again. 58 1
User's Guide
Page 59
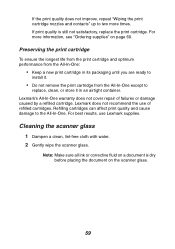
... the scanner glass 1 Dampen a clean, lint-free cloth with water. 2 Gently wipe the scanner glass. Refilling cartridges can affect print quality and cause damage to the All-In-One. Lexmark does not recommend the use Lexmark supplies. Note: Make sure all ink or corrective fluid on page 60. For best results, use of...
... the scanner glass 1 Dampen a clean, lint-free cloth with water. 2 Gently wipe the scanner glass. Refilling cartridges can affect print quality and cause damage to the All-In-One. Lexmark does not recommend the use Lexmark supplies. Note: Make sure all ink or corrective fluid on page 60. For best results, use of...
User's Guide
Page 60
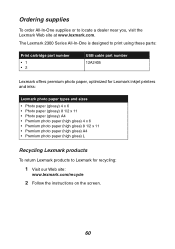
... Series All-In-One is designed to print using these parts: Print cartridge part number •1 •2 USB cable part number 12A2405 Lexmark offers premium photo paper, optimized for Lexmark inkjet printers and inks: Lexmark photo paper types and sizes • Photo paper (glossy) 4 x 6 • Photo paper (... (high gloss) L Recycling Lexmark products To return Lexmark products to locate a dealer near you, visit the Lexmark Web site at www.lexmark.com. Ordering supplies To order All-In-One supplies or to Lexmark for recycling: 1 Visit our Web site: www.lexmark.com/recycle 2 Follow the ...
... Series All-In-One is designed to print using these parts: Print cartridge part number •1 •2 USB cable part number 12A2405 Lexmark offers premium photo paper, optimized for Lexmark inkjet printers and inks: Lexmark photo paper types and sizes • Photo paper (glossy) 4 x 6 • Photo paper (... (high gloss) L Recycling Lexmark products To return Lexmark products to locate a dealer near you, visit the Lexmark Web site at www.lexmark.com. Ordering supplies To order All-In-One supplies or to Lexmark for recycling: 1 Visit our Web site: www.lexmark.com/recycle 2 Follow the ...
User's Guide
Page 63
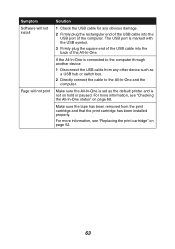
For more information, see "Replacing the print cartridge" on hold or paused. The USB port is marked with the USB symbol. 3 Firmly plug the square end of the USB cable into the USB ... as a USB hub or switch box. 2 Directly connect the cable to the computer through another device: 1 Disconnect the USB cable from the print cartridge and that the print cartridge has been installed properly. If the All-In-One is not on page 52. 63 Symptom Software will not install Page will not...
For more information, see "Replacing the print cartridge" on hold or paused. The USB port is marked with the USB symbol. 3 Firmly plug the square end of the USB cable into the USB ... as a USB hub or switch box. 2 Directly connect the cable to the computer through another device: 1 Disconnect the USB cable from the print cartridge and that the print cartridge has been installed properly. If the All-In-One is not on page 52. 63 Symptom Software will not install Page will not...

User's Guide
Page 66
... media. See "Improving print quality" on page 69. Use only new, unwrinkled paper. Check the ink levels, and install a new print cartridge if necessary. For photo printing, we recommend Lexmark photo paper. Unless you are using the following types of the page Solution If you are using the scan or copy features...
... media. See "Improving print quality" on page 69. Use only new, unwrinkled paper. Check the ink levels, and install a new print cartridge if necessary. For photo printing, we recommend Lexmark photo paper. Unless you are using the following types of the page Solution If you are using the scan or copy features...

User's Guide
Page 70
..., clean, lint-free cloth. Gently wipe the scanner glass with a new cartridge. Symptom Solution Scanning takes too long or freezes the computer Close all programs not being used. To change the scanning resolution to a lower value: 1 Click Start Æ Programs Æ Lexmark 2300 Series Æ All-In-One Center. 2 From the Scan...
..., clean, lint-free cloth. Gently wipe the scanner glass with a new cartridge. Symptom Solution Scanning takes too long or freezes the computer Close all programs not being used. To change the scanning resolution to a lower value: 1 Click Start Æ Programs Æ Lexmark 2300 Series Æ All-In-One Center. 2 From the Scan...
User's Guide
Page 71
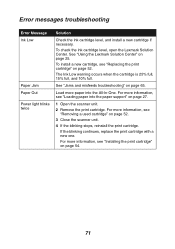
...stops, reinstall the print cartridge. If the blinking continues, replace the print cartridge with a new one. For more information, see "Installing the print cartridge" on page 27. 1 Open the scanner unit. 2 Remove the print cartridge. To check the ink cartridge level, open the Lexmark Solution Center. The Ink...For more information, see "Replacing the print cartridge" on page 25. For more paper into the paper support" on page 54. 71 To install a new cartridge, see "Removing a used cartridge" on page 65. See "Using the Lexmark Solution Center" on page 52. Error messages ...
...stops, reinstall the print cartridge. If the blinking continues, replace the print cartridge with a new one. For more information, see "Installing the print cartridge" on page 27. 1 Open the scanner unit. 2 Remove the print cartridge. To check the ink cartridge level, open the Lexmark Solution Center. The Ink...For more information, see "Replacing the print cartridge" on page 25. For more paper into the paper support" on page 54. 71 To install a new cartridge, see "Removing a used cartridge" on page 65. See "Using the Lexmark Solution Center" on page 52. Error messages ...
User's Guide
Page 75
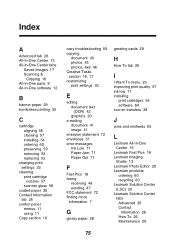
...tabs Saved Images 17 Scanning & Copying 16 All-In-One parts 9 All-In-One software 12 B banner paper 29 borderless printing 35 C cartridge aligning 56 cleaning 57 installing 54 ordering 60 preserving 59 removing 52 replacing 52 changing print settings 33 cleaning print... 57 ink low 71 installing print cartridges 54 software 64 iron-on transfers 28 J jams and misfeeds 65 L Lexmark All-In-One Center 15 Lexmark Fast Pics 18 Lexmark Imaging Studio 13 Lexmark Photo Editor 20 Lexmark products ordering 60 recycling 60 Lexmark Solution Center (LSC) 25 Lexmark Solution Center tabs Advanced 26 Contact ...
...tabs Saved Images 17 Scanning & Copying 16 All-In-One parts 9 All-In-One software 12 B banner paper 29 borderless printing 35 C cartridge aligning 56 cleaning 57 installing 54 ordering 60 preserving 59 removing 52 replacing 52 changing print settings 33 cleaning print... 57 ink low 71 installing print cartridges 54 software 64 iron-on transfers 28 J jams and misfeeds 65 L Lexmark All-In-One Center 15 Lexmark Fast Pics 18 Lexmark Imaging Studio 13 Lexmark Photo Editor 20 Lexmark products ordering 60 recycling 60 Lexmark Solution Center (LSC) 25 Lexmark Solution Center tabs Advanced 26 Contact ...

User's Guide
Page 76
Printer Status 26 Troubleshooting 26 Lexmark Web site 60 loading 4 x 6 cards 29 banner paper 29 documents on...One 52 Maintenance tab 26 N networking 49 peer-to-peer method 50 point-and-print method 51 nozzles, print cartridge cleaning 57 wiping 58 O OCR editing document text 42 Open with section 17 ordering supplies 60 out of paper ...scanning a photograph to e-mail 41 R receiving a fax 48 recycling 60 reinstalling software 64 removing print cartridge 52 software 64 replacing print cartridge 52 S safety information 2 Saved Images tab 17 Scan section 16 scan troubleshooting 69 scanner glass cleaning...
Printer Status 26 Troubleshooting 26 Lexmark Web site 60 loading 4 x 6 cards 29 banner paper 29 documents on...One 52 Maintenance tab 26 N networking 49 peer-to-peer method 50 point-and-print method 51 nozzles, print cartridge cleaning 57 wiping 58 O OCR editing document text 42 Open with section 17 ordering supplies 60 out of paper ...scanning a photograph to e-mail 41 R receiving a fax 48 recycling 60 reinstalling software 64 removing print cartridge 52 software 64 replacing print cartridge 52 S safety information 2 Saved Images tab 17 Scan section 16 scan troubleshooting 69 scanner glass cleaning...
User's Guide
Page 77
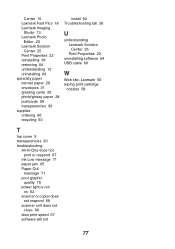
Center 15 Lexmark Fast Pics 18 Lexmark Imaging Studio 13 Lexmark Photo Editor 20 Lexmark Solution Center 25 Print Properties 22 reinstalling 64 removing 64 understanding 12 uninstalling 64 specialty paper banner paper 29 envelopes 31 greeting cards 29... 28 postcards 29 transparencies 30 supplies ordering 60 recycling 60 install 62 Troubleshooting tab 26 U understanding Lexmark Solution Center 25 Print Properties 22 uninstalling software 64 USB cable 60 W Web site, Lexmark 60 wiping print cartridge nozzles 58 T top cover 9 transparencies 30 troubleshooting All-In-One does not print or respond ...
Center 15 Lexmark Fast Pics 18 Lexmark Imaging Studio 13 Lexmark Photo Editor 20 Lexmark Solution Center 25 Print Properties 22 reinstalling 64 removing 64 understanding 12 uninstalling 64 specialty paper banner paper 29 envelopes 31 greeting cards 29... 28 postcards 29 transparencies 30 supplies ordering 60 recycling 60 install 62 Troubleshooting tab 26 U understanding Lexmark Solution Center 25 Print Properties 22 uninstalling software 64 USB cable 60 W Web site, Lexmark 60 wiping print cartridge nozzles 58 T top cover 9 transparencies 30 troubleshooting All-In-One does not print or respond ...


