
User's Guide
Page 1
All rights reserved. 740 West New Circle Road Lexington, Kentucky 40550 2300 Series All-In-One User's Guide May 2005 www.lexmark.com Lexmark and Lexmark with diamond design are trademarks of Lexmark International, Inc., registered in the United States and/or other countries. © 2005 Lexmark International, Inc.
All rights reserved. 740 West New Circle Road Lexington, Kentucky 40550 2300 Series All-In-One User's Guide May 2005 www.lexmark.com Lexmark and Lexmark with diamond design are trademarks of Lexmark International, Inc., registered in the United States and/or other countries. © 2005 Lexmark International, Inc.
User's Guide
Page 7
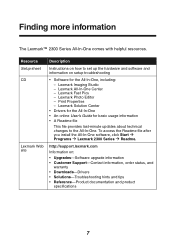
... Information on how to the All-In-One. Lexmark Photo Editor - Lexmark All-In-One Center - Print Properties - Lexmark Solution Center • Drivers for the All-In-One • An online User's Guide for basic usage information • A Readme file This file provides last-minute...the All-In-One software, click Start Æ Programs Æ Lexmark 2300 Series Æ Readme. Finding more information The Lexmark™ 2300 Series All-In-One comes with helpful resources. Resource Setup sheet CD Lexmark Web site Description Instructions on : • Upgrades-Software upgrade information ...
... Information on how to the All-In-One. Lexmark Photo Editor - Lexmark All-In-One Center - Print Properties - Lexmark Solution Center • Drivers for the All-In-One • An online User's Guide for basic usage information • A Readme file This file provides last-minute...the All-In-One software, click Start Æ Programs Æ Lexmark 2300 Series Æ Readme. Finding more information The Lexmark™ 2300 Series All-In-One comes with helpful resources. Resource Setup sheet CD Lexmark Web site Description Instructions on : • Upgrades-Software upgrade information ...
User's Guide
Page 9
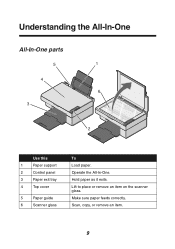
Make sure paper feeds correctly. Scan, copy, or remove an item. 9 Hold paper as it exits. Lift to place or remove an item on the scanner glass. Operate the All-In-One. Understanding the All-In-One All-In-One parts 5 1 4 6 3 2 Use this 1 Paper support 2 Control panel 3 Paper exit tray 4 Top cover 5 Paper guide 6 Scanner glass To Load paper.
Make sure paper feeds correctly. Scan, copy, or remove an item. 9 Hold paper as it exits. Lift to place or remove an item on the scanner glass. Operate the All-In-One. Understanding the All-In-One All-In-One parts 5 1 4 6 3 2 Use this 1 Paper support 2 Control panel 3 Paper exit tray 4 Top cover 5 Paper guide 6 Scanner glass To Load paper.
User's Guide
Page 27
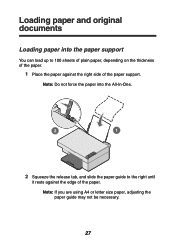
Note: Do not force the paper into the paper support You can load up to the right until it rests against the right side of the paper. Note: If you are using A4 or letter size paper, adjusting the paper guide may not be necessary. 27 Loading paper and original documents Loading paper into the All-In-One. 2 1 2 Squeeze the release tab, and slide the paper guide to 100 sheets of plain paper, depending on the thickness of the paper. 1 Place the paper against the edge of the paper support.
Note: Do not force the paper into the paper support You can load up to the right until it rests against the right side of the paper. Note: If you are using A4 or letter size paper, adjusting the paper guide may not be necessary. 27 Loading paper and original documents Loading paper into the All-In-One. 2 1 2 Squeeze the release tab, and slide the paper guide to 100 sheets of plain paper, depending on the thickness of the paper. 1 Place the paper against the edge of the paper support.

User's Guide
Page 28
... that is facing you read them carefully. • You load the photo paper vertically against the right side of the paper support. • The paper guide rests against the edge of the photo paper. paper (depending on transfer packaging. Up to 10 iron-on transfers • The print side (blank side...) is made for inkjet printers. • If the paper came with instructions, you . • The paper guide rests against the edge of the iron-on transfers. • You follow the loading instructions on the iron-on the • The paper...
... that is facing you read them carefully. • You load the photo paper vertically against the right side of the paper support. • The paper guide rests against the edge of the photo paper. paper (depending on transfer packaging. Up to 10 iron-on transfers • The print side (blank side...) is made for inkjet printers. • If the paper came with instructions, you . • The paper guide rests against the edge of the iron-on transfers. • You follow the loading instructions on the iron-on the • The paper...

User's Guide
Page 29
... right side of the paper support. • You do not force the cards into the All-In-One. • You squeeze and slide the paper guide to 25 sheets of • If the cards came with instructions, you . • The cards are loaded vertically against the right side of the support..., as shown. • You squeeze and slide the paper guide to the left side of the banner paper. postcards, or photo cards • The print side is facing you read them greeting card stock, carefully...
... right side of the paper support. • You do not force the cards into the All-In-One. • You squeeze and slide the paper guide to 25 sheets of • If the cards came with instructions, you . • The cards are loaded vertically against the right side of the support..., as shown. • You squeeze and slide the paper guide to the left side of the banner paper. postcards, or photo cards • The print side is facing you read them greeting card stock, carefully...
User's Guide
Page 30
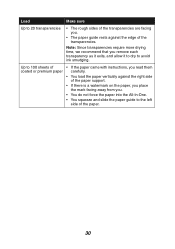
Load Make sure Up to 20 transparencies • The rough sides of the transparencies are facing you. • The paper guide rests against the right side of the paper support. • If there is a watermark on the paper, you place the mark facing away from you. &#...8226; You do not force the paper into the All-In-One. • You squeeze and slide the paper guide to the left side of the paper. 30 Note: Since transparencies require more drying time, we recommend that you read them coated or premium paper...
Load Make sure Up to 20 transparencies • The rough sides of the transparencies are facing you. • The paper guide rests against the right side of the paper support. • If there is a watermark on the paper, you place the mark facing away from you. &#...8226; You do not force the paper into the All-In-One. • You squeeze and slide the paper guide to the left side of the paper. 30 Note: Since transparencies require more drying time, we recommend that you read them coated or premium paper...

User's Guide
Page 31
Load Up to 10 envelopes Make sure • The print side is facing you. • The envelopes are loaded vertically against the right side of the paper support. • The stamp location is in the upper left corner. • The paper guide rests against the edge of the envelopes. Note: Do not load envelopes with: • Holes, perforations, or deep embossing • Metal clasps, string ties, or metal folding bars • Exposed flap adhesive 31
Load Up to 10 envelopes Make sure • The print side is facing you. • The envelopes are loaded vertically against the right side of the paper support. • The stamp location is in the upper left corner. • The paper guide rests against the edge of the envelopes. Note: Do not load envelopes with: • Holes, perforations, or deep embossing • Metal clasps, string ties, or metal folding bars • Exposed flap adhesive 31

User's Guide
Page 76
Printer Status 26 Troubleshooting 26 Lexmark Web site 60 loading 4 x 6 cards 29 banner paper 29 documents on scanner glass 32 envelopes 31 glossy paper 28 greeting cards 29...57 wiping 58 O OCR editing document text 42 Open with section 17 ordering supplies 60 out of paper 71 P paper exit tray 9 paper guide 9 paper jam 71 paper out 71 Paper Setup tab 24 paper support 9 paper, loading 27 photo cards 29 Photo Editor opening 20 task menus... 69 scanner glass cleaning 59 placing documents on 32 scanner unit 10 scanning 37 sending a fax 47 setup troubleshooting 61 software Lexmark All-In-One 76
Printer Status 26 Troubleshooting 26 Lexmark Web site 60 loading 4 x 6 cards 29 banner paper 29 documents on scanner glass 32 envelopes 31 glossy paper 28 greeting cards 29...57 wiping 58 O OCR editing document text 42 Open with section 17 ordering supplies 60 out of paper 71 P paper exit tray 9 paper guide 9 paper jam 71 paper out 71 Paper Setup tab 24 paper support 9 paper, loading 27 photo cards 29 Photo Editor opening 20 task menus... 69 scanner glass cleaning 59 placing documents on 32 scanner unit 10 scanning 37 sending a fax 47 setup troubleshooting 61 software Lexmark All-In-One 76


