User's Guide
Page 2
...Hewlett-Packard Company. This means the printer recognizes PostScript 3 commands used in the Technical Reference. PCL is a registered trademark of Lexmark International, Inc. Details relating to compatibility are included in various application programs, and the printer emulates the functions corresponding to the... commands. In the United Kingdom and Eire, send to Lexmark International Ltd., Marketing and Services Department, Westhorpe House, Westhorpe, Marlow Bucks SL7 3RQ. This means the printer recognizes PCL commands used in its software products. You must understand ...
...Hewlett-Packard Company. This means the printer recognizes PostScript 3 commands used in the Technical Reference. PCL is a registered trademark of Lexmark International, Inc. Details relating to compatibility are included in various application programs, and the printer emulates the functions corresponding to the... commands. In the United Kingdom and Eire, send to Lexmark International Ltd., Marketing and Services Department, Westhorpe House, Westhorpe, Marlow Bucks SL7 3RQ. This means the printer recognizes PCL commands used in its software products. You must understand ...
User's Guide
Page 3
...Macintosh ...15 UNIX/Linux ...16 Chapter 3: Installing drivers for network printing 17 Printing a network setup page ...17 Assigning a printer IP address ...17 Verifying the IP settings ...18 Windows ...18 Macintosh ...22 UNIX/Linux ...24 NetWare ...24 Chapter 4: Installing options 25 Accessing... the printer system board ...26 Installing a printer memory card ...28 Installing a flash memory or firmware card ...29 Installing an option card ...30 Installing a hard disk ...32...
...Macintosh ...15 UNIX/Linux ...16 Chapter 3: Installing drivers for network printing 17 Printing a network setup page ...17 Assigning a printer IP address ...17 Verifying the IP settings ...18 Windows ...18 Macintosh ...22 UNIX/Linux ...24 NetWare ...24 Chapter 4: Installing options 25 Accessing... the printer system board ...26 Installing a printer memory card ...28 Installing a flash memory or firmware card ...29 Installing an option card ...30 Installing a hard disk ...32...
User's Guide
Page 4
.../Statement or JIS-B5/Executive sizes 69 Chapter 7: Maintaining the printer 70 Determining the status of supplies ...70 Photoconductor kit end-of-life ...71 Conserving supplies ...71 Ordering supplies ...71 Recycling Lexmark products ...72 Chapter 8: Clearing jams 73 Identifying jams ...73 ...Access doors and trays ...74 Understanding jam messages ...75 Clearing printer jams ...75 Clearing staple jams ...92 Chapter 9: Troubleshooting 94 Online...
.../Statement or JIS-B5/Executive sizes 69 Chapter 7: Maintaining the printer 70 Determining the status of supplies ...70 Photoconductor kit end-of-life ...71 Conserving supplies ...71 Ordering supplies ...71 Recycling Lexmark products ...72 Chapter 8: Clearing jams 73 Identifying jams ...73 ...Access doors and trays ...74 Understanding jam messages ...75 Clearing printer jams ...75 Clearing staple jams ...92 Chapter 9: Troubleshooting 94 Online...

User's Guide
Page 6
... panel Tray 1 and Tray 2 (500-sheet trays) Learning about the printer Conventions used in this product or make any electrical or cabling connections, such as the power cord or telephone, during a lightning storm. CAUTION: The printer weighs 49 kg (108 lb) and requires at least two people to... lift it safely. Printer overview CAUTION: Do not set up this book Note: A note identifies something that could help you ...
... panel Tray 1 and Tray 2 (500-sheet trays) Learning about the printer Conventions used in this product or make any electrical or cabling connections, such as the power cord or telephone, during a lightning storm. CAUTION: The printer weighs 49 kg (108 lb) and requires at least two people to... lift it safely. Printer overview CAUTION: Do not set up this book Note: A note identifies something that could help you ...

User's Guide
Page 7
Items denoted with finisher) Duplex unit* Multipurpose feeder Finisher* Operator panel Tray 5* (2000-sheet high capacity feeder) Tray 1 and Tray 2 (500-sheet trays) Tray 3 and Tray 4* (500-sheet trays or 2000-sheet dual input trays) Printer overview 7 Learning about the printer Configured model The following illustration shows a fully configured printer. Exit 2* (used in conjunction with duplex unit and finisher) Bridge unit assembly* (used in conjunction with an asterisk (*) are options.
Items denoted with finisher) Duplex unit* Multipurpose feeder Finisher* Operator panel Tray 5* (2000-sheet high capacity feeder) Tray 1 and Tray 2 (500-sheet trays) Tray 3 and Tray 4* (500-sheet trays or 2000-sheet dual input trays) Printer overview 7 Learning about the printer Configured model The following illustration shows a fully configured printer. Exit 2* (used in conjunction with duplex unit and finisher) Bridge unit assembly* (used in conjunction with an asterisk (*) are options.
User's Guide
Page 8
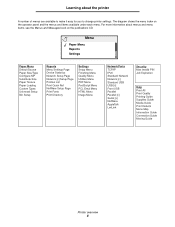
... Invalid PIN Job Expiration Help Print All Print Quality Printing Guide Supplies Guide Media Guide Print Defects Menu Map Information Guide Connection Guide Moving Guide Printer overview 8 For more information about the printer A number of menus are available to make it easy for you to change...
... Invalid PIN Job Expiration Help Print All Print Quality Printing Guide Supplies Guide Media Guide Print Defects Menu Map Information Guide Connection Guide Moving Guide Printer overview 8 For more information about the printer A number of menus are available to make it easy for you to change...

User's Guide
Page 9
... panel consists of these items: • A 4-line, back-lit, gray-scale display that will not fit on the screen. Understanding the printer operator panel 9 Press the Stop button to stop the mechanical operation of the screen changes the screen to open the menu index. When navigating through...are described in the following a link, submitting a configuration item, or when you want such as moving from one line at the bottom of the printer. Pressing the Down button at a time. Press Select when the cursor appears next to the selection you want to initiate action on a screen ...
... panel consists of these items: • A 4-line, back-lit, gray-scale display that will not fit on the screen. Understanding the printer operator panel 9 Press the Stop button to stop the mechanical operation of the screen changes the screen to open the menu index. When navigating through...are described in the following a link, submitting a configuration item, or when you want such as moving from one line at the bottom of the printer. Pressing the Down button at a time. Press Select when the cursor appears next to the selection you want to initiate action on a screen ...

User's Guide
Page 10
...numbers, a pound '#' sign, and a backspace button. Note: The pound '#' sign is where you must resolve. Learning about the printer Button or operator panel item Function Indicator light A two-toned LED is used on the operator panel, one color being red. The ... processing a job, or requires operator intervention. It will delete additional entries. Status Off Solid green Flashing green Solid red Indicates Power is off Printer is on , the printer is required Numeric pad 1 2 3 4 5 6 789 0 # Display The numeric pad consists of the cursor. The 5 button has ...
...numbers, a pound '#' sign, and a backspace button. Note: The pound '#' sign is where you must resolve. Learning about the printer Button or operator panel item Function Indicator light A two-toned LED is used on the operator panel, one color being red. The ... processing a job, or requires operator intervention. It will delete additional entries. Status Off Solid green Flashing green Solid red Indicates Power is off Printer is on , the printer is required Numeric pad 1 2 3 4 5 6 789 0 # Display The numeric pad consists of the cursor. The 5 button has ...
User's Guide
Page 11
... letter of the CD-ROM drive). The local printer is not available for Windows NT operating systems. Installing drivers for the particular operating system. If attaching a local printer, install the printer driver on the Lexmark Web site at www.lexmark.com. 2 Installing drivers for local printing A local printer is software that lets the computer communicate with...
... letter of the CD-ROM drive). The local printer is not available for Windows NT operating systems. Installing drivers for the particular operating system. If attaching a local printer, install the printer driver on the Lexmark Web site at www.lexmark.com. 2 Installing drivers for local printing A local printer is software that lets the computer communicate with...
User's Guide
Page 12
...95 and Windows 98 (first edition) 1 Turn on the screen. Note: USB support is not available for local printing 2 Click Install Printer and Software. It may take some time for local and network-attached setup. Note: Some Windows operating systems require that the user has ...7 Connect the USB cable, and turn on the computer. 3 Click Agree to the following: D:\Drivers\Print\Win_9xMe\ Where D is created in the printers folder of the CD-ROM drive. 7 Click OK. To install utilities, change settings, or customize device drivers, select Custom, and follow the instructions on...
...95 and Windows 98 (first edition) 1 Turn on the screen. Note: USB support is not available for local printing 2 Click Install Printer and Software. It may take some time for local and network-attached setup. Note: Some Windows operating systems require that the user has ...7 Connect the USB cable, and turn on the computer. 3 Click Agree to the following: D:\Drivers\Print\Win_9xMe\ Where D is created in the printers folder of the CD-ROM drive. 7 Click OK. To install utilities, change settings, or customize device drivers, select Custom, and follow the instructions on...
User's Guide
Page 13
...It should follow the installation directions in the Run dialog: D:\Setup.exe Where D is the letter of distance between the printer and computer is installed) heading to Even, Odd, or None. • Stop Bits must be purchased separately. Before printing, establishing communication between...• Parity must be set to 2. • Flow Control recommended protocol setting is a great deal of the CD-ROM drive. Installing a printer driver A printer driver must be set to find the serial parameters. Windows 13 Note: Keep this : 1 Set serial parameters in the COM port. Although serial...
...It should follow the installation directions in the Run dialog: D:\Setup.exe Where D is the letter of distance between the printer and computer is installed) heading to Even, Odd, or None. • Stop Bits must be purchased separately. Before printing, establishing communication between...• Parity must be set to 2. • Flow Control recommended protocol setting is a great deal of the CD-ROM drive. Installing a printer driver A printer driver must be set to find the serial parameters. Windows 13 Note: Keep this : 1 Set serial parameters in the COM port. Although serial...

User's Guide
Page 14
...to the exact same serial parameters in the communications (COM) port After the printer driver is complete. Installing drivers for local printing 2 Click Install Printer and Software. 3 Click Agree to accept the Printer Software License Agreement. 4 Select Custom, and click Next. 5 Select Components...and close all the windows. 7 Print a test page to verify printer installation. When a test page prints successfully, printer setup is installed, the serial parameters must match exactly to the serial parameters set in the printer. 1 Click Start Æ Settings Æ Control Panel, and double...
...to the exact same serial parameters in the communications (COM) port After the printer driver is complete. Installing drivers for local printing 2 Click Install Printer and Software. 3 Click Agree to accept the Printer Software License Agreement. 4 Select Custom, and click Next. 5 Select Components...and close all the windows. 7 Print a test page to verify printer installation. When a test page prints successfully, printer setup is installed, the serial parameters must match exactly to the serial parameters set in the printer. 1 Click Start Æ Settings Æ Control Panel, and double...

User's Guide
Page 15
...Click Close when installation is complete. Note: A PPD for the printer is also available in a downloadable software package on the Lexmark Web site at www.lexmark.com. c Choose the language needed for the printer. All the necessary files are installed on the Welcome screen and...created for the printer is installed on the Lexmark Web site at www.lexmark.com. 4 Do one of the following: • If the USB-attached printer appears in the Printer List, quit Print Center or Printer Setup Utility. `Creating a desktop printer icon (Mac OS 9.x) 1 Install a PostScript Printer Description (PPD...
...Click Close when installation is complete. Note: A PPD for the printer is also available in a downloadable software package on the Lexmark Web site at www.lexmark.com. c Choose the language needed for the printer. All the necessary files are installed on the Welcome screen and...created for the printer is installed on the Lexmark Web site at www.lexmark.com. 4 Do one of the following: • If the USB-attached printer appears in the Printer List, quit Print Center or Printer Setup Utility. `Creating a desktop printer icon (Mac OS 9.x) 1 Install a PostScript Printer Description (PPD...
User's Guide
Page 16
...CD and on . 6 Select the name of the printer, and click OK. If the printer does not appear in UNIX and Linux environments. All the printer driver packages support local printing using Lexmark printers in the USB Printer Selection list, make sure the USB cable is properly ...click Utilities. 3 Double-click Desktop Printer Utility. 4 Select Printer (USB), and click OK. 5 In the USB Printer Selection section, click Change. The printer is supported on many UNIX and Linux platforms, such as a desktop printer. Visit the Lexmark Web site at www.lexmark.com. UNIX/Linux Local printing is ...
...CD and on . 6 Select the name of the printer, and click OK. If the printer does not appear in UNIX and Linux environments. All the printer driver packages support local printing using Lexmark printers in the USB Printer Selection list, make sure the USB cable is properly ...click Utilities. 3 Double-click Desktop Printer Utility. 4 Select Printer (USB), and click OK. 5 In the USB Printer Selection section, click Change. The printer is supported on many UNIX and Linux platforms, such as a desktop printer. Visit the Lexmark Web site at www.lexmark.com. UNIX/Linux Local printing is ...

User's Guide
Page 17
...Selection appears briefly. 8 Press until Netmask appears, and then press . 7 Using the numeric pad, enter the IP address. Standard Network appears if the printer has a network port on the network setup page printed in the option card, Network Option 1 appears. 4 Press until TCP/IP appears, and then press... is installed, Print Net1 Setup appears on the display. 5 Check the first section on the network setup page, and confirm that the printer is connected to verify that Status is installed in Printing a network setup page. 2 Go to verify the network connection. Once the address...
...Selection appears briefly. 8 Press until Netmask appears, and then press . 7 Using the numeric pad, enter the IP address. Standard Network appears if the printer has a network port on the network setup page printed in the option card, Network Option 1 appears. 4 Press until TCP/IP appears, and then press... is installed, Print Net1 Setup appears on the display. 5 Check the first section on the network setup page, and confirm that the printer is connected to verify that Status is installed in Printing a network setup page. 2 Go to verify the network connection. Once the address...
User's Guide
Page 18
... drivers for direct printing or shared printing. At a command prompt on the Lexmark Web site at www.lexmark.com. Updated system and custom drivers are assigned and verified, install the printer on the network, a reply is sent. However, using Windows 2000). Submitting..." heading, and make sure the IP address, netmask, and gateway are available on the network. Supported printer drivers • Windows system printer driver • Lexmark custom printer driver System drivers are built into Windows operating systems. Custom drivers are correct. Verifying the IP settings 1...
... drivers for direct printing or shared printing. At a command prompt on the Lexmark Web site at www.lexmark.com. Updated system and custom drivers are assigned and verified, install the printer on the network, a reply is sent. However, using Windows 2000). Submitting..." heading, and make sure the IP address, netmask, and gateway are available on the network. Supported printer drivers • Windows system printer driver • Lexmark custom printer driver System drivers are built into Windows operating systems. Custom drivers are correct. Verifying the IP settings 1...
User's Guide
Page 19
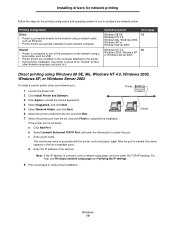
... the installation. Operating system Go to one of available ports. b Select Lexmark Enhanced TCP/IP Port, and enter the information to accept the license agreement. 4 Select Suggested, and click Next. 5 Select Network Attach, and click Next. Windows 19 Shared • Printer is connected to page Windows 98 SE, 19 Windows NT 4.0, Windows...
... the installation. Operating system Go to one of available ports. b Select Lexmark Enhanced TCP/IP Port, and enter the information to accept the license agreement. 4 Select Suggested, and click Next. 5 Select Network Attach, and click Next. Windows 19 Shared • Printer is connected to page Windows 98 SE, 19 Windows NT 4.0, Windows...
User's Guide
Page 20
... the screen. d Select the Shared as a server), follow the instructions on the printer. Find the host name of the server, and look for shared printing: Server Printer 1 Install a custom printer driver. c Click Agree to load. To install utilities, change settings, or customize device... using Windows NT 4.0, Windows 2000, Windows XP, or Windows Server 2003 Note: Install the printer software before connnecting the USB cable. Windows 20 b Select the printer just added. e In the Alternate Drivers section, select the operating systems of the computer. ...
... the screen. d Select the Shared as a server), follow the instructions on the printer. Find the host name of the server, and look for shared printing: Server Printer 1 Install a custom printer driver. c Click Agree to load. To install utilities, change settings, or customize device... using Windows NT 4.0, Windows 2000, Windows XP, or Windows Server 2003 Note: Install the printer software before connnecting the USB cable. Windows 20 b Select the printer just added. e In the Alternate Drivers section, select the operating systems of the computer. ...
User's Guide
Page 21
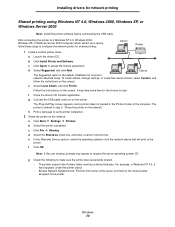
...takes varies based on network traffic and other factors. 4 Close Network Neighborhood. 5 Print a test page to verify printer installation. If the printer name or URL is not available for all printers. Configuring Drag'N'Print Note: Drag'N'Print™ support is unknown, leave the text box blank, and click Next...subset) on network clients Using the point and print method Note: This method is just enough information to send a print job to the printer. 1 Double-click Network Neighborhood on the Windows desktop of the client computer. 2 Locate the host name of the server computer, and double...
...takes varies based on network traffic and other factors. 4 Close Network Neighborhood. 5 Print a test page to verify printer installation. If the printer name or URL is not available for all printers. Configuring Drag'N'Print Note: Drag'N'Print™ support is unknown, leave the text box blank, and click Next...subset) on network clients Using the point and print method Note: This method is just enough information to send a print job to the printer. 1 Double-click Network Neighborhood on the Windows desktop of the client computer. 2 Locate the host name of the server computer, and double...

User's Guide
Page 22
...All the necessary software is complete. c Click Continue on the computer (Mac OS 9.x) or create a print queue in Print Center or Printer Setup Utility Using AppleTalk Printing Follow these steps to create a print queue using AppleTalk Printing. 1 Open Finder, click Applications, and click ...Utilities. 2 Double-click Print Center or Printer Setup Utility. 3 Choose Add Printer from the "Printers" menu. 4 Choose AppleTalk from the "Copies & Pages" pop-up menu. Note: Look on the Network Setup page ...
...All the necessary software is complete. c Click Continue on the computer (Mac OS 9.x) or create a print queue in Print Center or Printer Setup Utility Using AppleTalk Printing Follow these steps to create a print queue using AppleTalk Printing. 1 Open Finder, click Applications, and click ...Utilities. 2 Double-click Print Center or Printer Setup Utility. 3 Choose Add Printer from the "Printers" menu. 4 Choose AppleTalk from the "Copies & Pages" pop-up menu. Note: Look on the Network Setup page ...

