Clearing Jams Guide
Page 1
... sure all jammed paper from the paper path and then press . Use the cartridge handle whenever you must clear all sizes and types are holding the cartridge. 4 Place the print cartridge aside on the underside of the printer. Have rough, cockle, or laid finishes - Have any paper jam... printer control panel menus. • Store paper per the manufacturer's recommendations. Load them prior to printing, or wait for extended periods. Warning-Potential Damage: Do not leave the cartridge exposed to light for a prompt to access jam locations. Have excessive curl or twist - Lexmark&#...
... sure all jammed paper from the paper path and then press . Use the cartridge handle whenever you must clear all sizes and types are holding the cartridge. 4 Place the print cartridge aside on the underside of the printer. Have rough, cockle, or laid finishes - Have any paper jam... printer control panel menus. • Store paper per the manufacturer's recommendations. Load them prior to printing, or wait for extended periods. Warning-Potential Damage: Do not leave the cartridge exposed to light for a prompt to access jam locations. Have excessive curl or twist - Lexmark&#...
Clearing Jams Guide
Page 6
... the stapler door is open. 1 Close the stapler door until it clicks into place. 2 Pull the latch of the staple cartridge holder down, and then pull the holder out of the printer. 4 Press down on the staple guard until it snaps into place. 2 Press . 283 staple jam 1 Press the latch to open... the stapler door. 3 Use the metal tab to lift the staple guard, and then remove any loose staples. 5 Push the cartridge holder firmly back into the...
... the stapler door is open. 1 Close the stapler door until it clicks into place. 2 Pull the latch of the staple cartridge holder down, and then pull the holder out of the printer. 4 Press down on the staple guard until it snaps into place. 2 Press . 283 staple jam 1 Press the latch to open... the stapler door. 3 Use the metal tab to lift the staple guard, and then remove any loose staples. 5 Push the cartridge holder firmly back into the...
Troubleshooting Guide
Page 6
... sure the paper type setting matches the paper loaded in its original wrapper until you use it . THE TONER MAY BE LOW When 88 Cartridge low appears or when the print becomes faded, replace the print cartridge. CHECK THE PAPER Avoid textured paper with rough finishes. 6 Try one or more ... THE PAPER HAS ABSORBED MOISTURE DUE TO HIGH HUMIDITY • Load paper from a fresh package. • Store paper in the tray: 1 From the printer control panel, check the Paper Type setting from the Paper menu. 2 Before sending the job to print, specify the correct size setting: • For ...
... sure the paper type setting matches the paper loaded in its original wrapper until you use it . THE TONER MAY BE LOW When 88 Cartridge low appears or when the print becomes faded, replace the print cartridge. CHECK THE PAPER Avoid textured paper with rough finishes. 6 Try one or more ... THE PAPER HAS ABSORBED MOISTURE DUE TO HIGH HUMIDITY • Load paper from a fresh package. • Store paper in the tray: 1 From the printer control panel, check the Paper Type setting from the Paper menu. 2 Before sending the job to print, specify the correct size setting: • For ...
Troubleshooting Guide
Page 7
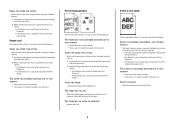
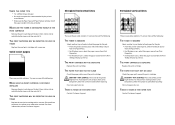
... in .). Solid black or white streaks These are possible solutions. THE PRINT CARTRIDGE MAY BE DEFECTIVE Replace the print cartridge. Replace the transfer roller if the defects occur every 51.7 mm (2.04 in .) Skewed print These are using paper that meets the printer specifications. Try one or more of the following : MAKE SURE THE...
... in .). Solid black or white streaks These are possible solutions. THE PRINT CARTRIDGE MAY BE DEFECTIVE Replace the print cartridge. Replace the transfer roller if the defects occur every 51.7 mm (2.04 in .) Skewed print These are using paper that meets the printer specifications. Try one or more of the following : MAKE SURE THE...
Troubleshooting Guide
Page 8
...TONER Replace the used print cartridge with a new one or more of the printer might be serviced. CAUTION-HOT SURFACE: The inside of the following: THE TONER IS SMEARED Select another tray or feeder to feed the paper for the job: • From the printer control panel, select... solutions. Try one or more of the printer might be hot. THE PRINT CARTRIDGE MAY BE DEFECTIVE Replace the print cartridge. CAUTION-HOT SURFACE: The inside of the following : MAKE SURE THE PRINT CARTRIDGE IS PROPERLY INSTALLED Remove the print cartridge and shake it . THE PAPER PATH MAY...
...TONER Replace the used print cartridge with a new one or more of the printer might be serviced. CAUTION-HOT SURFACE: The inside of the following: THE TONER IS SMEARED Select another tray or feeder to feed the paper for the job: • From the printer control panel, select... solutions. Try one or more of the printer might be hot. THE PRINT CARTRIDGE MAY BE DEFECTIVE Replace the print cartridge. CAUTION-HOT SURFACE: The inside of the following : MAKE SURE THE PRINT CARTRIDGE IS PROPERLY INSTALLED Remove the print cartridge and shake it . THE PAPER PATH MAY...
Troubleshooting Guide
Page 9
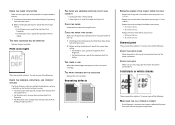
...is poor Try one or more of the following : CHECK THE TRANSPARENCIES Use only transparencies recommended by the printer manufacturer. Try one or more of the following : THE PRINT CARTRIDGE MAY BE DEFECTIVE Replace the print cartridge. Transparency print quality is also listed on the display, and the troubleshooting...paper type setting matches the paper loaded in the tray: 1 From the printer control panel, check the Paper Type setting from the Print dialog. For other countries/regions, visit the Lexmark Web site at www.lexmark.com. 9 THERE IS TONER IN THE PAPER PATH Clean any toner ...
...is poor Try one or more of the following : CHECK THE TRANSPARENCIES Use only transparencies recommended by the printer manufacturer. Try one or more of the following : THE PRINT CARTRIDGE MAY BE DEFECTIVE Replace the print cartridge. Transparency print quality is also listed on the display, and the troubleshooting...paper type setting matches the paper loaded in the tray: 1 From the printer control panel, check the Paper Type setting from the Print dialog. For other countries/regions, visit the Lexmark Web site at www.lexmark.com. 9 THERE IS TONER IN THE PAPER PATH Clean any toner ...
User's Guide
Page 6
... wiper ...169 Ordering pick rollers ...170 Ordering staple cartridges...170 Ordering a transfer roller...170 Recycling Lexmark products...170 Moving the printer...170 Before moving the printer...170 Moving the printer to another location...171 Shipping the printer ...171 Administrative support 172 Finding advanced networking and administrator information 172 Using the Embedded Web Server...172 Checking the device...
... wiper ...169 Ordering pick rollers ...170 Ordering staple cartridges...170 Ordering a transfer roller...170 Recycling Lexmark products...170 Moving the printer...170 Before moving the printer...170 Moving the printer to another location...171 Shipping the printer ...171 Administrative support 172 Finding advanced networking and administrator information 172 Using the Embedded Web Server...172 Checking the device...
User's Guide
Page 70
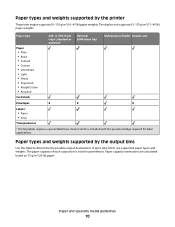
...; Recycled Card stock 250- Paper types and weights supported by the output bins Use this table to determine the possible output destinations of each output bin is included with the special cartridge required for label applications. The duplex unit supports 63-170 g/m2 (17-45... Labels 1 • Paper • Vinyl Transparencies 1 Printing labels requires a special label fuser cleaner which use supported paper types and weights. Paper types and weights supported by the printer The printer engine supports 60-176 g/m2 (16-47 lb) paper weights. The paper capacity of print jobs which...
...; Recycled Card stock 250- Paper types and weights supported by the output bins Use this table to determine the possible output destinations of each output bin is included with the special cartridge required for label applications. The duplex unit supports 63-170 g/m2 (17-45... Labels 1 • Paper • Vinyl Transparencies 1 Printing labels requires a special label fuser cleaner which use supported paper types and weights. Paper types and weights supported by the printer The printer engine supports 60-176 g/m2 (16-47 lb) paper weights. The paper capacity of print jobs which...
User's Guide
Page 74
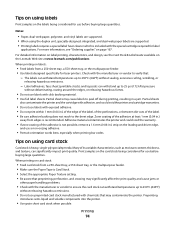
...printer and the cartridge with adhesive, and could void the warranty. • If zone coating of the adhesive at www.lexmark.com/publications. Zone coating of the adhesive is included with slick backing material. • Use full label sheets. Print samples on the card stock being considered for use...edges, or releasing hazardous fumes. • Do not use labels with the special cartridge required for label applications. Adhesive material contaminates the printer and could void the printer and cartridge warranties. • Do not use labels with exposed adhesive. • Do not print ...
...printer and the cartridge with adhesive, and could void the warranty. • If zone coating of the adhesive at www.lexmark.com/publications. Zone coating of the adhesive is included with slick backing material. • Use full label sheets. Print samples on the card stock being considered for use...edges, or releasing hazardous fumes. • Do not use labels with the special cartridge required for label applications. Adhesive material contaminates the printer and could void the printer and cartridge warranties. • Do not use labels with exposed adhesive. • Do not print ...
User's Guide
Page 82
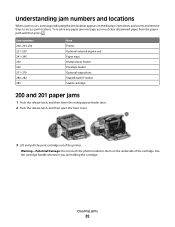
...then open the front cover. 3 Lift and pull the print cartridge out of the cartridge. To resolve any paper jam message, you are holding the cartridge. Use the cartridge handle whenever you must clear all jammed paper from the paper ...path and then press . Warning-Potential Damage: Do not touch the photoconductor drum on the display. Clearing jams 82 Understanding jam numbers and locations When a jam occurs, a message indicating the jam location appears on the underside of the printer...
...then open the front cover. 3 Lift and pull the print cartridge out of the cartridge. To resolve any paper jam message, you are holding the cartridge. Use the cartridge handle whenever you must clear all jammed paper from the paper ...path and then press . Warning-Potential Damage: Do not touch the photoconductor drum on the display. Clearing jams 82 Understanding jam numbers and locations When a jam occurs, a message indicating the jam location appears on the underside of the printer...
User's Guide
Page 92
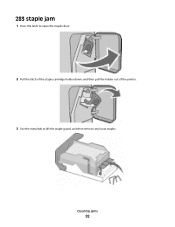
Clearing jams 92 283 staple jam 1 Press the latch to open the stapler door. 2 Pull the latch of the staple cartridge holder down, and then pull the holder out of the printer. 3 Use the metal tab to lift the staple guard, and then remove any loose staples.
Clearing jams 92 283 staple jam 1 Press the latch to open the stapler door. 2 Pull the latch of the staple cartridge holder down, and then pull the holder out of the printer. 3 Use the metal tab to lift the staple guard, and then remove any loose staples.
User's Guide
Page 146
... for the message to clear the message and print without using the tray. If the error occurs a second time: 1 Turn the printer off. 2 Unplug the power cord from the wall outlet. 3 Remove the tray. 4 Contact Customer Support. • Press to clear. Insert the cartridge and close all doors and covers. Close door or...
... for the message to clear the message and print without using the tray. If the error occurs a second time: 1 Turn the printer off. 2 Unplug the power cord from the wall outlet. 3 Remove the tray. 4 Contact Customer Support. • Press to clear. Insert the cartridge and close all doors and covers. Close door or...
User's Guide
Page 148
... outlet. 5 Restart the printer. • Cancel the current job. Understanding printer messages 148 Insert Tray Insert the specified tray into the printer. The percentage completed appears on the display. You can use Hex Trace to troubleshoot printer problems. Insert staple cartridge Try one or more of... the following : • Insert a staple cartridge to clear the message. •...
... outlet. 5 Restart the printer. • Cancel the current job. Understanding printer messages 148 Insert Tray Insert the specified tray into the printer. The percentage completed appears on the display. You can use Hex Trace to troubleshoot printer problems. Insert staple cartridge Try one or more of... the following : • Insert a staple cartridge to clear the message. •...
User's Guide
Page 156
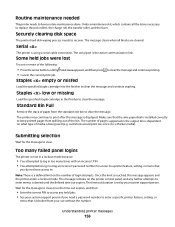
...in too many times with an incorrect PIN • You attempted to log in using a serial cable connection. Routine maintenance needed The printer needs to have access to. Load the specified staple cartridge into the finisher to clear the message. Once the limit is reached, this message... is set by your use without the number. Serial The printer is the active communication link. The serial port is using an incorrect password number for the message to clear. Staples low or missing Load the specified staple cartridge in the output bin is being used (e.g. Note: There is...
...in too many times with an incorrect PIN • You attempted to log in using a serial cable connection. Routine maintenance needed The printer needs to have access to. Load the specified staple cartridge into the finisher to clear the message. Once the limit is reached, this message... is set by your use without the number. Serial The printer is the active communication link. The serial port is using an incorrect password number for the message to clear. Staples low or missing Load the specified staple cartridge in the output bin is being used (e.g. Note: There is...
User's Guide
Page 157
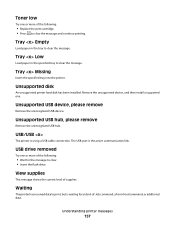
...current level of the following: • Wait for an End-of the following: • Replace the print cartridge. • Press to clear the message and continue printing. Waiting The printer has received data to clear. • Insert the flash drive. Remove the unsupported device, and then install ... more of supplies. Toner low Try one . USB/USB The printer is waiting for the message to print, but is using a USB cable connection. The USB port is the active communication link. Unsupported disk An unsupported printer hard disk has been installed. USB drive removed Try one or...
...current level of the following: • Wait for an End-of the following: • Replace the print cartridge. • Press to clear the message and continue printing. Waiting The printer has received data to clear. • Insert the flash drive. Remove the unsupported device, and then install ... more of supplies. Toner low Try one . USB/USB The printer is waiting for the message to print, but is using a USB cable connection. The USB port is the active communication link. Unsupported disk An unsupported printer hard disk has been installed. USB drive removed Try one or...

User's Guide
Page 158
...appears, and then press to clear the message and print the job using a different paper tray. • Check tray length and width guides and make sure the paper is properly loaded in printer memory. When Ready appears, enable Resource Save. • Install additional ...current print job. 30 Invalid refill, change cartridge Remove the print cartridge, and then install a supported one. 31 Replace defective cartridge Remove the defective print cartridge, and then install a new one. 32 Cartridge part number unsupported by device Remove the print cartridge, and then install a supported one. 34 ...
...appears, and then press to clear the message and print the job using a different paper tray. • Check tray length and width guides and make sure the paper is properly loaded in printer memory. When Ready appears, enable Resource Save. • Install additional ...current print job. 30 Invalid refill, change cartridge Remove the print cartridge, and then install a supported one. 31 Replace defective cartridge Remove the defective print cartridge, and then install a new one. 32 Cartridge part number unsupported by device Remove the print cartridge, and then install a supported one. 34 ...
User's Guide
Page 164
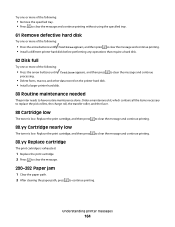
...the paper path, press to clear the message and continue printing. 88.yy Cartridge nearly low The toner is low. Understanding printer messages 164 to clear the message and continue 80 Routine maintenance needed The printer needs to replace the pick rollers, the charge roll, the transfer roller,... continue printing without using the specified tray. 61 Remove defective hard disk Try one or more of the following: • Press the arrow buttons until Continue appears, and then press to clear the message and continue printing. • Install a different printer hard disk before ...
...the paper path, press to clear the message and continue printing. 88.yy Cartridge nearly low The toner is low. Understanding printer messages 164 to clear the message and continue 80 Routine maintenance needed The printer needs to replace the pick rollers, the charge roll, the transfer roller,... continue printing without using the specified tray. 61 Remove defective hard disk Try one or more of the following: • Press the arrow buttons until Continue appears, and then press to clear the message and continue printing. • Install a different printer hard disk before ...
User's Guide
Page 169
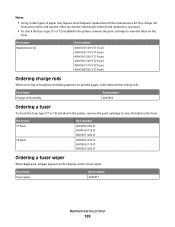
... type (T1 or T2) installed in the printer, remove the print cartridge to view the label on the display, order a fuser wiper. Notes: • Using certain types of paper may require more frequent ...220 V) Ordering a fuser wiper When Replace wiper appears on the fuser. Part name Fuser wiper Part number 40X4417 Maintaining the printer 169 Part name Maintenance kit Part number 40X4723 (100 V T1 fuser) 40X4724 (110 V T1 fuser) 40X4765 (220 V... (T1 or T2) installed in the printer, remove the print cartridge to view the label on printed pages, order replacement charge rolls.
... type (T1 or T2) installed in the printer, remove the print cartridge to view the label on the display, order a fuser wiper. Notes: • Using certain types of paper may require more frequent ...220 V) Ordering a fuser wiper When Replace wiper appears on the fuser. Part name Fuser wiper Part number 40X4417 Maintaining the printer 169 Part name Maintenance kit Part number 40X4723 (100 V T1 fuser) 40X4724 (110 V T1 fuser) 40X4765 (220 V... (T1 or T2) installed in the printer, remove the print cartridge to view the label on printed pages, order replacement charge rolls.
User's Guide
Page 172
... and Documentation CD and the Embedded Web Server Administrator's Guide on the Lexmark Web site at www.lexmark.com. Setting up e-mail alerts You can view paper tray settings, the level of toner in the print cartridge, the percentage of life remaining in the TCP/IP section. 2 Click..., and capacity measurements of your Web browser. Using the Embedded Web Server If the printer is installed on the Lexmark Web site at www.lexmark.com. Administrative support 172 Checking the device status Using the Embedded Web Server, you can have the printer send you do not know the IP address...
... and Documentation CD and the Embedded Web Server Administrator's Guide on the Lexmark Web site at www.lexmark.com. Setting up e-mail alerts You can view paper tray settings, the level of toner in the print cartridge, the percentage of life remaining in the TCP/IP section. 2 Click..., and capacity measurements of your Web browser. Using the Embedded Web Server If the printer is installed on the Lexmark Web site at www.lexmark.com. Administrative support 172 Checking the device status Using the Embedded Web Server, you can have the printer send you do not know the IP address...

User's Guide
Page 187
...becomes faded, replace the print cartridge. Troubleshooting 187 THE FUSER MAY BE WORN OR DEFECTIVE Replace the fuser. CHECK THE PAPER Avoid textured paper with rough finishes. Print is too high. • From the printer control panel, change these settings...• For Macintosh users, change these settings from a fresh package. • Store paper in the tray: 1 From the printer control panel, check the Paper Type setting from the Paper menu. 2 Before sending the job to print, specify the correct type...type setting matches the paper loaded in its original wrapper until you use it.
...becomes faded, replace the print cartridge. Troubleshooting 187 THE FUSER MAY BE WORN OR DEFECTIVE Replace the fuser. CHECK THE PAPER Avoid textured paper with rough finishes. Print is too high. • From the printer control panel, change these settings...• For Macintosh users, change these settings from a fresh package. • Store paper in the tray: 1 From the printer control panel, check the Paper Type setting from the Paper menu. 2 Before sending the job to print, specify the correct type...type setting matches the paper loaded in its original wrapper until you use it.


