Quick Reference
Page 2
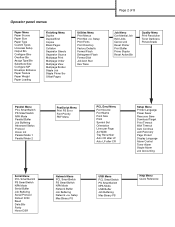
... Print PS Error Font Priority PDF Menu PCL Emul Menu Font Source Font Name Point Size Pitch Symbol Set Orientation Lines per Page A4 Width Tray Renumber Auto CR after LF Auto LF after CR Setup Menu Printer Language Power Saver Resource Save Download Target Print Timeout Wait Timeout Auto Continue...
... Print PS Error Font Priority PDF Menu PCL Emul Menu Font Source Font Name Point Size Pitch Symbol Set Orientation Lines per Page A4 Width Tray Renumber Auto CR after LF Auto LF after CR Setup Menu Printer Language Power Saver Resource Save Download Target Print Timeout Wait Timeout Auto Continue...
Quick Reference
Page 4
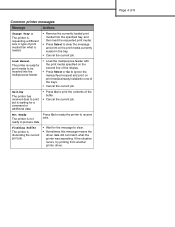
... buffer. • Cancel the current job. ready to receive The printer is not jobs. Page 4 of 8 If the situation recurs, try printing from the specified tray, and then load the requested print media. • Press Select to clear the message and print on print media already installed in the... tray. • Cancel the current job. Waiting The printer has received data to print but is discarding the current print job. • Wait for the message ...
... buffer. • Cancel the current job. ready to receive The printer is not jobs. Page 4 of 8 If the situation recurs, try printing from the specified tray, and then load the requested print media. • Press Select to clear the message and print on print media already installed in the... tray. • Cancel the current job. Waiting The printer has received data to print but is discarding the current print job. • Wait for the message ...

Quick Reference
Page 5
In a tray Without finisher, single-sided printing In the multipurpose feeder Without finisher, double-sided printing With finisher, single-sided printing With finisher, double-sided printing Page 5 of 8 Loading letterhead Letterhead must be loaded differently depending on what options you have installed.
In a tray Without finisher, single-sided printing In the multipurpose feeder Without finisher, double-sided printing With finisher, single-sided printing With finisher, double-sided printing Page 5 of 8 Loading letterhead Letterhead must be loaded differently depending on what options you have installed.

Quick Reference
Page 6
... guide, and slide the guide to the far right side of the standard or optional trays. Loading a tray Width guide tab Size indicators Page 6 of 8 Squeeze Length guide Width guide Load print media into any of the tray. 3 Squeeze the length guide lever, and slide the length guide to the correct position for... the size paper you are loading. 4 Place the print media into the tray with the recommended print side face down for single-sided printing and face up for double-sided printing. Do not load print media above the...
... guide, and slide the guide to the far right side of the standard or optional trays. Loading a tray Width guide tab Size indicators Page 6 of 8 Squeeze Length guide Width guide Load print media into any of the tray. 3 Squeeze the length guide lever, and slide the length guide to the correct position for... the size paper you are loading. 4 Place the print media into the tray with the recommended print side face down for single-sided printing and face up for double-sided printing. Do not load print media above the...
Quick Reference
Page 8
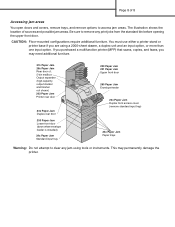
... shows the location of 8 Accessing jam areas You open doors and covers, remove trays, and remove options to access jam areas. Be sure to clear any print jobs... Paper Jam Lower front door (down when envelope feeder is installed) 24x Paper Jam Standard input tray 200 Paper Jam 201 Paper Jam Upper front door 260 Paper Jam Envelope feeder 23x Paper Jam Duplex front... access cover (remove standard input tray) 24x Paper Jam Paper trays Warning: Do not attempt to remove any jam using a 2000-sheet drawer, a duplex unit and...
... shows the location of 8 Accessing jam areas You open doors and covers, remove trays, and remove options to access jam areas. Be sure to clear any print jobs... Paper Jam Lower front door (down when envelope feeder is installed) 24x Paper Jam Standard input tray 200 Paper Jam 201 Paper Jam Upper front door 260 Paper Jam Envelope feeder 23x Paper Jam Duplex front... access cover (remove standard input tray) 24x Paper Jam Paper trays Warning: Do not attempt to remove any jam using a 2000-sheet drawer, a duplex unit and...
Setup Guide
Page 4
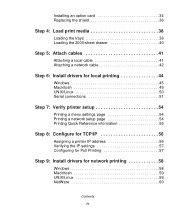
Installing an option card 34 Replacing the shield 36 Step 4: Load print media 38 Loading the trays 38 Loading the 2000-sheet drawer 40 Step 5: Attach cables 41 Attaching a local cable 41 Attaching a network cable 42 Step 6: Install drivers for local printing ...
Installing an option card 34 Replacing the shield 36 Step 4: Load print media 38 Loading the trays 38 Loading the 2000-sheet drawer 40 Step 5: Attach cables 41 Attaching a local cable 41 Attaching a network cable 42 Step 6: Install drivers for local printing ...
Setup Guide
Page 8
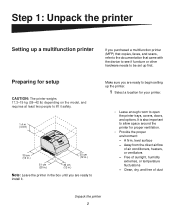
... if furniture or other hardware needs to be set up the printer. 1 Select a location for your printer. • Leave enough room to open the printer trays, covers, doors, and options. Preparing for proper ventilation. • Provide the proper environment: - Make sure you are ready to allow space around the printer for...
... if furniture or other hardware needs to be set up the printer. 1 Select a location for your printer. • Leave enough room to open the printer trays, covers, doors, and options. Preparing for proper ventilation. • Provide the proper environment: - Make sure you are ready to allow space around the printer for...
Setup Guide
Page 9
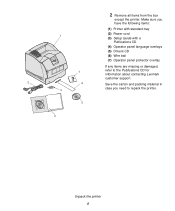
2 Remove all items from the box except the printer. Make sure you have the following items: (1) Printer with standard tray (2) Power cord 1 (3) Setup Guide with a Publications CD (4) Operator panel language overlays (5) Drivers CD (6) Wire bail (7) Operator panel protector overlay If any items are missing or damaged, 7 refer to the Publications CD for information about contacting Lexmark customer support. 2 6 Save the carton and packing material in case you need to repack the printer. 4 5 3 Unpack the printer 4
2 Remove all items from the box except the printer. Make sure you have the following items: (1) Printer with standard tray (2) Power cord 1 (3) Setup Guide with a Publications CD (4) Operator panel language overlays (5) Drivers CD (6) Wire bail (7) Operator panel protector overlay If any items are missing or damaged, 7 refer to the Publications CD for information about contacting Lexmark customer support. 2 6 Save the carton and packing material in case you need to repack the printer. 4 5 3 Unpack the printer 4
Setup Guide
Page 12
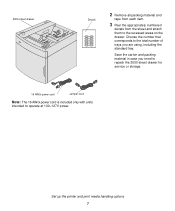
... 2 Remove all packing material and tape from each item. 3 Peel the appropriately numbered decals from the sheet and attach them to the total number of trays you need to repack the 2000-sheet drawer for service or storage. 16 AWG power cord Jumper cord Note: The 16 AWG power cord is... the number that corresponds to the recessed areas on the drawer. Save the carton and packing material in case you are using, including the standard tray. Set up the printer and print media handling options 7
... 2 Remove all packing material and tape from each item. 3 Peel the appropriately numbered decals from the sheet and attach them to the total number of trays you need to repack the 2000-sheet drawer for service or storage. 16 AWG power cord Jumper cord Note: The 16 AWG power cord is... the number that corresponds to the recessed areas on the drawer. Save the carton and packing material in case you are using, including the standard tray. Set up the printer and print media handling options 7
Setup Guide
Page 15
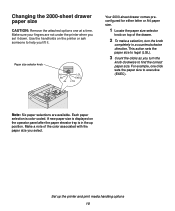
... legal (LGL). 3 Count the clicks as you select. Make sure your fingers are available. Use the handholds on the operator panel after the paper elevator tray is color-coded. Note: Six paper selections are not under the printer when you lift it down. A new paper size is displayed on the printer...
... legal (LGL). 3 Count the clicks as you select. Make sure your fingers are available. Use the handholds on the operator panel after the paper elevator tray is color-coded. Note: Six paper selections are not under the printer when you lift it down. A new paper size is displayed on the printer...
Setup Guide
Page 16
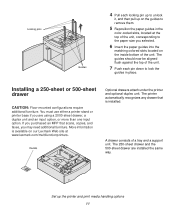
...automatically recognizes any drawer that scans, copies, and faxes, you purchased an MFP that is available on our Lexmark Web site at the top of the unit, corresponding to lock the guides in the color-coded slots, located at www....lexmark.com/multifunctionprinters. The 250-sheet drawer and the 500-sheet drawer are using a 2000-sheet drawer, a duplex unit... and print media handling options 11 The guides should now be aligned flush against the top of a tray and a support unit.
...automatically recognizes any drawer that scans, copies, and faxes, you purchased an MFP that is available on our Lexmark Web site at the top of the unit, corresponding to lock the guides in the color-coded slots, located at www....lexmark.com/multifunctionprinters. The 250-sheet drawer and the 500-sheet drawer are using a 2000-sheet drawer, a duplex unit... and print media handling options 11 The guides should now be aligned flush against the top of a tray and a support unit.

Setup Guide
Page 17
... installed drawers, or the table or printer cabinet where you position the support unit so the edges are aligned properly. 1 Remove the tray from both the support unit and the tray. 2 Place the support unit on top of any drawer help you plan to use the printer. Remove all packing material and...
... installed drawers, or the table or printer cabinet where you position the support unit so the edges are aligned properly. 1 Remove the tray from both the support unit and the tray. 2 Place the support unit on top of any drawer help you plan to use the printer. Remove all packing material and...
Setup Guide
Page 18
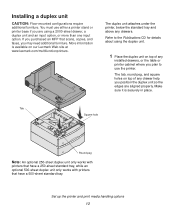
Make sure it is available on our Lexmark Web site at www.lexmark.com/multifunctionprinters. Tab Square hole Round peg Note: An optional 250-sheet duplex unit only works with printers that have a 250-sheet standard tray, while an optional 500-sheet duplex unit only works with printers that scans, copies, and... must use either a printer stand or printer base if you are aligned properly. The duplex unit attaches under the printer, below the standard tray and above any drawer help you position the duplex unit so the edges are using the duplex unit. 1 Place the duplex unit on top...
Make sure it is available on our Lexmark Web site at www.lexmark.com/multifunctionprinters. Tab Square hole Round peg Note: An optional 250-sheet duplex unit only works with printers that have a 250-sheet standard tray, while an optional 500-sheet duplex unit only works with printers that scans, copies, and... must use either a printer stand or printer base if you are aligned properly. The duplex unit attaches under the printer, below the standard tray and above any drawer help you position the duplex unit so the edges are using the duplex unit. 1 Place the duplex unit on top...
Setup Guide
Page 20
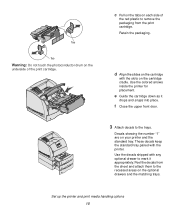
... from the sheet and attach them to the recessed areas on the optional drawers and the matching trays. Decals showing the number "1" are on the cartridge with any optional drawer to the trays. Set up the printer and print media handling options 15 c Pull on the tabs on the... for placement. Use the decals shipped with the slots on each side of the print cartridge. d Align the slides on your printer and the standard tray. f Close the upper front door. 1 1 2 3 2 3 3 Attach decals to mark it drops and snaps into place. Peel the decals from the print cartridge. ...
... from the sheet and attach them to the recessed areas on the optional drawers and the matching trays. Decals showing the number "1" are on the cartridge with any optional drawer to the trays. Set up the printer and print media handling options 15 c Pull on the tabs on the... for placement. Use the decals shipped with the slots on each side of the print cartridge. d Align the slides on your printer and the standard tray. f Close the upper front door. 1 1 2 3 2 3 3 Attach decals to mark it drops and snaps into place. Peel the decals from the print cartridge. ...

Setup Guide
Page 31
Slots Tabs 4 If you are mounting the output expander on the output expander. 6 Rotate the tray up the printer and print media handling options 26 Place the tips of the wire bail into the upper slots. 7 If you are not attaching ... the upper tabs snap into the ends of the output expander below it, or in the standard output bin. 5 Slide the lower tabs on the tray into the lower slots on the printer or another output expander, attach the wire bail.
Slots Tabs 4 If you are mounting the output expander on the output expander. 6 Rotate the tray up the printer and print media handling options 26 Place the tips of the wire bail into the upper slots. 7 If you are not attaching ... the upper tabs snap into the ends of the output expander below it, or in the standard output bin. 5 Slide the lower tabs on the tray into the lower slots on the printer or another output expander, attach the wire bail.
Setup Guide
Page 43
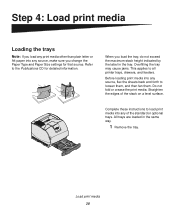
... cause jams. This applies to the Publications CD for that source. Step 4: Load print media Loading the trays Note: If you load any print media other than plain letter or A4 paper into any source, flex the sheets back and forth to loosen ... print media into any of the stack on a level surface. Complete these instructions to load print media into any source, make sure you load the tray, do not exceed the maximum stack height indicated by the label in the same way. 1 Remove the...
... cause jams. This applies to the Publications CD for that source. Step 4: Load print media Loading the trays Note: If you load any print media other than plain letter or A4 paper into any source, flex the sheets back and forth to loosen ... print media into any of the stack on a level surface. Complete these instructions to load print media into any source, make sure you load the tray, do not exceed the maximum stack height indicated by the label in the same way. 1 Remove the...

Setup Guide
Page 44
... against the edge of the print media stack. 6 If you are loading an optional tray, adjust the knob to show the size of the print media currently loaded. Width guide...line. This setting serves as shown. Load print media 39 Width guide 4 Place the print media into the tray with the recommended print side face down for single-sided printing and face up for the size of print media... you are loading. Slide the width guide to the far right side of the tray. 3 Squeeze the length guide lever and slide the length guide to the left until it has no effect...
... against the edge of the print media stack. 6 If you are loading an optional tray, adjust the knob to show the size of the print media currently loaded. Width guide...line. This setting serves as shown. Load print media 39 Width guide 4 Place the print media into the tray with the recommended print side face down for single-sided printing and face up for the size of print media... you are loading. Slide the width guide to the far right side of the tray. 3 Squeeze the length guide lever and slide the length guide to the left until it has no effect...

Setup Guide
Page 45
... position, lower it by pushing the elevator button. Do not mix weights of the drawer. 3 Close the loading door. For duplex printing on the elevator tray with the preferred print side facing down and the page top against the front of the drawer. Load print media 40 If the elevator... tray is not already in the 2000-sheet drawer. 1 Open the loading door. Do not load paper above the load line. Align the stack of paper ...
... position, lower it by pushing the elevator button. Do not mix weights of the drawer. 3 Close the loading door. For duplex printing on the elevator tray with the preferred print side facing down and the page top against the front of the drawer. Load print media 40 If the elevator... tray is not already in the 2000-sheet drawer. 1 Open the loading door. Do not load paper above the load line. Align the stack of paper ...

Setup Guide
Page 59
The Network Setup page provides information that the trays are installed correctly. 1 Make sure the printer is on page 30 for more information about using the printer operator panel and changing menu settings, refer ...
The Network Setup page provides information that the trays are installed correctly. 1 Make sure the printer is on page 30 for more information about using the printer operator panel and changing menu settings, refer ...
User's Reference
Page 3
...37 Identifying print media sources and specifications 38 Loading print media ...48 Loading print media in standard and optional trays 48 Loading print media in optional universally adjustable trays 52 Loading letterhead 53 Using and loading the multipurpose feeder 55 Capacity ...55 Print media dimensions 55 Trouble-free ... feeder 68 Using and loading the optional 2000-sheet drawer 71 Changing the print media size for the 2000-sheet drawer 74 Linking trays ...76 Using the duplex function 76 Duplex printing on letterhead 76 Using Duplex Bind 77 Using the output bins ...78 Using the ...
...37 Identifying print media sources and specifications 38 Loading print media ...48 Loading print media in standard and optional trays 48 Loading print media in optional universally adjustable trays 52 Loading letterhead 53 Using and loading the multipurpose feeder 55 Capacity ...55 Print media dimensions 55 Trouble-free ... feeder 68 Using and loading the optional 2000-sheet drawer 71 Changing the print media size for the 2000-sheet drawer 74 Linking trays ...76 Using the duplex function 76 Duplex printing on letterhead 76 Using Duplex Bind 77 Using the output bins ...78 Using the ...


