Quick Reference
Page 2
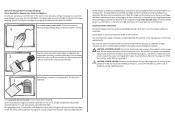
If you agree to return them only to be used with the licensed printer. The patented Lexmark inkjet cartridges and their contents terminates, and you 're sending single-color tanks, we encourage our customers to participate in the postage-paid bags. Mail the bag to abrasion ...or stress. The bag is near water or wet locations. printer except as the fax feature, ...
If you agree to return them only to be used with the licensed printer. The patented Lexmark inkjet cartridges and their contents terminates, and you 're sending single-color tanks, we encourage our customers to participate in the postage-paid bags. Mail the bag to abrasion ...or stress. The bag is near water or wet locations. printer except as the fax feature, ...
Quick Reference
Page 5
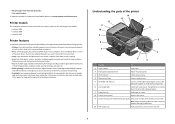
...ADF output tray Hold documents as share the printer among multiple computers. • Print. Print and scan from virtually anywhere in your printer works for the following printer models: • Lexmark S405 • Lexmark S408 • Lexmark S415 Printer features Your printer comes with your home or office over a...directly from a Bluetooth device. Built-in Windows. Do multiple-page, standalone black and color faxing at 33.6 Kbps modem speed. It automatically dims the printer display light, puts the printer into the ADF. • Recycle paper from the ADF. 5 Select photos to ...
...ADF output tray Hold documents as share the printer among multiple computers. • Print. Print and scan from virtually anywhere in your printer works for the following printer models: • Lexmark S405 • Lexmark S408 • Lexmark S415 Printer features Your printer comes with your home or office over a...directly from a Bluetooth device. Built-in Windows. Do multiple-page, standalone black and color faxing at 33.6 Kbps modem speed. It automatically dims the printer display light, puts the printer into the ADF. • Recycle paper from the ADF. 5 Select photos to ...
Quick Reference
Page 8
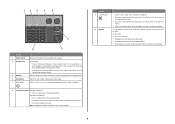
...mode. • Clear current settings or error messages, and return to make. 12 3 4 5 Eco-Mode Cancel 6 Use the 1 Address Book 2 Redial/Pause 3 Dialtone 4 Color/Black 5 Start button 8 7 To Access fax numbers from a menu level of the Setup menu to the top level of copies or prints you have already...of a menu. • Exit from a saved list of the paper (duplex). • Change to Power Saver mode after the printer is selected. 6 2-Sided/Eco-Mode Activate 2-Sided to color mode or black-and-white mode. Start a print, scan, fax, or copy job, depending on which mode is left or right...
...mode. • Clear current settings or error messages, and return to make. 12 3 4 5 Eco-Mode Cancel 6 Use the 1 Address Book 2 Redial/Pause 3 Dialtone 4 Color/Black 5 Start button 8 7 To Access fax numbers from a menu level of the Setup menu to the top level of copies or prints you have already...of a menu. • Exit from a saved list of the paper (duplex). • Change to Power Saver mode after the printer is selected. 6 2-Sided/Eco-Mode Activate 2-Sided to color mode or black-and-white mode. Start a print, scan, fax, or copy job, depending on which mode is left or right...
Quick Reference
Page 10
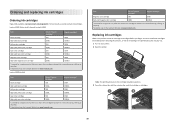
... magenta color cartridge 100XL 100XLA 1 Licensed for remanufacturing, refilling, or recycling. 2 Available only on the Lexmark Web site at www.lexmark.com. Ordering and replacing ink cartridges Ordering ink cartridges Page yields available at www.lexmark.com. W I F I PRINTING Note: The printhead moves to Lexmark for remanufacturing, refilling, or recycling. 2 Available only on your printer. 2 Open the printer...
... magenta color cartridge 100XL 100XLA 1 Licensed for remanufacturing, refilling, or recycling. 2 Available only on the Lexmark Web site at www.lexmark.com. Ordering and replacing ink cartridges Ordering ink cartridges Page yields available at www.lexmark.com. W I F I PRINTING Note: The printhead moves to Lexmark for remanufacturing, refilling, or recycling. 2 Available only on your printer. 2 Open the printer...
Quick Reference
Page 15
...range, print photos by selecting the photo numbers on page 9. • The computer must contain document files that are supported by the printer. When you select color or black-only printing, the light near your memory device. 6 Adjust the print settings: • If you purchased. The DPOF ...applications that you are stored in the memory device. 1 Insert a memory card or flash drive. Use Visit Lexmark SmartSolutions To • Visit the SmartSolutions Web site. • Choose your printer. 6 From the print options menu, choose the print quality, the number of copies to print, the ...
...range, print photos by selecting the photo numbers on page 9. • The computer must contain document files that are supported by the printer. When you select color or black-only printing, the light near your memory device. 6 Adjust the print settings: • If you purchased. The DPOF ...applications that you are stored in the memory device. 1 Insert a memory card or flash drive. Use Visit Lexmark SmartSolutions To • Visit the SmartSolutions Web site. • Choose your printer. 6 From the print options menu, choose the print quality, the number of copies to print, the ...
Quick Reference
Page 17
...a copy job, press . WI F I PRINTING Use the ADF for multiple-page documents. When you select color or black-only printing, the light near your choice comes on the scanner glass. Scanning stops and the printer returns to select the desired photo size, and then press . 7 Press . Note: The ADF is available... only in the General tab of copies, and then press the Color/Black button to set a color or black-and-white copy. This is available ...
...a copy job, press . WI F I PRINTING Use the ADF for multiple-page documents. When you select color or black-only printing, the light near your choice comes on the scanner glass. Scanning stops and the printer returns to select the desired photo size, and then press . 7 Press . Note: The ADF is available... only in the General tab of copies, and then press the Color/Black button to set a color or black-and-white copy. This is available ...

Quick Reference
Page 21
...printer does not appear in the list in the Printers folder or as a printer option when sending a print job, then try another USB port on the printer...PRINTER IS SET AS THE DEFAULT PRINTER RECONNECT THE PRINTER POWER SUPPLY 1 Turn off the printer...printer on, and then open , choose File > Print. 2 From the printer pop-up menu, choose your printer...printer, remove and then reconnect the USB cable. • For a printer that is not in the Default tab, select your printer does not appear on the Printer list, then choose Add Printer...PRINTER...printer...printer. Note: Make sure the printer...of printers in...
...printer does not appear in the list in the Printers folder or as a printer option when sending a print job, then try another USB port on the printer...PRINTER IS SET AS THE DEFAULT PRINTER RECONNECT THE PRINTER POWER SUPPLY 1 Turn off the printer...printer on, and then open , choose File > Print. 2 From the printer pop-up menu, choose your printer...printer, remove and then reconnect the USB cable. • For a printer that is not in the Default tab, select your printer does not appear on the Printer list, then choose Add Printer...PRINTER...printer...printer. Note: Make sure the printer...of printers in...
User Guide
Page 11
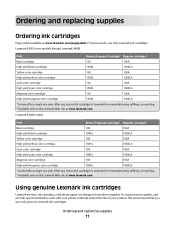
... genuine Lexmark ink cartridges Lexmark printers, ink cartridges, and photo paper are designed to perform together for superior print quality, and our inks are formulated to Lexmark for a single use only genuine Lexmark ink cartridges. Lexmark S408 models Item Return Program Cartridge1 Regular cartridge2 Black cartridge 108 108A High yield black cartridge 108XL 108XLA Yellow color cartridge...
... genuine Lexmark ink cartridges Lexmark printers, ink cartridges, and photo paper are designed to perform together for superior print quality, and our inks are formulated to Lexmark for a single use only genuine Lexmark ink cartridges. Lexmark S408 models Item Return Program Cartridge1 Regular cartridge2 Black cartridge 108 108A High yield black cartridge 108XL 108XLA Yellow color cartridge...

User Guide
Page 16
... To 4 Color/Black Switch to color mode or black-and-white mode. 5 Start button Start a print, scan, fax, or copy job, depending on the display. Changing temporary settings into new default settings The following menus revert to default settings after two minutes of inactivity or after the printer is turned ...error messages, and return to default settings. 7 Keypad In Copy mode or Photo mode: enter the number of inactivity or after you turn off the printer, but they will return to make. In Fax mode: • Enter fax numbers. • Navigate an automated answering system. • Select ...
... To 4 Color/Black Switch to color mode or black-and-white mode. 5 Start button Start a print, scan, fax, or copy job, depending on the display. Changing temporary settings into new default settings The following menus revert to default settings after two minutes of inactivity or after the printer is turned ...error messages, and return to default settings. 7 Keypad In Copy mode or Photo mode: enter the number of inactivity or after you turn off the printer, but they will return to make. In Fax mode: • Enter fax numbers. • Navigate an automated answering system. • Select ...

User Guide
Page 39
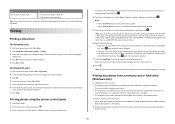
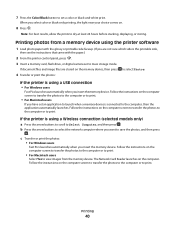
...memory device, then press the arrow buttons to select Photos, and then press . 4 Press the arrow buttons to scroll to adjust the brightness and color effects of the photos. Notes: • Select Easy Photo if you want to print photos quickly. • Select Print Photos if you make ...range, print photos by selecting the photo numbers on a proof sheet, or print pre-selected photos from a digital camera using the printer control panel 1 Load photo paper. 2 From the printer control panel, press . 3 Insert a memory card, flash drive, or digital camera set to select the paper size and photo size...
...memory device, then press the arrow buttons to select Photos, and then press . 4 Press the arrow buttons to scroll to adjust the brightness and color effects of the photos. Notes: • Select Easy Photo if you want to print photos quickly. • Select Print Photos if you make ...range, print photos by selecting the photo numbers on a proof sheet, or print pre-selected photos from a digital camera using the printer control panel 1 Load photo paper. 2 From the printer control panel, press . 3 Insert a memory card, flash drive, or digital camera set to select the paper size and photo size...
User Guide
Page 40
...or digital camera set to mass storage mode. The Network Card Reader launches on . 8 Press . 7 Press the Color/Black button to save the photos, and then press . If the printer is connected to view images from a memory device using a USB connection • For Windows users Fast Pics launches ...automatically when you select color or black-only printing, the light near your choice comes on the computer....
...or digital camera set to mass storage mode. The Network Card Reader launches on . 8 Press . 7 Press the Color/Black button to save the photos, and then press . If the printer is connected to view images from a memory device using a USB connection • For Windows users Fast Pics launches ...automatically when you select color or black-only printing, the light near your choice comes on the computer....

User Guide
Page 42
... glossy or printable side faceup. (If you are not sure which photos to print a proof sheet. Printing 42 or A4-size plain paper. 2 From the printer control panel, press . 3 Insert a memory card or flash drive. Note: When making selections, make a selection. 6 See the documentation for the job to print ...completely. 8 When Scan Proof Sheet appears on the display, press , and then load the proof sheet facedown on the proof sheet. 11 Press the Color/Black button to fill in the memory device, then press the arrow buttons to select Photos, and then press . 4 Press the arrow buttons to ...
... glossy or printable side faceup. (If you are not sure which photos to print a proof sheet. Printing 42 or A4-size plain paper. 2 From the printer control panel, press . 3 Insert a memory card or flash drive. Note: When making selections, make a selection. 6 See the documentation for the job to print ...completely. 8 When Scan Proof Sheet appears on the display, press , and then load the proof sheet facedown on the proof sheet. 11 Press the Color/Black button to fill in the memory device, then press the arrow buttons to select Photos, and then press . 4 Press the arrow buttons to ...

User Guide
Page 50
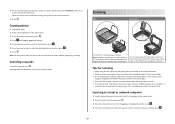
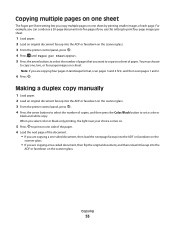
...postcards or photos), transparencies, photo paper, or thin media (such as magazine clippings) into the ADF or facedown on the scanner glass. 3 From the printer control panel, press . 4 Press the arrow buttons to select the number of the original document. • When using the ADF, adjust the paper ...guide on the ADF to the width of copies, and then press the Color/Black button to avoid dark edges on the scanner glass. Tips for multiple-page documents. Copying photos 1 Load photo paper. 2 Place a photo ...
...postcards or photos), transparencies, photo paper, or thin media (such as magazine clippings) into the ADF or facedown on the scanner glass. 3 From the printer control panel, press . 4 Press the arrow buttons to select the number of the original document. • When using the ADF, adjust the paper ...guide on the ADF to the width of copies, and then press the Color/Black button to avoid dark edges on the scanner glass. Tips for multiple-page documents. Copying photos 1 Load photo paper. 2 Place a photo ...
User Guide
Page 53
... print four page images per sheet. 1 Load paper. 2 Load an original document faceup into the ADF or facedown on the scanner glass. 3 From the printer control panel, press . 4 Press until Pages per Sheet setting lets you are copying a two-sided document, then flip the original document, and then reload... paper. 2 Load an original document faceup into the ADF or facedown on the scanner glass. 3 From the printer control panel, press . 4 Press the arrow buttons to select the number of copies, and then press the Color/Black button to copy one, two, or four page images on a sheet. When you select...
... print four page images per sheet. 1 Load paper. 2 Load an original document faceup into the ADF or facedown on the scanner glass. 3 From the printer control panel, press . 4 Press until Pages per Sheet setting lets you are copying a two-sided document, then flip the original document, and then reload... paper. 2 Load an original document faceup into the ADF or facedown on the scanner glass. 3 From the printer control panel, press . 4 Press the arrow buttons to select the number of copies, and then press the Color/Black button to copy one, two, or four page images on a sheet. When you select...

User Guide
Page 60
...restrict the scanned information from your computer. To scan in black and white, press the Color/Black button on the scanner glass. 2 From the Finder desktop, double-click the printer program folder. 3 Double-click the printer Center to open it ? To learn how PINs get assigned to black and white....it on your original documents are scanning a document to open the All-In-One Center. 4 From the "What is the default for the printer software associated with your operating system. You may be prompted to enter a PIN if the network computer you install new applications on your computer ...
...restrict the scanned information from your computer. To scan in black and white, press the Color/Black button on the scanner glass. 2 From the Finder desktop, double-click the printer program folder. 3 Double-click the printer Center to open it ? To learn how PINs get assigned to black and white....it on your original documents are scanning a document to open the All-In-One Center. 4 From the "What is the default for the printer software associated with your operating system. You may be prompted to enter a PIN if the network computer you install new applications on your computer ...

User Guide
Page 77
.... • When using the ADF, adjust the paper guide on the ADF to the width of the original document. • When using the printer control panel 1 From the printer control panel, press . 2 Enter or select a fax recipient: • Enter a fax number, and then press . • Press Address...sending faxes Before you purchased a printer without an ADF, load original documents or photos on the scanned image. The line is available only on and connected to 30 recipients. Repeat the step to add more recipients. 4 Press the Color/Black button to select a color or black-and-white fax....
.... • When using the ADF, adjust the paper guide on the ADF to the width of the original document. • When using the printer control panel 1 From the printer control panel, press . 2 Enter or select a fax recipient: • Enter a fax number, and then press . • Press Address...sending faxes Before you purchased a printer without an ADF, load original documents or photos on the scanned image. The line is available only on and connected to 30 recipients. Repeat the step to add more recipients. 4 Press the Color/Black button to select a color or black-and-white fax....

User Guide
Page 83
...receiving fax machine may not support high resolutions and may result in an unreadable fax, especially if the original document is a fax, then the printer detects the fax signal on one telephone line. How do not have multiple telephone numbers on the line and takes over the call before the... may not be able to turn off voice mail whenever you subscribe to add more often. Standard Fine Quality Black resolution 200 x 100 200 x 200 Color resolution 200 x 200 200 x 200 Superfine Ultrafine 300 x 300 300 x 300 (half-toned) 200 x 200 200 x 200 When sending a fax, after a greater ...
...receiving fax machine may not support high resolutions and may result in an unreadable fax, especially if the original document is a fax, then the printer detects the fax signal on one telephone line. How do not have multiple telephone numbers on the line and takes over the call before the... may not be able to turn off voice mail whenever you subscribe to add more often. Standard Fine Quality Black resolution 200 x 100 200 x 200 Color resolution 200 x 200 200 x 200 Superfine Ultrafine 300 x 300 300 x 300 (half-toned) 200 x 200 200 x 200 When sending a fax, after a greater ...
User Guide
Page 90
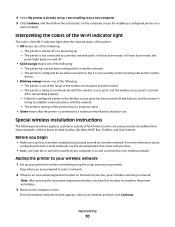
... the computer screen for a wireless network. - Interpreting the colors of the Wi-Fi indicator light The colors of the Wi-Fi indicator light show the network status of the printer. • Off means one of your wireless network. The printer has not yet been configured for installing a configured printer on and connected to select a network. 2 If...
... the computer screen for a wireless network. - Interpreting the colors of the Wi-Fi indicator light The colors of the Wi-Fi indicator light show the network status of the printer. • Off means one of your wireless network. The printer has not yet been configured for installing a configured printer on and connected to select a network. 2 If...
User Guide
Page 116
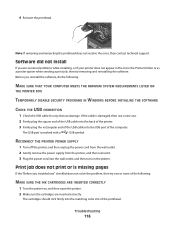
... print job, then try one . 2 Firmly plug the square end of the USB cable into the back of the printer. 3 Firmly plug the rectangular end of the USB cable into the matching color slot of the following : MAKE SURE THAT YOUR COMPUTER MEETS THE MINIMUM SYSTEM REQUIREMENTS LISTED ON THE... PRINTER BOX TEMPORARILY DISABLE SECURITY PROGRAMS IN WINDOWS BEFORE INSTALLING THE SOFTWARE CHECK THE USB CONNECTION 1 Check the USB ...
... print job, then try one . 2 Firmly plug the square end of the USB cable into the back of the printer. 3 Firmly plug the rectangular end of the USB cable into the matching color slot of the following : MAKE SURE THAT YOUR COMPUTER MEETS THE MINIMUM SYSTEM REQUIREMENTS LISTED ON THE... PRINTER BOX TEMPORARILY DISABLE SECURITY PROGRAMS IN WINDOWS BEFORE INSTALLING THE SOFTWARE CHECK THE USB CONNECTION 1 Check the USB ...

User Guide
Page 127
... to a resolution that the receiving machine can dial the actual fax number or telephone number. To make sure that error correction is enabled: 1 From the printer control panel, press . 2 Press the arrow buttons to scroll to Fax Setup, and then press . 3 Press the arrow buttons to scroll to Dialing ... if automatic fax conversion is set to select On, and then press . ENABLE AUTOMATIC FAX CONVERSION If the receiving fax machine does not support color fax, then this can be a specific number that you can support. MAKE SURE THAT THE DIAL PREFIX SETTING IS CORRECT The dialing prefix is...
... to a resolution that the receiving machine can dial the actual fax number or telephone number. To make sure that error correction is enabled: 1 From the printer control panel, press . 2 Press the arrow buttons to scroll to Fax Setup, and then press . 3 Press the arrow buttons to scroll to Dialing ... if automatic fax conversion is set to select On, and then press . ENABLE AUTOMATIC FAX CONVERSION If the receiving fax machine does not support color fax, then this can be a specific number that you can support. MAKE SURE THAT THE DIAL PREFIX SETTING IS CORRECT The dialing prefix is...


