User Guide
Page 2
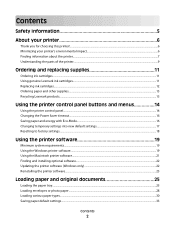
...Understanding the parts of the printer...9 Ordering and replacing supplies 11 Ordering ink cartridges...11 Using genuine Lexmark ink cartridges...11 Replacing ink cartridges...12 Ordering paper and other supplies...13 Recycling Lexmark products...13 Using the printer control panel buttons and menus 14 Using the printer control panel...14 ...software (Windows only)...22 Reinstalling the printer software...23 Loading paper and original documents 25 Loading the paper tray...25 Loading envelopes or photo paper...28 Loading various paper types...30 Saving paper default settings...33 Contents 2
...Understanding the parts of the printer...9 Ordering and replacing supplies 11 Ordering ink cartridges...11 Using genuine Lexmark ink cartridges...11 Replacing ink cartridges...12 Ordering paper and other supplies...13 Recycling Lexmark products...13 Using the printer control panel buttons and menus 14 Using the printer control panel...14 ...software (Windows only)...22 Reinstalling the printer software...23 Loading paper and original documents 25 Loading the paper tray...25 Loading envelopes or photo paper...28 Loading various paper types...30 Saving paper default settings...33 Contents 2

User Guide
Page 3
...Loading original documents into the ADF...34 Printing 35 Tips for printing...35 Printing basic documents...35 Printing specialty documents...39 Working with photos...41 Printing from a Bluetooth-enabled device...47 Printing on both sides of the paper (duplexing)...51 Managing print jobs...53 Copying ...Scanning 63 Tips for scanning...63 Scanning to a local or network computer...63 Scanning to a flash drive or memory card...64 Scanning photos into an editing application...64 Scanning documents into an editing application 65 Scanning directly to e-mail using the printer software 66 Scanning to...
...Loading original documents into the ADF...34 Printing 35 Tips for printing...35 Printing basic documents...35 Printing specialty documents...39 Working with photos...41 Printing from a Bluetooth-enabled device...47 Printing on both sides of the paper (duplexing)...51 Managing print jobs...53 Copying ...Scanning 63 Tips for scanning...63 Scanning to a local or network computer...63 Scanning to a flash drive or memory card...64 Scanning photos into an editing application...64 Scanning documents into an editing application 65 Scanning directly to e-mail using the printer software 66 Scanning to...

User Guide
Page 7
...printing, copying, scanning, and faxing tasks, depending on your printer model • Configuring printer settings • Viewing and printing documents and photos • Setting up and using printer software • Setting up and configuring the printer on a network, depending on your printer model... • Caring for reuse or recycling through the Lexmark Cartridge Collection Program. Follow the instructions to request a postage-paid bag. • Recycle the product packaging. • Recycle your ink...
...printing, copying, scanning, and faxing tasks, depending on your printer model • Configuring printer settings • Viewing and printing documents and photos • Setting up and using printer software • Setting up and configuring the printer on a network, depending on your printer model... • Caring for reuse or recycling through the Lexmark Cartridge Collection Program. Follow the instructions to request a postage-paid bag. • Recycle the product packaging. • Recycle your ink...

User Guide
Page 9
... it exits. About your printer 9 Understanding the parts of the printer Use the To 1 Scanner lid Access the scanner glass. 2 Scanner glass Scan and copy photos and documents. 3 Automatic Document Feeder (ADF) Scan, copy, or fax multiple-page letter-, legal-, and A4-size documents. 4 ADF tray Load original documents in the...
... it exits. About your printer 9 Understanding the parts of the printer Use the To 1 Scanner lid Access the scanner glass. 2 Scanner glass Scan and copy photos and documents. 3 Automatic Document Feeder (ADF) Scan, copy, or fax multiple-page letter-, legal-, and A4-size documents. 4 ADF tray Load original documents in the...

User Guide
Page 11
...color cartridge 100XL 100XLA Cyan color cartridge 100 100A High yield cyan color cartridge 100XL 100XLA Magenta color cartridge 100 100A High yield magenta color cartridge 100XL 100XLA 1 Licensed for remanufacturing, refilling, or recycling. 2 Available only on the Lexmark Web site at www.lexmark.com/pageyields. Lexmark...extend the life of your product. Using genuine Lexmark ink cartridges Lexmark printers, ink cartridges, and photo paper are designed to perform together for superior print quality, and our inks are formulated to Lexmark for a single use only. For best ...
...color cartridge 100XL 100XLA Cyan color cartridge 100 100A High yield cyan color cartridge 100XL 100XLA Magenta color cartridge 100 100A High yield magenta color cartridge 100XL 100XLA 1 Licensed for remanufacturing, refilling, or recycling. 2 Available only on the Lexmark Web site at www.lexmark.com/pageyields. Lexmark...extend the life of your product. Using genuine Lexmark ink cartridges Lexmark printers, ink cartridges, and photo paper are designed to perform together for superior print quality, and our inks are formulated to Lexmark for a single use only. For best ...

User Guide
Page 13
... select your country from the list. 3 Follow the instructions on the computer screen. Ordering and replacing supplies 13 Paper Paper size Lexmark Photo Paper • Letter • A4 • 4 x 6 in. •L Lexmark PerfectFinish Photo Paper • Letter • A4 • 4 x 6 in. •L Notes: • Availability may vary by country or region. • For best...
... select your country from the list. 3 Follow the instructions on the computer screen. Ordering and replacing supplies 13 Paper Paper size Lexmark Photo Paper • Letter • A4 • 4 x 6 in. •L Lexmark PerfectFinish Photo Paper • Letter • A4 • 4 x 6 in. •L Notes: • Availability may vary by country or region. • For best...

User Guide
Page 14
... following diagrams explain the sections of the printer control panel: Use 1 Power 2 Copy 3 Scan 4 Fax 5 Photo 6 Back To • Turn the printer on , press to switch to Power Saver mode. Access the photo menu and print photos. • Return to the previous screen. • Exit from one menu level to a higher one. Using...
... following diagrams explain the sections of the printer control panel: Use 1 Power 2 Copy 3 Scan 4 Fax 5 Photo 6 Back To • Turn the printer on , press to switch to Power Saver mode. Access the photo menu and print photos. • Return to the previous screen. • Exit from one menu level to a higher one. Using...

User Guide
Page 15
... pause only when you have already begun entering the number. • Display the last number dialed. Press the left or right arrow button to color mode or black-and-white mode. Dial the telephone number manually using the keypad before sending the fax. Switch to view the last five numbers.... • Printer status • Messages • Menus 10 Setup Access the setup menu and change printer settings. Note: The Copy, Scan, Fax, and Photo button lights are off in a fax number to wait for 3 seconds to menu or submenu items that appear on which mode is selected. Press and...
... pause only when you have already begun entering the number. • Display the last number dialed. Press the left or right arrow button to color mode or black-and-white mode. Dial the telephone number manually using the keypad before sending the fax. Switch to view the last five numbers.... • Printer status • Messages • Menus 10 Setup Access the setup menu and change printer settings. Note: The Copy, Scan, Fax, and Photo button lights are off in a fax number to wait for 3 seconds to menu or submenu items that appear on which mode is selected. Press and...
User Guide
Page 16
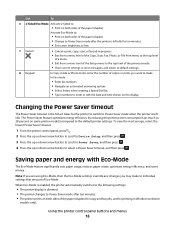
... sides of the paper (duplex) for copy and fax jobs, and for printing in progress. • Exit from a menu level of the Copy, Scan, Fax, Photo, or File Print menu to the top level of a menu. • Exit from a menu level of the Setup menu to the top level of the... previous mode. • Clear current settings or error messages, and return to default settings. 8 Keypad In Copy mode or Photo mode: enter the number of copies or prints you may make to individual settings that are using Eco-Mode, then the Eco-Mode settings override...
... sides of the paper (duplex) for copy and fax jobs, and for printing in progress. • Exit from a menu level of the Copy, Scan, Fax, Photo, or File Print menu to the top level of a menu. • Exit from a menu level of the Setup menu to the top level of the... previous mode. • Clear current settings or error messages, and return to default settings. 8 Keypad In Copy mode or Photo mode: enter the number of copies or prints you may make to individual settings that are using Eco-Mode, then the Eco-Mode settings override...

User Guide
Page 17
...; Original Size • Copies per Sheet • Content Type • Quality • Original Size • Lighter/Darker • Quality The following Photo options will not time out after two minutes of inactivity or after you turn off the printer, but they will return to the factory default... settings when a memory card or flash drive is removed. • Layout • Colorized Effect • Photo Size • Quality To change the temporary settings into new default settings 1 From the printer control panel, press . 2 Press the up ...
...; Original Size • Copies per Sheet • Content Type • Quality • Original Size • Lighter/Darker • Quality The following Photo options will not time out after two minutes of inactivity or after you turn off the printer, but they will return to the factory default... settings when a memory card or flash drive is removed. • Layout • Colorized Effect • Photo Size • Quality To change the temporary settings into new default settings 1 From the printer control panel, press . 2 Press the up ...
User Guide
Page 19
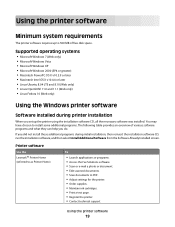
... the LexmarkTM Printer Home (referred to as Printer Home) To • Launch applications or programs. • Access the Fax Solutions software. • Scan or e-mail a photo or document. • Edit scanned documents. • Scan documents to 500 MB of various software programs and what they can help you did not install...
... the LexmarkTM Printer Home (referred to as Printer Home) To • Launch applications or programs. • Access the Fax Solutions software. • Scan or e-mail a photo or document. • Edit scanned documents. • Scan documents to 500 MB of various software programs and what they can help you did not install...
User Guide
Page 20
...-one printers. Access your printer model. Use the Lexmark Fast Pics (referred to as Fast Pics) Lexmark Toolbar (referred to as Toolbar) Lexmark Tools for Office (referred to as Tools for the print job, such as Service Center) Printing Preferences To Manage, edit, transfer, and print photos and documents. • Print black or text...
...-one printers. Access your printer model. Use the Lexmark Fast Pics (referred to as Fast Pics) Lexmark Toolbar (referred to as Toolbar) Lexmark Tools for Office (referred to as Tools for the print job, such as Service Center) Printing Preferences To Manage, edit, transfer, and print photos and documents. • Print black or text...

User Guide
Page 21
.... 2 Double-click the icon of a memory device inserted into a network printer. • Transfer photos and PDF documents from a memory device to the computer over a network. Use the To Lexmark All-In-One Center (referred to as Network Card Reader) • View the contents of the application...that you want to as All-In-One Center) • Scan photos and documents. • Customize settings for fax jobs. • Create and edit the Contacts list. Lexmark Network Card Reader (referred to use. Lexmark Wireless Setup Assistant Set up the printer on thecomputer. Printer software ...
.... 2 Double-click the icon of a memory device inserted into a network printer. • Transfer photos and PDF documents from a memory device to the computer over a network. Use the To Lexmark All-In-One Center (referred to as Network Card Reader) • View the contents of the application...that you want to as All-In-One Center) • Scan photos and documents. • Customize settings for fax jobs. • Create and edit the Contacts list. Lexmark Network Card Reader (referred to use. Lexmark Wireless Setup Assistant Set up the printer on thecomputer. Printer software ...

User Guide
Page 28
Loading envelopes or photo paper 1 Pull tray completely out of the printer. 2 Move the paper guides to the sides of tray. Loading paper and original documents 28
Loading envelopes or photo paper 1 Pull tray completely out of the printer. 2 Move the paper guides to the sides of tray. Loading paper and original documents 28

User Guide
Page 29
You can load either envelopes or photo paper, but not both. 4 Load envelopes or photo paper. Note: Load envelopes or photo paper with the envelopes or photo paper.) Loading paper and original documents 29 3 Use the envelope icon and the photo paper outline on the bottom of the tray to help you are not sure which side is the printable side, then see the instructions that came with the printable side facedown. (If you position envelopes or photo paper. Note: Do not mix paper types in the tray.
You can load either envelopes or photo paper, but not both. 4 Load envelopes or photo paper. Note: Load envelopes or photo paper with the envelopes or photo paper.) Loading paper and original documents 29 3 Use the envelope icon and the photo paper outline on the bottom of the tray to help you are not sure which side is the printable side, then see the instructions that came with the printable side facedown. (If you position envelopes or photo paper. Note: Do not mix paper types in the tray.

User Guide
Page 30
Loading paper and original documents 30 Note: For best results, allow photos to dry at least 24 hours before stacking, displaying, or storing. Loading various paper types Load up to 150 sheets of plain paper Make sure • The paper is designed for use with inkjet printers. • The paper guides rest against the left , right, and bottom edges of the envelopes or photo paper. 6 Insert the tray. 7 Flip up the paper stop to catch the envelopes or photos as they exit. 5 Adjust the paper guides to rest gently against the left , right, and bottom edges of the paper.
Loading paper and original documents 30 Note: For best results, allow photos to dry at least 24 hours before stacking, displaying, or storing. Loading various paper types Load up to 150 sheets of plain paper Make sure • The paper is designed for use with inkjet printers. • The paper guides rest against the left , right, and bottom edges of the envelopes or photo paper. 6 Insert the tray. 7 Flip up the paper stop to catch the envelopes or photos as they exit. 5 Adjust the paper guides to rest gently against the left , right, and bottom edges of the paper.

User Guide
Page 31
... , right, and bottom edges of the envelopes. • You select the correct envelope size. Load up to 100 sheets of coated paper 25 sheets of photo paper 25 sheets of glossy paper 10 envelopes Make sure • The glossy or printable side of the paper faces down. (If you are designed... for use with inkjet printers. • The print side of the envelopes faces down with holes, perforations, cutouts, or deep embossing. • Do not use envelopes that have exposed...
... , right, and bottom edges of the envelopes. • You select the correct envelope size. Load up to 100 sheets of coated paper 25 sheets of photo paper 25 sheets of glossy paper 10 envelopes Make sure • The glossy or printable side of the paper faces down. (If you are designed... for use with inkjet printers. • The print side of the envelopes faces down with holes, perforations, cutouts, or deep embossing. • Do not use envelopes that have exposed...

User Guide
Page 32
...label sheets. Note: Transparencies require more drying time. Note: For best results, allow it to dry to dry at a time. 25 index cards, photo papers, or postcards • The thickness does not exceed 0.025 inches (0.635 mm). • The print side of the transparencies. Load up to...the transfers. Partial sheets (with the iron-on transfers • You follow the loading instructions that came with areas exposed by the 4 x 6 photo paper outline. • The paper guides rest against the edges of the paper. or A4-size transparencies. • You remove any paper backing sheets...
...label sheets. Note: Transparencies require more drying time. Note: For best results, allow it to dry to dry at a time. 25 index cards, photo papers, or postcards • The thickness does not exceed 0.025 inches (0.635 mm). • The print side of the transparencies. Load up to...the transfers. Partial sheets (with the iron-on transfers • You follow the loading instructions that came with areas exposed by the 4 x 6 photo paper outline. • The paper guides rest against the edges of the paper. or A4-size transparencies. • You remove any paper backing sheets...

User Guide
Page 33
... the up or down arrow button to scroll to Paper Size, and then press . b Press the up or down arrow button to scroll to select Photo Print Size. To load banner paper: 1 Pull the tray completely out of the printer. 2 Remove all the way into the back of tray. Note: These... banner. 6 Set the stack of pages needed to print, copy, and scan jobs that you want to set the default paper size, paper type, and photo print size for the printer, and then press . • If you were loading legal-size paper. 4 Squeeze the lever and pull to extend the tray...
... the up or down arrow button to scroll to Paper Size, and then press . b Press the up or down arrow button to scroll to select Photo Print Size. To load banner paper: 1 Pull the tray completely out of the printer. 2 Remove all the way into the back of tray. Note: These... banner. 6 Set the stack of pages needed to print, copy, and scan jobs that you want to set the default paper size, paper type, and photo print size for the printer, and then press . • If you were loading legal-size paper. 4 Squeeze the lever and pull to extend the tray...
User Guide
Page 34
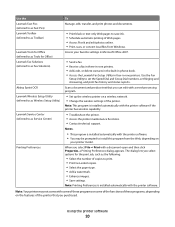
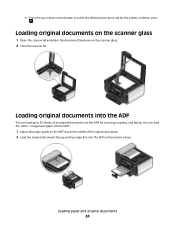
... You can load A4-, letter-, or legal-size paper into the ADF for the printer, and then press . c Press the up to select the default photo print size for scanning, copying, and faxing.
... You can load A4-, letter-, or legal-size paper into the ADF for the printer, and then press . c Press the up to select the default photo print size for scanning, copying, and faxing.


