User's Guide
Page 10
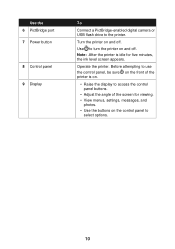
...messages, and photos. • Use the buttons on and off . Operate the printer. Note: .After the printer is on and off . Turn the printer on . • Raise the display to select options. 10 Before attempting to the printer. Use the 6 PictBridge port 7 Power button 8 Control panel 9 Display To ...Connect a PictBridge-enabled digital camera or USB flash drive to use the control panel, be sure on the front of the screen for five minutes, the ink level screen appears.
...messages, and photos. • Use the buttons on and off . Operate the printer. Note: .After the printer is on and off . Turn the printer on . • Raise the display to select options. 10 Before attempting to the printer. Use the 6 PictBridge port 7 Power button 8 Control panel 9 Display To ...Connect a PictBridge-enabled digital camera or USB flash drive to use the control panel, be sure on the front of the screen for five minutes, the ink level screen appears.
User's Guide
Page 36
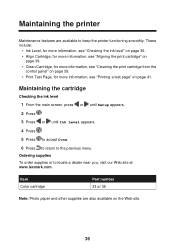
...the main screen, press or until Setup appears. 2 Press . 3 Press or until Ink Level appears. 4 Press . 5 Press to accept Done. 6 Press to return to locate a dealer near you, visit our Web site at www.lexmark.com. Item Color cartridge Part number 33 or 35 Note: Photo paper and other ...supplies are available to keep the printer functioning smoothly. These include: • Ink Level, for more information, see "Checking the ink level" on page 36. • Align Cartridge...
...the main screen, press or until Setup appears. 2 Press . 3 Press or until Ink Level appears. 4 Press . 5 Press to accept Done. 6 Press to return to locate a dealer near you, visit our Web site at www.lexmark.com. Item Color cartridge Part number 33 or 35 Note: Photo paper and other ...supplies are available to keep the printer functioning smoothly. These include: • Ink Level, for more information, see "Checking the ink level" on page 36. • Align Cartridge...
User's Guide
Page 45
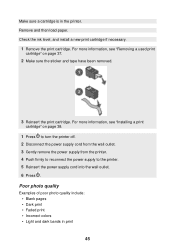
... Blank pages • Dark print • Faded print • Incorrect colors • Light and dark bands in the printer. Make sure a cartridge is in print 45 Check the ink level, and install a new print cartridge if necessary. 1 Remove the print cartridge. Remove and then load paper. For more... information, see "Removing a used print cartridge" on page 38. 1 Press to turn the printer off. 2 Disconnect the power supply cord...
... Blank pages • Dark print • Faded print • Incorrect colors • Light and dark bands in the printer. Make sure a cartridge is in print 45 Check the ink level, and install a new print cartridge if necessary. 1 Remove the print cartridge. Remove and then load paper. For more... information, see "Removing a used print cartridge" on page 38. 1 Press to turn the printer off. 2 Disconnect the power supply cord...
User's Guide
Page 46
...as it exits, and let it out. 3 Press to turn off the printer. 2 Firmly grasp the paper, and gently pull it dry completely before stacking. Use a different brand of ...paper into the printer. For more information, see "Paper jam" on . Paper misfeeds If paper misfeeds or skews...the paper size you . Paper jam 1 Press to turn the printer back on page 46. 46 Use only new, unwrinkled paper. Each paper brand accepts ink differently and prints with the print side facing you have selected from ...
...as it exits, and let it out. 3 Press to turn off the printer. 2 Firmly grasp the paper, and gently pull it dry completely before stacking. Use a different brand of ...paper into the printer. For more information, see "Paper jam" on . Paper misfeeds If paper misfeeds or skews...the paper size you . Paper jam 1 Press to turn the printer back on page 46. 46 Use only new, unwrinkled paper. Each paper brand accepts ink differently and prints with the print side facing you have selected from ...


