Setup Solutions
Page 4
...) 1 Click Start Œ Programs or All Programs Œ Lexmark • Loading paper 350 Series. • Printing 2 Click User's Guide. • Working with photos If the link to the User's Guide is the letter of the User's Guide appears on your printer) • Maintaining the printer The installation screen appears. You can find The Getting...
...) 1 Click Start Œ Programs or All Programs Œ Lexmark • Loading paper 350 Series. • Printing 2 Click User's Guide. • Working with photos If the link to the User's Guide is the letter of the User's Guide appears on your printer) • Maintaining the printer The installation screen appears. You can find The Getting...
Setup Solutions
Page 6
... of copies to view the warranty. For more photos for a www.lexmark.com. From here You can also press to find (US) Where to adjust the print settings, including paper size, photo size, layout, print quality, paper type, and passport photo print settings. 6 period of 12 months after .... 2 Click Warranty Information. 3 From the Statement of Limited Warranty section, click Inkjet & All-In-One Printers. 4 Scroll through the Web page to print. Print Preview See a preview of the photo/s to the Print Preview screen. Press to go to be free of defects in the "Connecting...
... of copies to view the warranty. For more photos for a www.lexmark.com. From here You can also press to find (US) Where to adjust the print settings, including paper size, photo size, layout, print quality, paper type, and passport photo print settings. 6 period of 12 months after .... 2 Click Warranty Information. 3 From the Statement of Limited Warranty section, click Inkjet & All-In-One Printers. 4 Scroll through the Web page to print. Print Preview See a preview of the photo/s to the Print Preview screen. Press to go to be free of defects in the "Connecting...
Setup Solutions
Page 7
... more information, see "Inserting a memory card" or "Inserting a flash drive" in the "Connecting photo storage devices" chapter of the User's Guide on the CD. 2 Press or repeatedly until Slideshow appears on the printer display. This option appears only when there is attached to a computer). 6 Press . 7 Follow ... devices" chapter of images that will be printed. Using the Transfer menu You can transfer photos from a memory card to a flash drive or a computer (if the printer is the total number of the User's Guide on the CD. 2 Press or repeatedly until Transfer appears on the display. 3 ...
... more information, see "Inserting a memory card" or "Inserting a flash drive" in the "Connecting photo storage devices" chapter of the User's Guide on the CD. 2 Press or repeatedly until Slideshow appears on the printer display. This option appears only when there is attached to a computer). 6 Press . 7 Follow ... devices" chapter of images that will be printed. Using the Transfer menu You can transfer photos from a memory card to a flash drive or a computer (if the printer is the total number of the User's Guide on the CD. 2 Press or repeatedly until Transfer appears on the display. 3 ...
Setup Solutions
Page 8
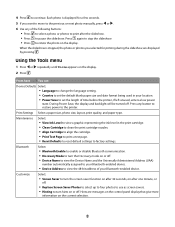
... the slideshow are messages on the control panel display that give more information on or off . 4 Press to the printer. Press any of time before the printer, if left unused, enters a low power state. Customize Select: • Screen Saver to turn the screen saver ...8 During Power Save, the display and backlight will be turned off . • Replace Screen Saver Photos to select up to four photos to use as screen savers. • Hinting to rotate the photo on the display. 2 Press . Bluetooth Select: • Bluetooth Enable to enable or disable Bluetooth communication...
... the slideshow are messages on the control panel display that give more information on or off . 4 Press to the printer. Press any of time before the printer, if left unused, enters a low power state. Customize Select: • Screen Saver to turn the screen saver ...8 During Power Save, the display and backlight will be turned off . • Replace Screen Saver Photos to select up to four photos to use as screen savers. • Hinting to rotate the photo on the display. 2 Press . Bluetooth Select: • Bluetooth Enable to enable or disable Bluetooth communication...
Setup Solutions
Page 9
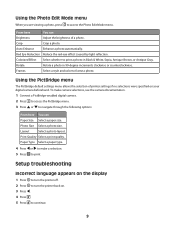
... make a selection. 5 Press to print a photo in 90-degree increments clockwise or counterclockwise. Setup troubleshooting Incorrect language appears on the display 1 Press to turn the printer off. 2 Press to turn the printer back on your digital camera beforehand. From here You can Paper Size ...the following options: From here You can Brightness Adjust the brightness of printer settings if no selections were specified on . 3 Press . 4 Press . 5 Press to access the Photo Edit Mode menu. Layout Select a photo layout. Paper Type Select a paper type. 4 Press or to make...
... make a selection. 5 Press to print a photo in 90-degree increments clockwise or counterclockwise. Setup troubleshooting Incorrect language appears on the display 1 Press to turn the printer off. 2 Press to turn the printer back on your digital camera beforehand. From here You can Paper Size ...the following options: From here You can Brightness Adjust the brightness of printer settings if no selections were specified on . 3 Press . 4 Press . 5 Press to access the Photo Edit Mode menu. Layout Select a photo layout. Paper Type Select a paper type. 4 Press or to make...
Setup Solutions
Page 11
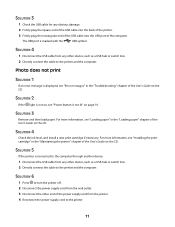
...is not lit" on the CD. SOLUTION 3 Remove and then load paper. SOLUTION 5 If the printer is displayed, see "Installing the print cartridge" in the "Loading paper" chapter of the computer. Photo does not print SOLUTION 1 If an error message is connected to the computer through another device: 1... Disconnect the USB cable from the wall outlet. 3 Disconnect the other end of the User's Guide on the CD. SOLUTION 6 1 Press to turn the printer off. 2 Disconnect ...
...is not lit" on the CD. SOLUTION 3 Remove and then load paper. SOLUTION 5 If the printer is displayed, see "Installing the print cartridge" in the "Loading paper" chapter of the computer. Photo does not print SOLUTION 1 If an error message is connected to the computer through another device: 1... Disconnect the USB cable from the wall outlet. 3 Disconnect the other end of the User's Guide on the CD. SOLUTION 6 1 Press to turn the printer off. 2 Disconnect ...
Getting Started
Page 3
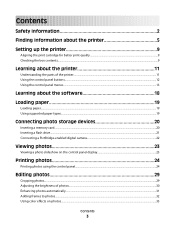
... 9 Checking the box contents...9 Learning about the printer 11 Understanding the parts of the printer...11 Using the control panel buttons...12 Using the control panel menus...13 Learning about the software 18 Loading paper 19 Loading paper...19 Using supported paper types...19 Connecting photo storage devices 20 Inserting a memory card...20...
... 9 Checking the box contents...9 Learning about the printer 11 Understanding the parts of the printer...11 Using the control panel buttons...12 Using the control panel menus...13 Learning about the software 18 Loading paper 19 Loading paper...19 Using supported paper types...19 Connecting photo storage devices 20 Inserting a memory card...20...

Getting Started
Page 6
... systems) 1 Click Start Œ Programs or All Programs Œ Lexmark • Loading paper 350 Series. • Printing 2 Click User's Guide. • Working with photos If the link to the User's Guide is not on your desktop, follow • Scanning (if supported by your printer) these instructions: • Making copies (if supported by your...
... systems) 1 Click Start Œ Programs or All Programs Œ Lexmark • Loading paper 350 Series. • Printing 2 Click User's Guide. • Working with photos If the link to the User's Guide is not on your desktop, follow • Scanning (if supported by your printer) these instructions: • Making copies (if supported by your...
Getting Started
Page 9
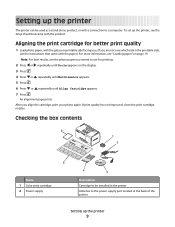
... glossy or printable side facing you. (If you align the cartridge, print your photo again. Setting up the printer The printer can be installed in the printer Attaches to the power supply port located at the back of the printer Setting up the printer, see "Loading paper" on the display. 3 Press . 4 Press or repeatedly until Maintenance...
... glossy or printable side facing you. (If you align the cartridge, print your photo again. Setting up the printer The printer can be installed in the printer Attaches to the power supply port located at the back of the printer Setting up the printer, see "Loading paper" on the display. 3 Press . 4 Press or repeatedly until Maintenance...
Getting Started
Page 10
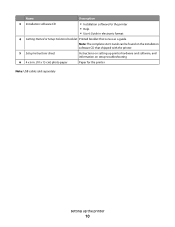
Name Description 3 Installation software CD • Installation software for the printer • Help • User's Guide in electronic format 4 Getting Started or Setup Solutions booklet Printed booklet that serves as a guide Note: The complete User's Guide can be found on the installation software CD that shipped with the printer. 5 Setup Instructions sheet Instructions on setting up printer hardware and software, and information on setup troubleshooting 6 4 x 6 in. (10 x 15 cm) photo paper Paper for the printer Note: USB cable sold separately Setting up the printer 10
Name Description 3 Installation software CD • Installation software for the printer • Help • User's Guide in electronic format 4 Getting Started or Setup Solutions booklet Printed booklet that serves as a guide Note: The complete User's Guide can be found on the installation software CD that shipped with the printer. 5 Setup Instructions sheet Instructions on setting up printer hardware and software, and information on setup troubleshooting 6 4 x 6 in. (10 x 15 cm) photo paper Paper for the printer Note: USB cable sold separately Setting up the printer 10
Getting Started
Page 11
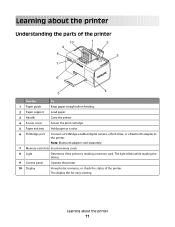
...slots Insert memory cards. 8 Light Determine if the printer is reading a memory card. The light blinks while reading the device. 9 Control panel Operate the printer. 10 Display View photos or menus, or check the status of the printer Use the To 1 Paper guide Keep paper straight when... feeding. 2 Paper support Load paper. 3 Handle Carry the printer. 4 Access cover Access the print cartridge. ...
...slots Insert memory cards. 8 Light Determine if the printer is reading a memory card. The light blinks while reading the device. 9 Control panel Operate the printer. 10 Display View photos or menus, or check the status of the printer Use the To 1 Paper guide Keep paper straight when... feeding. 2 Paper support Load paper. 3 Handle Carry the printer. 4 Access cover Access the print cartridge. ...
Getting Started
Page 12
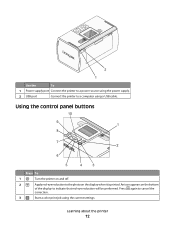
Using the control panel buttons Press To 1 Turn the printer on and off. 2 Apply red-eye reduction to cancel the correction. 3 Start a color print job using the current settings. Press again to the photo on the bottom of the display to a computer using a USB cable. An icon appears on the display when it is printed. Learning about the printer 12 Use the To 1 Power supply port Connect the printer to a power source using the power supply. 2 USB port Connect the printer to indicate that red-eye reduction will be performed.
Using the control panel buttons Press To 1 Turn the printer on and off. 2 Apply red-eye reduction to cancel the correction. 3 Start a color print job using the current settings. Press again to the photo on the bottom of the display to a computer using a USB cable. An icon appears on the display when it is printed. Learning about the printer 12 Use the To 1 Power supply port Connect the printer to a power source using the power supply. 2 USB port Connect the printer to indicate that red-eye reduction will be performed.
Getting Started
Page 13
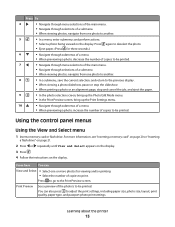
... menu selections of the main menu. • Navigate through selections of a submenu. • When viewing photos, navigate from one photo to another . 5 • In a menu, enter submenus and perform actions. • Select a photo being viewed on the display. Learning about the printer 13 Press to go to adjust the print settings, including paper size...
... menu selections of the main menu. • Navigate through selections of a submenu. • When viewing photos, navigate from one photo to another . 5 • In a menu, enter submenus and perform actions. • Select a photo being viewed on the display. Learning about the printer 13 Press to go to adjust the print settings, including paper size...

Getting Started
Page 14
... card or flash drive. For more information, see "Printing photos by date" on the memory card are retained. 1 Insert a memory card. For more information, see "Printing an index page of photos" on the printer display. Print All N Photos Print all the photos on the display. 3 Press . 4 If you to ...select a group of copies to print per photo. • Other Print Settings to choose a paper size, photo size, layout, print quality, and paper...
... card or flash drive. For more information, see "Printing photos by date" on the memory card are retained. 1 Insert a memory card. For more information, see "Printing an index page of photos" on the printer display. Print All N Photos Print all the photos on the display. 3 Press . 4 If you to ...select a group of copies to print per photo. • Other Print Settings to choose a paper size, photo size, layout, print quality, and paper...
Getting Started
Page 15
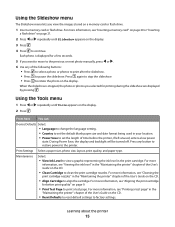
...drive. 1 Insert a memory card or flash drive. Press any of the following buttons: • Press to select a photo or photos to print after the slideshow. • Press to the printer. For more information, see "Viewing the ink level" in the print cartridge. For more information, see "Aligning the ...your location. • Power Save to view a graphic representing the ink level in the "Maintaining the printer" chapter of the User's Guide on the CD. • Align Cartridge to rotate the photo on the CD. • Reset Defaults to reset default settings to print a test page. For more...
...drive. 1 Insert a memory card or flash drive. Press any of the following buttons: • Press to select a photo or photos to print after the slideshow. • Press to the printer. For more information, see "Viewing the ink level" in the print cartridge. For more information, see "Aligning the ...your location. • Power Save to view a graphic representing the ink level in the "Maintaining the printer" chapter of the User's Guide on the CD. • Align Cartridge to rotate the photo on the CD. • Reset Defaults to reset default settings to print a test page. For more...

Getting Started
Page 16
... page 22. 2 Press to turn hints on or off . Learning about the printer 16 From here You can Select: • Bluetooth Enable to view the 48-bit address of photos" on page 30. For more information on the current selection. Red Eye Reduction ... here Bluetooth Customize You can Brightness Adjust the brightness of printer settings if no selections were specified on your Bluetooth-enabled device. • Device Address to enable or disable Bluetooth communication. Auto Enhance Enhance a photo automatically. For more information, see "Using Bluetooth technology" on...
... page 22. 2 Press to turn hints on or off . Learning about the printer 16 From here You can Select: • Bluetooth Enable to view the 48-bit address of photos" on page 30. For more information on the current selection. Red Eye Reduction ... here Bluetooth Customize You can Brightness Adjust the brightness of printer settings if no selections were specified on your Bluetooth-enabled device. • Device Address to enable or disable Bluetooth communication. Auto Enhance Enhance a photo automatically. For more information, see "Using Bluetooth technology" on...

Getting Started
Page 17
Photo Size Select a photo size. Paper Type Select a paper type. Print Quality Select a print quality. For more information, see "Using supported paper types" on page 19. 4 Press or to make a selection. 5 Press to navigate through the following options: From here You can Paper Size Select a paper size. Learning about the printer 17 3 Press or to print. Layout Select a photo layout.
Photo Size Select a photo size. Paper Type Select a paper type. Print Quality Select a print quality. For more information, see "Using supported paper types" on page 19. 4 Press or to make a selection. 5 Press to navigate through the following options: From here You can Paper Size Select a paper size. Learning about the printer 17 3 Press or to print. Layout Select a photo layout.

Getting Started
Page 18
.... 2 From the Print dialog, click Properties, Preferences, Options, or Setup. For more information, see "Printing photos using a computer. 1 With a photo open in the "Printing photos" chapter of the User's Guide on page 34. Learning about the software 18 page 21. • Edit...computer. From the desktop: 1 Click Start Œ Programs or All Programs Œ Lexmark 350 Series. 2 Select Solution Center. Fast Pics • Transfer photos from a computer. Learning about the software The printer software can be accessed only from a memory Insert a memory card or flash drive....
.... 2 From the Print dialog, click Properties, Preferences, Options, or Setup. For more information, see "Printing photos using a computer. 1 With a photo open in the "Printing photos" chapter of the User's Guide on page 34. Learning about the software 18 page 21. • Edit...computer. From the desktop: 1 Click Start Œ Programs or All Programs Œ Lexmark 350 Series. 2 Select Solution Center. Fast Pics • Transfer photos from a computer. Learning about the software The printer software can be accessed only from a memory Insert a memory card or flash drive....
Getting Started
Page 19
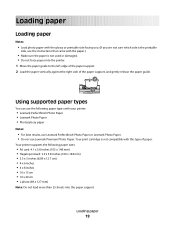
... the instructions that came with the paper.) • Make sure the paper is not compatible with your printer: • Lexmark Perfectfinish Photo Paper • Lexmark Photo Paper • Photo/glossy paper Notes: • For best results, use Lexmark Perfectfinish Photo Paper or Lexmark Photo Paper. • Do not use the following paper types with this type of paper. Loading paper...
... the instructions that came with the paper.) • Make sure the paper is not compatible with your printer: • Lexmark Perfectfinish Photo Paper • Lexmark Photo Paper • Photo/glossy paper Notes: • For best results, use Lexmark Perfectfinish Photo Paper or Lexmark Photo Paper. • Do not use the following paper types with this type of paper. Loading paper...

Getting Started
Page 20
... Insert a memory card. • Insert the card with it before inserting it points toward the printer. For more information, see "Transferring photos from a memory card to a flash drive. For more information, see "Transferring photos from a memory device to a computer" on page 34. • From a memory card to... a flash drive" on a memory card. For more information, see "Printing photos" on page 24 or "Editing photos" on the card, make sure it in the slot. The printer lets you transfer photos: • From a memory card to the adapter that came with the brand name ...
... Insert a memory card. • Insert the card with it before inserting it points toward the printer. For more information, see "Transferring photos from a memory card to a flash drive. For more information, see "Transferring photos from a memory device to a computer" on page 34. • From a memory card to... a flash drive" on a memory card. For more information, see "Printing photos" on page 24 or "Editing photos" on the card, make sure it in the slot. The printer lets you transfer photos: • From a memory card to the adapter that came with the brand name ...


